Mixed media art journals let you blend paint, paper, ink, and found objects in one place. They are perfect for anyone who likes to experiment and keep a visual diary. In this guide you’ll see every step you need to start a journal that feels personal and lasts a long time. Let’s get the basics set up so you can focus on the fun part , making art.
Step 1: Gather Materials
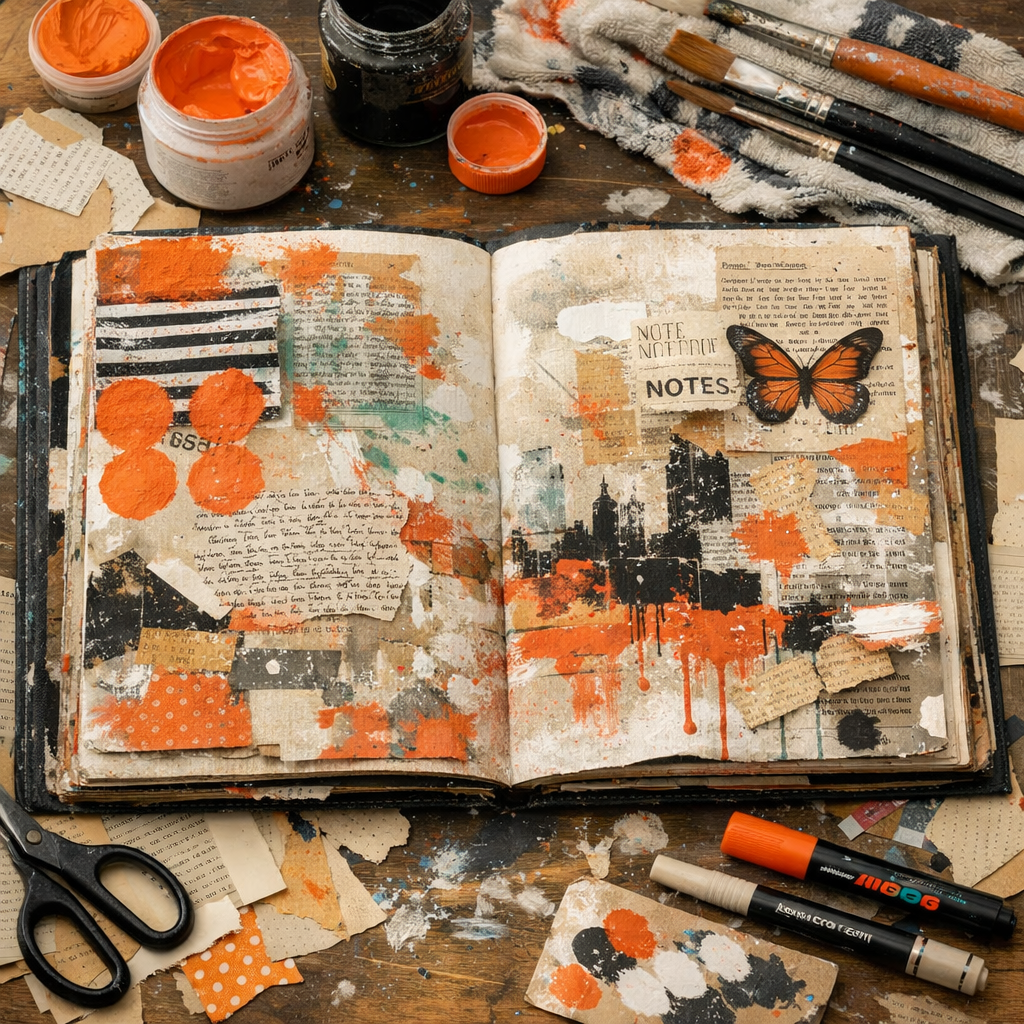
First thing you need is a surface that can hold wet and dry media. Heavy watercolor paper (300 gsm or more) works well because it won’t warp when you add water. If you prefer a bound book, look for a mixed‑media sketchbook that lists the paper weight on the cover.
Next, collect the paints you like. Acrylics dry fast and stay flexible, which is great for layering. Watercolor powders let you control color intensity with a drop of water. Ink pens give fine lines for writing or drawing.
Don’t forget adhesives. A matte acrylic gel medium works as both glue and sealant. It dries clear and stays flexible, so it won’t crack over time.
Tools that help you work cleanly include a palette knife, a soft synthetic brush, and a set of small scissors. You’ll also want a lint‑free cloth and a spray bottle for misting wet areas.
Look around your home for free supplies. Old magazines, cardboard, and fabric scraps make great collage fodder. Even a piece of bubble wrap can create interesting textures when you press paint into it.
“The best art journal is the one that feels like a record of your own experiments.”
When you have a list of items, organize them on a tray. This simple step saves time later and helps you see what you have at a glance.
For more ideas on how to pick a course that walks you through these basics, check out Unlocking Creativity: Your Guide to Mixed Media Art Courses. The lessons cover everything from paper choice to colour mixing.
According to Wikipedia’s mixed media page, artists often choose surfaces that can handle both wet and dry techniques. That’s why a heavy paper base is a safe bet for beginners.
Step 2: Prepare Your Journal Base
Now that you have supplies, it’s time to make the journal itself. If you bought a blank sketchbook, you can skip the binding step. If you want a custom size, you’ll need to fold and bind the pages yourself.
Take A3 sheets and fold them in half to create A4‑size signatures. Crease the fold firmly with a bone folder or the edge of a ruler. You’ll end up with a stack of folded pages that will become the spine.
Mark where the binding holes will go. A common pattern is five holes evenly spaced along the spine. Use a ruler to measure from the top and bottom edges, then mark with a pencil.
Push an awl through each hole. A light tap on a cutting mat does the trick. Make sure the holes line up on every page.
Thread a strong twine or thin cord through the holes. Start in the middle, pull the ends out the top and bottom, then tie a reef knot to secure the binding.
Cover the spine with a strip of tape for extra strength. A piece of kraft tape about 15 mm wide works well. Press it down firmly with a ruler.
Finally, add a cover. Cardstock, a piece of thin wood, or a pre‑made art journal cover will protect the pages.
For more inspiration on binding techniques, see the Wikipedia article on bookbinding. It explains the basics of pamphlet binding and why a tight spine matters.
Step 3: Layer and Combine Media
With the journal ready, you can start adding colour and texture. The secret to a strong page is to work in layers, letting each dry before you add the next.
Begin with a background wash. Use a large flat brush to lay down a thin acrylic wash. Let it dry until it feels tacky.
Next, add a collage layer. Cut paper scraps, fabric pieces, or old book pages into shapes. Apply a thin line of gel medium where you want the piece to stick, then press it down with a brayer.
After the collage is dry, bring in ink pens or fine‑tip markers for line work. Write a short note, draw a doodle, or add a quote.
To add texture, try a palette knife with modelling paste. Spread a dab, then scratch patterns with a toothpick. This creates a raised surface that catches light.
If you want to experiment with colour, try sprinkling watercolor powder onto a wet area and spraying with water. The crystals dissolve and leave a speckled effect.
When you combine many media, keep an eye on the weight of each layer. Too many heavy pieces can cause the paper to buckle.
For more collage ideas, look at Creative Art Collage Ideas to Spark Your Imagination and Skill. The page shows how to use everyday objects for interesting backgrounds.
According to Wikipedia’s collage page, mixing paper, fabric, and paint has been a staple of mixed media since the early 20th century. That history shows why the technique works so well.
Step 4: Finish and Preserve Your Journal
The last step is to protect the pages so they last. Wet media can stick together, so separate damp pages with wax paper or thin plastic sheets.
Cut the wax paper a little larger than the page. Slip it between two freshly painted spreads and let the pages dry flat. This prevents the glue from pulling the pages together.
When everything is dry, seal the surface. A thin coat of matte gel medium works as a protective finish. Spray varnish can add a slight sheen if you used watercolour.
Store the journal flat in a drawer or on a shelf. Avoid stacking heavy books on top, as pressure can cause the pages to warp.
If you travel with your journal, tuck a few pre‑cut sheets of wax paper in the back cover. Use a rubber band or a small binder clip to keep them in place.
For more on safe storage, see the Wikipedia article on art conservation. It explains how to keep mixed media works from yellowing and fading.
To get fresh ideas for finishing touches, check out Unlocking Your Artistic Potential: 50 Creative Ideas for Art to Inspire You Today. It offers quick projects you can add to the back of your journal.

FAQ
What kind of paper is best for a mixed media art journal?
Heavy watercolor paper (300 gsm or more) is the safest choice. It holds wet paint, glue, and collage without buckling. If you prefer a bound book, look for a sketchbook that lists the paper weight. The extra weight lets you add several layers without the page tearing.
Do I need special glue for mixed media?
A matte acrylic gel medium works best because it dries clear, stays flexible, and doesn’t yellow. For light paper‑on‑paper work, a PVA glue in a squeeze bottle is handy. Avoid school glue, which stays wet and can cause paper to warp.
How long should I wait between layers?
Let each wet layer dry until it feels tacky to the touch. Acrylic dries in a few minutes, watercolour may need 10, 15 minutes. If you’re unsure, wait an extra five minutes; it’s better to be safe than to see layers lift later.
Can I add digital prints to my journal?
Yes. Print a design on thin matte paper, then glue it with gel medium. The medium will seal the edges and keep the print from peeling. Make sure the print is dry before you add any more wet media on top.
How do I keep my journal from getting too heavy?
Work with thin layers. Use a light hand with paint, and cut collage pieces small. If a page feels thick, let it dry flat under a heavy book for an hour. This flattens any slight curl.
What’s the best way to store a finished journal?
Store it flat in a dry place, away from direct sunlight. A shallow drawer or a low shelf works well. If you need to transport it, wrap it in a clean sheet of wax paper and place it in a sturdy box.
Do I need a specific binding method?
No. Simple pamphlet binding with five holes and twine works for most projects. If you want a more polished look, try a coptic stitch or a hardcover binding. The key is to keep the spine firm so pages don’t pull apart.
Can kids use mixed media journals?
Absolutely. Choose non‑toxic paints and adhesives, and supervise the use of tools like scissors. Simple projects like a colour wash followed by a collage of magazine cut‑outs work great for beginners of any age.
Conclusion
Creating a mixed media art journal is a rewarding habit. You start with the right paper, gather a few basic supplies, and bind the pages yourself. Then you layer paint, collage, ink, and texture, letting each dry before you add the next. Finally, you protect the work with wax paper separators and a clear seal. With each page you fill, you build a visual record of ideas, experiments, and growth. If you need more guidance, CreativiU offers affordable, science‑backed courses that walk you through every step. Start, play with the materials, and watch your journal become a personal showcase of creativity.
Leave a Reply