Polymer clay can turn a quiet afternoon into a burst of color you can wear. Most tutorials leave you guessing about bake time, so you often end up with soft or cracked pieces. This guide walks you through every detail you need to create sturdy, vibrant earrings right in your kitchen. This tutorial is brought to you by CreativiU, your online hub for creative learning and project inspiration.
We’ll cover the tools you need, how to condition the clay, shaping tricks, safe baking practices, and the finishing steps that give your earrings a professional look. By the end you’ll have a repeatable workflow you can use for any design.
Step 1: Gather Materials and Tools
Before you start, make a checklist. Having everything at hand keeps the process smooth and prevents you from scrambling for a missing item mid‑project.
**Clay**, Choose a polymer clay that balances softness and durability. Popular options include a pliable professional‑grade formula and a beginner‑friendly soft formula. The pliable option stays workable after baking, while the soft formula is easy for beginners. For a quick reference on clay options, see How to Make Polymer Clay Earrings: Step‑By‑Step Instructions.
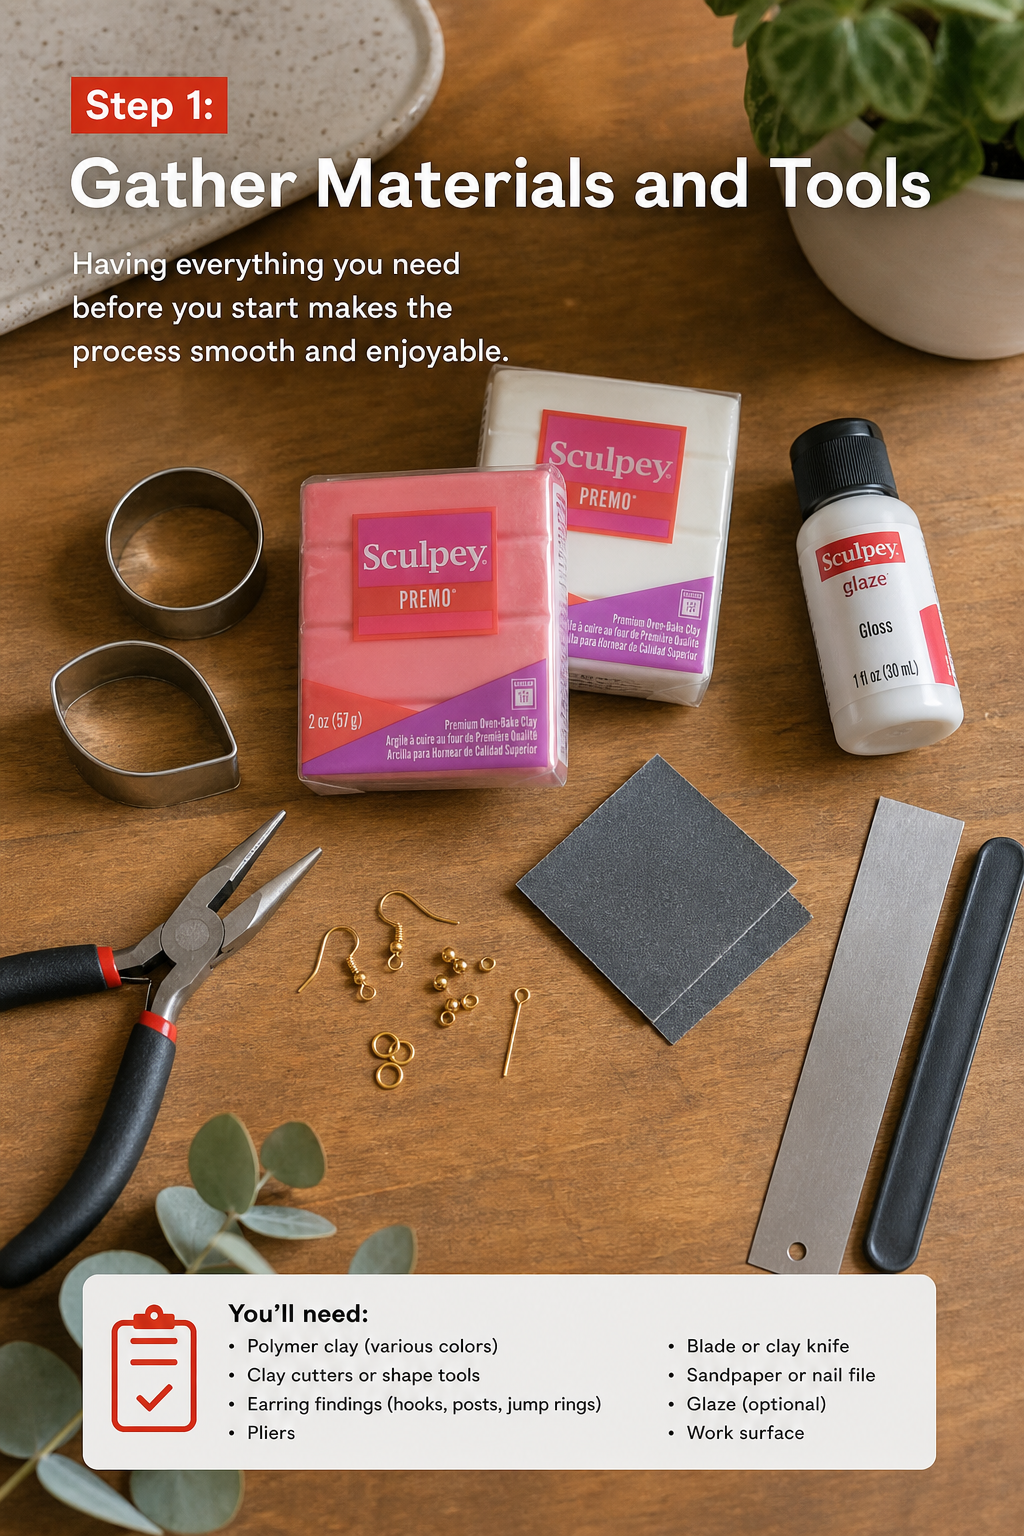
**Work surface**, A silicone mat or a clean ceramic tile works best. It gives the clay grip without sticking.
**Rolling tools**, A small acrylic rolling pin, a pasta machine, or a dedicated clay press will flatten the clay evenly. If you don’t own a pasta machine, the rolling pin does the job.
**Cutters**, Circle cutters, cookie cutters, or a sharp X‑Acto knife let you shape the earrings. For intricate shapes, a double‑sided polymer clay press mould works well.
**Hole‑making tools**, A needle tool, a thin skewer, or a specialized clay drill makes clean holes for jump rings.
**Baking supplies**, Use a rim‑less baking sheet lined with parchment paper or a ceramic tile. An oven thermometer is a must; it removes the guesswork from temperature settings.
**Finishing gear**, Fine‑grit sandpaper (400‑800), a soft cloth, and metal findings (jump rings, earring hooks, pliers) complete the piece.
**Safety gear**, A well‑ventilated area and a mask if you sand a lot of dust protect your lungs.
And that’s it. Gather these items, set up a tidy workstation, and you’re ready to move on.
Step 2: Condition the Polymer Clay
Conditioning turns a cold block into a supple sheet that won’t crack in the oven. The goal is to align the polymer particles and chase out trapped air.
You can condition by hand or with a pasta machine. Hand conditioning works for small batches; the machine gives a more uniform thickness for larger projects.
Hand conditioning
Break off a piece about the size of a golf ball. Warm your fingertips under lukewarm water for a few seconds, then dry them. Rub the clay between your palms, folding and pressing until it feels smooth and slightly glossy. Test the pliability by pressing a fingernail into the sheet, it should spring back quickly.
Machine conditioning
Set the pasta machine to its widest setting. Flatten the clay piece, fold it in half, run it through again. Keep repeating, reducing the roller gap a little each pass, until you reach about 2 mm thickness. The machine removes air bubbles more efficiently than hand kneading.
When the clay is fully conditioned, it will have a slight sheen and will bend without breaking. If it feels gritty, keep kneading or run it through the machine a few more times.
For a deeper dive on conditioning techniques, the official polymer clay resource offers a step‑by‑step guide: conditioning guide.
Step 3: Shape and Form Your Earring Design
Now the fun part begins , turning the soft slab into a piece of wearable art. Your design can be as simple as a round stud or as bold as a layered botanical shape. CreativiU’s step‑by‑step guides make this process easy for beginners.
First, decide on the thickness. For most earrings, 2 mm gives enough strength while staying lightweight. Roll the conditioned slab on a silicone mat until you reach the desired thickness. Use a ruler to check consistency.
Next, cut out the basic shape. A 20 mm round cutter works for classic studs; a heart cutter adds a romantic touch. If you don’t have a cutter, trace a template onto parchment paper and use an X‑Acto knife to cut around it.
**Adding texture** , Before cutting, press a textured roller, lace fabric, or crumpled foil onto the slab. The imprint creates visual interest without extra steps.
**Layering colors** , To create a two‑tone effect, roll two different colors side by side, then slice a thin sheet. Stack the slices and press lightly to blend the edge for a marble look.
**Creating holes** , You can poke holes now with a needle tool or wait until after baking. Poking before bake keeps the hole clean, but drilling later gives more precision for thicker pieces.
Here’s a quick video that shows the shaping process in action:
Once you’ve cut and textured, gently lift each piece onto a piece of parchment. This protects the shape while you prep the baking sheet.
Remember, the more you practice the smoother your cuts will become. Even a small mis‑cut can be sanded away later, but starting clean saves time.
Step 4: Bake the Earrings Properly
Baking is where polymer clay transforms from soft to solid. The biggest mistake crafters make is guessing the temperature.
Preheat your oven to 130 °C (266 °F). Most brands, including widely‑used polymer clay options, cure well at this range. Use an oven thermometer, the built‑in dial can be off by 10 °F or more.
Place the parchment‑lined sheet on the middle rack. Space the earrings at least 1 cm apart to allow even heat flow.
Timing depends on thickness. A rule of thumb is 30 minutes for every ¼ inch (6 mm) of clay. A 2 mm piece therefore needs about 12‑15 minutes. If you’re baking a thicker, multi‑layer piece, add 5‑10 minutes per extra millimeter.
Check the pieces after the first interval. The clay should look slightly duller and lose its tackiness. If you see any bubbling, lower the temperature by 5 °C and extend the time.
When the bake is done, turn off the oven and let the pieces cool inside for at least 10 minutes. Sudden temperature changes can cause cracking.
For safety, always wear oven mitts and keep the area well‑ventilated. Health authorities note that prolonged exposure to heated polymer fumes can irritate the respiratory system, so a short bake in a kitchen with a range hood is fine.
Step 5: Add Finishing Touches (Hooks, Sealant, Polish)
After the earrings have cooled, you’ll likely see tiny rough spots or fingerprints. Polishing them makes a big visual difference.
**Sanding** , Use 400‑800 grit sandpaper wrapped around a small block. Lightly sand the edges and any raised bumps. Keep the motion gentle; you don’t want to wear through the clay.
**Sealing** , A clear polymer‑clay sealer protects the surface from moisture and wear. Test the sealer on a scrap piece first; some varnishes can turn the color cloudy. A testing article outlines a reliable sealer selection process.
**Polishing** , After the sealer dries, buff the surface with a soft microfiber cloth. If you want extra shine, apply a thin coat of clear gloss resin; it adds a glass‑like finish without yellowing.
**Attaching findings** , Open a jump ring with pliers, slide it through the pre‑punched hole, then add the earring hook. Close the ring by twisting it sideways, not pulling it apart , this keeps the ring from weakening.
For a full tutorial on building a professional‑grade kit, see Buy Polymer Clay Jewelry Kit Online. It walks through selecting the right findings and tools for long‑lasting earrings.
If you prefer a step‑by‑step video on sealing and polishing, a popular tutorial channel offers a concise guide.
Finally, store your finished earrings in a cool, dry drawer or a small zip‑lock bag. Avoid direct sunlight for long periods; UV light can fade bright pigments over months.
FAQ
Can I use a regular kitchen oven for baking polymer clay?
Yes. A standard oven works fine as long as you set the temperature accurately and use an oven thermometer. Avoid using the broiler setting, and keep the oven door closed during the bake to maintain an even temperature.
What thickness is best for sturdy earrings?
Two millimeters is a sweet spot. It’s thick enough to resist breaking but thin enough to stay light on the ear. If you go thicker, increase bake time by about five minutes per extra millimeter.
Do I need to sand the pieces after baking?
Most makers sand lightly to remove any rough edges or leftover tool marks. Sanding also helps the sealer adhere better, giving a smoother final surface.
How do I choose a good polymer clay brand?
High‑quality polymer clay options that balance flexibility and durability are widely praised. Some hold detail exceptionally well, while others are forgiving for beginners. Check each product’s temperature recommendations before you bake.
Can I add color after the clay is baked?
Yes, you can paint cured clay with acrylic paints. Once the paint dries, seal the piece with a clear polymer‑clay varnish to protect the color from wear.
Is it safe to use a hair dryer to warm up stiff clay?
A low‑heat setting can soften a cold block without starting the curing process. Keep the dryer moving and don’t hold it too close, or you risk uneven heating.
What if my earrings crack during baking?
Cracks often result from under‑conditioning, too high a temperature, or baking too fast. Make sure the clay is fully conditioned, use a reliable oven thermometer, and follow the recommended time‑per‑thickness rule.
Where can I find a reliable polymer‑clay sealer?
A reputable crafting resource evaluated several sealers and highlighted a few that performed well across multiple clay types. Look for a sealer that stays clear and does not become sticky after a few weeks.
Conclusion
Making polymer‑clay earrings at home is a rewarding blend of art and science. You start with the right tools, condition the clay until it feels buttery, shape it with your chosen textures, bake it at a precise temperature, and finish with sanding, sealing, and hardware. The workflow we’ve outlined removes the guesswork that often trips beginners , especially around bake time and safety.
With practice, you’ll develop a personal style and be able to experiment with color blends, embossing, and even miniature sculptural elements. If you want a ready‑made kit that covers all the basics, check out the DIY Polymer Clay Jewelry Tutorial on CreativiU for a curated list of supplies and step‑by‑step videos.
So grab some clay, fire up the oven, and let your creativity sparkle on your ears. Happy crafting!
Leave a Reply