DIY polymer clay jewelry is one of the most accessible and creative ways to make your own unique accessories.
But what are the best techniques and tools to get started with polymer clay jewelry?
This comprehensive DIY polymer clay jewelry tutorial will walk you through every essential step—from prepping your clay to finishing your one-of-a-kind pieces.
Some are obsessed with mixing colors to create mesmerizing marbled effects.
Some are fascinated by abstract patterns and adding tiny dots and lines for intricate designs.
Some are perfectionists, meticulously sanding and buffing edges for a professional look.
Some are passionate about selecting the perfect hardware to transform clay shapes into wearable art.
Some discover life-changing tips like conditioning clay with a pasta machine instead of rolling it manually.
Let’s dive right in.
Table of Contents
- Why Choose Polymer Clay for Jewelry Making?
- Essential Tools and Materials
- How to Condition Polymer Clay Properly
- Creating Stunning Designs: Tips and Tricks
- Cutting and Shaping Your Jewelry Pieces
- Preparing for Baking: Holes, Trimming, and Safety
- Baking Polymer Clay: Temperature and Timing Guide
- Sanding, Buffing, and Final Touches
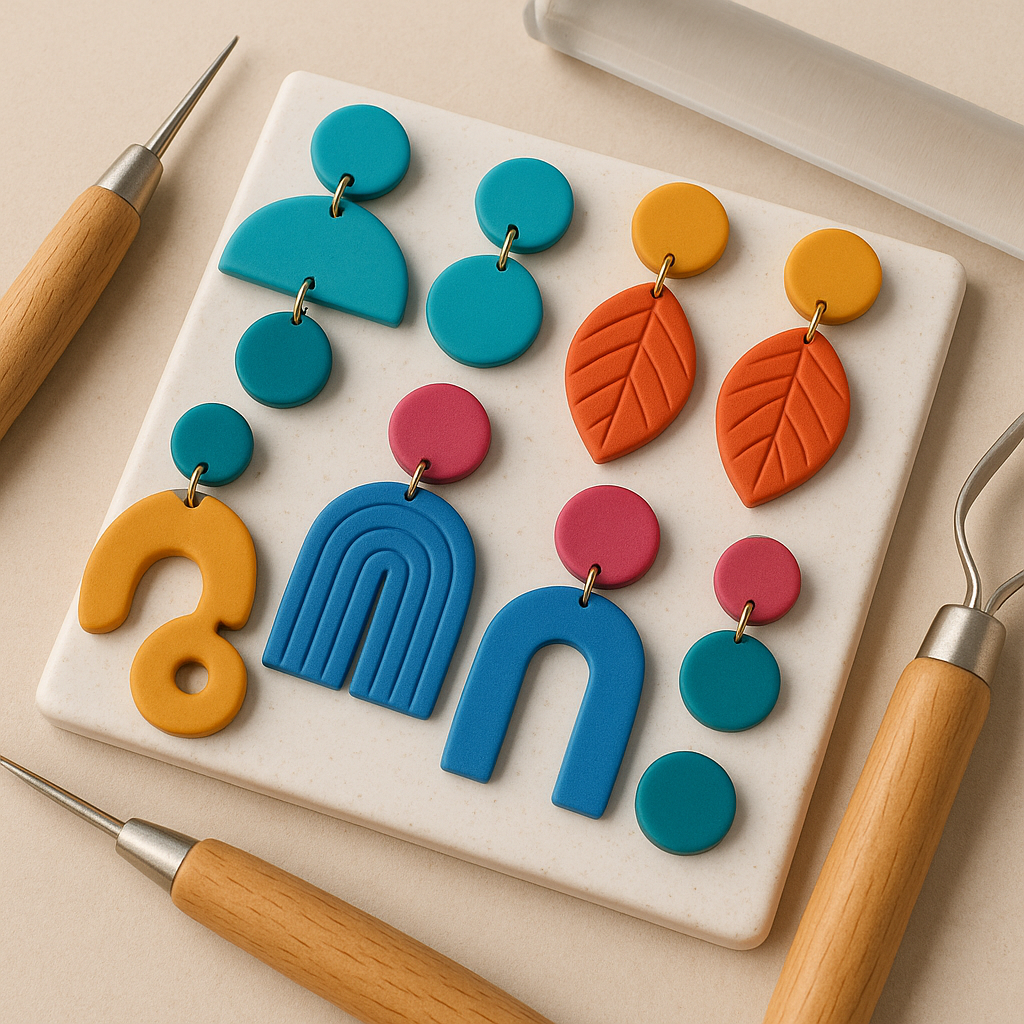
- How to Attach Hardware and Make Earrings
- Creative Project Ideas and Learning Resources
- Frequently Asked Questions
- What’s Your Next Step?
Why Choose Polymer Clay for Jewelry Making?
Polymer clay has revolutionized the world of DIY jewelry. It’s lightweight, versatile, and allows you to express creativity in countless ways. Unlike traditional materials like metal or gemstones, polymer clay is accessible to beginners yet retains appeal for seasoned artists.
What makes polymer clay especially popular is its flexibility. You can mix colors, texture it, or create smooth, clean surfaces. It’s also forgiving; mistakes can often be reshaped before baking.
Many crafters prefer brands like Premo and Sculpey for their durability and ease of use. Specifically, Premo is recommended for bases because it’s more durable, while Sculpey 3 works well for delicate designs but breaks easily if used alone as a base.
Thanks to polymer clay, creating customized, affordable accessories has never been easier.
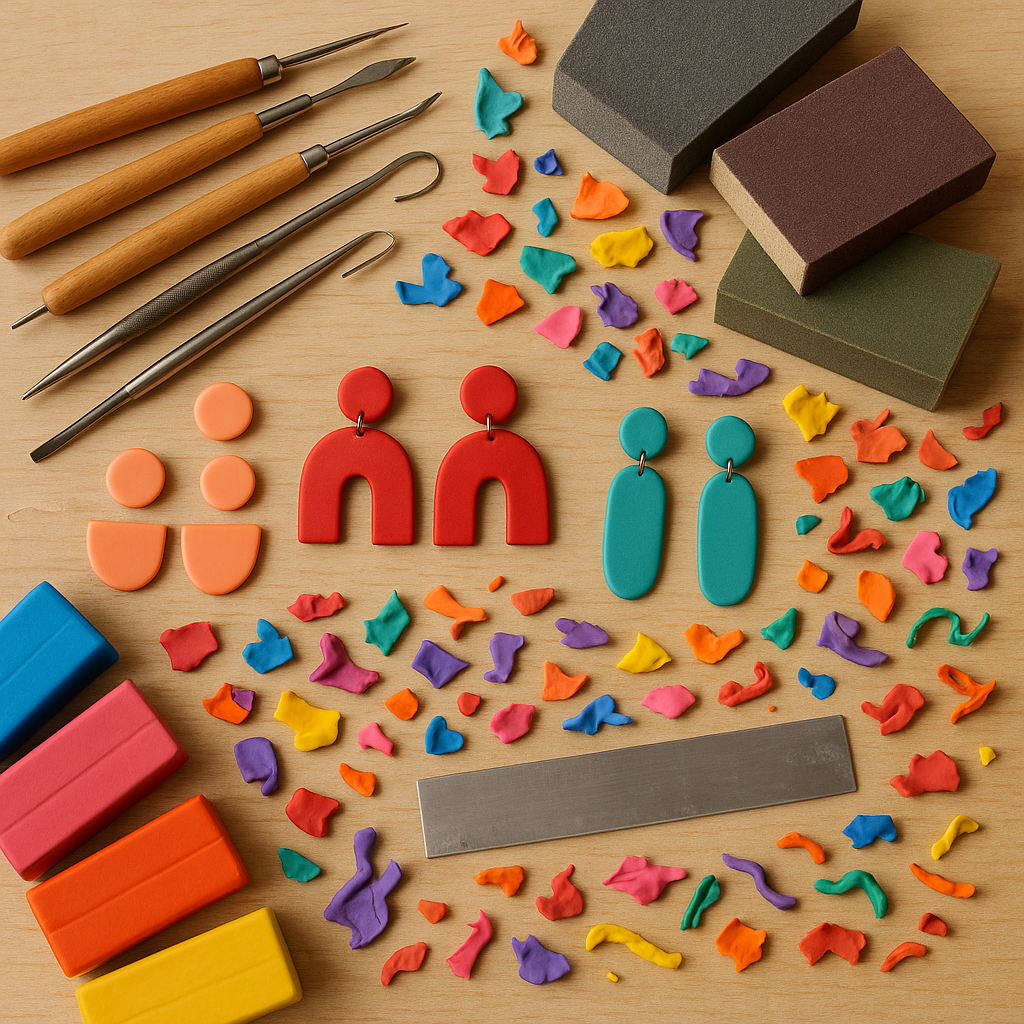
Essential Tools and Materials
Before diving into your DIY polymer clay jewelry tutorial, collect the right tools for a smooth experience. Here is an exhaustive list:
- Polymer clay: Start with Premo for bases, Sculpey 3 or Soufflé for detailed designs.
- Cutting mat or ceramic tile: Provides a sturdy, clean workspace.
- Pasta machine or acrylic rolling pin: For conditioning and thinning clay evenly.
- Blade or X-Acto knife: For precise cuts and trimming edges.
- Dotting tools or nail art tools: Perfect for adding small details or poking holes. Household items like chopsticks work too.
- Shape cutters: Round, square, or custom shapes—cut perfect pieces quickly.
- Sandpaper and nail buffer: For smoothing edges post-baking.
- Oven thermometer: To monitor accurate baking temperature.
- Pliers: Needle nose for opening jump rings; wire cutters for trimming.
- Findings: Jump rings, hooks, posts, backs—hardware to turn clay pieces into jewelry.
- Baking tray and parchment paper: To prevent sticking and even baking.
- Optional: Dremel tool for buffing, BanBond glue for strong bonding, UV resin for shine.
Don’t worry if you don’t have all these at first. Many crafters start with basics and upgrade tools as they progress.
How to Condition Polymer Clay Properly
Conditioning polymer clay is essential for smooth, resilient jewelry. It removes air bubbles and softens the clay for easier shaping.
The best method is using a pasta machine. Fold clay, run it through the rollers several times until it’s smooth and even on both sides. Don’t have a pasta machine? No problem. Use an acrylic roller over clay placed between two sticks or skewers to guide an even thickness.
Condition your clay thoroughly to prevent cracking or bubble formation after baking. Mishandled clay can result in fragile pieces or visible imperfections.
If you want to see this in action, check out this beginner’s guide to polymer clay jewelry with conditioning tips: DIY Polymer Clay Earrings Tutorial.
Creating Stunning Designs: Tips and Tricks
Designing your polymer clay slab is where creativity shines. Here are techniques to elevate your jewelry:
- Color mixing: Blend clays to create custom shades and gradients.
- Abstract patterns: Add blobs, patches, squiggly lines, and dots.
- Texture tools: Use silicone sculpting tools, toothbrushes, or household items to imprint patterns.
- Layering: Build dimensional designs by layering different clay colors.
- Dotting tool details: Add tiny highlights or dimples for interest.
Don’t rush! Take your time filling gaps in your slab for a rich design. Experimenting advances skill and produces stunning results.
Cutting and Shaping Your Jewelry Pieces
Once your design slab is ready, it’s dressing time. Cutting shapes brings your idea off the slab and into reality.
Shape cutters are ideal for clean edges. Large round shapes are versatile, but small ones, half-cuts, or asymmetrical shapes add flair. Remember to maximize clay usage by positioning cutters smartly.
If you don’t have cutters, use an X-Acto knife to trace template shapes. Some artists even print shapes, place them over clay, and cut carefully.
Before baking, poke holes with a dotting tool or skewer—these will be used for jump rings or hooks. Pre-poking is better than drilling later since drilling post-bake can cause mess and breakage.
Are you ensuring your clay pieces are the perfect thickness? Thickness affects durability and how well the piece bakes.
Preparing for Baking: Holes, Trimming, and Safety
Trimming edges before baking saves sanding time later. Use your blade to remove any excess clay or lumps that could cause unevenness.
Your kitchen oven can bake polymer clay, but accuracy is critical. Preheat your oven to 130°C (266°F) and use an oven thermometer to monitor temperature. Ovens vary, so don’t rely solely on built-in dials.
Use a ceramic tile if possible as your baking surface. It helps distribute heat evenly and prevents burning. Otherwise, a parchment-lined tray works well.
Safety reminder: Never use an oven with extreme temperature fluctuations or open flames. Always bake in a well-ventilated area.
Baking Polymer Clay: Temperature and Timing Guide
Baking polymer clay correctly is an art in itself. Underbaking causes soft or brittle results; overbaking can scorch or discolor your pieces.
The recommended time is 50 minutes to 1 hour at 130°C. Check on your pieces every 5–10 minutes to avoid burning. Remember, patience leads to stronger results.
Some crafters recommend baking longer at exact temps to achieve flexibility and durability, especially for jewelry bases. Always follow manufacturer guidelines of your chosen clay brand.
Sanding, Buffing, and Final Touches
Once cooled, rough edges are common. Sand them smooth with fine-grit sandpaper or a nail buffer. If you have a Dremel or rotary tool, it can save time and do precision buffing.
Be cautious sanding too much as it can create scratches. Buffing afterward removes minor marks and adds shine. Some artists also apply UV resin to seal and brighten their work.
Take your time here—finishing elevates your jewelry from craft to art.
How to Attach Hardware and Make Earrings
Hardware transforms your clay pieces into wearable art. Jump rings connect parts, studs and hooks turn shapes into earrings, chains create necklaces, and backs secure pins.
Use pliers to open jump rings carefully—twist sideways rather than pulling apart to keep them intact. Slip your piece’s hole and the hardware piece through the jump ring before closing.
Quality of findings matters. Cheap metals might irritate skin or discolor quickly. Buy nickel-free, hypoallergenic options for comfort and durability.
For studs, some artists prefer gluing with epoxy or BaconBond before baking for extra strength.
Creative Project Ideas and Learning Resources
Polymer clay jewelry offers endless possibilities—geometric shapes, floral motifs, miniature food designs, and more.
Experimenting expands your skill and style. Try mixing textures, incorporating resin, or adding metallic leaf.
Looking to deepen your skills? CreativiU provides on-demand access to arts and crafts courses suited for hobbyists to entrepreneurs. Explore how to channel creativity efficiently in Mastering the Arts and Crafts of Problem Solving: A Comprehensive Guide.
Frequently Asked Questions
- What is the best polymer clay for beginners?
- Premo clay is highly recommended for bases due to its balance of flexibility and durability. Soufflé and Cernit are also great options for ease of use and flexibility after baking.
- How do I prevent bubbles in polymer clay?
- Condition your clay thoroughly by folding and rolling repeatedly, preferably using a pasta machine or acrylic roller. Avoid trapping air during the process.
- Can I drill holes after baking?
- While possible, it’s messier and risks breaking the clay. It’s best to poke holes prior to baking.
- What temperature and time should I bake polymer clay?
- Typically 130°C (266°F) for 50 minutes to 1 hour. Always check manufacturer instructions and monitor your oven temperature using a thermometer.
- How do I finish my polymer clay jewelry for a polished look?
- Sand edges with fine-grit sandpaper, then buff to remove scratches. Optionally, apply UV resin for shine and protection.
What’s Your Next Step?
Tell us in the comments: How will you apply this to your DIY polymer clay jewelry tutorial journey? For tailored advice and further resources, explore CreativiU’s creative learning guides and unlock your full artistic potential.
Leave a Reply