Most people think resin river coasters are hard to make. The truth? With the right plan you can pull a glass‑like river across wood in an evening. In this guide you’ll learn how to prep the mold, mix the epoxy, create the river effect, cure, demold and finish each coaster so it looks pro‑level.
We’ll walk through every phase, add timing tips most free guides skip, and point out safety steps that keep fumes and burns away. By the end you’ll have a complete checklist you can reuse for any coaster set.
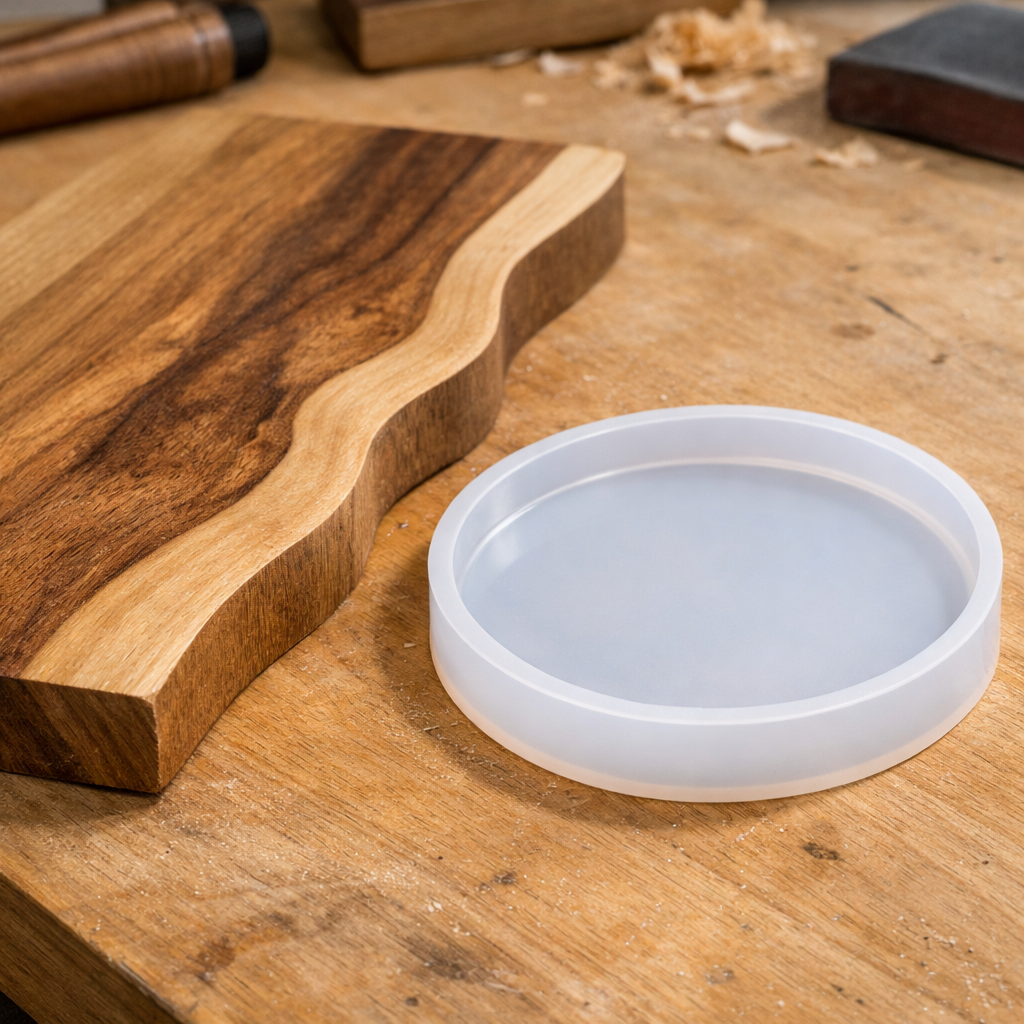
Step 1: Prepare Your Mold and Wood Pieces
First, pick a hardwood board that’s at least 1 × 4 inches. The wood gives the coaster a sturdy base and lets the river look like it’s flowing through real timber.
Cut a wavy line along the grain with a jigsaw. Aim for a gentle S‑shape that runs the length of the board. If the line is too sharp, the river will look fake.
Sand the cut edge smooth. Use 120‑grit sandpaper first, then finish with 220‑grit for a nice feel. Wipe the surface with a lint‑free cloth dampened with isopropyl alcohol. This removes dust and oils that can trap bubbles.
Next, trace circles that match the size of your silicone coaster mold. A 4‑inch circle works for most kits. Cut those circles out of the same hardwood piece. You’ll stack the circles later to form a layered river look.
Clamp the wood pieces together with rubber bands or small bar clamps. The goal is to keep them snug while the epoxy cures, so the river stays in one smooth line.
Now clean the silicone mold. Spray a light coat of mold release if the silicone is old, then wipe with a paper towel. A clean mold means a clear river.
While you’re prepping, think about the size of the river. A common trick is to fill the mold with water to the depth you want, then pour that water into a measuring cup. The volume tells you how much resin you’ll need for each coaster.
Here’s a quick list to keep you on track:
- Hardwood board (1 × 4)
- Jigsaw and fine‑tooth blade
- 120‑ and 220‑grit sandpaper
- Isopropyl alcohol and lint‑free cloth
- Rubber bands or clamps
- Silicone coaster mold
- Mold release spray (optional)
When everything is clean and clamped, you’re ready for the epoxy mix.
How to Make Resin Coasters with Dried Flowers shows a similar wood‑prep routine that helps keep the river crisp.
After the wood is ready, you’ll move to the heart of the project , mixing the epoxy and shaping the river.
Bottom line:Properly prepping the wood and mold prevents bubbles and ensures a smooth river line.
Step 2: Mix Epoxy and Create the River Effect
Resin epoxy comes in two parts: resin (Part A) and hardener (Part B). Most kits use a 1:1 volume ratio, but always double‑check the label.
Measure the resin using a graduated cup. If your mold holds 80 ml, measure 40 ml of resin and 40 ml of hardener. Accuracy matters , a 5 % slip can make the mix cloudy.
Pour both parts into the same cup. Stir slowly for 3‑5 minutes. Use a figure‑eight motion and scrape the sides each time. Fast stirring whips in air, which creates bubbles.
While you stir, you can add pigment or dye. A few drops of translucent blue give the river a natural water look. Mix the color in a separate cup first, then pour it back into the main batch.
Temperature is key. The resin stays fluid between 70 °F and 80 °F. If it’s cooler, the mix thickens fast; if it’s hotter, it can cure before you pour.
Now comes the river layer. Start by pouring a thin base of clear resin into the mold, just enough to cover the bottom. Let it sit for a minute so bubbles rise.
Next, add the colored river mix. Tilt the cup and let the colored resin flow in a slow, steady stream across the wood piece. The wood acts as a barrier, so the colored resin stays on one side, mimicking a river.
“The river effect works best when the colored resin meets the clear base at a gentle angle, not a hard splash. This creates a smooth blend that looks like real water.”
If bubbles appear, tap the mold lightly on the table. Then, pass a heat gun or a kitchen torch a few inches above the surface for 2‑3 seconds. The heat shrinks the bubbles and makes them disappear.
When the river fills the mold, cover it with a cardboard box or a clean coffee mug. This keeps dust away while the epoxy begins to cure.
Here’s a quick checklist for the mixing stage:
- Measure resin and hardener 1:1 by volume.
- Stir slowly 3‑5 minutes, scraping sides.
- Add pigment in a separate cup.
- Pour a thin clear base layer.
- Tilt and pour colored river slowly.
- Tap to release bubbles, then heat‑gun.
- Cover to protect from dust.
For a deeper dive on epoxy chemistry, see Wikipedia’s epoxy resin page. It explains why the 1:1 ratio and temperature matter.
Key Resin Types And Their Uses breaks down which resin works best for thin pours like river coasters.

When the pour looks even, you can let it sit. The pot life of most arts‑and‑crafts epoxy is about 30‑40 minutes, giving you plenty of time to adjust the flow.
Bottom line:Accurate measuring, gentle stirring and careful pouring create the river’s glass‑like look.
Step 3: Cure, Demold, and Finish Your Coaster
Curing is where the resin turns from liquid to solid. The mix you used (arts‑and‑crafts resin) becomes tack‑free after 12‑24 hours and fully hard after 48‑72 hours at 70‑75 °F.
Keep the workspace well‑ventilated. Open a window or run a fan. Good airflow helps heat escape and stops fumes from building up.
After the first 4 hours, the surface has a thin skin. You can gently tap the mold to release any remaining bubbles. If the resin feels too stiff, move the mold to a slightly warmer spot (around 75 °F) to finish the cure evenly.
When the full cure time passes, it’s time to demold. Flip the silicone mold onto a clean, flat surface. Use a flexible plastic spatula to ease the coaster out. If it sticks, roll a warm (not hot) washcloth over the silicone for 20 seconds , the heat expands the mold just enough to free the piece.
Now the edges may be a bit rough. Sand them with 400‑600 grit sandpaper in a circular motion. Finish with a microfiber cloth to bring back the shine.
For extra durability, many makers apply a thin UV‑resistant sealant. A spray sealant from an art supply store works, or you can brush on a clear coat of resin and let it cure again.
According to Craft Resin’s curing guide, controlling temperature and humidity prevents yellowing and cracks. Follow their tip to keep the workspace at 70‑80 °F.
Now you have a finished coaster. Test it with a hot cup , the resin should feel solid, and the river should stay clear.
Bottom line:A controlled cure, careful demolding and light sanding give you a coaster that looks like it came from a studio.
Frequently Asked Questions
Can I use pine wood instead of hardwood?
You can, but pine is softer and may absorb resin, causing a cloudy look. Hardwood like maple or oak stays clear and adds weight, making the coaster more durable. If you choose pine, seal the wood with a thin coat of clear sealant before the epoxy pour.
What safety gear do I need?
Wear nitrile gloves, safety goggles and a mask that filters organic vapors. Work in a space with good ventilation , open windows or use a fan. Keep a fire extinguisher nearby in case you use a torch for bubble removal.
How long should I wait before sanding?
Wait until the resin is fully cured , typically 48 hours for arts‑and‑crafts resin at room temperature. Sanding too early can gouge the still‑soft resin and create scratches.
Can I add glitter or metallic pigments?
Yes. Add glitter after the base layer is tacky but before the final pour. Metallic pigments work best when mixed in a small side batch and poured over the clear base so the color stays vivid.
Do I need a heat gun for bubble removal?
A heat gun or a small butane torch helps pop bubbles quickly. If you don’t have one, a hair dryer on low heat works, but you’ll need to keep it moving to avoid overheating a spot.
What is the ideal cure temperature?
Aim for 70‑75 °F. Below 65 °F the resin cures slowly and may stay tacky. Above 85 °F it can cure too fast, leading to cracks or a cloudy finish.
Can kids help with this project?
Kids can help with safe steps like arranging dried flowers or tapping the mold, but they should always wear gloves and a mask. Keep the mixing and torch work to an adult.
How do I store leftover resin?
Seal the bottles tightly and store them in a cool, dark place. Most epoxy resins stay usable for about six months after opening if kept airtight.
Conclusion
Making a resin epoxy river coaster is a mix of careful prep, precise mixing and patient curing. The biggest win is the checklist‑style approach , clean wood, exact measurements, gentle stirring, bubble‑busting heat and a controlled cure. Follow each step, and you’ll end up with a coaster that looks like a mini river trapped in glass.
CreativiU’s online courses walk you through every phase with video demos and timing charts, so you never have to guess how long each step takes. Whether you’re a hobbyist or a creative entrepreneur, the skills you learn here open the door to a whole line of resin‑based products.
Ready to try your own set? Gather the wood, resin and tools, follow the steps above, and share your finished coasters with friends or on a shop platform. The river will flow, and you’ll have a solid, beautiful piece to show for it.
Leave a Reply