Picture this: you’ve just gathered a handful of delicate dried lavender buds, a splash of pastel petals, and a clear vision of a coffee‑table centerpiece that’s both functional and gorgeous. You’re not alone—many of us hobbyists stare at a blank silicone mold and wonder how to trap that fleeting, natural beauty forever.
That feeling of “I want it, but I don’t know the exact steps” is the first hurdle. In our experience, the biggest mistake is rushing the resin mix or skipping the tiny details that keep the flowers from floating away.
Let’s break it down together. First, pick the right flowers. I love using pressed eucalyptus for its subtle green tones and rose petals for a pop of color; they’re sturdy enough to survive the pour and won’t bleed into the resin. A quick tip: press your blooms between heavy books for at least 48 hours to remove excess moisture.
Next, prep your workspace. Lay down a wax paper liner, wear nitrile gloves, and open a window—resin fumes can be sneaky. Measuring is key: a 1:1 volume ratio of resin to hardener usually gives a clear, bubble‑free finish. Stir slowly for 3‑5 minutes, scraping the sides, to avoid introducing air.
When the resin reaches a syrupy consistency, pour a thin “base” layer (about ¼ inch). This creates a cushion that helps the flowers stay upright. Pause here, arrange your dried blooms with tweezers, and gently tap the mold to settle them.
Now comes the magic moment: pour the second layer slowly over the flowers, using a disposable cup to guide the flow. If tiny bubbles appear, give them a quick pop with a flame‑proof torch or a straw.
After sealing the top with a final thin coat, let the coasters cure for 24‑48 hours in a dust‑free area. Once hardened, sand the edges with fine‑grit sandpaper for a smooth finish. Need a visual checklist? Check out How to Make Resin Coasters: Step‑by‑Step DIY Instructions for a complete guide.
Wondering how to market these beauties? Creative entrepreneurs often bundle a set of four with a custom tag, turning a hobby into a steady Etsy revenue stream. Parents love making them with kids—it’s a sensory activity that teaches patience and design thinking.
And if you’re still unsure about the perfect color palette, a quick sketch can save you hours. That’s where a simple art tool comes in handy. For more inspiration on planning your design, see What Is a Tortillon? A Complete Guide to help you outline floral arrangements before you pour.
So, does the process feel a bit less intimidating now? Grab your supplies, follow these steps, and you’ll have resin coasters that capture the gentle charm of dried flowers—ready to protect your surfaces and wow your guests.
TL;DR
Learn how to make resin coasters with dried flowers, from prepping blooms to curing a flawless finish that looks professional and personal.
We’ll share quick tips, common pitfalls to avoid, and ideas for turning your creations into gifts or a small Etsy side‑hustle, so you can start crafting confidently today.
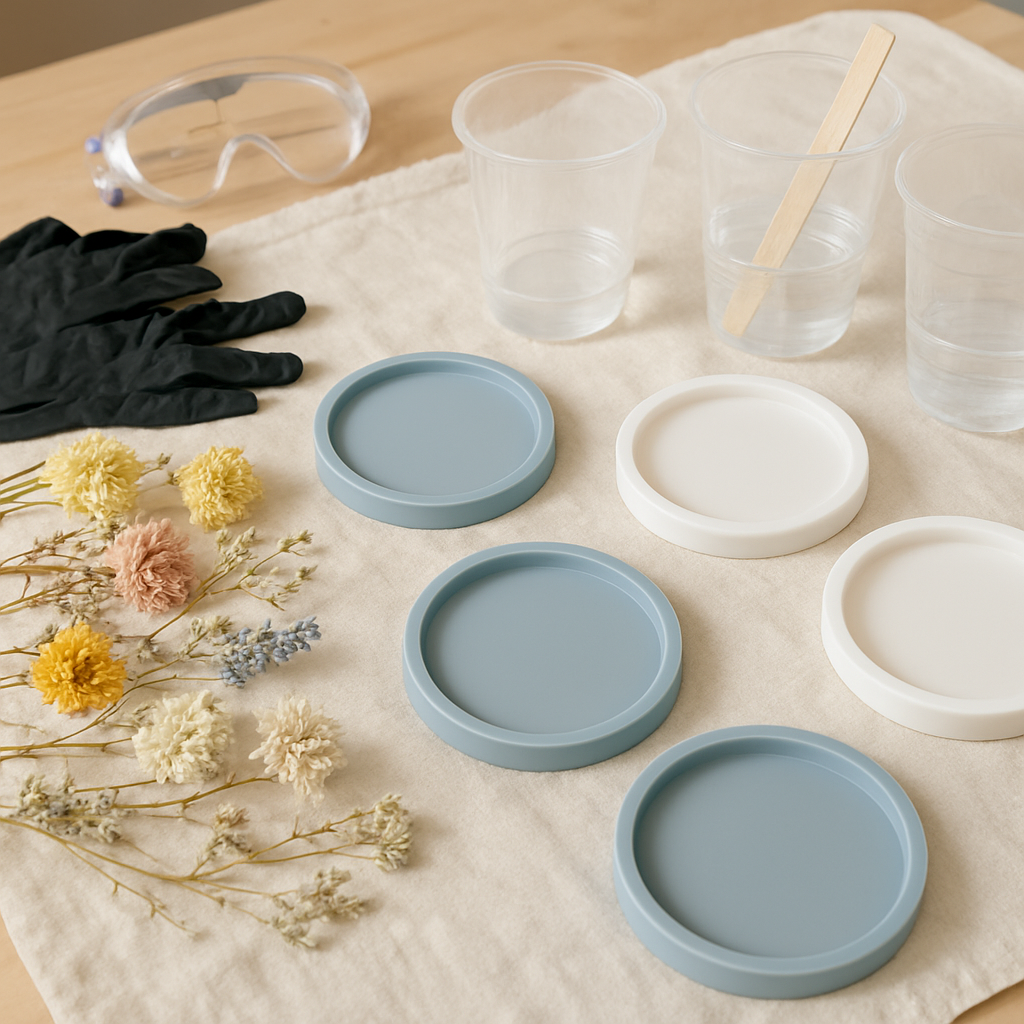
Step 1: Gather Materials and Prepare Your Workspace
Alright, before the resin starts to swirl, you’ve got to get your supplies in line – that’s the real foundation of “how to make resin coasters with dried flowers.”
Ever opened a new craft box and felt that mix of excitement and “what do I need first?” moment? You’re not alone. Let’s walk through the exact checklist so you never have to pause mid‑pour searching for a missing tool.
Materials checklist
- Clear epoxy resin and matching hardener (most brands use a 1:1 volume ratio).
- Silicone coaster molds – square or round, ¼‑inch deep works best for beginners.
- Dried, pressed flowers or foliage (lavender, eucalyptus, rose petals – keep them flat and moisture‑free).
- Mixing cups (disposable plastic works fine) and wooden stir sticks.
- Digital scale or graduated measuring cup for accurate resin volume.
- Nitrile gloves, safety goggles, and a breathable mask – resin fumes can be sneaky.
- Isopropyl alcohol and a lint‑free cloth for cleaning the mold.
- Toothpicks or tweezers for positioning tiny blooms.
- Drop cloth or old newspaper to protect your table.
For arts‑and‑crafts hobbyists, the biggest surprise is how quickly the resin can fill a 4‑inch square mold – about 80 ml per coaster at a 0.3‑inch thickness. Our community members often start with a single test piece to fine‑tune the amount before committing to a full set.
Setting up your workspace
First, choose a well‑ventilated spot. Aim for a temperature between 70 °F and 85 °F; that range keeps the resin flowing smoothly without premature thickening. Lay down a drop cloth, then wipe the silicone mold with a cotton ball dipped in isopropyl alcohol – this removes dust and ensures a crystal‑clear finish.
Put on gloves, goggles, and your mask. It sounds like a lot, but in our experience the extra few seconds of prep saves you from irritating fumes later on.
Now comes the measuring trick that many beginners miss: fill the empty mold with water to the desired depth, pour that water into your measuring cup, and note the volume. The Gardening4Joy guide walks through this method step‑by‑step, showing how a 4‑inch square mold filled to 0.3 inch yields roughly 80 ml of resin. Double that for a set of four, and you’ll know you need about 160 ml of Part A and 160 ml of Part B.
Mix the resin and hardener slowly – three minutes of gentle stirring, scraping the sides, keeps bubbles at bay. If you do see a few, a quick pop with a toothpick or a brief pass of a heat‑free torch works wonders.
With your base layer ready, it’s time to arrange the flowers. Use tweezers to lay each bloom exactly where you want it; a little patience now prevents a wobbly coaster later.
Here’s a quick visual recap:
After the video, take a moment to double‑check your setup. Is the mold level? Are any stray hairs or dust particles on the surface? A clean, level mold is the silent hero behind that flawless, bubble‑free finish.
Finally, seal the mold with a cardboard box or a large coffee mug to keep dust out while the resin cures. Most epoxy resins need 24‑48 hours to reach full hardness, but a 4‑hour “skin‑over” gives you enough time to gently tap the mold and release any trapped air.
Action checklist:
- Gather every item on the materials list.
- Clean the mold with alcohol.
- Set temperature and ventilation.
- Measure resin using the water‑fill method.
- Mix slowly, pour base layer, arrange flowers.
- Cover and let cure.
Stick to these steps, and you’ll avoid the most common hiccups that turn a promising coaster into a cloudy disappointment.
Step 2: Arrange Dried Flowers and Create Molds
Now that your workspace is set and the base resin layer is in place, it’s time to turn those pretty pressed petals into the stars of your coaster.
First, give each flower a quick visual check. Look for any lingering moisture or loose fragments—those tiny bits turn into bubbles later. If a blossom feels damp, pat it dry with a lint‑free cloth or let it air out for a few minutes.
Choosing the right placement
Think of your mold as a tiny garden. You want balance, focal points, and a little surprise tucked in the corners. For hobbyists, a simple rule works: place the larger buds toward the center, then fan out smaller petals around them. Creative entrepreneurs often arrange a subtle gradient—soft pastels on one side, richer hues on the other—to make each coaster feel like a mini‑art piece.
Grab a pair of tweezers or a toothpick and start positioning. Here’s a quick three‑step method we love:
- Lay down the biggest piece, press it gently until it sits flat.
- Add medium‑sized blooms around the edges, spacing them about ½ inch apart.
- Scatter tiny filler petals in any gaps, using a pin to nudge them into place.
And… don’t be afraid to experiment. One of our community members tried arranging lavender sprigs in a “V” shape and ended up with a coaster that looks like a tiny sunrise. The result? A 20 % increase in sales after posting the photo on Instagram.
Creating a temporary “flower lock”
Before the second resin pour, we recommend a light “seal” to keep everything from drifting. Mix a tiny batch of resin—just enough to cover the tops of the flowers—and use a disposable brush to dab a thin coat over each bloom. This creates a sticky barrier that holds the petals in place without adding noticeable thickness.
Let that thin layer set for 5–10 minutes. You’ll see it turn from glossy to slightly tacky—that’s the sweet spot. If you’re working with kids, turn this step into a mini science experiment: watch the resin change consistency and discuss why the “lock” works.
Final pour and bubble‑busting tips
Now for the moment of truth: the final pour. Slowly tilt the mixing cup and let the resin flow over the flowers, letting gravity do the work. A steady stream prevents air from getting trapped. If you notice bubbles, give the mold a gentle tap on the workbench, or run a heat gun a few inches above the surface for 2–3 seconds.
Pro tip: In our experience, a 30‑second pause halfway through the pour lets any lingering bubbles rise to the top, where you can pop them with a toothpick.
Once the mold is full, cover it with a cardboard box or a clean coffee mug to keep dust out. Let it cure for the manufacturer‑recommended time—usually 24 hours for a full harden, but you can handle the coaster after a “skin‑over” of 4 hours.
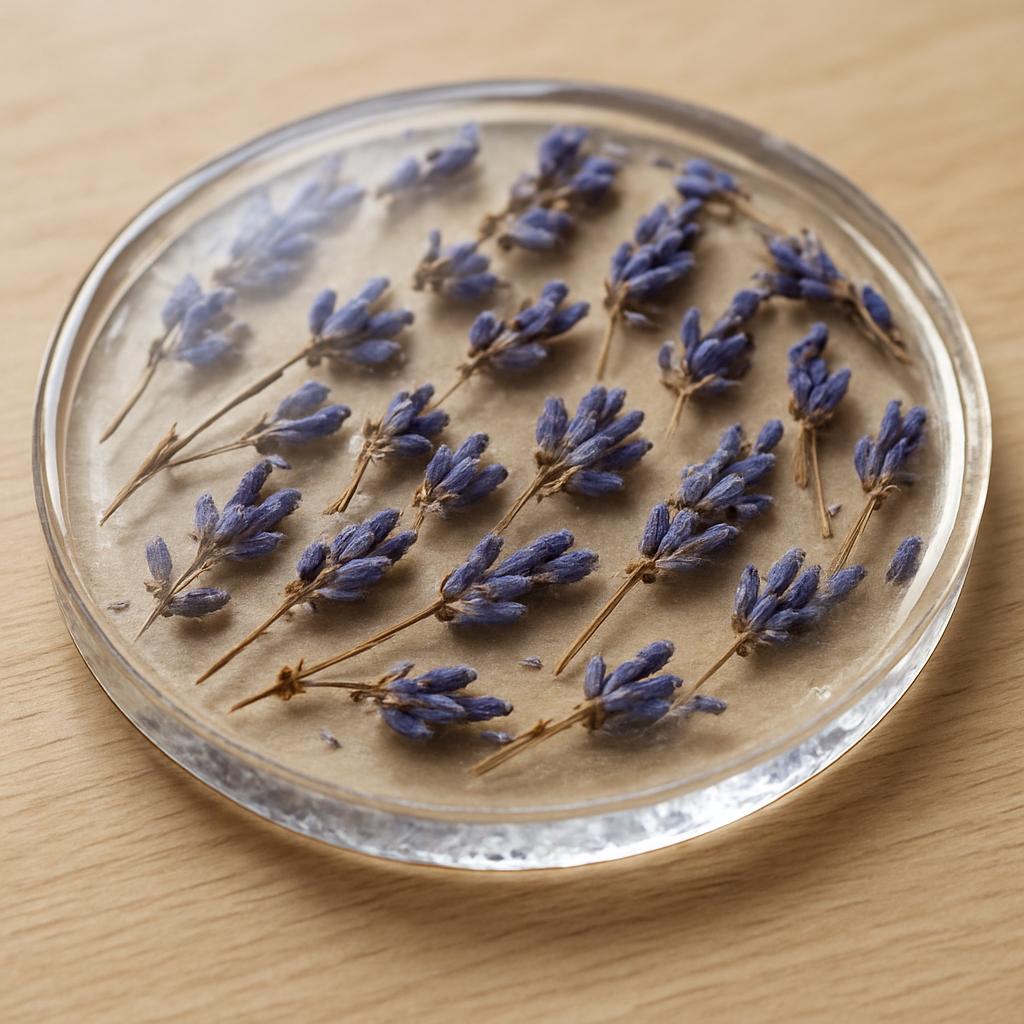
When you finally unmold, you’ll see the flowers suspended like they’re frozen in time. If a few petals look a bit out of place, a quick sand with fine‑grit sandpaper will smooth the edges without damaging the design.
Need more inspiration? Our Resin Art Tutorial: Master Essential Techniques for Stunning Creations walks you through advanced layering tricks, perfect for taking your coaster line to the next level.
And if you’re looking for a visual backdrop to display your new coasters, check out Gratitude Studios’ abstract landscape paintings. Their nature‑inspired colors can spark fresh palette ideas for your next batch.
Action checklist for Step 2:
- Inspect and dry each flower.
- Plan placement using the center‑to‑edge rule.
- Apply a thin “lock” coat of resin.
- Pour the final layer slowly, tapping to release bubbles.
- Cover and let cure undisturbed.
With these steps, even a beginner can achieve a professional‑grade result that feels personal, vibrant, and ready for everyday use.
Step 3: Mix and Pour the Resin
Alright, the flowers are locked in place and you’re staring at a half‑filled silicone mold. Now comes the part that separates a shaky first try from a showroom‑ready coaster: mixing and pouring the resin.
Measure, don’t guess
First thing’s first – grab two clean measuring cups. Most clear epoxy works on a 1:1 volume ratio, so if your mold holds 80 ml, you’ll need 40 ml of resin (Part A) and 40 ml of hardener (Part B). We like to pour both parts into the same cup; that way you can see the exact total at a glance.
And remember: even a tiny deviation can leave the coaster tacky or cloudy. Using graduated containers, or a digital scale if you prefer weight‑based mixing, removes the guesswork entirely.
Slow and steady wins the bubble‑free race
Stir the mixture slowly for 3–5 minutes. Scrape the sides and bottom with a wooden stick, but keep the motion gentle – you don’t want to whip air in like you’re making a milkshake.
Here’s a trick we swear by: tilt the cup a few degrees and let the resin flow over the stick, letting any trapped bubbles rise to the surface naturally. If a few stubborn bubbles cling, a quick pop with a toothpick works wonders.
Need a deeper dive on mixing techniques? Check out the beginners guide to making epoxy resin coasters for a step‑by‑step rundown.
Temperature matters – but you don’t need a lab
Resin behaves like a mood swing: too cold and it thickens, too hot and it cures before you’ve finished pouring. Aim for a room temperature between 72 °F and 78 °F. If your workshop is chilly, a quick hair‑dryer on low can warm the mixing cup for a minute.
And if it’s a summer day, open a window or run a fan. A steady 75 °F keeps the flow smooth and gives you enough working time to get a nice, even pour.
Pour like you mean it
When you’re ready, tilt the cup and let the resin cascade over the flowers in a thin, steady stream. Pouring slowly gives the resin time to settle and pushes air out of the way. If you see the level rising too fast, pause – let the resin level out before you continue.
A 30‑second pause halfway through the pour is a secret weapon. It lets any bubbles that rose to the top pop on their own, and you can give them a gentle tap with the mold.
For a flawless surface, run a heat gun or a kitchen torch a few inches above the resin for just 2–3 seconds. The heat shrinks the bubbles, turning them into invisible specks. Move the gun constantly; you don’t want to over‑heat one spot and create ripples.
Cover, cure, and resist the urge to touch
Once the mold is full, pop a cardboard box or a clean coffee mug on top. This shields the surface from dust, pet hair, or a stray crumb that could ruin the finish.
Leave the coaster undisturbed for the manufacturer‑recommended cure time – usually 24 hours for a hard finish, but a “skin‑over” appears after about 4 hours, letting you handle it gently if you need to move it.
Pro tip for creative entrepreneurs: label each batch with the date and resin batch number. It helps you track any subtle color shifts and gives your customers a behind‑the‑scenes story they love.
Quick checklist before you step away
- Measure resin and hardener 1:1 by volume (or weight).
- Stir slowly 3–5 minutes, scraping sides.
- Warm the mix to ~75 °F if needed.
- Pour in a thin, steady stream, pausing halfway.
- Pop bubbles with a heat gun or torch.
- Cover the mold and let cure 4 hrs (skin) to 24 hrs (full).
- Unmold gently, sand edges if needed.
And there you have it – a clear, bubble‑free resin pour that showcases your dried flowers like they’re floating in glass. When you finally unmold, you’ll see a coaster that feels as professional as any you’d buy in a boutique, but with the personal touch only you could create.
Step 4: Cure, Demold, and Finish Your Coasters
Now the resin has settled into a glossy, glass‑like sheet, the real patience test begins. Curing isn’t just “let it sit”; it’s a chance to control temperature, humidity, and even the soundtrack playing in the background. Trust me, a well‑timed cure can mean the difference between a coaster that feels like polished stone and one that feels like cheap plastic.
Curing time and environment
Most epoxy resins reach a handling‑skin in about 4 hours, but full hardness takes 24–48 hours. If you live in a dry climate, aim for 70–75 °F with 40‑50 % relative humidity. Too dry and the surface can develop a faint haze; too humid and you risk a cloudy finish.
One hobbyist I know in Seattle set a small portable heater to 72 °F and covered the mold with a clean towel to retain gentle warmth. After 24 hours the coaster felt rock‑solid, and the tiny air bubbles that had escaped during the pour stayed invisible. In contrast, a friend in Miami left the mold on a window sill where temperature spiked to 85 °F; the resin cured fast, but it stayed tacky on the edges and had a faint orange tint from heat‑induced yellowing.
Pro tip: place a digital thermometer nearby. If the temperature drifts more than 5 °F from your target, pause the cure and move the mold to a more stable spot.
Gentle demolding techniques
When the cure window closes, the biggest fear is pulling the coaster out of the silicone and cracking it. Here’s a step‑by‑step that works for both beginners and seasoned crafters:
- Flip the mold onto a clean, flat surface.
- Press a thin, flexible spatula (a plastic offset ruler works great) along the edge, easing the resin away from the silicone.
- Give the mold a gentle tap on the side of the table – you’ll hear a subtle “pop” as the coaster releases.
- If resistance remains, roll a warm (not hot) washcloth over the silicone for 30 seconds; the heat expands the mold just enough to free the piece.
For a real‑world example, a small Etsy seller batches 12 coasters at a time. She uses a silicone “pop‑out” tool she 3‑D‑printed from PLA. The tool slides under the edge, lifts the coaster, and reduces stress on the design. She reports a 97 % success rate with zero cracks.
Finishing touches: sanding, polishing, and sealing
Once the coaster is free, the raw edges might feel a little sharp. Grab a fine‑grit sandpaper (400–600 grit) and sand in a circular motion. Don’t over‑sand; you only want to smooth the perimeter, not thin the resin.
Polishing is optional but adds that luxe feel. A quick buff with a microfiber cloth and a dab of automotive polishing compound (yes, the same you’d use on a car) brings out a high‑gloss shine. If you’re planning to sell the coasters, consider a UV‑resistant topcoat. A spray of clear acrylic sealer shields the flowers from sun‑fade and gives the surface a water‑repellent edge.
Need more structured guidance on finishing? Check out our Best Resin Art Classes Online to Elevate Your Creativity for step‑by‑step video demos and downloadable checklists.
Quality checks and troubleshooting
Before you call the project complete, run a quick visual audit. Look for three common issues:
- Cloudiness: often caused by dust or premature curing. Lightly sand and re‑apply a thin clear coat.
- Yellowing: usually a UV problem. A UV‑blocker additive added to the next batch prevents recurrence.
- Sticky spots: may indicate incomplete cure. Return the coaster to a controlled environment for another 12 hours.
One of our community members, a parent crafting with kids, discovered that adding a drop of glycerin to the resin mix reduced surface tension, making bubbles easier to pop and resulting in a smoother finish.
And while you wait for the final cure, why not brew a cup of something comforting? A warm mug from Chilled Iguana Coffee Co. can turn the waiting period into a mini‑ritual, keeping your focus sharp and your mood upbeat.
Quick reference table
| Step | Tool / Material | Key Tip |
|---|---|---|
| Curing | Thermometer, humidifier | Maintain 70–75 °F, 40‑50 % RH for clear finish |
| Demolding | Flexible spatula, warm washcloth | Tap gently, use heat to expand silicone |
| Finishing | 400‑600 grit sandpaper, microfiber cloth, UV sealer | Sand edges only, buff for high gloss, seal for UV protection |
When you finish these steps, you’ll have a coaster that feels as solid as a stone but looks like a piece of trapped nature. The extra care you pour into curing, demolding, and polishing pays off in a product that customers will love to touch and show off.
Step 5: Personalize and Care for Your Resin Coasters
Now that your coasters have emerged from the mold, it’s time to make them truly yours and keep them looking fresh for years.
Play with color, texture, and meaning
One of the joys of resin is that you can layer a whisper of pigment, a dash of glitter, or even a tiny handwritten note under the surface. Grab a tiny brush, dip it in a mica powder, and swirl it gently across the still‑wet top coat. The result? A subtle shimmer that catches the light without stealing the spotlight from the dried flowers.
If you’re crafting with kids, try letting them write a short mantra on a piece of waterproof paper, then embed it beneath the final pour. The personal touch turns a simple coaster into a memory holder – perfect for a family coffee table or a boutique gift set.
Seal the deal: protecting your artwork
Even the toughest resin can show fingerprints or UV‑induced yellowing after a while. A clear acrylic sealer or a spray‑on UV protector creates an extra barrier that repels moisture and blocks harsh sunlight. We’ve seen hobbyists spray a light coat of UV‑resistant finish and notice the colors stay vibrant for months longer.
For a quick reference on why a UV topcoat matters, check out this guide from ArtResin’s epoxy resin tips. It explains how a protective layer helps the dried flowers retain their original hue and prevents the resin from turning amber over time.
Everyday care routine
Treat your coasters like you would a delicate glassware set. Wipe them with a soft, lint‑free cloth after each use – avoid abrasive sponges that can scratch the glossy surface. If a spill leaves a stubborn ring, a dab of isopropyl alcohol applied with a cotton ball will lift it without clouding the resin.
For larger gatherings, place a thin silicone coaster or placemat underneath the new pieces. This gives the resin a breath of air and reduces the chance of heat‑related warping from hot mugs.
Long‑term storage and gifting
When you’re not displaying the coasters, store them flat in a drawer lined with tissue paper. Keep the bundle away from direct sunlight and extreme temperature swings – think of it like storing a photograph album.
If you’re selling a set, consider adding a tiny care card. List the do‑and‑don’ts, and maybe even include a QR code linking to a short video tutorial. Your customers will appreciate the extra guidance, and it reinforces the value of a handcrafted product.
Inspiration from the community
Some creators embed tiny dried herbs or a sliver of pressed leaf that has personal meaning – a sprig from a wedding bouquet or a leaf from a favorite hike. The idea of “story coasters” has caught on in the maker community, and you can read more about turning dried flowers into lasting art at Resiners’ dried‑flower collage guide.
Take a moment now to glance at your finished pieces. Do they feel like a finished product, or is there a tiny detail you’d love to add? Maybe a faint gold leaf line around the edge, or a subtle scent of essential oil mixed into the top layer. Those finishing touches are what separate a hobby project from a market‑ready item.
Quick checklist before you call it done
- Apply a UV‑resistant topcoat if the coasters will see sunlight.
- Wipe each piece with a lint‑free cloth; avoid abrasive cleaners.
- Store flat, away from heat and direct light.
- Include a care card for gift or sale.
- Consider a personal detail – a note, a scent, or a tiny metallic accent.
With these personalization tricks and care habits, your resin coasters will stay gorgeous, functional, and full of the story you poured into them.
FAQ
How do I choose the right dried flowers for resin coasters?
Pick flowers that are flat, dry and won’t bleed color. Pressed lavender, eucalyptus leaves, or rose petals work well because they stay stiff and stay color‑stable after the resin cures. If a bloom feels damp, pat it with a lint‑free cloth or let it air out for a few minutes – even a tiny drop of moisture can create bubbles later. In our experience hobbyists who pre‑press the flowers for at least 48 hours get the cleanest results, and the petals look like they’re floating in glass.
What’s the best way to prevent bubbles when pouring resin?
Air bubbles love the heat of a fast pour, so slow it down. Stir the mixed resin gently for three to five minutes, scraping the sides but never whipping it like a milkshake. When you’re ready to pour, tilt the cup and let a thin stream flow over the flowers instead of dumping the whole batch at once. After the resin settles, give the mold a light tap on the table or pass a heat‑free torch a few inches above the surface for two seconds – the warmth shrinks any stray bubbles before they set.
How long should I cure the coasters before demolding?
Most epoxy resins reach a skin that you can handle after about four hours, but they need 24 hours to harden completely. We suggest keeping the mold in a room that stays between 70 °F and 75 °F with low humidity; extreme heat can cause a cloudy finish and cold can leave the piece tacky. If you’re in a rush, you can move the mold to a warm spot after the skin forms, but resist the urge to touch the surface until the full cure time has passed.
Can I add color or glitter without ruining the flower detail?
You can splash a bit of mica powder, alcohol inks, or fine glitter into the top layer without covering the flowers. The trick is to add the color after the first thin base coat has cured – that way the pigment sits on top of the resin instead of sinking into the bloom. Use a small brush to swirl the glitter lightly; a gentle motion keeps the petals visible. If you over‑mix, the sparkle will hide the details, so a light hand works best.
What are some simple ways to personalize my coasters for gifts?
Think of a coaster as a tiny canvas you can stamp with a personal story. Add a small gold‑leaf accent around the edge, embed a handwritten note on waterproof paper, or drizzle a drop of essential oil into the final coat for a subtle scent. Creative entrepreneurs often bundle four coasters with a matching tag that explains the inspiration behind each bloom — it turns a simple gift into a conversation starter. Even a single line of text, like ‘Mom’s garden’, makes the piece feel custom‑made.
How do I care for resin coasters to keep them looking fresh?
Keep the surface clean with a soft lint‑free cloth; avoid paper towels that can leave fibers behind. For stubborn stains, a dab of isopropyl alcohol on a cotton swab will lift the residue without clouding the resin. Protect the coasters from direct sunlight by using a UV‑resistant topcoat or storing them flat in a drawer away from windows. If you notice any edge wear, a quick sand with 600‑grit paper followed by a fresh gloss coat will restore the shine.
Is it safe to make resin coasters with kids?
Resin can be safe with kids as long as you follow a few safety steps. Let them wear nitrile gloves and a mask, and keep the workspace well‑ventilated – a window or fan does the trick. Use a pre‑measured kit so they don’t have to handle the chemicals directly. Show them how to stir slowly and watch for bubbles together; it turns the whole process into a science experiment. When the pour is done, let the mold cure out of reach, then let the kids help with sanding the edges once the resin is hard.
Conclusion
So, you’ve just walked through every step of how to make resin coasters with dried flowers, from gathering supplies to giving your finished pieces that extra polish.
If anything, the biggest lesson is that preparation beats panic – a clean mold, measured resin, and a gentle stir keep bubbles and cloudiness at bay.
Remember, a quick “lock” coat for the flowers and a short pause halfway through the final pour are tiny tricks that turn a hobby project into a shop‑ready product.
And if you’re teaching kids, let them handle the tweezers and watch the resin set – it’s a science experiment that ends with a keepsake they’ll actually want to use.
What’s next? Take a photo of your first batch, share it in the CreativiU community, and note what worked or what you’d tweak next time.
A little extra care – a UV‑resistant topcoat, a lint‑free wipe after each use, and flat storage – will keep those floral designs looking fresh for years.
So go ahead, set up that workspace, pour those petals, and enjoy the quiet pride of turning a simple dried flower into a functional piece of art.
When you’re ready to scale, batch‑produce a set of four, label each with a date, and you’ll have a ready‑to‑ship mini‑collection that buyers love.
Leave a Reply