TL;DR: Resin art offers endless creative possibilities with the right materials and techniques. This resin art tutorial provides you with all the essential steps and insider tips to begin crafting beautiful resin pieces.
Resin art has captured the imagination of creators worldwide.
But what exactly makes resin art so addictive and unique?
This resin art tutorial will give you a complete roadmap to master the craft — from choosing the best resin to creating flawless, eye-catching projects.
Some are mesmerized by the glass-like shine resin creates.
Some are intrigued by the endless possibilities of embedding objects or playing with pigments and powders.
Some appreciate how resin combines science with art in an exciting way.
Some are looking to turn their resin skills into a profitable small business.
Some simply want a fun, immersive hobby to spark creativity.
Let’s dive right in.
What Is Resin Art and Why Is It So Popular?
Resin art involves the use of synthetic resin, usually epoxy, that cures into a hard, glossy, durable surface. Artists use resin for coatings, castings, and sculptural effects. Its clarity and depth bring projects to life—whether you are making jewelry, coasters, river tables, or decorative pieces.
The popularity of resin art soared because of its uniqueness: it bridges art and chemistry, allowing creative expression combined with technical precision. The variety of pigments, dyes, and additives you can use with resin makes every piece distinct.
Moreover, resin’s versatility means beginners and professionals alike can find a niche in this craft. According to the expert testimony from creators, understanding the material and the process is the foundation of great resin art (source).
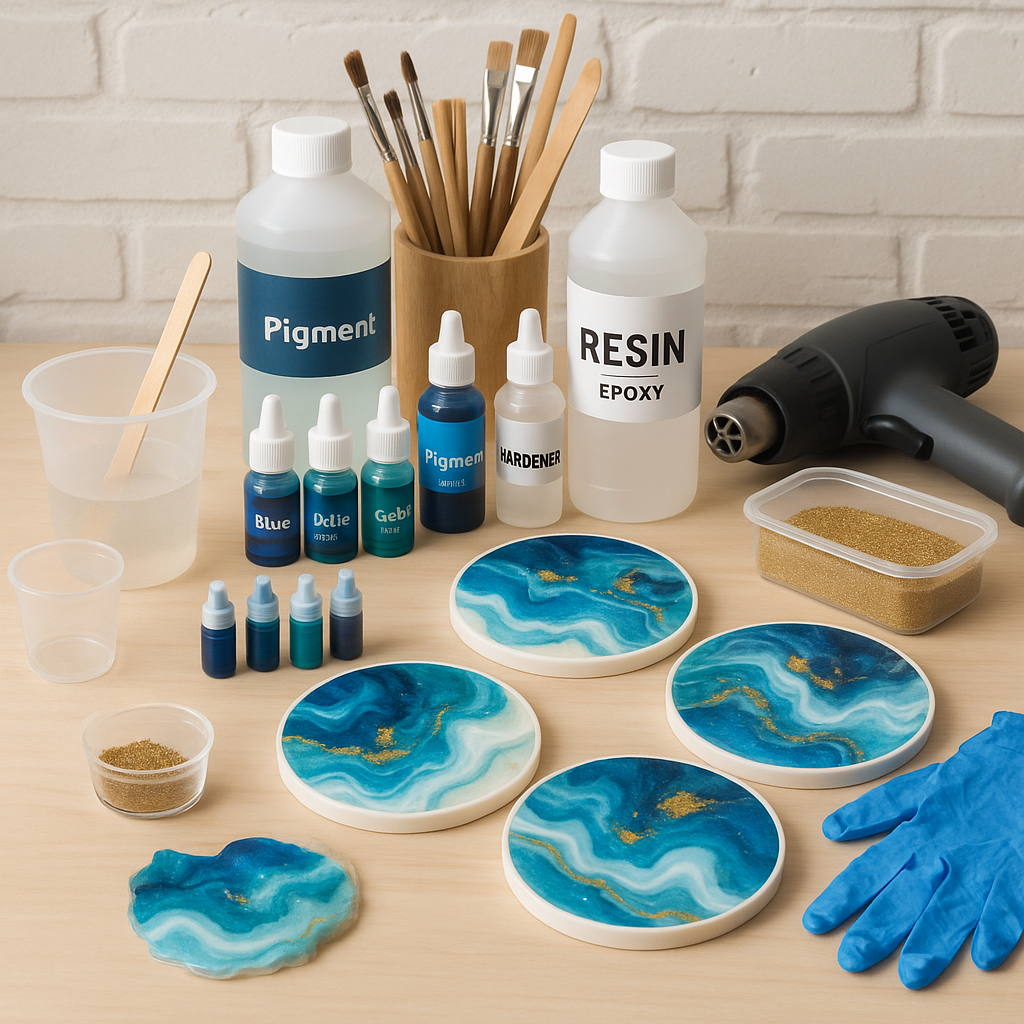
Essential Materials for Starting Resin Art
Getting the right supplies will save you hours of frustration later. Here’s the must-have kit for resin art beginners and enthusiasts:
- High-quality epoxy resin: Choose brands known for clarity and minimal yellowing, such as J-Diction or T-Expert. These offer consistent curing and hardness (source).
- Silicone molds: These flexible molds make removal easy and are safe for resin use.
- PPE (Personal Protective Equipment): Nitrile gloves, a respirator mask, and working in a well-ventilated area protect you from fumes and skin irritation.
- Mixing cups and stir sticks: Use disposable items to avoid contamination.
- Pigments and additives: Alcohol inks, mica powders, glitter, and resin dyes allow you to customize colors and effects.
- Heat gun or long-neck lighter: To eliminate surface bubbles safely without damaging molds or resin layers.
- Thermometer: To monitor resin temperature and prevent overheating.
Choosing the right resin type matters. Deep pour resins cure slowly and are ideal for river tables or thick castings. UV resins cure quickly under light but usually for shallow pours. Specialized resins offer heat resistance, important for items like coasters that may face hot cups (source).
Are you wondering how to avoid bubbles that ruin your masterpiece? Keep reading for practical tips.
Step-by-Step Resin Art Tutorial: How to Create Your First Resin Piece
Creating resin art may seem daunting but breaking it down makes the process manageable and fun.
1. Prepare Your Workspace
Cover your surface with plastic sheets or silicone mats. Wear gloves and a mask. Ensure the room temperature is around 70°F (21°C), ideal for resin curing and bubble reduction.
2. Measure and Mix Resin Accurately
Follow your resin kit instructions for resin-to-hardener ratios. Mix slowly and thoroughly for the recommended time—usually 3 to 5 minutes—to avoid bubbles but ensure full mixing.
Mixing too fast traps bubbles; mixing too slowly might not activate curing fully. Some artisans immerse mixing cups in warm water before mixing to reduce viscosity and bubbles (source).
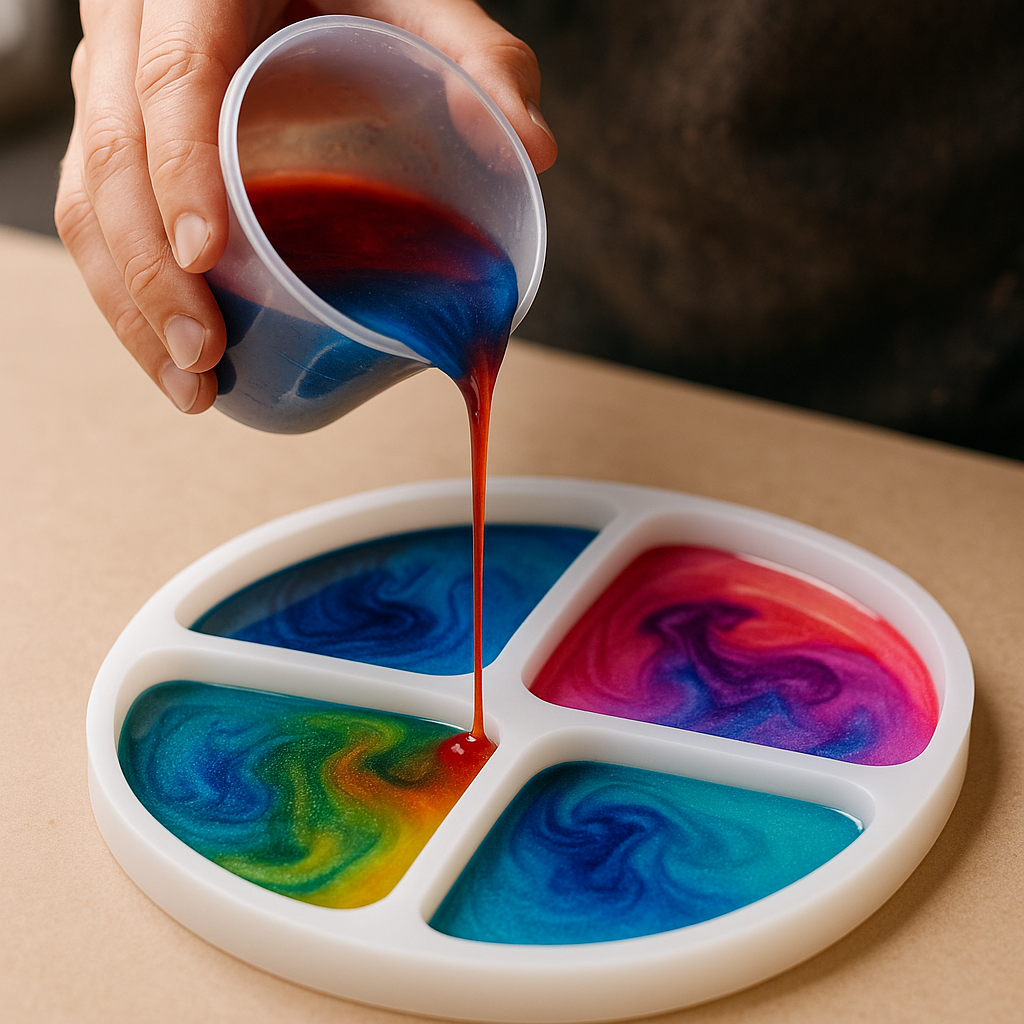
3. Add Colors and Effects
Add mica powder, alcohol inks, or pigments in small amounts to the mixed resin, stirring gently. Experiment with layering colors or swirling techniques for unique patterns.
4. Pour Resin into Mold
Pour resin slowly to reduce bubbles. Use a heat gun or a long-neck lighter over the surface to pop bubbles carefully. Never use a torch directly on silicone molds as it can damage them and shorten their life.
5. Cure Properly
Leave your resin piece to cure in a dust-free, vibration-free environment for at least 24 to 72 hours. Deep pours may take longer. Ensure you do not disturb the piece during this time to get a glass-like finish.
6. Demold and Finish
Once cured, gently remove from the mold. You can sand edges if necessary or add a final clear resin topcoat for shine.
Don’t be discouraged by early mistakes. Resin crafting often yields different results even with the same process. Keep experimenting and refining your technique (source).
How to Make Velvet Effects and Other Creative Resin Finishes
One of the fascinating parts of resin art is getting unique textures and finishes. You can create a “velvet effect” by partially filling your mold with resin, then placing a thin plastic film with scrunched fabric texture on top during curing. After curing, apply chameleon or mica powders, followed by a pigmented epoxy resin layer to achieve a stunning, velvety appearance (source).
You can also experiment with layering translucent colors, embedding dried flowers, glitter, or even small objects like shells or tiny figurines to tell a story within your creation.
Exploring these finishes not only enhances creativity but also boosts your portfolio if you want to sell resin art professionally.
How Can You Prevent Common Resin Challenges Like Yellowing and Cracking?
Yellowing and cracking are dreaded problems for resin artists, but with knowledge, you can avoid them.
- Choose high-quality resin brands: Some lower-quality or unsuitable resins yellow quickly or don’t cure properly. Trusted brands like J-Diction or T-Expert are recommended because of their superior hardness and clarity (source).
- Use the correct resin for your project: Deep pours need specific deep-cure resins to avoid overheating that causes yellowing and cracking. Quick cure resins are suited for thin coats but can trap bubbles easily.
- Cure in controlled conditions: Avoid temperature fluctuations, direct sunlight, and handle curing times carefully. Note that some resins reach their full heat resistance after 4 weeks curing, essential for coasters and heat-exposed items.
Remember, adding pigments and glitters changes resin’s heat resistance — pure resin claims should not be trusted blindly when additives are present.
How Can You Avoid Bubbles in Resin Art Projects?
Bubbles reduce the flawless finish every resin artist desires. Here are expert tips to minimize them:
- Use room temperature resin and materials; cold resin thickens and traps more air bubbles.
- Mix resin at a slow, steady pace to avoid introducing air.
- Immerse mixing containers in warm water before mixing to improve flow.
- Apply heat to the surface with a long-neck lighter or heat gun to pop surface bubbles, but avoid flames directly on silicone molds.
- For professional quality, use pressure pots or vacuum chambers to remove bubbles before curing.
Would you prefer a resin piece full of tiny bubbles or one with a perfect glass clarity? Most artists prefer the latter, and the difference starts with your mixing and pouring technique (source).
Important Safety Tips for Working with Resin
Handling resin safely is crucial. Resin fumes and direct contact can cause allergic reactions or dermatitis.
- Always wear a high-quality respirator mask certified for organic vapors.
- Wear nitrile gloves — never latex — to avoid skin contact.
- Work in a well-ventilated space, preferably with an exhaust fan.
- Dispose of resin-contaminated materials properly according to local hazardous waste policies.
- Do not use open flames or alcohol mists near resin due to flammability.
Long-term exposure without protection can lead to serious health issues. As noted by resin artisans who work exposure daily, personal protective equipment is not optional (source).
How to Price and Monetize Your Resin Art
If you’re inspired to turn resin art from hobby to income, pricing your work fairly is essential.
Consider these factors:
- Material costs: Calculate resin, pigments, molds, and finishing materials.
- Time and skill: Factor in hours spent crafting and your experience level.
- Uniqueness: Custom pieces or intricate designs can command higher prices.
- Market research: Check local and online competitor pricing and craft fairs.
CreativiU offers resources to enhance both your skillset and business strategy in artistic crafts. Check out their range of courses for mastering your creative skills and monetization techniques, like in this comprehensive guide to acquiring skills.
Frequently Asked Questions About Resin Art
What type of resin is best for beginners?
Epoxy resin kits from reputable brands like J-Diction or T-Expert are great for beginners due to their predictable curing and clarity. Try starter kits for all-in-one convenience.
How long does resin take to cure?
Most epoxy resins cure hard in 24–72 hours. Deep pours can take several days to fully cure. Full heat resistance develops over weeks.
How do I prevent resin from yellowing?
Choose a high-quality resin, avoid overheating during curing, and keep your pieces away from direct sunlight. Use deep pour resins for thick projects.
Can resin art be done safely indoors?
Yes, with good ventilation, PPE, and proper handling, it is safe. Always wear masks and gloves and avoid eating or drinking in the work area.
How to remove bubbles from resin?
Mix resin slowly, work at room temperature, use heat like a long-neck lighter on surface bubbles, or use pressure/vacuum systems for professional results.
Resin Art Video Tutorial for Beginners
Watching a step-by-step video is a great way to reinforce what you’ve learned. Here’s a detailed beginner’s guide that covers essential resin tips, common pitfalls, and advanced techniques to keep you inspired and informed.
Final Words on Mastering Resin Art
Resin art is a rewarding craft that combines science, creativity, and skill. With the right materials, safety precautions, and a willingness to experiment, you can produce stunning, professional-quality pieces.
Even experts admit that no two pours are ever exactly alike. Embrace the surprises and keep refining your techniques.
For those wanting to grow their craft and explore more artistic skills, check out this guide on mastering arts and crafts through problem solving — a resource that perfectly complements learning resin art with creativity and confidence.
What’s Your Next Step?
Tell us in the comments: How will you apply this resin art tutorial to your next project? Whether it’s your first pour or your hundredth, keep experimenting and unleashing your creativity!
Leave a Reply