Only 27% of polymer‑clay earring tutorials actually number their steps. That leaves most beginners guessing which action comes next. This guide gives you a clear, numbered roadmap so you never have to stitch together fragmented instructions again. You’ll walk through gathering supplies, conditioning the clay, baking, finishing, and caring for your finished pieces, all in one place.
By the end you’ll know exactly what to do, how long each part should take, and which tools keep your work from cracking or bending. Let’s get your studio set up and start shaping earrings you can wear or sell.
Step 1: Gather Your Materials
Having the right tools at hand saves time and prevents frustration. Below is a checklist that covers everything you need for a basic pair of earrings. Feel free to add extras like glitter or mica if you want more sparkle.
- Polymer clay — various beginner‑friendly brands work well.
- Silicone mat or clean ceramic tile — provides a non‑stick surface.
- Rolling pin or acrylic roller — to flatten the clay.
- Pasta machine (optional) — helps condition large blocks evenly.
- Shape cutters — round cookie cutters, heart‑shaped cutters, or X‑Acto knife.
- Needle‑nose pliers and wire cutters — for opening and trimming jump rings.
- Jump rings, ear‑wires, and earring backs — the hardware that turns a clay shape into jewelry.
- Oven thermometer — ensures you bake at the correct temperature.
- Parchment paper or a silicone baking sheet — prevents sticking.
- Fine‑grit sandpaper (400‑800 grit) and a nail buffer — for smoothing edges after baking.
When you shop, look for nickel‑free findings if you plan to sell your earrings. Nickel can cause allergic reactions for some wearers. A quick search on a reputable jewelry supply site will show you the options.
For a deeper look at each item, check out How to Make Polymer Clay Earrings: Step‑By‑Step Instructions. It breaks down why each tool matters and where to source them affordably.
Once you’ve collected everything, set up a clean workspace. Lay the silicone mat on a flat table, keep your tools within arm’s reach, and have a cup of water nearby for quick hand‑warming.
And remember: a tidy station keeps the clay from picking up dust, which can show up as specks after baking.
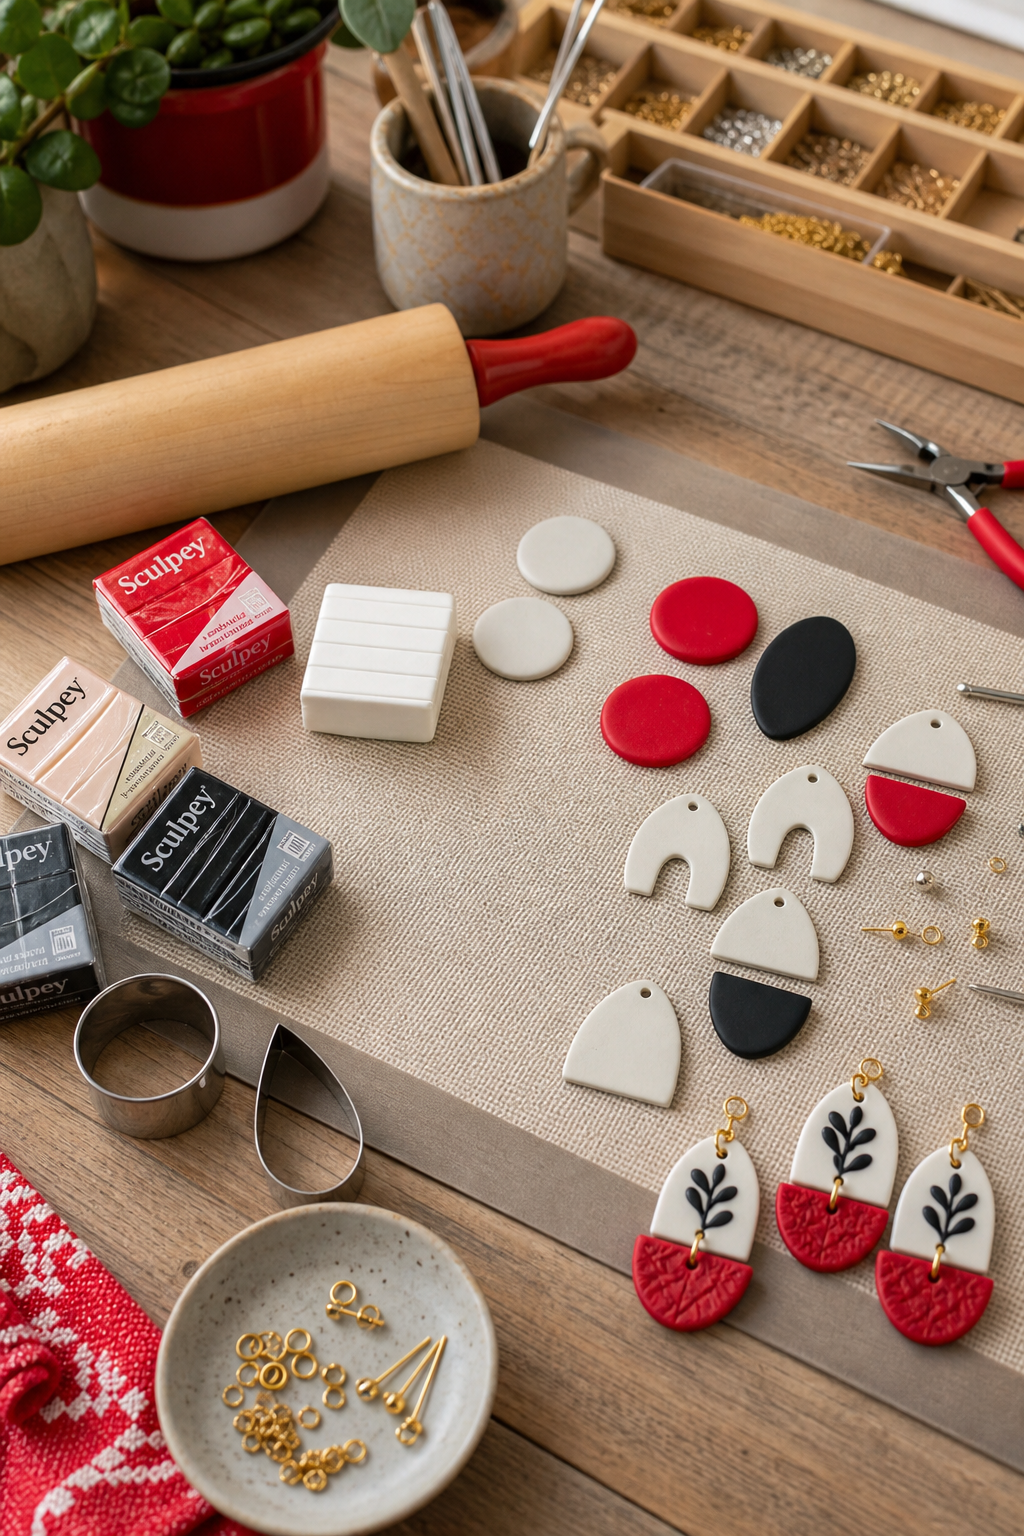
Below is a quick reference table that matches each material to its primary purpose.
Step 2: Condition and Shape the Clay
Conditioning warms the plasticizers in the clay and makes it pliable. Skipping this step often leads to cracks during baking.
Start by breaking off a small piece, about the size of a golf ball. Warm your hands under lukewarm water for a few seconds, then dry them. Rub the clay between your palms for 30‑60 seconds until it feels smooth and buttery.
If you’re using a firmer brand of polymer clay, give the block a gentle whack with a mallet first. This helps break up any old, stiff sections.
Next, roll the conditioned clay with a rolling pin or pass it through a pasta machine. Aim for a thickness of roughly 2 mm. Fold the slab in half, run it through the rollers again, and repeat 20‑30 times. Folding pushes out air bubbles and aligns the polymer particles, which reduces cracking later.
When the slab feels even and springs back under a fingernail, it’s ready for shaping. Use your chosen cutter to press out the earring shape. Press firmly, then give a quick twist to snap the piece cleanly. If the edge looks ragged, smooth it with a fingertip while the clay is still soft.
After cutting, transfer each piece onto a piece of parchment paper. This prevents the shapes from sticking to each other before they go into the oven.
For a visual guide, watch this short video that walks through conditioning and shaping step‑by‑step:
And if you want to explore more advanced shaping tricks, like adding texture with lace or creating layered designs, check out Creative Project Ideas And…. That page shows how to use dotting tools, stamps, and even household items for unique effects.
Remember to keep the workspace tidy. Clay dust can settle on nearby surfaces and be hard to clean later.
Step 3: Bake and Sand the Earrings
Baking turns the soft clay into a durable piece of jewelry. Follow these steps to get a even cure without burning.
Preheat your oven to 110 °C (230 °F). Most kitchen ovens aren’t that precise, so place an oven thermometer on the middle rack and wait until the reading stabilises.
Arrange the parchment‑lined pieces on a baking tray, making sure they don’t touch. Even a tiny bridge can cause the pieces to fuse together.
Slide the tray into the oven and bake for 15‑20 minutes per ¼ inch of thickness. For a 2 mm sheet, 15 minutes is usually enough. Keep the oven door closed; opening it drops the temperature and can cause uneven baking.
When the timer goes off, turn the oven off but leave the tray inside for another five minutes. This gradual cool‑down helps prevent cracking from a sudden temperature change.
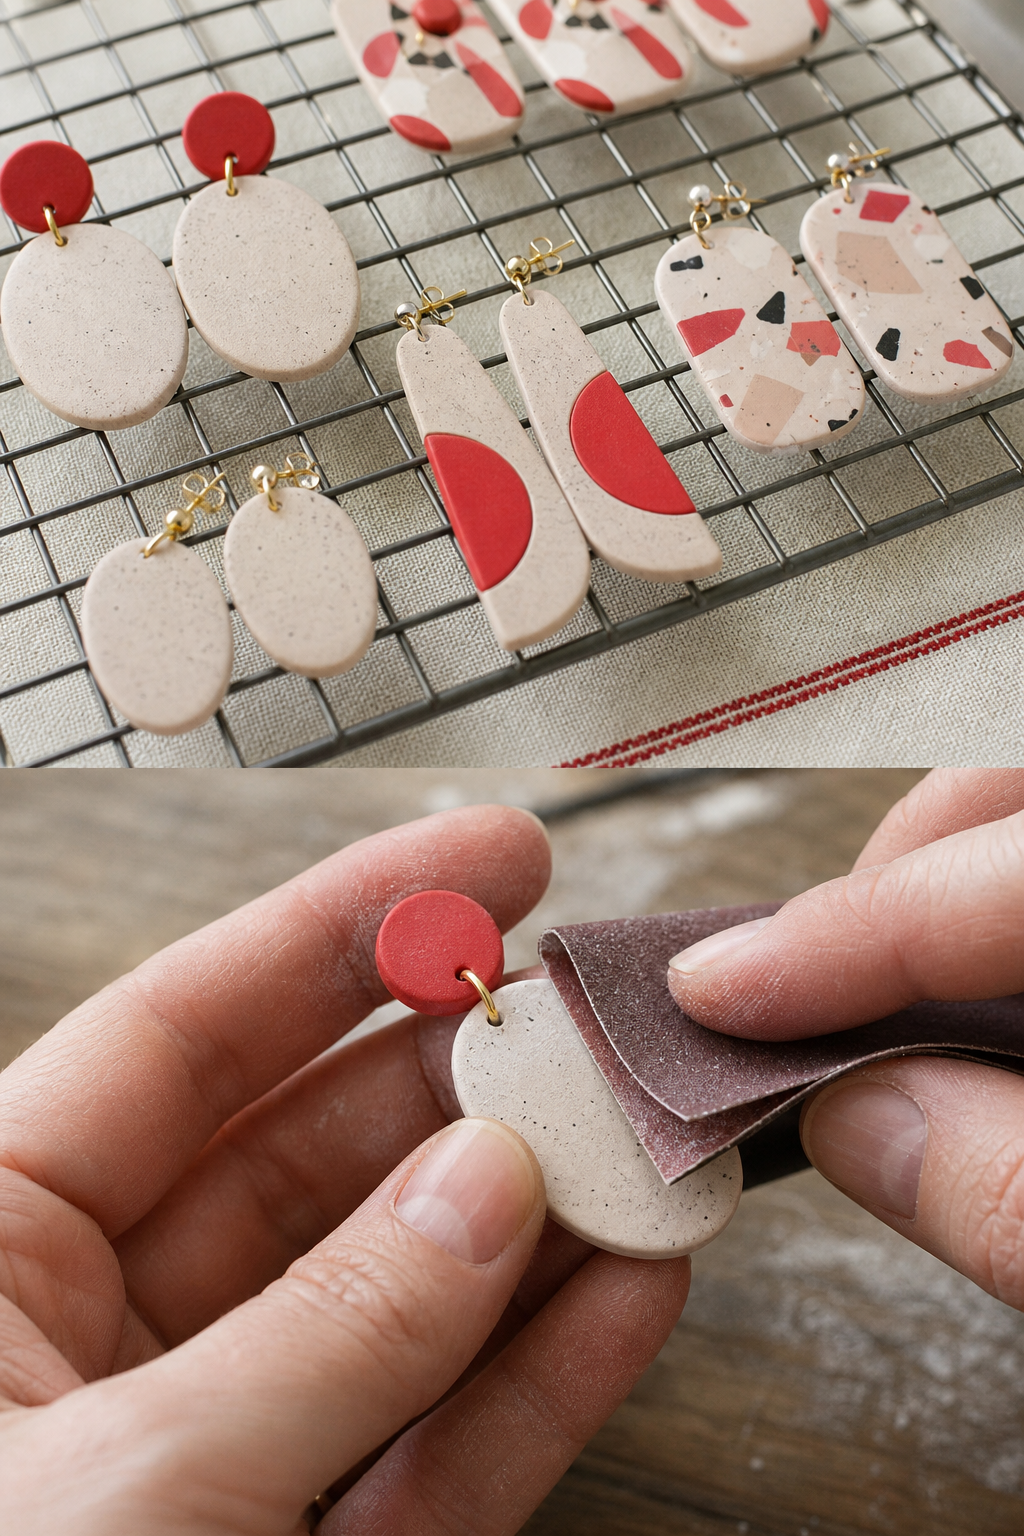
After the tray cools, move the earrings to a wire rack. Let them reach room temperature before handling.
Now for sanding. Start with 400‑grit sandpaper to smooth any rough edges. Hold the piece gently; you don’t want to bend it. Move to finer grit (600‑800) for a smoother finish. Finish with a nail buffer to bring out a subtle shine.
If you notice any tiny bumps after sanding, a light dusting of talc can reduce stickiness before you apply the final finish.
For a quick reference on safe baking temperatures, many hobbyists follow official temperature guidelines available online: temperature guidelines. This helps you set your oven accurately and avoid overheating the clay.
And once you’re happy with the smoothness, you’re ready for the next step: adding finishes and hardware.
Step 4: Add Finishes and Hardware
Finishing not only makes your earrings look polished, it also protects the surface from wear.
There are three main finish types: gloss, matte, and spray. Each works best with different clay brands and design styles.
Gloss varnish gives a shiny, glass‑like surface. A high-quality crystal-clear gloss varnish is a popular choice because it stays clear and doesn’t react with most polymer clays. Apply a thin brush‑on coat, let it dry for 15 minutes, then add a second coat if you want extra depth.
Matte varnish keeps the natural look of the clay. A reliable matte varnish works well and has a pleasant peach‑shampoo scent. It’s great for designs that rely on texture rather than shine.
Spray varnish, such as a specialized spray varnish, is ideal for pieces with raised texture or mica powders. The spray reaches into crevices without pooling, which can happen with brush‑on finishes.
When you choose a finish, test a small hidden area first. Some varnishes can react with certain clay brands after a few weeks, so a quick test prevents a full‑scale mishap.
After the finish cures (usually 24 hours for best durability), attach the hardware. Use needle‑nose pliers to open a jump ring, slip the earring hole through, then close the ring by twisting the ends together, not pulling them apart. This method keeps the ring intact and reduces stress on the clay.
For studs, a simple ear‑wire works. For dangles, add a small bail before closing the jump ring. Make sure the findings are nickel‑free if you plan to sell the earrings.
For a complete look at the best finishes, see Polymer Clay Tutorial: Step‑by‑Step Guide for Beginners. It breaks down which varnish works best with each major clay brand.
Once the hardware is secure, give each earring a gentle shake. If any part feels loose, re‑close the jump ring with a firmer twist.
Step 5: Styling and Care Tips
Even the best‑made earrings need proper care to stay beautiful.
Avoid water and harsh chemicals. Moisture can cause the polymer clay to soften over time, and solvents like acetone will strip varnish and paint. If you must clean them, use a slightly damp, non‑abrasive cloth and wipe gently.
Store earrings in a soft pouch or a dedicated jewelry box. Keep them away from other metal pieces that could scratch the surface. A small piece of felt under each pair helps prevent smudging.
When you wear them, steer clear of activities that expose the earrings to heat, sweat, or perfume. Those can degrade the finish faster.
If an earring gets bent, resist the urge to force it back. Instead, warm the piece gently in your hands and reshape it slowly. Excessive bending can cause the clay to crack.
For long‑term wear, consider applying a second clear coat after a few months. This refreshes the protective layer and keeps colours vibrant.
And if you ever need to repair a broken piece, a tiny dab of strong epoxy glue works well. Apply the glue sparingly, press the parts together, and let it cure for 24 hours before handling.
Finally, keep a small notebook of colour mixes and finish choices. Over time you’ll notice which combos hold up best, saving you trial‑and‑error on future projects.
FAQ
What temperature should I bake polymer clay earrings?
Set your oven to 110 °C (230 °F) and bake for 15‑20 minutes per ¼ inch of thickness. Use an oven thermometer to verify the temperature, because built‑in oven dials can be off by several degrees. After baking, let the tray stay in the turned‑off oven for five minutes before removing the earrings to avoid a sudden temperature drop.
How do I know if my clay is fully conditioned?
After kneading and rolling, press a fingernail into the slab. If the imprint springs back quickly, the clay is soft enough. If the nail leaves a lasting dent, keep conditioning, either by more rolling or a brief hand‑warm‑up. Proper conditioning prevents cracking during bake.
Can I use a regular kitchen oven for baking?
Yes, a kitchen oven works fine as long as you monitor the temperature with a reliable thermometer. Avoid using convection settings, because the fan can create hot spots that cause uneven curing. A standard bake setting gives the most consistent results.
What finish should I choose for a matte look?
A quality matte varnish is a top pick for a natural, non‑shiny finish. Apply a thin brush‑on coat, let it dry 15 minutes, then add a second coat if you want extra protection. Test a small hidden area first to ensure the varnish doesn’t react with your specific clay brand.
How do I attach findings without breaking the clay?
First, poke a small hole using a dotting tool while the clay is still soft. After baking, open a jump ring with needle‑nose pliers, slide the ring through the hole, then close it by twisting the ends sideways. This method avoids pulling or cracking the clay edge.
How can I prevent my earrings from scratching each other?
Place each earring on a piece of parchment or a small silicone mat while they cool. Once cooled, store them in individual fabric pouches or a jewelry box with compartments. Adding a tiny felt pad under each piece further reduces friction.
Is it safe to wear polymer clay earrings in the shower?
It’s best to avoid water altogether. Moisture can soften the polymer and weaken the varnish, especially if the earrings have painted details. If you must get them wet, dry them immediately with a soft cloth and let them air‑dry before wearing again.
Can I recycle leftover polymer clay?
Yes, you can blend leftover pieces back into a fresh batch. Knead the scraps together until they form a uniform colour and texture, then condition the new lump as usual. This reduces waste and keeps your studio tidy.
Conclusion
Now you have a full roadmap from raw clay to finished earrings. You’ve learned how to gather the right tools, condition the material, bake safely, apply the best finishes, and care for your creations so they last. With each step numbered and explained, there’s no guessing, just clear, actionable actions.
If you want more guidance, CreativiU offers on‑demand courses that walk you through each phase with video demos and a community of fellow makers. Those courses fill the gaps you often find in free tutorials, like missing step numbers or vague time estimates.
Give the tutorial a try, experiment with colours and textures, and soon you’ll have a collection of unique polymer clay earrings you can wear, gift, or sell. Happy claying!
Leave a Reply