Ever tried a macrame plant hanger and ended up with a tangled mess? You’re not alone. This guide shows exactly how a virtual class can take you from raw cord to a polished hanger you can hang with pride. We’ll walk through gathering tools, learning knots, designing a pattern, weaving each row, and caring for the finished piece. By the end you’ll know how to turn a subscription‑based class into a reliable skill‑building habit.
Step 1: Gather Your Materials and Set Up Your Workspace
First, list what you need. A sturdy wooden or metal ring, 5 mm cotton cord, a pair of scissors, a measuring tape, and a place to work are the basics. If you like a little sparkle, a few wooden beads can add visual interest, but they’re optional.
When you order a virtual class, the platform often sends a materials checklist. CreativiU, for example, bundles the ring, cord, and beads in the starter kit for its macrame track. That means you won’t have to hunt for the right size at a craft store.
Set up a clean, flat surface. A small table covered with a silicone mat protects both your fibers and the desk. Keep the ring anchored with a clamp or a heavy book so it doesn’t roll while you work.
Lighting matters. Natural light shows the true color of the cord, but a daylight‑balanced lamp (around 5,000 K) works just as well on cloudy days.
Before you start, double‑check the class’s cancellation policy and any COVID‑19 guidelines. The workshop notes that all registrations are final, so make sure you’re ready to commit before you enroll.
Once your space is ready, log into the virtual class portal. CreativiU’s dashboard shows a welcome video that walks you through the week’s lesson plan and points you to the community mastermind group where you can ask questions.
Here’s a quick inventory checklist you can print:
- Wooden ring (8‑inch diameter works for most pots)
- 5 mm cotton cord (about 30 feet for a medium hanger)
- Scissors (sharp enough to cut cleanly)
- Measuring tape
- Optional beads or charms
And don’t forget a cup of tea or a glass of water within arm’s reach. Staying hydrated helps you keep a steady hand.
When you’re comfortable with the setup, you’re ready for the knots.
Master Fiber Art with These Inspiring Online Classes dives deeper into choosing the right class format for your schedule.
Step 2: Master the Basic Macrame Knots
The foundation of any plant hanger is a solid knot. The most common ones are the gathering knot, the square knot, and the spiral (half‑square) knot. Each creates tension that holds the weight of a pot without slipping.
Start with the gathering knot. Measure a 30‑inch length of cord, fold it in half, and loop it around the ring. Wrap the standing parts around the loop 8‑9 times, then pull the tail through the loop and tighten. This creates a secure anchor for the rest of the project.
Next, practice the spiral knot. Hold two outer cords, cross the right over the middle, under the left, and pull tight. Repeat this sequence until you have a series of even knots. The spiral knot is the workhorse for the hanging rows because it shortens predictably as you add more.
Finally, learn the square knot. It’s similar to the spiral but the crossing direction swaps each time, giving a tidy, flat edge that looks great on the bottom of the hanger.
Here’s a quick visual reference for each knot:
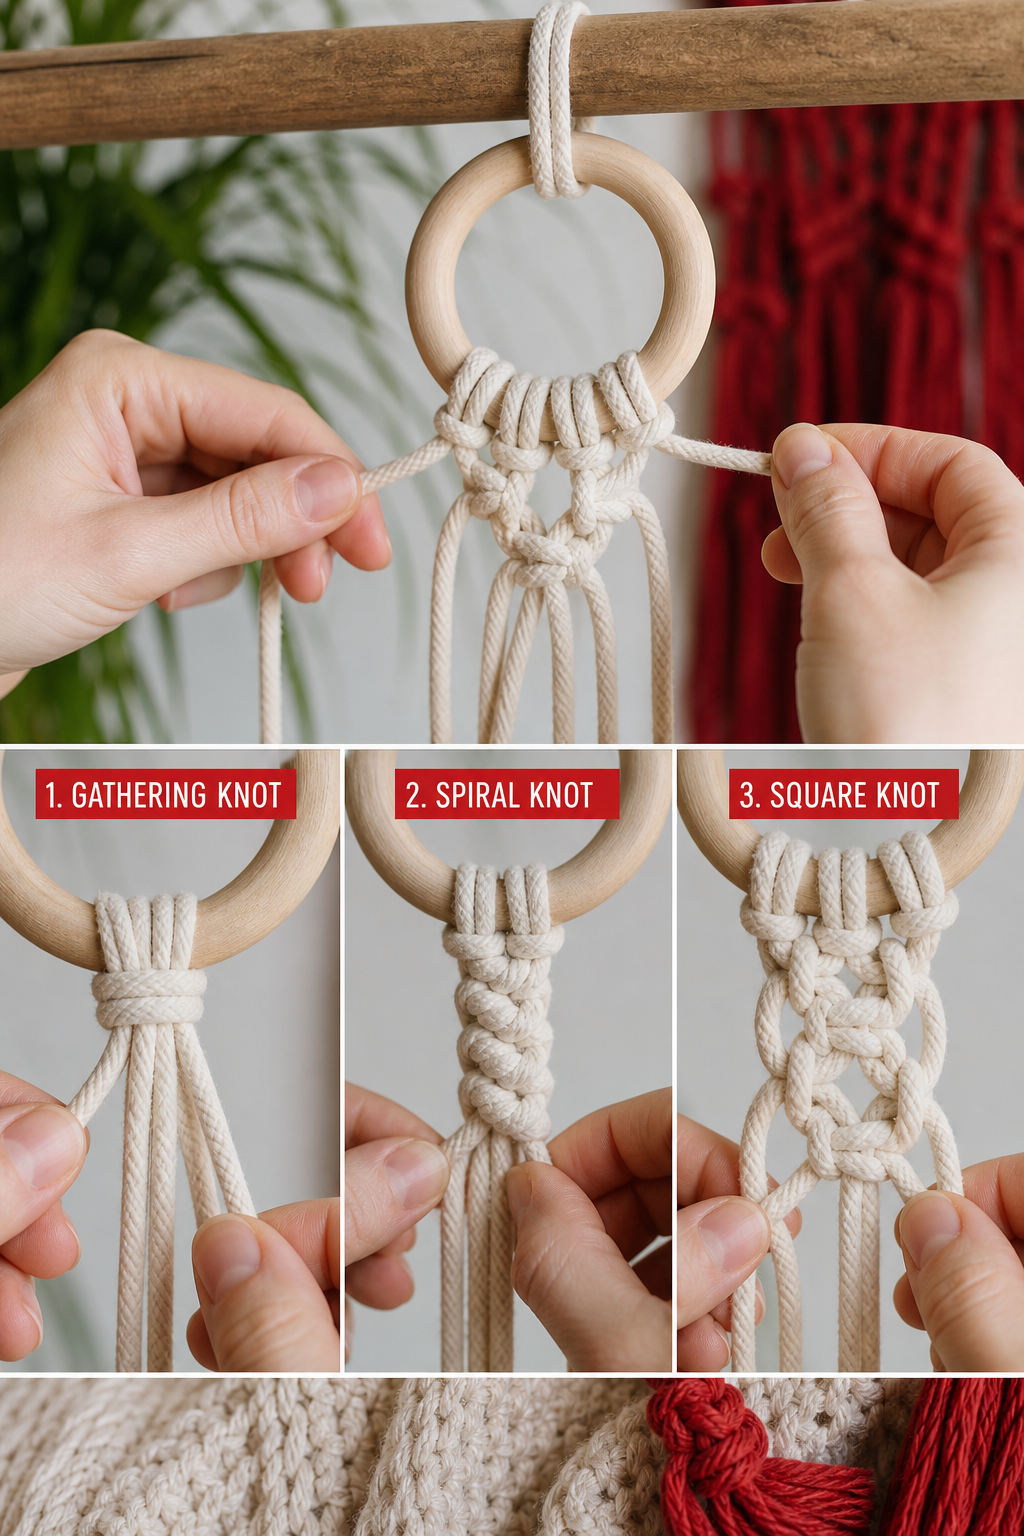
Practice each knot on a scrap piece of cord before you start the actual hanger. The more fluid your movements, the tighter the final knots will be.
According to Wikipedia’s macramé entry, the square knot is historically favored for its strength, which explains why it appears in almost every plant‑hanger pattern.
When you feel confident, move on to designing your own pattern.
Step 3: Design Your Plant Hanger Pattern
Design is where you add personality. A simple “four‑strand diamond” works for beginners, while a “double half‑hitch cascade” suits advanced makers.
Start by sketching the layout on paper. Decide how many rows of knots you want, how far apart each row will be (usually 3‑4 inches), and where the decorative elements will sit.
Many virtual classes provide downloadable PDFs that you can edit. CreativiU’s macrame track offers a pattern editor where you can drag‑and‑drop knot symbols to visualize the final shape.
Consider the weight of the pot you’ll use. A heavier pot needs a tighter gathering knot and perhaps an extra row of square knots for reinforcement.
Here’s a short video that walks through a popular diamond‑shaped pattern. It pairs well with a medium‑size succulent pot.
Once you’ve settled on a design, write down the sequence of knots in a checklist. For example:
- Gathering knot (base)
- 4 rows of spiral knots
- Square knot row for the basket
- Final gathering knot (top)
That checklist keeps you from losing track when you’re mid‑project. It also makes it easier to share your pattern with the class’s private mastermind group for feedback.
When you’re ready, gather the cords according to the pattern’s length requirements. Cutting the cords in half before you start, as suggested by expert macrame designers, helps you keep the ends even and speeds up the setup.
Step 4: Weave the Hanger Step by Step
Now the real work begins. Follow the pattern checklist you created, and watch each row form under your hands.
Begin with the base gathering knot you tied earlier. Make sure it’s tight enough to hold the weight of the plant. If it feels loose, pull the cords a bit more before you move on.
Next, work the first row of spiral knots. Keep the tension even; too tight and the cord will break, too loose and the hanger will sag.
After the first row, add a square‑knot row to create a flat edge. This row also acts as a reinforcement band that prevents the hanger from stretching over time.
Repeat the spiral‑then‑square sequence until you reach the desired length. Measure the distance from the ring to the bottom of the pot as you go , most medium‑size pots need about 24‑30 inches of hanging length.
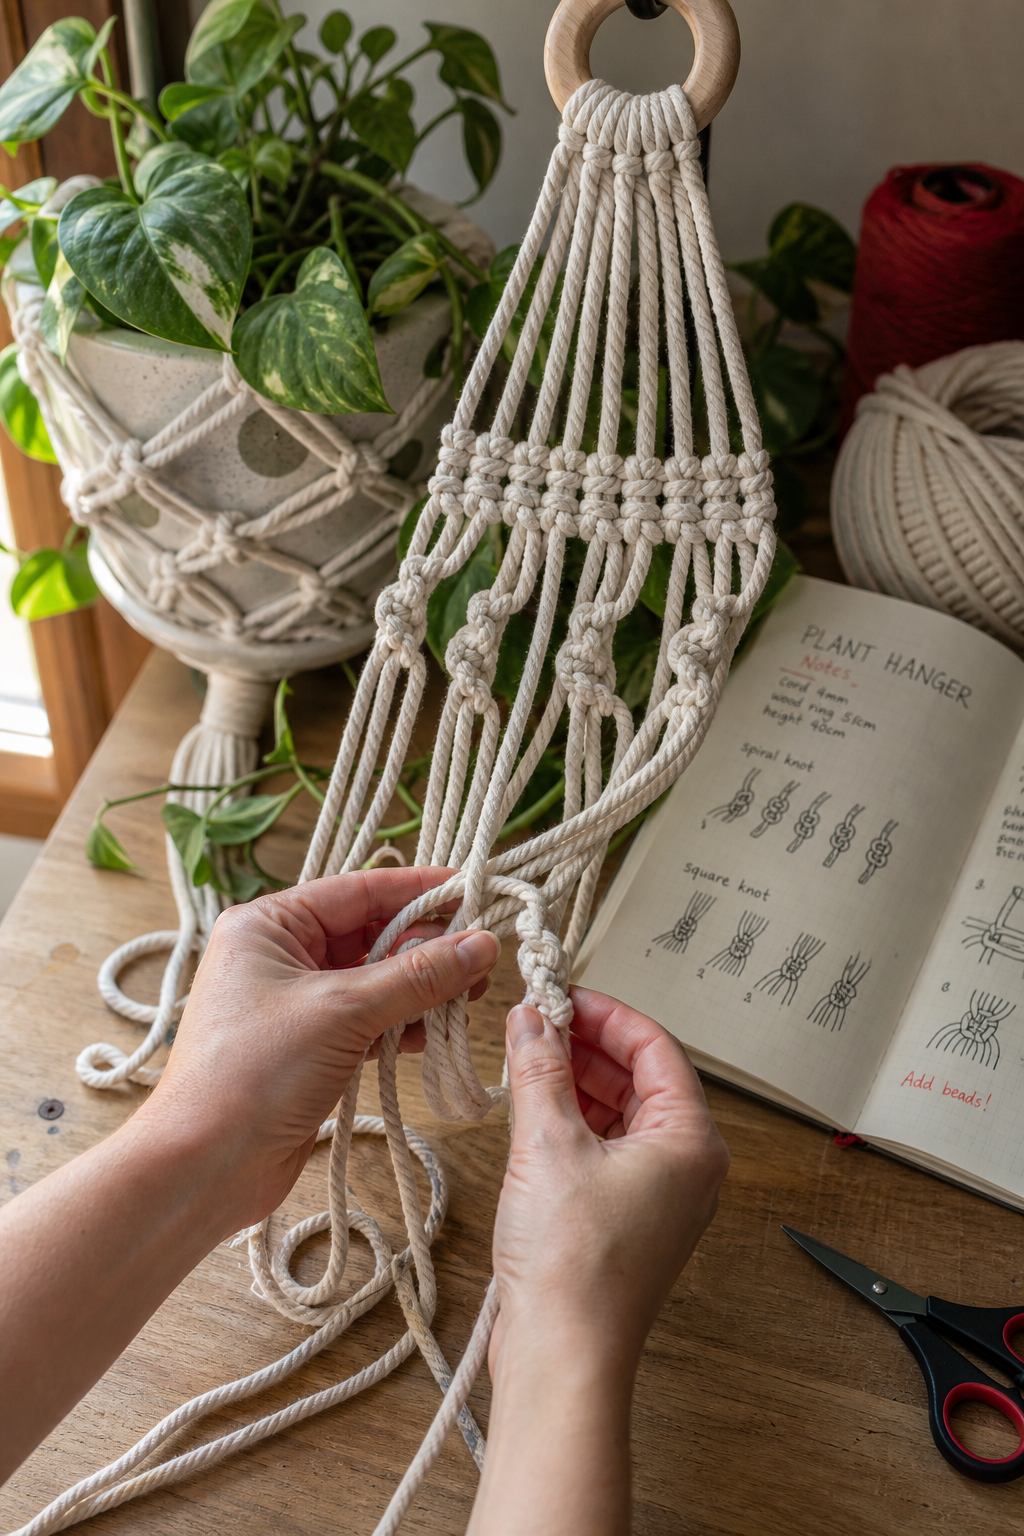
When you finish the last row, tie a final gathering knot to close the basket. Trim any excess cord, leaving a tail of about 2 inches for a neat finish.
Here’s a quick troubleshooting table:
After the hanger is complete, you can add a decorative fringe or a bead strand for extra flair. Many creators share these ideas in CreativiU’s mastermind forums, where you can get quick feedback on color combos.
Online Basket Weaving Classes: Find the Best Resources and Tips offers a deeper look at finishing techniques like fringe trimming and bead placement.
Step 5: Finish, Attach, and Care for Your Plant Hanger
With the weaving done, it’s time to add the final touches. First, trim any excess cord to a tidy length. If you prefer a polished look, melt the ends lightly with a candle flame; this seals the fibers and prevents fraying.
Next, attach a pot holder. Slide a small wooden dowel or a metal hook through the top gathering knot, then thread the pot’s wire or rope through it. Make sure the holder sits snugly so the hanger doesn’t swing too much.
Hang the completed piece in a spot with indirect light. Direct sunlight can dry out cotton cord over months, making it brittle.
Maintenance is simple: dust the hanger with a soft brush once a month, and check the knots for any loosening. If a knot starts to slip, re‑tighten it by pulling both standing parts and retie a square knot at that spot.
Because CreativiU’s subscription gives you ongoing access to new patterns, you can experiment with different designs without buying a new class each time. The private mastermind groups also host monthly “maintenance Q&A” sessions where members share tips on prolonging the life of their macrame pieces.
Finally, showcase your work. Snap a photo and post it in the class’s community feed. Not only does this give you feedback, it also inspires other learners.
Crochet Classes – One Year for One Dollar is another CreativiU offering that lets you expand into related fiber arts, keeping your creative momentum alive.
Frequently Asked Questions
What equipment do I need for a virtual macrame class?
You’ll need a sturdy ring, 5 mm cotton cord (about 30 feet for a medium hanger), scissors, a measuring tape, and a flat, well‑lit workspace. CreativiU’s starter kit includes the ring and cord, so you can focus on learning rather than shopping.
How long does it take to finish a beginner plant hanger?
Most beginners finish a basic four‑strand hanger in 2, 3 hours. If you follow a step‑by‑step virtual class, you can break the work into 30‑minute sessions, which fits easily into a busy schedule.
Can I use synthetic cord instead of cotton?
Yes. Synthetic cords like nylon or polypropylene are stronger and more UV‑resistant, making them ideal for outdoor hangers. Just be sure the cord’s thickness matches the pattern’s length calculations.
Do I need a special pot for a macrame hanger?
A pot with a diameter of 6‑8 inches fits most beginner patterns. The pot should have a drainage hole and be lightweight enough that the hanger can support it without sagging.
Is the CreativiU subscription worth it compared to free YouTube tutorials?
CreativiU offers unlimited lessons, a private mastermind group for personalized feedback, and a growing library of patterns. Free videos give you one‑off instruction, but the subscription’s community and ongoing content add far more value for a $7.95 monthly fee after the first day.
How do I keep my macrame hanger from unraveling over time?
Trim ends cleanly, melt them slightly to seal the fibers, and store the hanger away from direct sunlight. Regularly check the gathering knots for looseness and retighten if needed. A quick monthly dusting also prevents buildup that can weaken the cord.
Can I sell my finished macrame hangers?
Absolutely. Many CreativiU members turn their hobby into a side business. The platform’s marketplace feature lets you list finished pieces, and the community can help you price and market them effectively.
What if I miss a live class session?
All CreativiU lessons are recorded and stay in your account for as long as your membership is active. You can watch the missed session at any time, pause, and replay until you master each step.
Conclusion
Building a macrame plant hanger from a virtual class is a mix of proper prep, solid knot work, thoughtful design, and careful finishing. By gathering the right tools, learning the gathering, spiral, and square knots, drafting a pattern that suits your pot, and following a step‑by‑step weaving routine, you end up with a functional piece of decor you can be proud of. CreativiU’s subscription model gives you unlimited access to fresh patterns, a supportive mastermind group, and the confidence to keep improving without extra cost.
Take the first step today: sign up, set up your workspace, and start tying. As you grow, you’ll find new patterns, experiment with colors, and maybe even turn your hobby into a side hustle. The only thing standing between you and a beautiful hanging garden is the willingness to start.
Leave a Reply