Digital collage feels like magic, but you don’t need pricey software to start. All you need is a computer, a few free tools, and a clear plan. This guide walks you through a free step‑by‑step digital collage art course. You’ll pick a tool, collect images, learn layer tricks, add texture, and export your final piece. By the end you’ll have a polished collage you can share or print.
Step 1: Choose Your Free Digital Collage Software
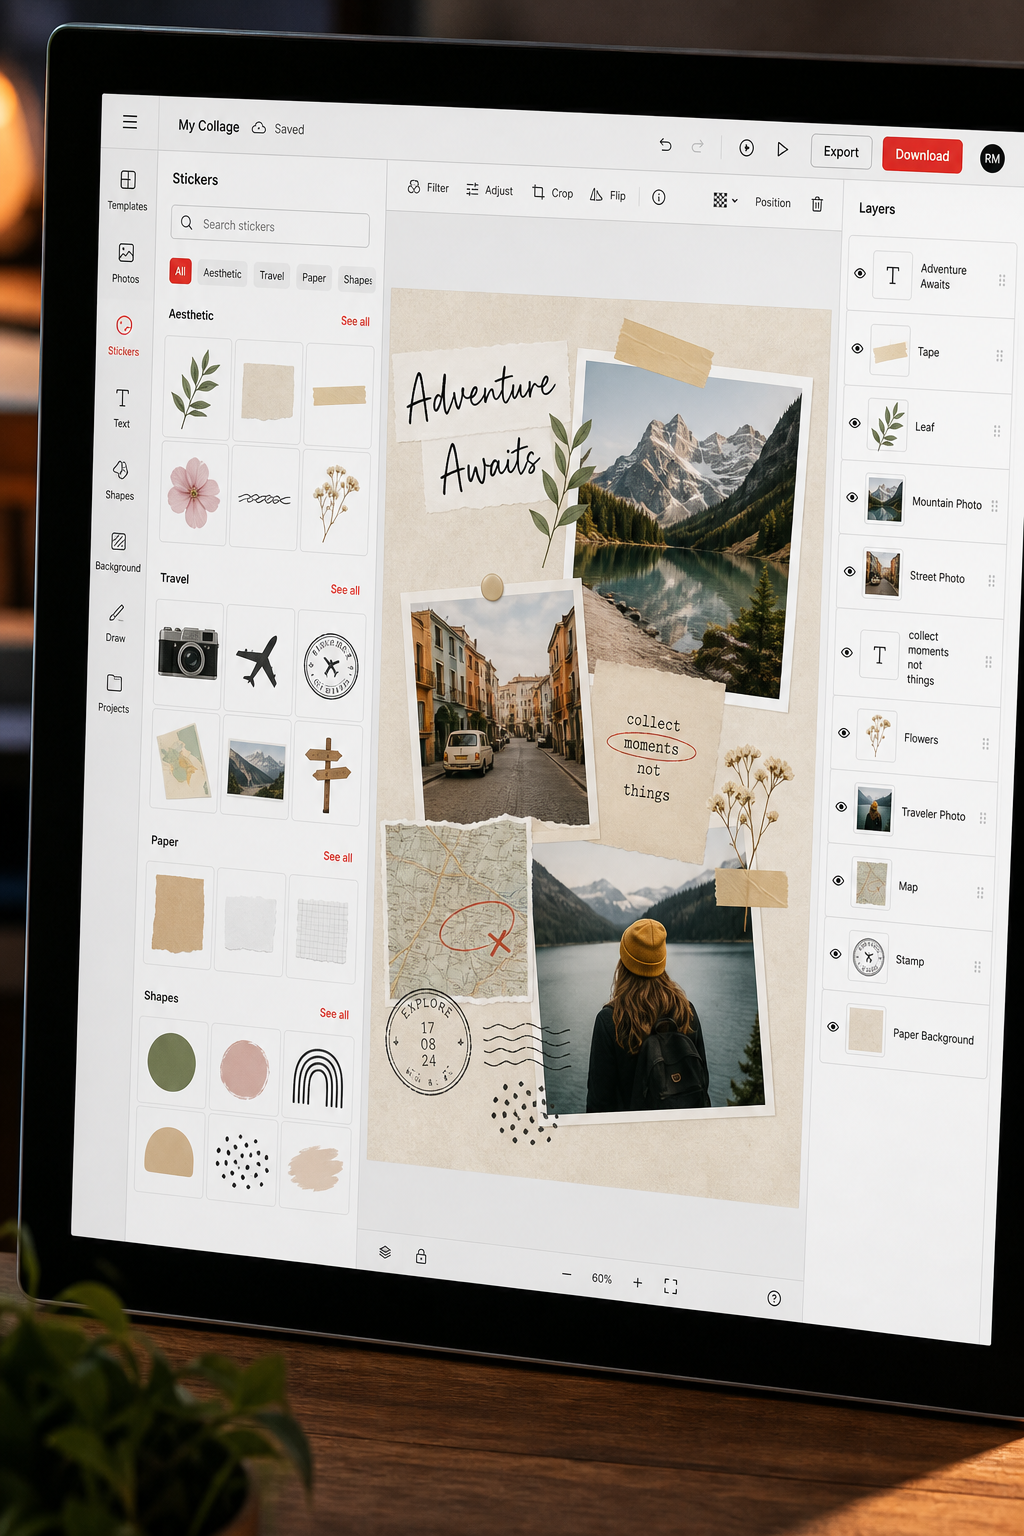
First, find a program that runs in your browser or downloads for free. A web‑based option means no install, no license key, and you can work from any computer. A web-based collage maker fits that bill. It offers grids, templates, stickers, and text tools without any sign‑up fee. The interface lets you drag photos into cells, resize them, and add emojis in just a few clicks.
Another solid choice is a popular online design platform’s free plan. It gives you a library of layouts, a simple layer system, and a massive stock of free graphics. While the premium version adds extra assets, the free tier is more than enough for beginner collages.
Both tools let you export a high‑resolution PNG or JPG, which is handy when you later want to print your art. If you prefer a desktop program, a free open-source desktop editor is available and works on Windows, macOS, and Linux. It mimics advanced layer workflows, so you can grow into more advanced techniques without paying a dime.
CreativiU also offers a free‑trial collage course that walks you through the same steps with a community of artists. The trial gives you access to a curated curriculum, feedback from peers, and a library of textures you can use straight away. Because it’s a trial, there’s no cost, but you do get a richer learning experience than a lone tutorial.
When you compare these options, think about what you need right now. Do you want a quick browser tool? A web-based collage tool fits. Need design templates and a drag‑and‑drop canvas? An online design platform works. Want deep layer control? An open-source desktop editor is the way.
Here’s a quick checklist to help you decide:
- Run in a browser? → browser-based tool or online design platform.
- Desktop app with advanced layers? → open-source desktop editor.
- Guided community learning? → CreativiU free trial.
Once you’ve picked a tool, create a new project that matches the size you plan to output. A common canvas size for social‑media posts is 1080 × 1350 px at 300 dpi. This gives you crisp detail without slowing down your browser.
After setting up the canvas, you’re ready to gather the images you’ll use.
Digital Painting for Beginners: Step‑by‑Step Guide offers a deeper look at setting up your canvas and choosing the right colour mode, which can help you later when you add colour overlays.
Step 2: Gather and Organize Your Source Images
The heart of any collage is the image library you pull from. Public‑domain archives give you endless material that you can use for any purpose, even commercial projects. The Library of Congress hosts millions of digitized works, most of which are in the public domain and free to download.
Visit the Library’s official site and browse collections like historic photographs, vintage maps, and old illustrations. Each item includes a clear rights statement, so you know exactly what you can do with it.
Another goldmine is the Rijksmuseum’s open‑access collection, which uses a Creative Commons 1.0 Universal license. You can download high‑resolution TIFFs and use them without attribution.
Once you have a handful of images, set up a folder structure that mirrors your workflow. A simple system works best: create top‑level folders such as “Backgrounds,” “Focus Elements,” and “Textures.” Inside each, add subfolders for themes like “Nature,” “Urban,” or “Vintage.” This way you can locate a needed element in seconds.
Label each file with a short, descriptive name. Instead of “IMG_1234.jpg,” use “Vintage‑Woman‑1892.png.” Adding a keyword or source name helps you search later, especially when you use a program’s built‑in file search.
Back up your collection regularly. Keep one copy on an external hard drive, another on a cloud service, and the original on your computer’s internal drive. This three‑copy strategy protects you from accidental loss.
Now you have a tidy library ready for quick drag‑and‑drop.
Step 3: Master Basic Layer and Mask Techniques
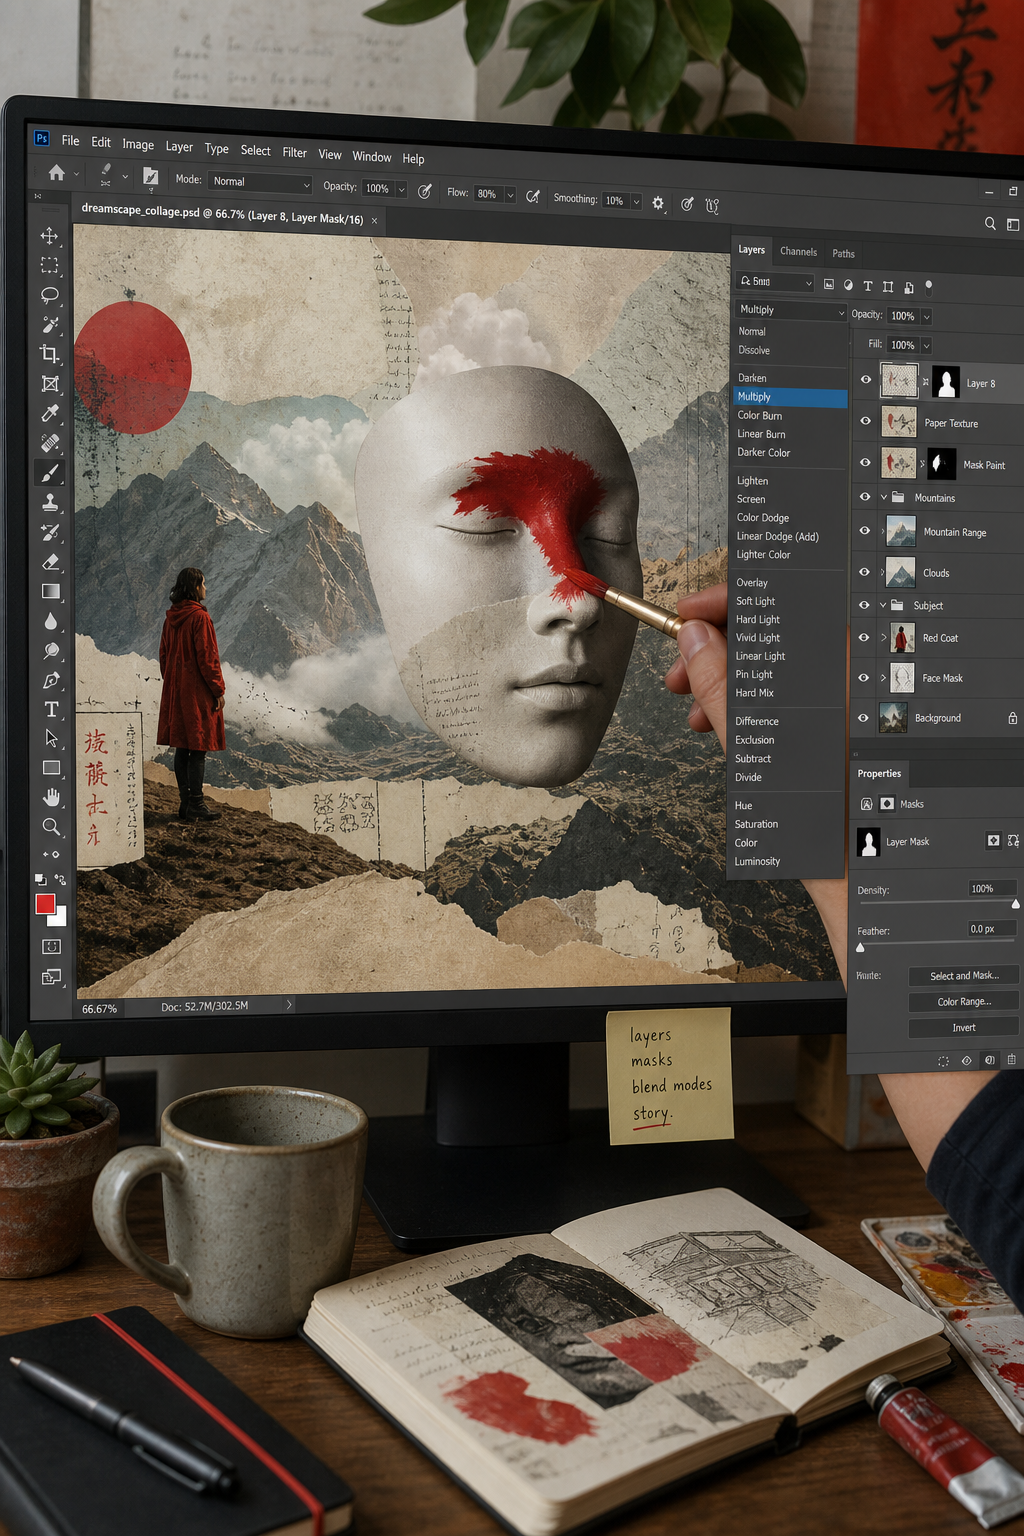
Layers are the backbone of digital collage. Think of each layer as a transparent sheet that you can move up or down. The topmost layer shows first; the bottom layer shows last. By stacking elements, you can create depth without erasing anything.
Start by importing each image onto its own layer. In most editors, you can drag a file onto the canvas and it automatically creates a new layer. Name the layers as you add them , “Background,” “Subject‑1,” “Texture‑A” , so you can find them later.
Next, learn to use masks. A mask lets you hide part of a layer without deleting the pixels. In a standard image editor, you add a mask by clicking the mask icon at the bottom of the layers panel. In another popular editor, right‑click the layer and choose “Add Layer Mask.” Then paint with black to hide and white to reveal.
Here’s a quick workflow:
- Place your background image on the bottom layer.
- Add a focus image on the next layer.
- Create a mask for the focus image.
- Use a soft brush to paint black on the mask where you want the background to peek through.
This technique lets you blend a portrait into a textured backdrop smoothly.
Blend modes add even more power. Set a layer’s blend mode to “Multiply” to darken underlying layers, or “Screen” to lighten them. Experiment with “Overlay” for a punchy contrast.
When you get comfortable, try grouping related layers. In a standard image editor, select multiple layers and press Ctrl+G. This keeps your layer list tidy and lets you move an entire group with one drag.
For beginners, CreativiU’s free‑trial course includes video lessons that walk through layer basics step by step, so you can see each action in real time.
Wikipedia’s definition of collage explains the historical roots of the technique, giving you context that can inspire modern twists.
Getting Started with Digital Art: A Beginner’s Guide to Online Courses also covers how to set up layers in different programs, which helps you transfer skills across tools.
Step 4: Add Textures, Blends, and Effects
Textures give your collage a tactile feel. You can download free texture packs from sites that offer free textures or create your own by scanning paper, fabric, or even leaves. Once you have a texture, drop it onto a new layer and set the blend mode to “Overlay” or “Soft Light” to let the underlying colors shine through.
Here are three popular texture types and when to use them:
Effects like drop shadows or glows can separate elements. In your image editing software, right‑click a layer and choose “Blending Options” to add a subtle shadow. Keep the shadow soft; a harsh edge can break the organic feel of a collage.
Another trick is to use adjustment layers for colour grading. Add a “Color Lookup” layer and choose a preset such as “vintage film look” to give the whole piece a cohesive tone.
Remember to keep a visual balance. If you add a heavy dark texture on the left, counterbalance it with a lighter element on the right. This prevents the piece from feeling lopsided.
“Layer masks let you blend without losing the original image , a safety net for creative experiments.”
Play with these tools until you find a look that feels right for your story.
Step 5: Export and Share Your Digital Collage
When your collage looks finished, it’s time to export. Most editors let you choose file type, resolution, and colour profile. For online sharing, PNG works well because it preserves transparency and sharp edges. If you plan to print, export as a high‑resolution JPEG or TIFF at 300 dpi.
Before you hit export, double‑check the canvas size. A common mistake is to create a small canvas and then enlarge it, which blurs the image. Resize the canvas early in the workflow to avoid this.
Next, embed metadata if the platform supports it. Adding a title and keywords helps you organise your portfolio and improves discoverability on portfolio sites or social media platforms.
Share your work on social media with a short caption that explains the concept. Use relevant hashtags like #digitalcollage, #mixedmedia, and #artprocess to reach a wider audience.
If you want feedback, post the image in CreativiU’s community forums. The free‑trial course includes a discussion board where members critique each other’s work, which can accelerate your growth.
Mixed Media Collage Art Techniques Online Class provides a checklist for exporting and uploading your final piece, making sure you keep colour integrity across platforms.
Frequently Asked Questions
What free software can I use if I don’t have Photoshop?
Browser-based editors, template-based online editors, and free layer-based editors are all solid options. Browser-based editors run in any browser and offer stickers and text tools. Template-based online editors give you templates and a simple drag‑and‑drop canvas. Free layer-based editors provide full layer and mask control, similar to Photoshop, but at no cost. Choose the one that matches your comfort level and project needs.
Where can I find public‑domain images for my collages?
The Library of Congress ( LOC) and Rijksmuseum’s open‑access collection are excellent sources. Both provide high‑resolution files with clear licensing information. Look for items marked “Public Domain” or Creative Commons Zero (CC0) to ensure you can use them freely.
How do I keep my image library organised?
Start with three main folders: Backgrounds, Focus Elements, and Textures. Inside each, add subfolders for themes like Nature, Urban, or Vintage. Use descriptive filenames and back up the entire folder to an external drive and a cloud service. A tidy library saves you time when you need the right piece quickly.
What is the best way to blend a subject into a background?
Use a layer mask on the subject layer. Paint with a soft black brush on the mask where you want the background to show through. Then experiment with blend modes like “Multiply” or “Overlay” to harmonise colour and lighting. Adjust opacity for a smooth transition.
How can I add texture without overwhelming the composition?
Pick one texture that supports the story you’re telling. Set the texture layer to a subtle blend mode such as “Soft Light” and lower its opacity to 20‑30%. Pair it with a complementary colour adjustment layer so the texture feels integrated, not pasted on.
What file format should I use for printing my collage?
Export as a TIFF or high‑quality JPEG at 300 dpi. TIFF preserves all colour data and is ideal for professional printing. JPEG is smaller but still acceptable if you set the quality to 90 % or higher. Always check the printer’s specifications before you send the file.
Conclusion
Creating a digital collage doesn’t have to be expensive or intimidating. By following this step‑by‑step digital collage art course free, you can pick a tool, gather public‑domain images, master layers and masks, add texture, and share your finished piece with confidence. The free trial at CreativiU gives you a community‑driven curriculum that goes deeper than a short browser‑based class, so you can keep learning long after your first collage.
Take the first step today: choose a free editor, set up a simple folder system, and start experimenting. The more you play, the more you’ll discover your own style. When you’re ready, export at high resolution, post your work online, and invite feedback from the CreativiU community. Your next collage is just a few clicks away.
Leave a Reply