Ever stared at a tiny bottle of clear resin and thought, “I could turn this into something pretty and actually sell it?” You’re not alone. So many of us have that spark—wanting to create a piece of jewelry that feels personal, yet looking at the chemistry jargon makes us freeze.
But here’s the good news: resin jewelry making for beginners is less about lab coats and more about simple steps, a dash of patience, and a sprinkle of creativity. Think of it like baking a cupcake; you follow a recipe, add your favorite sprinkles, and soon you’ve got something sweet you can share.
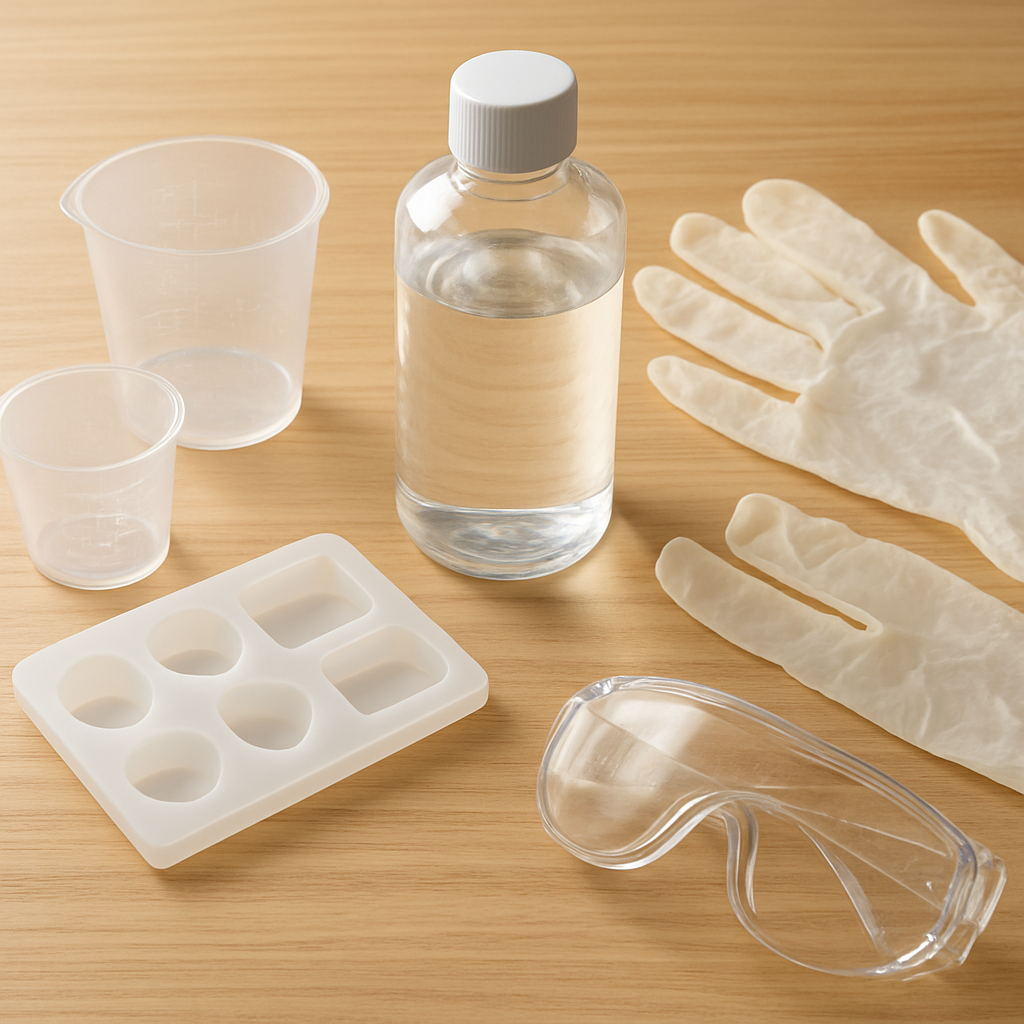
First, gather the basics: clear epoxy resin, a hardener, silicone molds (or a simple muffin tin), a stir stick, and whatever you want to embed—glitter, dried flowers, tiny charms. A common mistake newbies make is skipping the protective gloves; a quick slip can turn a perfect pendant into a sticky mess.
Let’s walk through a real‑world example. Jenna, a stay‑at‑home mom, started with a tiny set of molds and a handful of pressed lavender buds she harvested from her garden. She mixed resin 1:1, poured, added the buds, and after 24 hours had a batch of fragrant, nature‑infused earrings that her friends loved. She posted the photos on Instagram, and within a week she sold three pairs.
So, how can you replicate that success? Here are three actionable steps you can try today:
- Measure resin and hardener precisely using equal parts by volume; even a 5% deviation can cause cloudiness.
- Warm the resin in a water bath for a few minutes to reduce bubbles—think of it like warming up before a workout.
- Use a torch or a quick‑fire heat gun briefly over the surface to pop any lingering bubbles before the resin sets.
If you ever feel stuck, don’t forget you can always dive deeper with our detailed guide on how to create resin art jewelry at home. It walks you through material choices, troubleshooting tips, and even marketing ideas for turning hobby projects into a side hustle.
Once your pieces are cured, polish them with a soft cloth, attach jump rings, and you’ve got ready‑to‑wear jewelry. You might wonder, “Do I need fancy tools?” Not really—most beginners start with just a kitchen scale and a silicone mold, and upgrade as they grow.
And if you’re thinking about turning this passion into a business, consider getting some professional SEO support to help your shop get discovered. A partner like rebelgrowth can boost your online visibility, driving traffic to your new resin jewelry store.
Bottom line: resin jewelry making for beginners is totally doable, and every piece you finish is a step toward mastering the craft and maybe even building a brand. Ready to mix, pour, and shine?
TL;DR
Resin jewelry making for beginners is a fun, low‑cost way to turn simple supplies into wearable art you can sell or gift for personal use or a small side hustle.
Follow our step‑by‑step tips—measure accurately, warm the mix, pop bubbles, cure, polish—and you’ll create polished pieces fast, without expensive tools.
Step 1: Gather Materials and Safety Gear
Okay, picture this: you’re standing in your kitchen, resin bottle in hand, and you suddenly realize you don’t even have the basics. It’s a little panic‑inducing, right? Don’t worry—you’re not alone. The first hurdle in resin jewelry making for beginners is simply getting the right supplies together and staying safe while you do it.
Here’s a quick mental checklist before you sprint to the store:
- Clear epoxy resin (the kind that cures hard and stays crystal‑clear)
- Hardener that matches the resin 1:1 or as the manufacturer specifies
- Silicone molds or metal bezels – think pendant trays, ring molds, or even a muffin tin for experimental shapes
- Measuring cups or a digital kitchen scale for precise 5%‑tolerance mixing
- Stir sticks (wooden or disposable plastic) and a mixing surface that you don’t mind getting sticky
- Protective gloves, goggles, and a well‑ventilated workspace
Why the emphasis on precision? Even a tiny deviation in the resin‑hardener ratio can leave your piece cloudy or forever tacky. According to resin experts, “accurate measurement is the single biggest factor in achieving a flawless cure”.
Step‑by‑step: Collecting Your Kit
1. Pick a resin brand you trust. Premium epoxy resins are forgiving, give you a longer pot life, and cure clear—perfect for beginners.
2. Choose molds that suit your first project. If you’re unsure, start with a simple silicone earring mold. They release easily and require no demolding tricks.
3. Grab safety gear. Nitrile gloves protect your hands, safety goggles keep splashes out of your eyes, and a respirator mask is a good idea if you’re working in a tight space.
4. Set up a clean, level work surface. Use a disposable silicone mat or a sheet of parchment paper. This prevents accidental drips from ruining your table.
5. Gather measuring tools. A set of graduated cups (one for resin, one for hardener) works, or a digital scale that measures in grams for ultra‑precise mixes.
6. Have a heat source ready. A small heat gun or a kitchen torch helps pop bubbles—just keep it moving so you don’t overheat the resin.
So, what does all this look like in a real‑world scenario? Meet Maya, a college art student. She bought a starter kit that included 8 oz of clear epoxy, a set of silicone pendant molds, and a pair of nitrile gloves. Maya measured 4 oz of resin and 4 oz of hardener using a kitchen scale, mixed for 3 minutes, and poured into the molds. Within 24 hours she had a batch of glossy pendants ready for a campus pop‑up shop.
Safety First – No Shortcuts
Resin fumes can be irritating, especially in a small apartment. Open a window, turn on a fan, and never skip the gloves. If you get resin on your skin, wash immediately with soap and water—acetone can dry out your skin, so save it for cleaning tools after they’re cured.
And remember, never reuse a mixing cup without a thorough clean. Residual resin can cause a “double‑cure” that leaves the next piece cloudy.
Do you ever wonder how to keep your workspace tidy? A simple trick is to line your tray with a fresh sheet of wax paper each session. When the resin cures, you can lift the entire sheet and slide the finished piece onto a polishing cloth without touching it.
Bonus: Community Learning
If you’re feeling a bit overwhelmed, consider joining an online workshop. Exploring Online Resin Art Workshops for Beginners with Community Feedback offers step‑by‑step video lessons and a forum where you can ask questions in real time.
Once you’ve got your kit assembled, the next step is actually mixing the resin. But before you do, a quick pro tip: warm the resin bottle in a bowl of warm (not hot) water for 2‑3 minutes. Warm resin flows better and traps fewer bubbles.
Ready to dive in? Grab your supplies, suit up, and let’s get that first pour perfect.
Need a little extra help promoting the pieces you’ll soon create? A professional SEO partner can give your new shop the visibility it deserves. Check out Rebelgrowth for automated content and backlink services tailored to creative entrepreneurs.
And when you’re ready to showcase your collection, you’ll likely need eye‑catching product photos. Skilled freelancers on TalentsHive can handle photography, branding, and even website design so you can focus on crafting.
Step 2: Prepare Your Workspace and Mixing Tools
Choose the right space
First thing’s first – you need a spot where you feel comfortable and where the air can move. A kitchen countertop, a garage workbench, or even a sturdy coffee table can work, as long as it’s level, well‑ventilated, and away from pets or kids. If you’re in an apartment, crack a window and point a small fan toward the door; the fresh airflow helps keep resin fumes at bay.
Does the idea of a cluttered kitchen make you cringe? Me too. That’s why I always lay down a disposable painter’s plastic sheet or a large piece of wax paper before I even open the resin bottle. It’s cheap, it protects your surface, and when the job’s done you can just roll it up and toss it – no sticky mess left behind.
Set up your mixing station
Next, gather the mixing tools and give them a dedicated spot. I like using a silicone mat because it’s non‑stick and easy to clean. Place two graduated cups (one for resin, one for hardener) side by side, a wooden stir stick, and a digital kitchen scale if you prefer weighing your mix.Pro tip: label each cup with a permanent marker before you start. Trust me, the last thing you want is a brain‑fade moment wondering which cup holds the resin and which holds the hardener.
Warm the resin bottle in a bowl of warm (not boiling) water for 2‑3 minutes. A little heat lowers viscosity, so the resin flows smoother and traps fewer bubbles – a trick that saves you time later.
Essential tools and their purpose
Here’s a quick checklist of the tools you’ll actually use during the pour:
- Measuring cups or scale: Accuracy is king; a 5% deviation can make your piece cloudy.
- Stir sticks: Wooden sticks are disposable and give you good torque.
- Heat gun or torch: A brief pass over the surface pops bubbles without overheating the resin.
- Gloves, goggles, mask: Nitrile gloves protect your skin, goggles keep splashes out of your eyes, and a mask helps with any lingering fumes.
- Silicone molds or metal bezels: Silicone releases easily, while metal gives a sleek edge for pendant trays.
According to UltraClear Epoxy’s guide, maintaining a room temperature of 75°F‑80°F (24‑27°C) gives the most consistent cure time, so if you can keep the space in that range, you’ll avoid tacky finishes.
Pro tips for a clean workspace
Ever notice a speck of dust floating in the air and wonder why it ends up on your curing piece? The answer is simple: resin loves to trap particles. To combat this, run a quick vacuum or dust‑mop the area before you start. I also keep a small hand‑held air blower (the kind you use for camera lenses) handy to give the mold a gentle puff right after the first pour.
Another habit that saves headaches is to have a “clean‑up kit” ready: a container of isopropyl alcohol, a few paper towels, and a spare set of mixing cups. If you accidentally get resin on a surface, a quick swipe with alcohol before it hardens wipes it away without damaging the table.
And don’t forget to protect your hands between pours. I keep a pair of fresh nitrile gloves within arm’s reach, swapping them out after each batch. It’s a tiny step, but it prevents the dreaded resin‑skin that can feel like a sticky nightmare.
Turning the workspace into a launchpad
Once your workspace feels like a second home, you’re ready to think bigger. If you’ve been dreaming about turning your new hobby into a side hustle, there’s a webinar that walks you through exactly that transition. Check out Lisa Nartey’s digital business webinar – it’s tailored for creative entrepreneurs who want to monetize their craft without a steep learning curve.
Finally, if you crave a deeper dive into technique, the Resin Art Tutorial: Master Essential Techniques for Stunning Creations walks you through advanced pouring methods, color blending, and finishing tricks that take your beginner pieces to a professional level.
Take a moment now: clear a shelf, lay down that plastic sheet, gather your tools, and set a timer for 20 minutes. When the timer dings, you’ll know you’ve got a ready‑to‑mix station, and the rest of the process will feel almost effortless.
Step 3: Mixing Resin and Adding Color
Measure and mix – the science behind the art
First thing’s first: grab two clean cups, one for resin and one for hardener. Pour the exact amount of resin you need – most beginners start with 2 oz because it’s easy to handle. Then match it with the same volume of hardener. If you prefer weighing, a digital kitchen scale gives you gram‑perfect accuracy. Remember, even a 5% slip can turn a crystal‑clear pendant cloudy.
Now stir. Use a wooden stir stick and scrape the sides and bottom of the cup in a slow, steady motion. Aim for at least one minute of mixing – some pros go up to three minutes to make sure the chemical reaction is uniform. You’ll notice the mixture change from a milky hue to a transparent amber; that’s the point where the resin is ready for color.
Does it feel like a chore? Think of it like whisking a pancake batter; you want everything blended, not a few stubborn clumps.
De‑airing – banish bubbles before they ruin your piece
Air bubbles love resin, especially when you stir aggressively. After your mix is smooth, set the cup on a silicone mat and give it a quick tap on the tabletop – that sends the larger bubbles rising.
Next, grab a heat gun or a small kitchen torch. Hold it about 6‑8 inches above the surface and sweep it slowly. The heat thins the resin just enough for the bubbles to pop without scorching the mix. If you don’t have a torch, a hair dryer on low heat works in a pinch.
Here’s a real‑world tip: Maya, the college art student from earlier, swears by a 10‑second torch pass right after stirring. She says it cuts her cure time by about 15 minutes because fewer bubbles mean the resin sets more evenly.
Choosing and adding color – make your jewelry pop
Now the fun part: color. There are three main routes – liquid resin pigments, mica powders, and alcohol inks. Liquid pigments are the easiest; just add a few drops and stir until you see an even hue. Mica gives you a shimmery, metallic finish – sprinkle a pinch and watch it swirl. Alcohol inks are great for watercolor‑like gradients; drop a tiny dab, then use a toothpick to swirl.
Pro tip: start with less color than you think you need. You can always deepen the shade, but you can’t undo an oversaturated batch. For example, Sam, a hobbyist who sells earrings on Etsy, adds two drops of pink pigment to a clear mix, then adds a pinch of gold mica for a subtle sparkle. He reports that customers love the “soft, glimmery” look because it feels more natural than a full‑on neon.
Want a multi‑color effect? Divide your mixed resin into two or three small cups, tint each cup differently, then gently pour them side‑by‑side into the mold. Use a stick or a straw to create a marbled swirl. The result looks like a mini galaxy trapped inside the pendant.
Safety while you mix – keep the vibe relaxed but protected
Never skip the gloves. Nitrile protects your skin, and if resin does get on you, soap and water are enough – save the acetone for cleaning tools after they’re fully cured.
Ventilation matters. Open a window, point a fan toward the door, and consider a cheap respirator if you’re in a tight space. The fumes are mild but can irritate eyes and lungs over time.
And always work in a well‑lit area. Good lighting helps you spot stray bubbles and uneven color distribution before you pour.
Quick checklist before you pour
- Measure resin and hardener 1:1 (by volume or weight).
- Stir for 1‑3 minutes, scraping the sides.
- Tap cup to release large bubbles.
- Apply heat gun/torch for 10‑15 seconds.
- Add color – start low, test, then adjust.
- Wear gloves, goggles, and ensure ventilation.
Once you’ve ticked those boxes, you’re ready to pour your masterpiece into the mold. Remember, the more intentional you are in this mixing stage, the smoother and more vibrant your final jewelry will be. So grab that stir stick, add a splash of color, and watch your resin jewelry making for beginners journey turn into something truly yours.
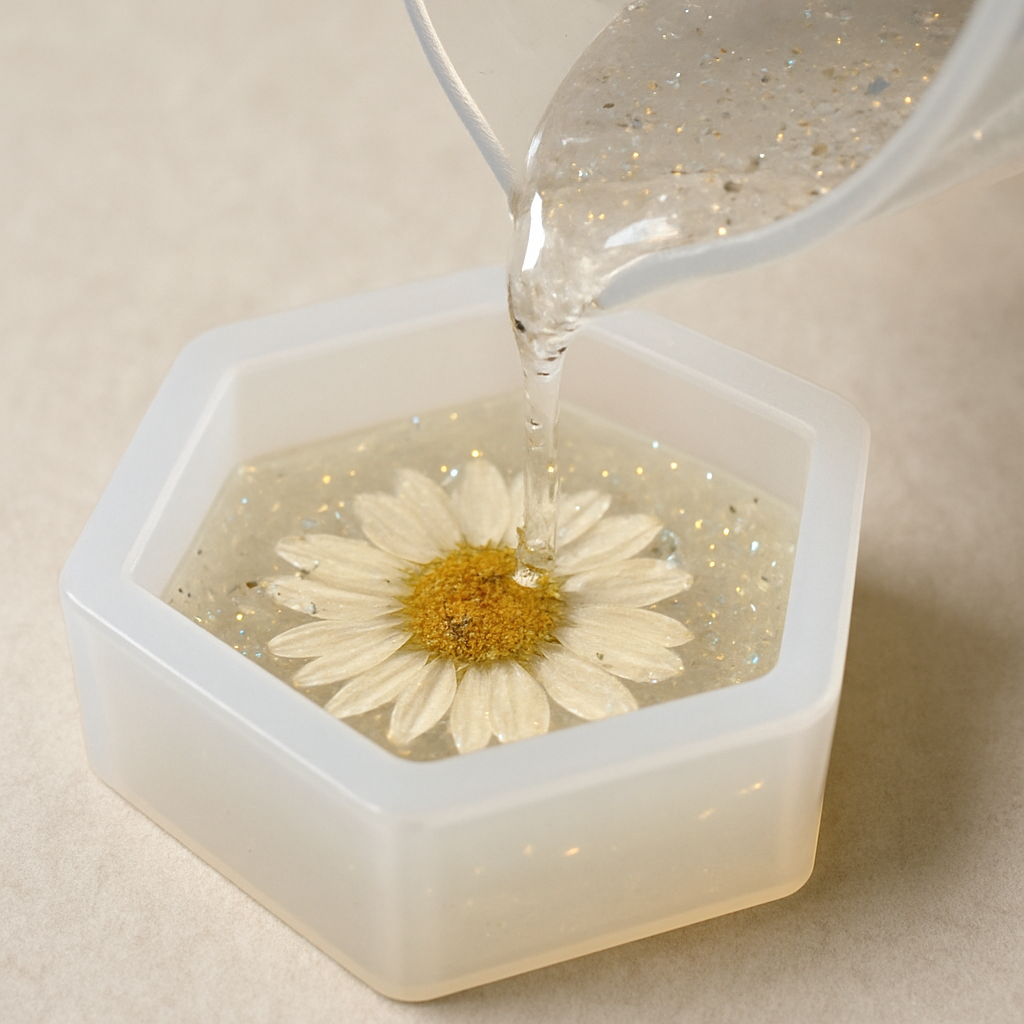
Step 4: Pouring Resin into Molds and Embedding Elements
Alright, the mix is ready and the bubbles are mostly gone – now comes the fun part: actually getting that liquid glass into your mold. It feels a little like pouring milk into a coffee cup, except you’re creating a piece of jewelry that could end up on a chain.
Check your setup before you pour
Before you tip the cup, do a quick visual check: is the mold clean, free of dust, and properly seated on a flat surface? Grab a disposable pipette or a small squeeze bottle – they give you control, so you don’t end up with a tidal wave of resin flooding the edges.
How to pour without spilling
Start by pouring a thin stream right into the center of the cavity. Let the resin spread on its own; gravity does most of the work. If you notice it hugging one side, tilt the mold ever so slightly and watch the liquid level even out.
Embedding your chosen elements
Now’s the moment to embed whatever sparkles your imagination – tiny dried flowers, glitter shards, a tiny charm, or even a sprinkle of mica. Using a toothpick, gently press the element just below the surface, then cover it with a thin layer of fresh resin to lock it in place.
Layering for depth
If you want depth, try a two‑stage pour. First, fill the mold about half full, let any bubbles rise, then add your embed. After a few minutes, pour the remaining resin to bring the piece to the top. This creates a subtle “floating” effect that looks like a mini galaxy trapped inside the pendant.
Bubble‑busting after the pour
Even with careful pouring, a few bubbles can sneak in. The heat gun trick you used earlier works here, too – sweep it lightly over the surface for 5‑10 seconds. You’ll see the bubbles pop like popcorn, leaving a glass‑smooth finish ready for curing.
Watch a quick demo
Still not sure how the pour looks in real time? Watching a quick demo can clear up any lingering doubts.
After the resin settles, cover the mold with a piece of cardboard or a silicone lid to protect it from dust while it cures. Keep the workspace at room temperature (around 75°F) and avoid moving the mold for at least the first 30 minutes – any disturbance can create unwanted lines or ripples.
Visual reference
Final polish
Your first pour is the foundation for countless designs. To make the process feel repeatable, write down the exact amount you used, the temperature of the room, and any tweaks you made to the pour speed. Next time you’ll know exactly what worked and can experiment with new embed ideas without guessing.
Pro tip: if you’re working with transparent elements like tiny beads, place them on the bottom layer before the first pour. This way they stay fully visible and don’t get lost in a cloud of resin. And remember, patience is key – a slow, steady pour always beats a rushed splash.
Give it a try today and watch your ideas come alive.
Step 5: Curing, Finishing, and Comparing Resin Types
Now the pour is done, the real magic happens while the resin is hardening. If you’ve ever wondered why some pieces feel a little sticky after 24 hours while others are rock‑solid, the answer lies in how you cure and finish them – and, yes, the kind of resin you chose in the first place.
Patience is your best tool
First things first: let the piece sit undisturbed. Most clear epoxies reach a safe‑to‑handle state after about 4‑6 hours, but they don’t truly reach full strength until 24‑48 hours. Resist the urge to peel the mold off early – that thin skin you see is just the surface setting, not the whole thing.
Pro tip: cover the mold with a cardboard lid or a piece of silicone. It keeps dust out and creates a slightly humid micro‑climate that can reduce surface crazing.
Temperature tricks
Room temperature matters. Keep the space between 70°F and 80°F (21‑27°C). If it’s cooler, the cure slows down and you might end up with a tacky finish. If it’s hotter, the resin can cure too fast, trapping bubbles and causing a cloudy look.
Got a chilly garage? Pop a small space heater nearby (but stay at least a foot away from the mold). If you’re in a hot kitchen, a fan can pull excess heat away.
Finishing steps – from dull to dazzling
Once the cure time is up, gently pop the piece out of the mold. You’ll probably see a faint film on the surface. That’s your cue for sanding.
Start with 400‑grit sandpaper, moving in light, circular motions. Then step up to 800‑grit, followed by 1500‑grit for a glass‑like smoothness. Don’t forget to sand the edges – a smooth edge feels far more professional than a rough bite.
After sanding, wipe away dust with a lint‑free cloth dampened with isopropyl alcohol. Now comes the polish: a few drops of resin polish or even a dab of clear nail polish on a soft cloth will give the piece that final shine. Buff in small circles until the light catches it like a tiny jewel.
Comparing resin types – which one fits your workflow?
Not all resins are created equal, and picking the right one can save you hours of frustration. Below is a quick side‑by‑side look at three popular options for beginners.
| Resin Type | Cure Time (hrs) | Clarity & Yellowing | Best For |
|---|---|---|---|
| Standard Clear Epoxy | 24‑48 (full cure) | High clarity, low yellowing for 1‑2 years | Everyday jewelry, beginners who want consistency |
| UV‑Cure Resin | Minutes (under UV lamp) | Crystal clear, virtually no yellowing | Fast‑turn projects, small charms, when speed matters |
| UV‑Resistant UV‑Stable Resin | 6‑12 (room temp) | Excellent UV resistance, stays clear for years | Outdoor pieces, keychains, items exposed to sunlight |
Standard clear epoxy is the workhorse – it’s forgiving, cheap, and gives you a decent working time (pot life) to embed flowers or glitter. UV‑cure resin shines when you need a quick turnaround; just pop the piece under a UV LED for a few seconds and it’s ready. The trade‑off is that you need a lamp and the pot life is almost non‑existent.
If you plan to sell pieces that might sit on a sunny windowsill, the UV‑stable formula is worth the extra cost. It resists that nasty yellowing that can turn a gorgeous amber pendant into a dated relic.
Quick finishing checklist
- Leave the piece to cure 24‑48 hrs at 70‑80°F.
- Cover the mold to keep dust away.
- Sand progressively: 400 → 800 → 1500 grit.
- Wipe with isopropyl alcohol.
- Apply polish or clear coat for shine.
- Store finished jewelry in a dust‑free pouch.
And there you have it – the final stretch that turns a gooey pour into a polished pendant you can actually wear. Experiment with the resin types above, note the cure times, and soon you’ll know exactly which formula matches your schedule and style.
Ready to give your next batch that flawless finish? Grab your chosen resin, set the timer, and let the curing process do the heavy lifting while you plan your next design.
Conclusion
We’ve walked through everything you need to start resin jewelry making for beginners, from gathering supplies to polishing the final piece.
If you ever felt stuck staring at that clear bottle, remember the simple rule: measure, warm, de‑air, pour, cure, then sand and shine.
That moment when the resin hardens and you see the tiny flower or glitter trapped inside—that’s the payoff for the patience you put in.
So, what’s next? Grab the starter kit you already have, set up a clean workspace, and try one quick pour today. Even a single pendant can teach you what works for your style and schedule.
Keep a quick notebook: resin amount, temperature, any tweaks. Those notes become your shortcut guide the next time you experiment with colors or new embeds.
And if you want to level up faster, CreativiU’s on‑demand courses walk you through advanced techniques, troubleshooting, and even how to turn your hobby into a small shop.
Bottom line: resin jewelry making for beginners is totally doable, and each finished piece is a step toward mastering the craft and maybe even building a brand.
Ready to pour, cure, and shine? Let’s get that next design out of your head and onto a piece you can wear.
FAQ
What basic supplies do I need for resin jewelry making for beginners?
First, grab a clear epoxy resin and the matching hardener – they usually come in a 1:1 ratio. You’ll also want a few silicone molds (pendant trays or earring molds work great), a digital kitchen scale or graduated cups for precise measuring, and a pair of nitrile gloves. Add a stir stick, a heat gun or torch for popping bubbles, and basic safety gear like goggles and a mask. Those items keep the process smooth and mess‑free.
How can I prevent bubbles from ruining my pieces?
Bubbles love to hide in resin, but a few simple tricks keep them at bay. Warm the resin bottle in warm (not hot) water for a couple of minutes – the lower viscosity lets bubbles rise easier. After you stir, tap the mixing cup lightly on the work surface to send larger bubbles to the top. Then give the surface a quick sweep with a heat gun or a kitchen torch; the heat thins the resin just enough for the bubbles to pop without scorching the mix.
How long does curing actually take, and can I speed it up?
Most clear epoxies need 4‑6 hours to become safe‑to‑handle, but they reach full strength after 24‑48 hours at room temperature (70‑80°F). If you’re in a cooler space, a small space heater nearby can gently raise the temperature and shorten the cure time. Just avoid overheating – too much heat can cause cloudiness or premature curing. For a quick‑turn project, UV‑cure resin is an option, but it requires a UV lamp and offers almost no pot life.
Can I reuse household items as molds, or do I need special silicone molds?
You can get creative with everyday objects, but silicone molds are the safest bet for beginners. They release the cured piece without damaging delicate details, and they’re easy to clean. If you try a muffin tin or a plastic ice‑cube tray, make sure it’s food‑grade and test a small batch first – some plastics can warp or stick when the resin cures, leading to frustrating break‑outs.
Is resin safe to use around kids, and what precautions should I take?
Resin itself isn’t toxic once fully cured, but the liquid mix releases fumes and can stick to skin. Keep the workspace well‑ventilated, wear nitrile gloves, goggles, and an optional mask, and store the bottles out of reach of children. If a child does get resin on their skin, wash it immediately with soap and water; save acetone for cleaning tools after they’re hardened. Supervision is key, especially during mixing and pouring.
What’s the best way to sand and polish a finished pendant?
Start with 400‑grit sandpaper to smooth any rough edges, then move up to 800‑grit and finish with 1500‑grit for a glass‑like surface. Wet‑sanding helps prevent dust and keeps the resin cool. After sanding, wipe the piece with a lint‑free cloth dampened with isopropyl alcohol to remove residue. Finish with a few drops of clear resin polish or even a dab of clear nail polish on a soft cloth, buffing in small circles until the light catches the shine.
How should I price my first resin jewelry pieces?
Start by adding up all material costs – resin, molds, embeds, safety gear – then factor in your time (most beginners spend about 1‑2 hours per piece). A common rule of thumb is to double the material cost to cover labor, then add a small margin for packaging and marketing. Keep an eye on what similar handmade pieces sell for on platforms like Etsy, but don’t undervalue the creativity and learning curve you’ve invested.
Leave a Reply