Polymer clay lets you turn a tiny lump of putty into a detailed figurine, a charm, or a tiny vase. The trick is knowing which steps matter most and where beginners usually slip. In this guide you’ll get a full online tutorial for making polymer clay miniatures, from the first tool you reach for to the final seal that keeps your piece looking fresh.
We’ll walk through six clear steps, add pro tips, and point out common pitfalls. By the end you’ll have a repeatable workflow you can use for any miniature project, plus links to free resources that boost your learning speed.
Step 1: Gather Materials and Tools
The first thing you need is a solid list of supplies. Too many crafters buy every shiny gadget they see, then wonder why the budget blows out. In reality, you only need a handful of reliable items to start.
Choose a polymer clay brand that stays flexible after baking. CreativiU’s beginner guide recommends several well‑known polymer clay brands for smooth handling and strong cured results.
Here’s what to add to your toolbox:
- Clay blocks in the colors you plan to use.
- Rolling pin or pasta‑machine rollers (the cheap acrylic rollers work fine).
- Basic shaping tools: a craft knife, a needle‑point stylus, and a small ruler.
- Surface protection: a silicone mat or a clean acrylic palette, plus cling film to keep the clay from sticking.
- A dedicated oven or a small countertop toaster oven that can hold a low, steady temperature.
- Air‑tight storage like zip‑lock bags (test a bag first for reactivity).
Don’t forget safety gear. A pair of kitchen‑type gloves and a well‑ventilated space keep fumes from bothering you while the clay bakes.
When you have everything laid out, set up a tidy work surface near good light. A kitchen counter or a sturdy table works, as long as the floor isn’t carpeted , clay can embed into carpet fibers and be hard to clean.
With the basics ready, you’re set to move on to conditioning.
Step 2: Condition and Prepare the Clay
Fresh polymer clay feels hard, almost like a block of wax. Conditioning warms it up, makes it pliable, and removes air bubbles that can cause cracking later.
Start by cutting a small slab about the size of a credit card. Knead it in your hands for 30‑60 seconds. The warmth of your palms and the gentle folding motion will soften the polymer particles.
If the slab still feels stiff, roll it through a pasta‑machine or an acrylic roller between two sheets of cling film. Go through the rollers a few times, flipping the slab each pass. This “stretch‑fold” routine aligns the polymer chains and gives the clay a buttery feel.
Keep an eye on the thickness. For most miniatures, a 2 mm sheet is ideal , thick enough to hold detail but thin enough to bake evenly.
Tip: If you notice tiny pin‑holes after rolling, lightly press a clean finger over the surface to seal them. Small imperfections often show up as tiny bubbles when the piece bakes.
Once conditioned, test the clay by pulling a thin strip and bending it. It should flex without cracking. If it snaps, give it another few minutes of kneading.
When the clay feels like soft putty, you can move on to shaping.
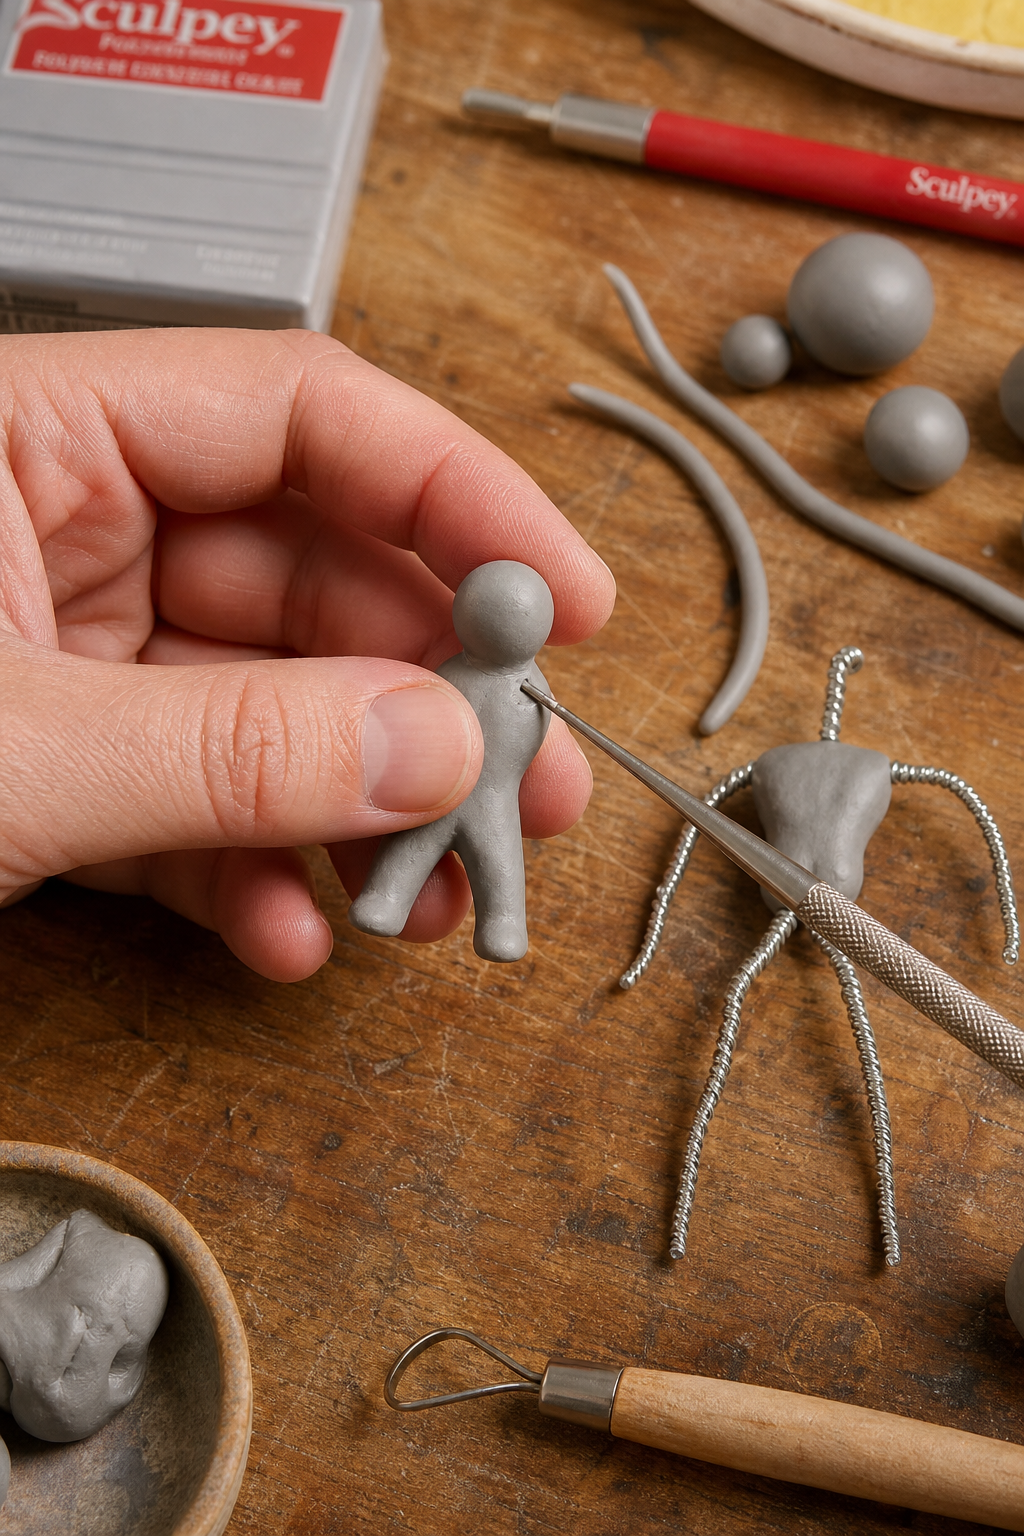
Step 3: Sculpt Basic Shapes and Forms
Basic forms are the skeleton of any miniature. Start with simple geometry , spheres, cylinders, and cones , then combine them to build more complex figures.
Roll a small ball for a head or a rounded body part. Use your thumb to gently press a dent where the neck will join. For limbs, roll thin snakes and coil them around a needle‑point stylus to create smooth arms or legs.
Attach pieces by scoring the contact areas with a needle‑point tool, then press the surfaces together. The scored lines act like a tiny “weld” that holds after baking.
Don’t forget the armature for larger pieces. A thin piece of aluminum foil or a wooden skewer gives extra support and prevents sagging while the clay cures.
Work in stages: build the core shape first, then add layers of detail later. This keeps the piece balanced and reduces the chance of over‑handling thin sections.
When you’re happy with the basic shape, set it aside on parchment paper. You’ll return later to add texture and fine details.
Once the basic form is solid, you can move on to adding texture that brings life to the miniature.
Step 4: Add Details and Texture
Details turn a simple shape into a character. Tools like texture rollers, lace, leaves, or even everyday objects can imprint patterns onto the clay surface.
Press a textured roller gently over the clay while it’s still soft. For a natural look, try a leaf or a piece of fabric with a subtle weave. The impression will stay after baking if you press with even pressure.
If you need fine lines, a needle‑point stylus works like a tiny chisel. Carve eyes, scales, or decorative grooves by scoring the surface and then smoothing the edges with a fingertip or a soft brush.
Adding small beads or mica glitter before baking creates an integrated sparkle. Knead a pinch of glitter into the clay, or roll a tiny bead over the surface and press it lightly into place.
When you add separate parts , like a tiny hat or a piece of jewelry , use a dab of cyanoacrylate glue after the piece is baked, or attach them with a little extra clay that you smooth into the seam.
After all details are in place, give the piece a light dusting of talc or cornstarch. This reduces stickiness and makes it easier to move the miniature onto the baking tray.
Now the piece is ready for the heat that locks everything in place.
Step 5: Bake and Cure the Miniatures
Baking is where polymer clay becomes hard, durable, and safe to handle. The key is temperature control and timing.
Pre‑heat your oven to 130 °C (266 °F). Use an oven thermometer , many home ovens run hotter or cooler than the dial shows. Place a piece of parchment paper on a metal baking tray and arrange your miniatures so they don’t touch each other.
Rule of thumb: bake 30 minutes for each ¼ inch of thickness. A thin charm (2 mm) needs about 15 minutes, while a thicker figurine (6 mm) needs about 45 minutes.
Do not open the oven door halfway through; each opening drops the temperature and can cause uneven curing. If you must check, peek quickly through the glass without reaching in.
After the timer dings, turn the oven off but leave the door slightly ajar for five minutes. This gradual cooling reduces the risk of cracking, much like letting a cake cool on the rack before slicing.
When the tray is cool enough to handle, move the pieces to a wire rack and let them sit until they reach room temperature. The clay will feel firm but still retain a slight flexibility, which is normal for polymer clay.
To verify that the bake was successful, press a fingernail into the underside of a test piece. If the surface feels solid and does not dent, the cure is complete.
Below is a quick reference table for common clay types and their recommended bake settings:
Once baked, you can move on to painting.
One final tip: keep a small “tester” piece of the same thickness as your project. Bake it first; if it looks right, you’re good to go with the full piece.
Step 6: Paint and Seal Your Creation
Painting lets you add color, shading, and highlights that bring depth to your miniature. You have two main options: paint before baking or after.
Silk‑screening on unbaked clay works well for a uniform background. Use acrylic paints because they wash off tools easily. Roll out a thin sheet of clay, press the screen onto it, squeegee the paint, then lift the screen. Let the paint dry before baking.
For fine details , eyes, veins, or tiny symbols , wait until the piece is baked. Acrylic paints adhere well to cured polymer clay. Start with a base coat, then add shadows using a diluted wash, and finish with highlights applied with a dry brush.
When painting, work in thin layers. Thick paint can crack as the clay expands and contracts with temperature changes. Allow each layer to dry fully before adding the next.
After the final paint layer dries, protect your work with a clear sealant. A gloss varnish or a specialized polymer‑clay glaze gives a shiny finish and shields the paint from wear.
Apply the sealant with a soft brush in light, even strokes. Let it cure according to the product directions , usually 30 minutes for a thin coat.
Here’s a quick checklist for a flawless paint job:
- Use only acrylic paints; oil‑based paints stay soft.
- Paint in a dust‑free area.
- Apply a matte or gloss sealant based on the look you want.
- Store finished pieces in a cool, dry place.
For a step-by-step project that applies these techniques, see the How to Make Polymer Clay Earrings tutorial.
With paint and seal in place, your miniature is ready to display, gift, or sell.
Frequently Asked Questions
Can I use a regular kitchen oven for polymer clay?
Yes, but you should avoid using a microwave. Polymer clay needs dry heat, and the kitchen oven can provide a steady temperature. Make sure the oven can hold 130 °C and use an oven thermometer to verify the setting. Also, keep the clay on a parchment‑lined tray to prevent sticking.
How do I know if my clay is fully cured?
After the bake, let the piece cool on a wire rack. Press a fingernail into the underside; if it feels solid and does not dent, the cure is complete. You can also bake a small tester piece of the same thickness to double‑check the timing.
Is it okay to mix different polymer clay brands?
Mixing brands works as long as both are polymer‑based and you condition the blend well. Some artists combine different brands to get a balance of softness and strength. Avoid mixing polymer clay with air‑dry clay, play‑dough, or plasticine because they have different curing mechanisms.
What tools are essential for adding texture?
A texture roller, a piece of lace, or even a leaf work great. Press the tool onto the clay while it’s still soft, then roll or press gently to imprint the pattern. For fine lines, a needle‑point stylus or a craft knife can carve details that will stay crisp after baking.
Can I bake polymer clay in an air fryer?
Yes, an air fryer can serve as a compact oven. Pre‑heat it to 130 °C, place the clay on a piece of parchment, and bake for about half the time you’d use in a traditional oven , usually 15 minutes for a thin piece. Keep an eye on the temperature, as air fryers can run hotter.
How do I store leftover clay?
Wrap the leftover pieces in a non‑reactive zip‑lock bag and store them in a cool, dark place. Test the bag first by placing a small piece of clay inside for a week; if the plastic stays clear, it’s safe to use. This method keeps the clay from drying out for months.
Do I need a special sealant for painted miniatures?
A clear acrylic varnish works well for most projects. If you want extra shine, a glossy glaze provides a glass‑like finish. Apply in thin coats and let each layer cure fully before adding another.
Where can I find community support while learning?
CreativiU offers a live community forum, one‑on‑one feedback, and a free trial that lets you ask questions, share progress, and get personalized tips from experienced artists. This support is unique compared with generic video platforms.
Conclusion
Putting together a polymer‑clay miniature is a blend of planning, careful handling, and a bit of heat. By gathering the right tools, conditioning the clay, sculpting solid forms, adding texture, baking with precision, and finishing with paint and seal, you can create pieces that look professional and last for years.
If you want a learning path that includes video lessons, printable checklists, and a supportive community, the CreativiU platform stands out as the only option that offers all three: a structured curriculum, a live forum, and personalized feedback. Start with the free trial, follow the steps above, and soon you’ll have a collection of tiny works you can be proud of.
Leave a Reply