Picture this: you’re standing at the kitchen counter, a fresh block of soy wax glinting under the light, and the scent of your favorite essential oil waiting to fill the room.
Does that feeling of possibility ever make you smile and wonder, “Can I really pull this off without a fancy studio?” Absolutely—you can. In this intro we’ll walk through why learning how to make soy wax candles at home is one of the most rewarding DIY projects you can start right now.
First, there’s something oddly calming about watching solid flakes melt into a buttery liquid. It’s the same kind of slow, satisfying transformation that many of our CreativiU members talk about when they move from sketching to sculpting. The process doesn’t demand a million tools; just a few kitchen staples, a reliable thermometer, and a pinch of curiosity.
And if you’re a creative entrepreneur eyeing a new product line, think about the edge a hand‑crafted candle gives your brand. A custom scent can become a signature, a talking point that turns casual buyers into repeat customers.
Parents, you’ll love this too. It’s a hands‑on activity that teaches kids about measurement, safety, and the joy of seeing something they made light up a room. Plus, the finished candle makes a perfect, personal gift for birthdays or holidays.
So, what’s the first step? Gather your soy wax flakes, choose a fragrance that speaks to you—maybe lavender for calm evenings or citrus for a bright morning—and get your double‑boiler set up. The magic happens when you keep the wax at the right temperature, usually around 185 °F, then let it cool just enough before you stir in the oil.
We’ve seen beginners skip the “fragrance window” and end up with a weak scent throw. Trust the temperature dance; it’s the secret sauce that lets the oil bind properly and gives your candle a strong, lasting aroma.
Ready to dive deeper? Stick with us, and we’ll guide you through each stage—from measuring and melting to pouring and curing—so you’ll finish with a candle that looks professional and smells exactly how you imagined.
TL;DR
Learn how to make soy wax candles at home with a quick, step‑by‑step roadmap that covers everything from gathering supplies to mastering temperature and pouring for a clean, long‑lasting scent throw. Whether you’re a hobbyist, a budding entrepreneur, or a parent crafting with kids, the guide gives you actionable tips and confidence to create professional‑grade candles without a studio.
Step 1: Gather Materials and Safety Gear
You’re here because you want to start strong when you learn how to make soy wax candles at home. The first step isn’t fancy techniques; it’s gathering the right materials and safety gear so your workspace feels calm, not chaotic. In our experience at CreativiU, a simple, well-stocked station makes the rest feel almost easy.
Let’s break it down into two parts: what you need to have and what handy safety gear will save you a headache later.
Core ingredients you can’t skip
Start with soy wax flakes, glass jars that can handle a gentle heat, cotton wicks sized for your containers, and a fragrance or essential oil you actually love. You don’t need a full studio to begin—just the basics that let you practice melting, mixing, and pouring with confidence. If you want a tested baseline, a 1-lb wax block is plenty for a few trial jars and a quick learning loop.
Beyond the wax and jars, think about where your scent will come from. A reliable fragrance oil or a pure essential oil blend gives you the aroma you’re chasing. And because this journey is as much about process as result, keep a spare thermometer and a small scale so you can track melt temps and fragrance load with accuracy.
For a sense of how related crafts can inspire your setup, check out this primer on bead-focused decor and this lavender-soap guide for complementary ideas—they remind us that cohesive, handmade products often pair well with candles. How to Make Soy Candles at Home: A Step‑by‑Step Guide remains a solid reference for mastering temps and ratios as you start.
Tools that make the process smoother
Use a dip-safe pouring pitcher, a digital thermometer (preferably with a narrow reading range for accuracy), a scale that measures to the gram, and sturdy stirring sticks. These tools keep your temperature in check and help you avoid the common pitfall of oils burning off when you pour too hot.
Log your numbers as you go—melting temp, fragrance load, pour temp. This isn’t about perfectionism; it’s about building a repeatable formula you can rely on. And yes, this is exactly the kind of structured practice CreativiU members love because it scales into projects and small-batch launches.
Safety gear that’s worth it
Safety first helps you stay in the craft mood longer. Wear heat-resistant gloves, safety glasses, and an apron or old shirt. Keep your workspace well-ventilated and clear of distractions. A spill mat or silicone mat under your jars is a tiny investment that pays dividends in clean, stress-free sessions.
Now, a quick moment to reset: does this setup feel doable right away, or is there a gadget you’re unsure about? It’s totally normal to feel a little overwhelmed at first, but remember, you’re building a routine that grows with you and your creativity.
To keep things moving, here’s a quick visual cue: place your jars in a shallow tray, set the wax pot on a stable surface, and keep your fragrance ready to measure. If you’re curious how a more advanced setup might look, the Candles for Beginners guide on CreativiU walks you through the progression from 1-lb batches to larger runs.
And because we love a quick demo, here’s a short video that shows the exact order to line up your station before you melt a batch.
Remember, 2026 is the year to start small and improve intentionally. The goal isn’t perfection on day one; it’s consistency you can build on week after week.
Step 2: Melt the Soy Wax Properly (Video Demonstration)
Now that your station is set, it’s time to turn those solid flakes into a smooth, pour‑ready pool. This is the part where temperature becomes your best friend, and a little patience makes the difference between a flawless candle and a sticky mess.
First, fire up your double‑boiler. If you’re using a pot‑and‑bowl combo, fill the bottom pot with about two inches of water, bring it to a gentle simmer, and then place your heat‑proof pitcher or metal bowl on top. You’ll hear a soft hiss— that’s the sweet spot. Anything louder means you’re boiling, and the wax could scorch.
Drop the soy wax flakes into the top vessel. Give them a quick stir with a silicone spatula just to break up any clumps. As the flakes melt, they’ll change from a powdery snow‑flake look to a clear, buttery liquid. This visual cue is why we love the melt; it’s almost therapeutic.
Here’s the crucial part: watch the thermometer like a hawk. Aim for 185 °F (≈85 °C). That temperature fully liquefies the soy without burning off the delicate aromatic compounds you’ll add later. If you’re using a digital instant‑read probe, it should stay within a 5‑degree window; if it spikes above 190 °F, pull the pot off the heat and let it settle.
Why 185 °F? At this range the wax molecules are loose enough to accept fragrance, yet stable enough to avoid scorching. In our experience, staying in this band gives a strong scent throw and a smooth surface once the candle sets.
Once the wax hits 185 °F, remove the top pot from the simmering water. Let it sit for about 30 seconds— this tiny pause prevents the water‑steam from raising the temperature again. If you’re planning to add essential oils, now’s the moment to check the next temperature window: most essential oils have a flash point around 150‑160 °F, so you’ll want the wax to cool to roughly 160 °F before you stir them in.
If you’re not ready for the fragrance yet, you can keep the wax at a safe holding temperature (around 170 °F) while you gather your scent blends. A quick tip: wrap the top pot in a thin kitchen towel; it acts as a gentle insulator and keeps the wax from cooling too fast.
Before you move on, run a quick visual test. Dip a small spoon into the wax and let a droplet sit on a piece of parchment paper. It should spread smoothly without beading. If you see a greasy film, the wax is still a bit too hot— give it another minute.
Now, let’s talk about stirring. A slow, circular motion for about 45 seconds helps any remaining solid bits dissolve and creates a uniform temperature throughout the batch. Avoid vigorous whisking; you don’t want to introduce bubbles that could later turn into surface craters.
Safety check time: wear heat‑resistant gloves and safety glasses. Even a tiny splash can cause a burn, and wax can splatter if the water boils too hard. Keep a kitchen towel nearby to blot any accidental drips.
When the wax finally settles at 160‑165 °F, you’re ready for the fragrance window. For a deeper dive into exact temperature timing, check our detailed melt temperature guide.
A quick checklist before you pour:
– Wax at 160‑165 °F (fragrance window)
– Thermometer calibrated
– Wick centered and secured
– Pouring pitcher or funnel ready
– Workspace covered with a silicone mat
With those steps done, you’ll have a clear, buttery liquid that’s primed for scent and color. The next step will walk you through adding essential oils and getting that perfect pour, but for now, enjoy the calm glow of a perfectly melted soy wax batch.
Step 3: Add Fragrance and Color
Now the wax is sitting at that buttery 155‑165 °F window and you’re probably thinking, “Do I just dump the oil in and call it a day?” Spoiler: a little finesse here makes the difference between a candle that whispers and one that shouts.
Measure before you pour
Grab your digital scale and weigh the essential or fragrance oil. Most of our CreativiU members start with a 6‑10 % fragrance load – that’s roughly 0.9 oz of oil for a 1‑lb batch of soy wax. If you’re working in grams, multiply the wax weight by 0.06‑0.10. For example, 400 g of wax at 7 % gives you 28 g of oil.
Tip: use a small glass measuring cup, tare the scale to zero, then add the oil drop‑by‑drop. A steady drizzle helps the oil disperse instead of forming a greasy puddle.
Temperature matters
Pure essential oils have lower flash points than synthetic fragrance oils, so you’ll want the wax a bit cooler before you stir anything in. Aim for 150‑155 °F (65‑68 °C) for most essential oils – that’s comfortably below the typical flash point of 150‑165 °F, which prevents any volatile top notes from evaporating.
If you’re using a fragrance oil that can handle a hotter wax, you can add it at 165‑170 °F. The All Seasons Wax guide recommends adding fragrance once the wax cools to around 60 °C (140 °F) for very viscous scents, but most hobbyists find the 150‑155 °F sweet spot works great.
Stirring rhythm
Start with a slow, clockwise stir for about 30 seconds – just enough to wet the wax. Then pause for a few seconds, let the mixture settle, and give it another gentle swirl. This tiny break lets the oil molecules nestle into the wax crystals, boosting scent‑throw later on. Some of our community members even switch tools mid‑stir – silicone spatula first, then a bamboo stick – just to keep the motion feeling fresh.
Don’t over‑mix. Once the oil is fully incorporated (you’ll see a uniform sheen), stop. Over‑stirring can introduce air bubbles that later appear as tiny speckles on the surface.
Adding color
If you want a pop of hue, now’s the time. Liquid dye works best when added while the wax is still a little warm (around 165 °F). Add a few drops, stir gently, and watch the colour melt in like a watercolor. For solid dye chips, sprinkle them in and give a brief stir until they dissolve completely. Remember, the hotter the wax after adding colour, the higher the chance of slight fading once it cools.
Pro tip: test a tiny dab on a piece of white cardstock. If the colour looks too pale, add another drop of dye; if it’s too intense, dilute with a splash of melted wax.
Real‑world examples
One of our CreativiU hobbyists, Maya, loves a lavender‑vanilla blend for bedtime candles. She measures 350 g of soy wax, adds 21 g of lavender essential oil (6 % load) at 152 °F, then a teaspoon of vanilla fragrance oil (still within the 6‑10 % range) a minute later. She finishes with a few drops of pink liquid dye, giving the candle a soft blush that looks lovely on a nightstand.
Another entrepreneur, Alex, runs a small home‑based line. He uses a 7 % load of citrus essential oil for a fresh kitchen scent. Because citrus oils have a lower flash point, he lets the wax drop to 148 °F before adding the oil, then pours at 135 °F to avoid any surface “skin.” The result? A clean, bright candle that sells out in weeks.
Quick checklist before you pour
- Wax temperature: 150‑155 °F for essential oils, 165‑170 °F for fragrance oils.
- Fragrance load: 6‑10 % of wax weight, measured precisely.
- Stir: two gentle swirls with a short pause.
- Color added: after oil, while wax is still warm.
- Final temp check: 135‑140 °F before pouring.
When everything looks good, you’re ready for the pour. If you’re curious about the next steps, you can always hop back to our How to Make Soy Wax Candles with Essential Oils – A Step‑By‑Step Guide for a quick refresher.
And hey, while you’re waiting for the wax to set, why not sketch a label or design a custom candle wrap? A quick doodle can turn a simple jar into a gift‑worthy piece. Need a primer on sketching? Check out How to Draw with Graphite Pencils: A Step‑by‑Step Guide for some easy techniques.
Step 4: Pour the Wax and Set the Candle
Let’s get to the moment you’ve been waiting for. Pouring isn’t just dumping liquid into a jar; it’s the moment your candle finally begins to live in your space.
First, set up for success. Center the wick and make sure it’s straight. If you have a wick holder, pop it in. If not, a pencil laid across the top will do in a pinch. You want the wick perfectly vertical as the wax flows in, or you’ll get a crooked melt pool and a wobbly surface.
Now, pour with intention. Start in the center and slow down as the wax glides to the edges. A steady, controlled pour minimizes air bubbles and avoids creating a thin skin on top. Think of it like laying a glaze on pottery—steady hands, gentle patience.
Does this really work? Yes. A clean pour sets the stage for a smooth top and even burn. If you rush, you’ll see dimples, waves, or tiny craters that look, frankly, amateur. You want glassy perfection, not a rustic texture you’ll want to sand away later.
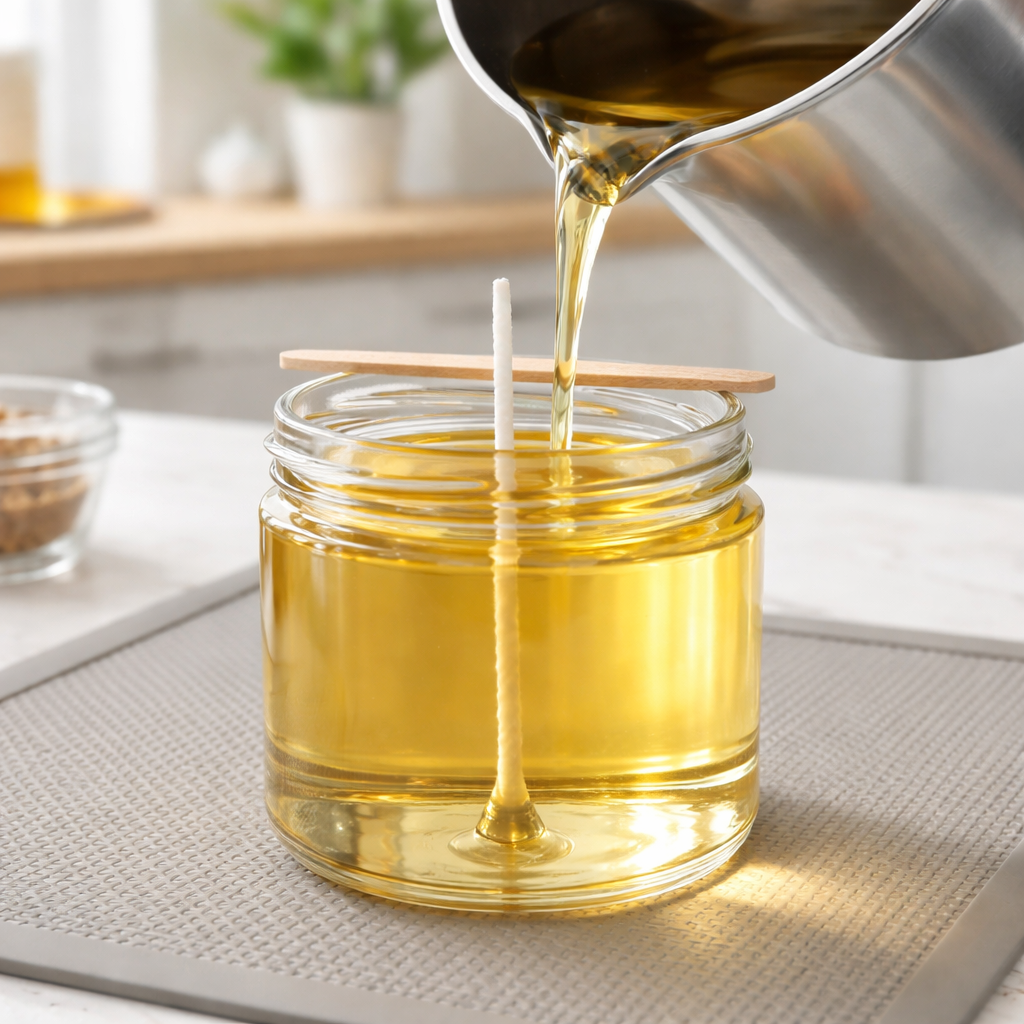
Okay, the surface is glossy, and the candle is beginning to take shape. Don’t move it yet. Let it sit and cool slowly. The wax contracts as it sets, so you might notice a tiny dip at the center or a slight rim around the lip. That’s normal; you can gently smooth it once it firms up a bit with a clean fingertip or a heat-safe tool.
Wick maintenance is next. Once the surface has set but before it fully hardens, trim the wick to about 1/4 inch. A shorter wick reduces the risk of a high flame and helps prevent tunneling on the first burn.
Now comes the long game: curing. Leave the candle undisturbed for 24 to 48 hours; many of our CreativiU community members swear by 72 hours for heavier blends. During this time, the fragrance molecules bond with the wax, delivering a stronger scent throw when you light it. It’s worth the wait, trust me.
One more tip from our community: jot down the batch details—jar size, wax weight, pour temperature, cure time. That simple log makes repeat batches feel almost automatic. If you want a deeper dive into the pouring process, check out this in‑depth guide from our learning library: How to Make Soy Wax Candles with Essential Oils – Step‑By‑Step Guide.
Alright, you’ve poured, waited, and trimmed. The last bit is storing and testing. Keep the candle in a cool, dark spot while it cures, and resist the urge to light it too early. A well‑cured candle not only smells stronger, it burns cleaner and longer—a small but mighty difference you’ll notice every time you light it.
Step 5: Finishing Touches & Troubleshooting
So you’ve done the hard part—the pour is set, the scent is settling, and you’re looking at a surface that’s almost there. Finishing touches are where your candle graduates from homemade to pro-grade. It’s not flashy, but it matters.
First things first: inspect the top. Is it smooth and even, or do you see tiny dimples, cracks, or a slight sink? If you spot a rough patch, don’t panic. A light pass with a low-heat heat gun or a fresh thin pour can smooth the surface without compromising the cure. The key is to be patient and gentle—think of it as polishing glass, not chiseling stone.
Next, confirm the wick is centered and trimmed. A drifted wick during curing will burn unevenly or tunnel. If needed, recenter with a wick holder and trim to about a quarter inch once the surface looks stable. You’ll thank yourself later when you light it for the first time and see a clean, even melt pool.
Patience here pays off. Most soy candles benefit from 24–72 hours of curing before the first burn. The longer you wait (within reason), the stronger the scent throw tends to be. Keep the jar in a cool, dry spot away from direct sun and drafts. It’s not glamorous, but it’s science—and it works.
Stubborn imperfections? A quick re-pour can fix minor issues. If you spot a small sinkhole or edge unevenness after cooling, melt a thin layer of wax and gently top it off to smooth things out. It’s a small trick that beginners use all the time to get a flawless finish.
Beyond the surface, think about labeling, packaging, and presentation—those little details create the perceived quality your customers notice. If you want a deeper dive into scent blends and troubleshooting, this guide from CreativiU offers practical steps you can apply right away: How to Make Soy Candles with Essential Oils: Step-by-Step Guide.
Quick-running checklist for finishing touches
- Wick centered and trimmed to 1/4 inch
- Top surface smooth; re-pour if needed
- Candle cured 24–72 hours before lighting
- Container preheated or cooled evenly to avoid pull-away
- Label and wrap ready for gifting or sale
Troubleshooting at a glance
| Issue | Root Cause | Fix |
|---|---|---|
| Surface cracks or dimples | Air bubbles or rapid cooling | Re-melt a thin layer and re-smooth; pour at a stable temp (135–140°F) |
| Uneven burn or tunneling | Wrong wick size or off-center wick | Recenter; trim wick to 1/4 inch; consider a wick size up or down for future batches |
| Sink holes at top after set | Uneven cooling or too hot pour | Cool surface gradually; re-pour a small cap of wax to even it out |
With these finishing touches and a few troubleshooting habits, you’ll reduce surprising flaws and boost consistency. Remember, every batch teaches you something, and practice turns good candles into reliably great ones. You’re almost there—a careful finish makes the glow feel intentional, not accidental.
Creative Ideas and Seasonal Variations
Ever stared at a plain jar and thought, “What if this could feel like a fresh spring morning?” You’re not alone – the magic of soy candles is that a simple tweak can turn a basic candle into a seasonal story.
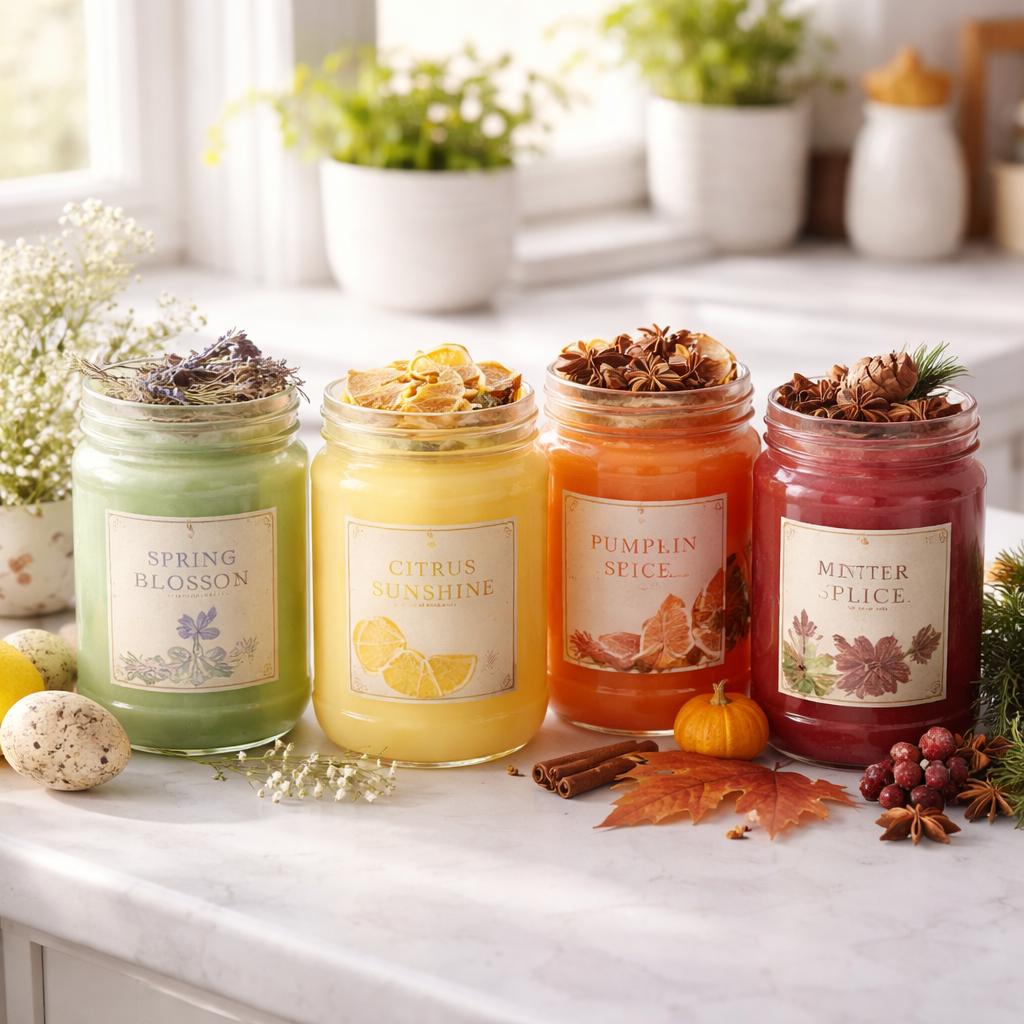
We like to start with the season’s mood. Spring is all about bright, uplifting aromas. Try a blend of citrus zest, a splash of spearmint, and a whisper of floral geranium. Pour the wax at the usual 135‑140°F, then let the candle cure for 48 hours; the scent will bloom like the first buds outside your window.
Summer calls for breezy, refreshing notes. Think tropical pineapple, a hint of coconut, and a dash of eucalyptus. Adding a few dried lavender buds around the wick not only looks pretty but also releases a subtle aroma as the candle burns.
When autumn rolls in, cozy up with warm spices. Mix cinnamon, clove, and a touch of vanilla bean. Swirl in a tiny pinch of pumpkin‑spice colored dye for that perfect amber hue. The result feels like a crisp walk through falling leaves.
Winter? Go for deep, comforting scents like frankincense, cedarwood, and a drop of sweet orange. Embedding a small sprig of pine or a tiny crystal (nothing too pricey) adds visual intrigue and a hint of holiday cheer.
DIY decorative twists
Beyond scent, you can play with texture. Try embedding dried rose petals for a romantic vibe, or sprinkle biodegradable glitter for a subtle sparkle that catches the flame. For a professional‑looking finish, lightly mist the top with a touch of isopropyl alcohol after the surface sets – it smooths tiny ripples without affecting the scent.
Parents love turning candle‑making into a family project. Let kids choose a colour, drop in a few herb petals, and watch the wax swirl. It’s a quiet, hands‑on activity that teaches measurement and patience while creating a keepsake for the night‑stand.
If you’re looking for more inspiration, our detailed soy wax candle guide walks you through advanced blending techniques and seasonal variations step by step.
Conclusion
You’ve walked through every step of how to make soy wax candles at home, from gathering tools to the final cure.
So, what’s the biggest takeaway? Temperature is your secret weapon – keep the melt around 185 °F, drop to the 155‑165 °F fragrance window, and pour at 130‑140 °F for a smooth surface.
And remember the little details that make a big difference: center the wick, trim it to a quarter‑inch, and let the candle cure for at least 24 hours before the first light.
For hobbyists, those tiny experiments – swapping a drop of citrus for a hint of vanilla – turn a simple jar into a personal signature.
Creative entrepreneurs, think of each batch as a mini‑product line. Consistent measurements, a clean finish, and a strong scent throw are the ingredients that turn a craft into a marketable item.
Parents, involving kids in measuring and stirring turns the process into a hands‑on lesson in safety, math, and patience.
Got a question or want to dive deeper? Our community at CreativiU is always sharing tips, troubleshooting tricks, and new scent ideas – just hop into the forums and keep the glow going.
Now, light that first candle, breathe in the aroma you created, and let the confidence you’ve built spark the next project.
FAQ
What’s the ideal melt temperature for soy wax when making candles at home?
In our experience, aim for around 185°F (85°C) to fully melt the wax without scorching it. Keep a steady simmer, then pull the pot off the heat and let the wax rest a minute. This helps avoid hot spots that can unevenly bind fragrance. If you’re adding fragrance, drop to the fragrance window (roughly 155–165°F) before stirring in the oils. This two–step dance keeps surface smooth and scent true.
So, what should you do next? Wait for the wax to cool slightly, then measure your fragrance and stir gently. This small pause matters as much as the heat you used to melt it.
How should I calculate fragrance load for a beginner batch?
Most hobbyists start with 6–10% fragrance by weight. For a 1 lb (454 g) batch, that’s roughly 0.9–1.0 oz (25–28 g) of oil. Use a scale and tare the jar, then add oil drop‑by‑drop to monitor strength. If the candle cures and smells faint, increase in small increments on your next batch. Always test one small sample first to avoid waste.
Can I use essential oils safely in place of fragrance oils?
Yes, you can, but be mindful of flash points and scent strength. Essential oils are potent and can evaporate if the wax is too hot. Keep the wax around 150–155°F when adding them to avoid losing aroma. Use a small blend and increase slowly after testing. If a scent throws poorly, switch to a fragrance oil or mix a small percentage of essential oils with a compatible blend.
What are the most common surface issues and fixes?
Cracks, dimples, or a rough top usually mean uneven cooling, air bubbles, or over‑pouring. Fix by re‑melting a thin top layer and smoothing with a warm tool. Ensure the wick is centered and the pour finishes within the right temperature range. For stubborn dimples, re‑pour a thin cap after the surface cures for a day or two. Patience and proper curing (24–72 hours) help the finish settle.
How long should candles cure before lighting?
Most cure for 24–72 hours, sometimes up to a week for dense blends. Curing lets fragrance molecules bond with wax, producing stronger scent throw. Store in a cool, dry place away from direct sun. If you’re in a hurry, you can test a small sample after 24 hours, but patience pays off in a more even burn. Keep the wick trimmed and the container free from drafts during cure.
What tools should hobbyists invest in, and does CreativiU offer anything helpful?
Invest in a digital thermometer, a sturdy pour funnel, a precision scale, heat‑resistant gloves, and a clean workspace. A dedicated double boiler or reliable microwave‑safe setup helps, too. For learning and optimization, CreativiU offers in‑depth courses on candle making, scent blending, and scaling from hobbyist to small business. Our community sharing tips, troubleshooting, and project feedback can help you refine blends and finish.
Leave a Reply