Ever walked into a room and felt instantly calm because of a gentle, natural scent, and thought, ‘I could make that myself’?
If you’ve ever dreamed of turning a simple soy wax block into a fragrant masterpiece, you’re in the right place.
In this guide we’ll walk through every step of how to make soy wax candles with essential oils, from choosing the perfect oil to the final pour.
Why soy wax? It burns cleaner, lasts longer, and pairs beautifully with the subtle nuances of plant‑based essential oils—no harsh chemicals, just pure aroma.
And because we’re all about making creativity approachable, we’ll keep the science simple: think of the wax as a buttery canvas, and the essential oil as your paint.
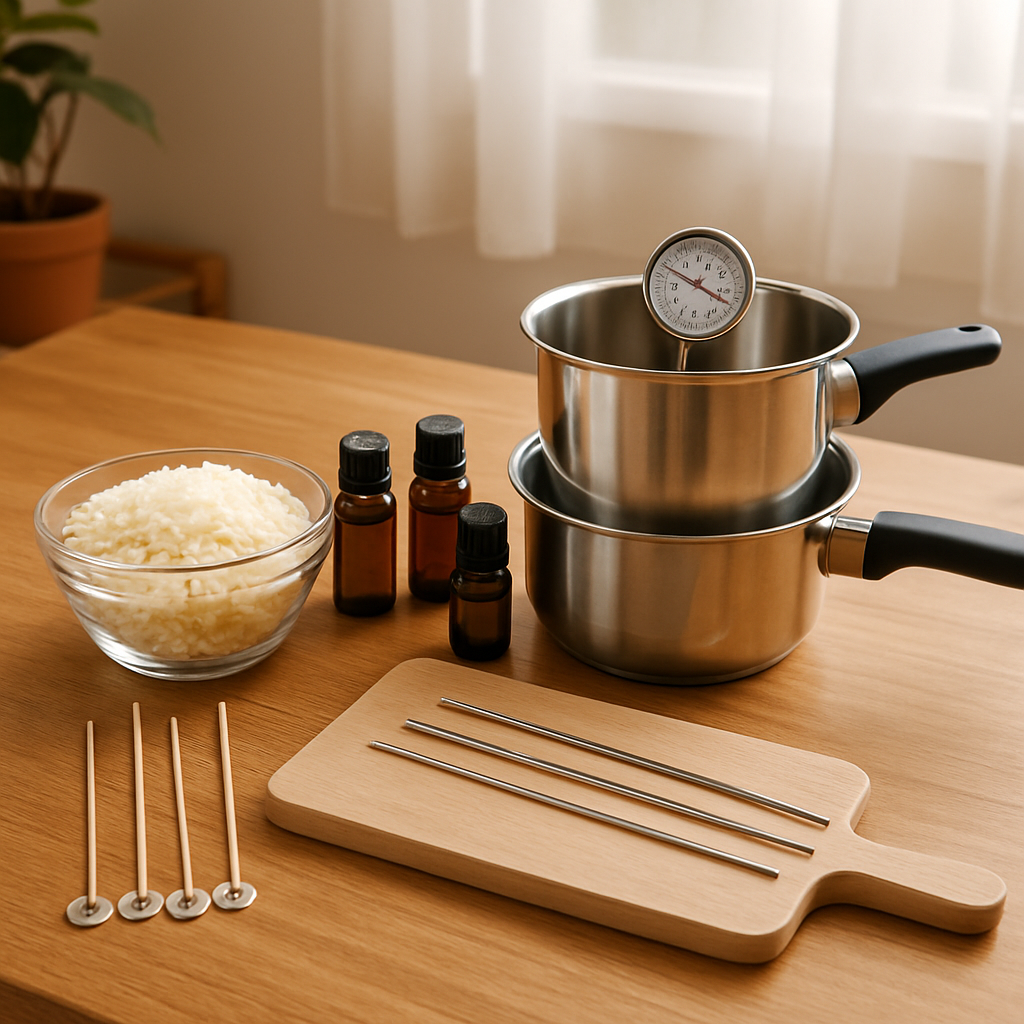
First, gather your tools: a double‑boiler or microwave‑safe pitcher, a thermometer, sturdy stirrers, and, of course, high‑quality soy wax flakes.
Next, pick an essential oil that speaks to you—lavender for relaxation, citrus for a burst of energy, or eucalyptus when you need clarity.
Here’s where the magic happens: melt the wax to about 185 °F, then let it cool just enough so the temperature sits around 135 °F before you stir in the oil.
Timing matters because adding the oil too hot burns off those delicate aromatic compounds; too cool and the scent never fully bonds.
Once mixed, pour the liquid into a pre‑warmed jar, let it set undisturbed, and resist the urge to move it—patience rewards a smooth surface and strong scent throw.
Need a quick visual reminder of the whole process? Check out our Candle Making for Beginners at Home: A Simple Step-by-Step Guide that walks you through each stage with photos and tips.
By the end of this article you’ll be confident enough to experiment with blends, create personalized gifts, and maybe even start a small home‑based line of natural candles.
TL;DR
If you’ve ever wondered how to make soy wax candles with essential oils, this guide walks you through every step—from gathering tools and choosing fragrances to mastering melt temperatures and achieving a clean, long‑lasting scent throw. By the end you’ll feel confident enough to experiment with blends, create personalized gifts, and even launch a small home‑based candle line, all while enjoying a calming, DIY crafting experience.
Step 1: Gather Materials and Tools
Alright, let’s start with the basics – the stuff you’ll actually hold in your hands before any wax even melts. It feels a bit like prepping for a camping trip, except the only wildlife you’ll meet are the aromas you choose.
Core ingredients you can’t skip
First up, soy wax flakes. Go for a high‑quality, 100% soy blend – it gives a clean burn and holds fragrance better than the cheap “soy blend” you might find in a discount store. One cup of flakes usually covers a medium‑sized jar, but you’ll quickly learn the sweet spot for your own vessels.
Next, essential oils. They’re the stars of the show, but remember they’re super concentrated. Pick oils that are safe for candle use and have a decent flash point – lemongrass, cedarwood, or sweet orange are popular choices. Essential oil stability research warns that many oils start breaking down above 80 °F, so temperature control matters.
Tools that make the process smooth
A double‑boiler or a microwave‑safe pitcher works fine. If you’re using a double‑boiler, fill the bottom pot with water, bring it to a gentle simmer, and place the wax in the top pot. The water bath keeps the wax from scorching.
Thermometer is non‑negotiable. You’ll be juggling two temperature windows: melt the wax around 185 °F, then let it cool to roughly 135 °F before adding the oils. A digital instant‑read stick thermometer is cheap and accurate.
Stirring sticks – think stainless steel or bamboo. You’ll want something that won’t melt or leach flavors. A silicone spatula works too, especially if you’re stirring in small oil droplets.
Safety gear you’ll thank yourself for
It’s easy to forget, but a pair of heat‑resistant gloves and safety glasses keep splatters from turning into a mini‑fire‑drill. And a well‑ventilated space? Absolutely. Essential oils can be potent, and a little fresh air goes a long way.
Do you have a dedicated work surface? A silicone mat or a tray catches any drips and protects your countertops. It also gives you a clean visual cue for when the wax is ready to pour.
Optional but helpful extras
A scale that measures to 0.01 oz helps you keep oil ratios spot‑on – most recipes call for about 6‑10 % oil by weight. If you’re feeling fancy, a small funnel or a silicone pouring pitcher reduces spills when you transfer the wax into jars.
And because we love a visual cue, here’s a quick video that walks you through setting up your double‑boiler and getting that perfect melt temperature:
While the video plays, you might notice the gentle simmer under the pot – that’s the sweet spot. No raging boil, just a quiet hiss that keeps the wax from overheating.
Now, let’s pause and imagine the moment you scoop that warm, fragrant wax into a pretty jar. The scent is still subtle, but you can already picture the calming glow on a rainy evening. Does that mental picture feel rewarding? It should – that’s the payoff for gathering the right tools.
Before you move on to melting, do a quick checklist:
- Soy wax flakes – measured and ready
- Essential oils – chosen, stored in dark glass
- Double‑boiler or microwave pitcher
- Thermometer (digital preferred)
- Stirring sticks or silicone spatula
- Heat‑resistant gloves and safety glasses
- Scale for precise oil measurement
- Silicone mat or tray for spills
If everything’s checked, you’re set. The next step is all about mastering temperature, but that’s a story for the following section.
One last tip: label each bottle of essential oil with the date you opened it. Oils oxidize over time, and using fresh oil keeps your candle’s aroma true to what you intended.
Step 2: Melt and Prepare Soy Wax
Alright, the wax is measured, the oils are chosen, and the double‑boiler is waiting. This is the part where patience becomes your best friend.
Getting the water bath just right
Fill the bottom pot with a couple of inches of water and bring it to a gentle simmer – not a rolling boil. You’ll hear a soft hiss, and that’s the sweet spot. If the water starts shouting, lower the heat. The goal is a steady, low‑level bubble that keeps the wax from scorching.
Place your soy wax flakes in the top pot. As they melt, give them a gentle stir every now and then with a silicone spatula. You’ll notice the flakes turning from a powdery snow‑flake into a clear, buttery liquid.
Watch the thermometer like a hawk
Temperature is the invisible hand guiding the whole process. For most soy waxes, you’ll want to heat up to about 185 °F (≈85 °C). That’s hot enough to fully liquefy the wax but not so hot that you start burning off the subtle notes of your essential oils later.
Here’s a quick mental checklist:
- Water simmering, not boiling
- Wax fully melted, no solid chunks
- Thermometer reading 185 °F ± 5 °F
Got it? Great. If you’re curious why that range matters, timing and temperature are crucial when making soy candles – the right heat lets the wax bind with fragrance without vaporizing those precious aromatic compounds.
Cooling to the fragrance window
Now comes the subtle art of timing. Pull the top pot off the heat and let the wax settle. You’re aiming for the “fragrance window,” usually between 155 °F and 165 °F for soy wax. That’s the sweet spot where the wax is fluid enough to hold the oil, but cool enough that the oil’s delicate molecules stay intact.
Think of it like a dance: you don’t want to lead too fast or too slow. If you add the oil while the wax is still sizzling at 185 °F, you risk burning off top notes. Drop it in when it’s cooler, and the scent will lock in nicely.
Stirring in the essential oils
Measure your essential oil using a scale – 6‑10 % of the wax weight is a good rule of thumb. Slowly drizzle the oil into the wax while you stir gently in a circular motion. This helps the oil disperse evenly, avoiding those pesky pockets of strong scent that can cause tunneling later.
Pro tip: let the mixture sit for a minute after the first stir, then give it another gentle swirl. That tiny pause lets the oil and wax marry properly.
Optional: Adding color or extra goodies
If you want a splash of hue, now’s the moment. Add liquid dye or color chips when the wax is fully melted (around 175 °F‑185 °F) and stir until the color is uniform. Just remember, the more you heat after adding color, the higher the chance of slight discoloration.
Some crafters toss in a pinch of dried herbs or glitter at this stage. If you do, keep the stirring gentle – you don’t want the glitter to clump.
Final temperature check before pouring
Before you pour, let the wax cool to its optimal pouring range: 120 °F‑140 °F. This range prevents surface cracks and ensures a smooth top when the candle sets.
Take a quick dip of a finger (just a quick test, not a full‑hand dunk) or glance at the thermometer. If it’s in the sweet zone, you’re ready to pour.
And there you have it – melted, scented, and pre‑pped soy wax, sitting perfectly poised for a beautiful pour. The next step will walk you through that final transfer, but for now, enjoy the warm glow of a job well done.
Step 3: Add Essential Oils & Customize Scent
Now the wax is sitting at that sweet 135‑140 °F window, and you’re probably wondering, “Do I just dump the oil in?” Spoiler: you can, but a little finesse makes the difference between a candle that whispers and one that shouts.
Measure, then pour
Grab your digital scale and weigh the essential oil. Most crafters aim for 6‑10 % of the wax weight – that means about 1.5 oz of oil for a 24‑oz batch of soy. CandleScience’s step‑by‑step guide recommends 6 % as a safe starting point for beginners.
Tip: use a small glass measuring cup, tare the scale to zero, then tip the oil in slowly. A steady drizzle helps the oil disperse instead of forming a greasy layer.
Stirring rhythm
Here’s where the “dance” analogy pays off. Start with a slow, clockwise stir for about 30 seconds – just enough to wet the wax. Then pause, let the mixture settle for a few seconds, and give it another gentle swirl. That tiny break lets the oil molecules nestle into the wax crystals, boosting scent‑throw later.
And if you’re feeling fancy, use a silicone spatula for the first stir, then switch to a bamboo stir stick for the second. Different textures can create a more uniform blend.
Temperature matters
Most essential oils start to degrade above 180 °F. That’s why we wait until the wax cools into the fragrance window (around 155‑165 °F) before adding the oil. If you add too hot, you’ll lose those delicate top notes – think citrus zest or fresh herbs.
But if the wax is too cold (<120 °F), the oil won’t bind well, and you’ll end up with scent pockets that cause tunneling. A quick finger‑dip test (just a quick touch, not a full dunk) can reassure you that you’re in the right range.
Real‑world blend examples
Let’s walk through three go‑to combos you can try tonight:
- Relaxation blend: 4 % lavender + 2 % chamomile. Perfect for bedtime or a quiet reading nook.
- Morning boost: 5 % sweet orange + 1 % peppermint. The citrus lifts you, while peppermint adds a crisp edge.
- Focus formula: 3 % eucalyptus + 3 % rosemary. Great for a home office or study space.
Each blend stays within the 6 % total rule, but you can tweak the ratios as you get comfortable. Just remember to keep a notes sheet – scent is personal, and a tiny shift can change the vibe entirely.
Optional scent boosters
If you want an extra punch, consider a “top‑note booster” like a few drops of citrus oil added right after the main blend. Because top notes evaporate fastest, a small boost right before pouring can make the candle smell stronger the first few days.
And if you love a layered aroma, add a second, deeper oil (like sandalwood) at the very end of the cooling phase – around 120 °F – so it settles deeper into the wax.
Quick checklist before you pour
- Wax temperature: 135‑140 °F
- Essential oil measured: 6‑10 % of wax weight
- Stirring done: two gentle swirls with a pause
- Optional boosters added at the right temperature
Once everything checks out, you’re ready to move on to the final pour. But before you do, take a moment to sniff the surface – if it smells right, you’ve nailed the scent lock‑in.
Comparison table: popular essential oils for soy candles
| Essential Oil | Recommended % of Wax | Ideal Add Temp (°F) |
|---|---|---|
| Lavender (calming) | 4‑6 % | 155‑165 |
| Sweet Orange (uplifting) | 5‑7 % | 155‑165 |
| Eucalyptus (clarity) | 3‑5 % | 155‑165 |
And that’s it – you’ve just customized the scent profile of your soy candle. Play with the ratios, note the outcomes, and soon you’ll have a small library of signature blends that feel like they were made just for you.
Step 4: Pour, Cool, and Set the Candles
Alright, the wax is scented, the temperature is in the sweet spot, and you’re staring at that glossy pool of liquid gold. This is the moment where the magic really shows up – the pour.
Get the pour right
First, grab a steady‑hand funnel or a silicone pouring pitcher. A narrow spout helps you control the flow and avoids a splash that could ruin the surface.
Position your pre‑warmed jar on a silicone mat. The mat catches any drips and gives you a clean workspace.
Now, pour in a slow, steady stream. Imagine you’re pouring coffee into a delicate cup – you don’t want a sudden rush that creates bubbles.
Tip: start the pour from the center, then let the wax glide toward the edges. That little technique reduces the chance of a “skin” forming on top.
Watch the cooling curve
Once the wax is in the jar, the real patience test begins. Soy wax contracts as it cools, and if you move the candle too early you’ll get cracks or a lopsided surface.
Set a timer for 10‑15 minutes and let the candle sit undisturbed. During this window, the wax will drop from about 135 °F down to roughly 100 °F.
If you’re curious, you can gently tap the side of the jar after the first five minutes – a faint “ping” means the wax is starting to set.
For those who love a perfectly smooth top, wait until the surface feels firm to the touch but still a little warm. Then, run a clean chopstick or a thin spatula around the edge to release any trapped air.
Set and finish
When the candle is solid – usually after 30‑45 minutes at room temperature – it’s time to give it a final check.
Look for a glossy, level surface. If you see a small depression, a quick “touch‑up” with a warm hair dryer on low can melt the top just enough to smooth it out.
Next, trim the wick to about ¼ inch. A properly trimmed wick ensures an even burn and reduces smoke.
Finally, let the candle cure for at least 24‑48 hours before lighting. During curing, the wax and oil continue to bind, which boosts the scent throw when you finally light it.
Quick pour checklist
- Funnel or silicone pitcher ready
- Jar placed on a silicone mat
- Wax temperature at 135‑140 °F when pouring
- Pour slowly, starting from the center
- Leave candle undisturbed for 10‑15 min
- Check surface firmness before touching
- Trim wick to ¼ inch after solidifying
- Allow 24‑48 h curing before first burn
And that’s it – you’ve just poured, cooled, and set a soy candle that smells amazing and burns clean. The next time you make a batch, you’ll know exactly how long to wait, when to intervene, and how to avoid those pesky cracks that can ruin an otherwise perfect candle.

If you notice a faint ring around the wick after it sets, that’s just a natural contraction line – it won’t affect the burn, but you can smooth it with a quick warm‑hand rub before the candle cures.
Give it a try tonight and see how a little patience turns a simple pour into a candle you’ll be proud to display on your coffee table.
Step 5: Finishing Touches & Troubleshooting
Final Surface & Wick Care
Now that your candle has cooled and looks solid, it’s time for the little details that turn a good candle into a truly polished one.
First, give the surface a once‑over. If you see a faint ring or a tiny dip where the wax contracted, a warm hand or a hair‑dryer on low will gently melt the top enough to smooth it out.
Next up: the wick. A wick that’s too long will mushroom, while one that’s too short creates tunneling. The sweet spot is about ¼ inch (6 mm) above the wax once it’s fully set.
Trim it with a pair of scissors right after the candle feels firm. A clean cut gives a steady flame and reduces smoke – something every home‑candle maker loves.
Now, let’s talk curing. Even though the wax feels hard, the fragrance molecules are still bonding with the soy base. Give your candle 24‑48 hours (or even up to a week for heavy blends) before the first light. This patience pays off with a stronger scent throw.
What if you notice uneven burning? Often the culprit is a mis‑centered wick or a drafty spot on your workbench. Gently tap the jar on a soft surface to settle any air bubbles, then re‑center the wick using a wick holder or a simple pencil.
Sometimes you’ll get a tiny “tunnel” where the wax near the edges never melts. The quick fix? Light the candle for a full hour the first time – the melt pool will reach the walls and erase the tunnel.
If you’re battling wax cracks, check your pour temperature. Pouring above 140 °F often creates a skin that cracks as it contracts. Try a slower pour at 130‑135 °F and let the candle cool naturally—no fan or refrigerator needed.
Another common hiccup is scent fading after a week. That usually means the oil was added a bit too hot, burning off the top notes. The remedy is to lower the fragrance‑addition temperature to the 155‑165 °F window we discussed earlier, and always stir gently for at least a minute.
Common Issues & Quick Fixes
Wax sinking around the wick? That usually means the wax cooled too fast, creating a small well. Warm the top with a hair‑dryer for a few seconds and gently press the wax back into place – the sink will disappear as the wax re‑flows.
Oil separation, where you see a clear layer on top, is a sign the wax was poured above the ideal range. Let the candle sit a bit longer, then re‑heat gently in a water bath until the surface becomes uniform again.
If the scent seems weak after the first burn, it might be because the candle didn’t cure long enough. Extend the cure time to 72 hours for heavier essential oils, and you’ll notice a richer throw.
A handy troubleshooting checklist can save you a lot of re‑work. Keep it on your crafting table and tick off each item as you go.
- Verify wick is centered and trimmed to ¼ inch.
- Ensure surface is smooth; re‑heat if needed.
- Let candle cure 24‑48 h before first burn.
- Burn for at least 1 hour on first use.
- Store candles away from direct sunlight and drafts.
- Record temperature and pour details for future batches.
When you follow these finishing touches and troubleshoot as they arise, you’ll end up with candles that not only look professional but also burn cleanly and scent the room just right. So go ahead, light one, and enjoy the glow you created with your own hands.
Safety Precautions and Best Practices
Before you even think about lighting that first wick, ask yourself: do you have a safe space to work in?
We’ve all been there – the excitement of a fresh scent can make you overlook the basics. A well‑ventilated kitchen counter, a silicone mat, and a few minutes of prep can mean the difference between a cozy glow and a kitchen mishap.
Gear up, don’t wing it
Heat‑resistant gloves protect your hands from splashes, and safety glasses keep a rogue droplet from turning your eyes into a stinging mess. It sounds overkill, but you’ll thank yourself when a sudden boil sends wax flying.
And don’t forget the apron or an old shirt – soy wax can be stubborn, and a little spill can stain your favorite tee.
Ventilation matters
Essential oils have lower flash points than synthetic fragrance oils, meaning they can evaporate quickly if the wax gets too hot. Working near a window, fan, or open door clears any concentrated vapors before they overwhelm your senses.
That same concern is why you’ll see experts stress keeping the workspace airy – it’s not just about smells, it’s about preventing a buildup of flammable vapors.
Temperature control is your best friend
Use a digital thermometer and never guess. Heat the soy wax to about 185 °F, then let it cool to the 155‑165 °F “fragrance window” before adding essential oils. Adding oils too early burns off those delicate top notes; too late and the oil won’t bind properly.
Watch the numbers like a stock ticker. If you’re unsure what temperature is safe for a particular oil, check its flash point – most quality essential oils sit comfortably above 150 °F. Essential oil flash points are a quick reference.
Choose the right wick and container
A wick that’s too big creates a large flame, which can overheat the wax and accelerate oil loss. A smaller cotton or wood wick designed for soy wax gives a steady burn and lets the fragrance shine without scorching.
Containers must be heat‑resistant. Glass mason jars, enamel cups, or tins are solid choices. Avoid delicate wine glasses or anything that could crack under heat. A quick test: hold the empty container under hot tap water for a minute – if it feels sturdy, you’re good to go.
Fire‑safe setup
Never leave a burning candle unattended, even for a quick coffee run. Keep a lid or a metal tray a few inches away as a fire‑break, and have a small fire extinguisher or a box of baking soda nearby – the latter works wonders on wax fires.
When you first light the candle, let it burn for at least an hour. That creates an even melt pool, reduces tunneling, and prevents the wick from drowning in wax.
Cooling, curing, and storage
After you pour, let the candle sit undisturbed for 10‑15 minutes before moving it. Sudden temperature changes can cause cracking or sinkholes.
Patience pays off: let each candle cure for 24‑48 hours (or up to a week for heavier oils) before the first burn. This gives the wax and oil time to bond, boosting the scent throw.
Store finished candles away from direct sunlight, drafts, and extreme heat. A cool, dark pantry is ideal – it preserves the fragrance and keeps the wax from softening.
Quick safety checklist
- Wear gloves and safety glasses.
- Work in a well‑ventilated area.
- Monitor wax temperature with a digital thermometer.
- Add essential oils within the 155‑165 °F window.
- Use a properly sized wick for soy wax.
- Choose heat‑resistant containers (glass, enamel, tin).
- Never leave a lit candle unattended.
- Cure 24‑48 hours before first use; store away from heat and light.
Following these simple habits turns candle‑making from a risky hobby into a safe, satisfying ritual. You’ll end up with beautiful, fragrant candles and a peace of mind that lets you focus on the creative part – the scent, the color, the story behind each jar.
FAQ
What temperature should I melt soy wax for essential oils?
When you melt soy wax, aim for about 185 °F (≈85 °C). That’s hot enough to fully liquefy the flakes but not so scorching that you start breaking down the delicate aromatic compounds. Once it hits that range, remove the pot from the heat and let it cool to the fragrance window—usually 155‑165 °F—before you stir in your essential oils. This two‑step temperature dance keeps the scent true and the wax smooth.
Can I use any essential oil in soy candles?
Most pure essential oils work fine, but you’ll want to check a couple of things first. Look for a flash point above 150 °F; oils with lower flash points (like some citrus extracts) can burn off or discolor the wax if they get too hot. Also, avoid oils that are known skin irritants when heated—think undiluted clove or wintergreen—unless you’re making a purely decorative candle that won’t be burned near people. Sticking to oils like lavender, sweet orange, eucalyptus, or cedarwood gives you a safe, aromatic result.
How much essential oil should I add to a batch of soy wax?
The sweet spot is usually 6‑10 % of the total wax weight. For a standard 16‑oz jar that means roughly 1‑1.5 oz of oil, which you can measure with a digital scale for accuracy. Start at the lower end if you’re new to a particular scent, then test‑burn the candle after it cures. If the fragrance feels shy, bump the percentage up by a percent or two on your next batch.
Do I need to stir the wax after adding essential oils?
Yes—stirring is key to a uniform scent throw. Once the oil hits the wax, give it a gentle clockwise swirl for about 30 seconds, then pause for a few seconds and give it another soft swirl. This pause lets the oil molecules settle into the wax crystals, preventing pockets of strong scent that can cause tunneling later. A silicone spatula works well for the first stir; a bamboo stick can finish the mix.
Why should I let my candle cure before the first burn?
Curing lets the wax and essential oil bind on a molecular level. During the 24‑48 hour (or up to a week for heavier blends) rest, the fragrance settles into the wax matrix, which boosts both the strength and the longevity of the scent when you finally light it. Skipping this step often results in a weaker throw and a wax surface that feels a bit “tacky” right after the first melt.
What’s the best wick size for soy wax candles with essential oils?
A properly sized wick prevents both tunneling and mushrooming. As a rule of thumb, match the wick diameter to the jar’s width: a 10‑mm jar usually needs a #10‑12 cotton wick, while a larger 12‑15 mm container may require a #14‑16. If you’re using a wood wick, choose a split‑stem style that’s rated for soy wax. Test‑burn a short candle first; if the flame flickers or the melt pool stays small, move up one size.
How do I troubleshoot a candle that tunnels after the first burn?
Tunneling usually means the wax didn’t melt all the way to the jar’s edge. The fix is simple: let the candle burn for a full hour the first time, so the melt pool reaches the walls. If the problem persists, check that you poured at the right temperature (130‑135 °F is ideal) and that the wick is centered. A quick tip is to gently tap the jar before lighting; that can help any trapped air settle.
Conclusion
So, you’ve walked through every step of how to make soy wax candles with essential oils, from gathering tools to the final cure.
If you ever wondered whether all that patience really pays off, just picture the moment you light that first wick and the room fills with a scent you crafted yourself.
The biggest takeaway? Temperature is your best friend – keep the wax around 185 °F for melting, drop it to the 155‑165 °F fragrance window before adding oils, and pour at 130‑140 °F for a smooth surface.
A correctly sized wick matched to your jar prevents tunneling and mushrooming, and a quick 1‑hour first burn creates an even melt pool that erases any early‑burn tunnel.
Don’t skip the cure: 24‑48 hours lets the wax and essential oils bind, giving you a stronger, longer‑lasting throw when you finally enjoy your candle.
And remember the tiny details – trim the wick to about ¼ inch, smooth any surface cracks with a warm hand, and store your finished candles away from direct sunlight.
Now you’ve got a reliable checklist, a handful of proven tricks, and the confidence to experiment with new scent blends or colors.
Ready to light up your next creation? Dive back into the studio, grab your favorite essential oils, and let the glow of your handmade candle remind you why you started crafting in the first place.
Leave a Reply