Introduction hook: You can turn plain clay into art with your own hands. No fancy studio needed. You’ll learn to gather simple materials, form pieces, paint with care, and finish so your work lasts. This guide shows you safe, practical paths to hand-paint pottery at home, using kiln-free options when you want to skip a kiln. You’ll also see how CreativiU supports your crafty goals with friendly courses. And yes, you’ll finish with pieces you’re proud to display or gift. If you’re curious about the big ideas behind pottery, Wikipedia has a solid overview.
In this guide, you’ll learn how to make hand-painted pottery at home from start to finish. We’ll cover materials, basic hand-building, painting, safe firing without a kiln, and quick fixes for common issues. You’ll get practical steps, real-world tips, and checks you can use right away. We’ll also show you how to stay safe around clay dust and glazes, plus how to seal your final pieces for everyday use. And we’ll point you to CreativiU resources so you can keep growing your skills as a creator.
Ready? You’ll finish with a clear, doable plan you can start this weekend. It’s all about small steps, steady practice, and a calm workspace. Let’s jump in and begin with Step 1: gather materials and set up your workspace, so you can begin how to make hand-painted pottery at home with confidence.
Step 1: Gather Materials & Set Up Your Workspace
First, you need a simple, clean setup. Hand-painted pottery at home starts with a few basics: clay, brushes or underglazes, a glaze or clear sealant, a few clean bowls for water, a sponge, and a sturdy table. If you’re just testing the waters, you can start with air-dry clay or a low-fire stoneware and still get nice results. The key is to keep your area calm and tidy so your mind can focus on shaping and painting. Your tools don’t have to be fancy; they just need to be reliable and easy to clean. And yes, you’ll want a safe mask when you work with glaze dust. For now, choose a corner you won’t mind clearing after each project. how to make hand-painted pottery at home is a skill you can build piece by piece, and it starts with the right space and tools.
Before you start, take a quick inventory. Clay can be stoneware or earthenware. Pick a clay type that fits your budget and firing plan. Stoneware is forgiving and takes well to glaze, but it does need a kiln for bisque and glaze firing. Earthenware fires at lower temps and can be easier for beginners, but it may need sealing if you plan to hold liquids. Gather a few brushes: a medium flat brush for base coats, a fine brush for details, and a sponge for soft blending. You’ll also want a clean, reliable slip (a slurry of clay and water) to join pieces if you’re hand-building. Check CreativiU’s beginner guide for more setup ideas and budget tips.
And here’s a real‑world starter kit vibe that can help you map costs. A small starter kit might include a bag of stoneware clay (about 5, 10 lb to begin with), a basic set of hand tools (needle, loop, knife, rib), a few acrylic-based underglazes, and a clear sealant or food-safe glaze. You can often find a simple, serviceable kit for under $60. If you already have some household brushes, a plastic tray, and a spray bottle, you’ll save more. CreativiU’s online wheel classes guide can help you decide how much gear to buy now versus later.
Tools and setup aren’t just about making; they set your safety and speed. Keep a small fan or vent near your workspace. Work on a sealed, easy‑to‑clean surface to gather dust. Remember, safety first: wear a mask when handling dry clay dust and glaze powders, and work with good ventilation when you glaze. If you plan to bake or bake glaze, you’ll want to follow local guidelines about kiln use or a kiln service. This is how to make hand-painted pottery at home with less risk and more joy.
Bottom line: A clean, safe workspace is the first pillar of making hand-painted pottery at home.
Step 2: Prepare Clay , Wedging, Rolling, and Forming the Base
Wedging is the first big move in how to make hand-painted pottery at home. It gets air bubbles out and makes the clay even. Think of it like kneading dough. If you skip wedging, you risk cracks or weak spots later when it dries or goes through a firing cycle. Start by kneading the clay in your hands, turning it over, and pressing with the heel of your palm. Do this until the piece feels uniform and soft. A well-wedged chunk will be easier to roll, shape, and join with another piece later on.
Next, roll or hand-build your base form. Pinching and coiling are simple ways to shape a pot. Pinch pots start with a ball; you press your thumb in and gently pinch around the surface. Coiling builds form with long ropes of clay wrapped and smoothed. For a small planter or cup, you can start with a thick-walled cone and then blend the seam. The smoother your base, the less you’ll have to sand or trim later. Always keep your thickness uniform, about 0.25 inches is a good target for many hand-built pieces. Variations are fine, but even walls help glaze behavior and drying times.
When you have a base, join two pieces with scoring and slip. You’ll learn to add slip and coils to the seam to prevent cracks. A damp brush or a small sponge can help you blend the seam so it looks smooth. A clean seam is essential for strong joins, especially if you plan to add handles or decorative elements. If you’re practicing, you can make a small tester piece to see how the form dries and how the glaze sits on the surface. This is a good way to learn how to make hand-painted pottery at home with better predictability.
Remember to keep your workspace clean as you work. Wipe up spills, rinse brushes, and cover clay that you aren’t using. This helps keep your clay at the right moisture level and reduces dust. Patience matters here. Let your base dry to a leather hard stage before you try to attach any handles or add details. Leather hard means the clay can hold its shape but still feels a bit cool and slightly soft when you press. This is the sweet spot for shaping and joining without warping. Online class tips can help you pick the best approach for hand-building at home.
Pro Tip: Keep a damp cloth handy to wipe surfaces between steps. It keeps the clay surface clean and makes your paint and glaze look smoother when you apply the first coats. Bottom line: steady wedging and even form give you a better base for all your hand-painted details later.
Bottom line: A smooth, uniform base makes your hand-painted pottery at home look clean and professional.
Step 3: Build and Join Pieces , Scoring, Slip, and Adding Details
Now we get to the join work. To build and join the pieces, you’ll score the surfaces that touch with a needle tool or fork. Scoring gives the slip something to grip. Slip is just liquid clay, think glue for clay. You’ll brush a thin line on the scored edges and gently press the pieces together. A smooth seam is key for a strong piece. If you’re adding a lid, a handle, or a decorative coil, score both surfaces and slip the joint. When you press, blend the seam with your fingers or a spatula, then smooth with a damp sponge.
Here’s a quick technique: roll a thin coil and wrap it around a seam to seal it. Use a damp finger to blend the coil into the surface until there’s no ridge. If the seam shows, add a little slip and blend again. For extra strength, you can add a small slip fillet along the seam. This gives you a clean, continuous line that looks deliberate and sturdy. And remember, when you join, the seam should look like it’s part of the form, not a scar.how to make hand-painted pottery at homeis easier when joins are crisp and stable.
In this section, you’ll also see a real short video clip showing these steps in action. The video demonstrates scoring, applying slip, and smoothing seams step by step. After you watch, try a mini build using two small bowls joined at the rim. It’s a great way to test how your methods hold up under paint and glaze.
“The secret is to keep your hands calm and your seams clean.”
Bottom line: Strong seams and careful edge work are the backbone of your hand-painted pottery at home projects.
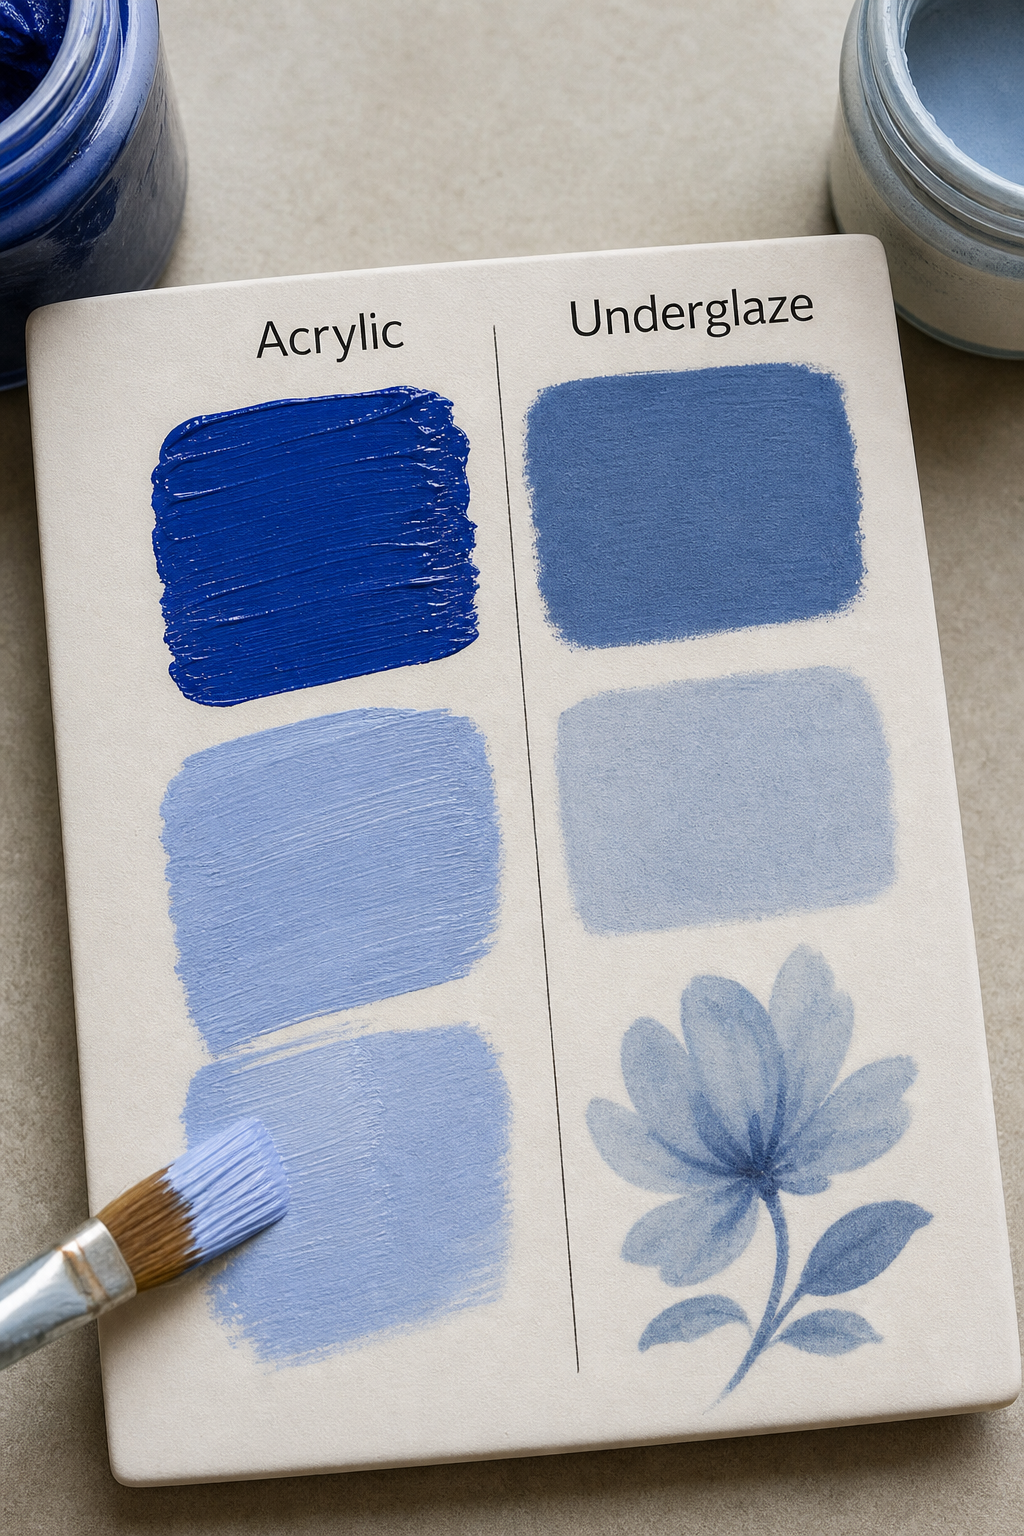
Step 4: Paint Techniques , Acrylic vs Underglaze, Layering & Brush Tips
Paint time. You’ll learn how to apply color, layer tones, and finish with a clear coat. Acrylic paints are easy to use, quick to dry, and great for learning textures and brushwork. Underglazes are good for true color on ceramic surfaces and stay vibrant after firing. The trick is to test colors on a sample tile or chunk of scrap clay first. Practice your brush strokes, keep your lines clean, and plan your color layers before you glaze. You’ll want to build depth with thin layers, not big blobs. how to make hand-painted pottery at home takes patience here, especially when layering darker over lighter tones.
Brush tips: keep the brush partly loaded, not dripping wet. Use short, confident strokes for leaves, lines, and small motifs. For shading, build color gradually. For a glaze-like look without a kiln, you can use acrylic glaze mediums or a water-based glaze to simulate a ceramic glaze finish. Brush care matters; rinse brushes quickly, then reshape the bristles. Let coats dry between layers to avoid muddy colors. And if you want a glossy look, finish with a clear acrylic sealer when your paint is fully dry. This CreativiU guide can help you plan more painting sessions at home.

 Alt: Painting close-up on ceramic surface.
In this section, you’ll also see a quick table showing layering tips and painting order. Remember to keep a clean workspace. A small fan can help your paint dry evenly. And always wash your brushes after you finish a session.30%of sources note lack of safety tips in docs, safety matters even in painting.
“Layer in thin coats; better depth comes from slow steps not big jumps.”
Bottom line: Thoughtful layering and careful brush work make your hand-painted pottery at home pop with color and depth.
Step 5: Fire Without a Kiln , Oven, Pit, or Service Options
Firing is what makes clay durable and water-tight. If you don’t have a kiln, you can still finish pieces safely. Some people use a home oven for certain clays and glazes, but you must know the glaze medium’s safety and the temperature range. A kiln service or local studio can fire pieces for a fee per piece or per batch. If you choose oven firing, use only enamels or glazes labeled as oven-safe for home use. Always dry pieces completely before any firing. And never seal a piece that will hold food with a non-food-safe coating.
When you’re exploring kiln-free options, start with small tiles or testers to see how the surface behaves in heat. Some home methods give a glossy look with acrylic paints, but the durability differs. If you’re selling or gifting, you’ll want to note that true food-safe glazes require proper firing in a kiln or service. For ideas on safe firing paths, CreativiU’s online classes can help you pick the best route for your space and budget.
Safety tip: never fire in a kitchen oven with food nearby. Clay dust and glaze fumes are not food-safe in that setting. If you’re curious about the slower drying and cooking times, you can map your own schedule. The main lesson: get a plan and stay within safe limits. OSHA safety guidelines can help you think about home workshop safety in general.
Bottom line: You can fire without a kiln, but choose materials and methods that are designed for kiln-free use, plus follow safety steps to avoid mishaps.
Step 6: Creative Shortcuts & Troubleshooting Common Issues
If you want shortcuts, you can repurpose household tools for texture and pattern. A straw can help with drainage holes in bowls. A wooden skewer can be a simple brush for fine lines. You’ll find many small hacks that speed up your work. When problems pop up, cracks, uneven colors, or glaze runs, don’t panic. Dry the piece completely, level the surface, and fix the issue with a careful rework. This is how to make hand-painted pottery at home that lasts. Use a clean method to fix. If color pools, wipe away excess glaze and re-apply in thin layers. And when you’re unsure, test on scraps first.
Common issues include cracking from shrinkage, warping from uneven drying, and glaze pooling on one side. A simple rule is to keep walls even in thickness and to dry pieces slowly in a dust-free space. You can clamp or prop pieces to keep shape while drying. A small dehumidifier nearby can help in a damp room. This section also has a quick pro tip: wrap pieces in plastic to slow drying on humid days, but uncover them overnight before firing to avoid damp pockets.
Bottom line: plan, test on scraps, and fix issues with careful touch-ups rather than rushing drying and firing.
Bottom line: Use careful testing and small tweaks to solve issues in your hand-painted pottery at home projects.
Step 7: Seal, Cure, and Ensure Food‑Safety
Sealing is the last big step. Seals protect the painted surface and help with water resistance. If you plan to use pieces for food or drink, choose sealants labeled as food-safe and heat-friendly. Read glaze directions carefully and follow curing times for the exact product you pick. If you’re unsure, test the finish on a small tile first. You want a finish that won’t chip or peel when washed. After curing, wash the piece gently and dry it well before use. You’ll also want to store pieces in a dry space to prevent humidity damage.
Finishing touches can be fun. A clear coat can add gloss and depth to colors. Some artists like to apply a wax or oil finish to highlight textures. You may choose to display your pieces on a shelf or use them in a light‑use setting. The key is to ensure safety if you’ll eat or drink from the piece. A lot of times, a simple, durable sealant will work if you choose the right product. For more on how to plan your finish steps, see CreativiU’s class pages. How to Choose and Thrive in an Online Pottery Class gives you ideas for continuing your journey.
Internal note: CreativiU readers can also check a related guide to online pottery for beginners. It’s a good fit for this stage because it helps you map future projects and how to keep learning. When you seal, your project becomes more durable and ready for daily use. If you want a food-safe result, skip any general craft sealants and choose a product with explicit food safety guidance. The finish should be clear and non‑sticky, so it won’t trap odors or residues.
Bottom line: a safe, durable seal makes your hand-painted pottery at home truly usable and long‑lasting.
Conclusion
Now you’ve walked through the core steps of how to make hand-painted pottery at home. You’ve learned to gather the right tools, prepare clay, build pieces, paint with layered technique, and even consider kiln‑free firing routes. You’ve seen how to join parts, fix common issues, and seal your work so it lasts. The big idea is to keep it simple at first, then add layers of technique as you gain confidence. CreativiU offers a wide range of courses to help you grow, whether you want to master hand-building, glaze combinations, or finishing. The more you practice, the better your pieces will look, and the more you’ll enjoy the process. Remember to pace yourself, test on scraps, and keep your workspace clean and safe. CreativiU is here to help you learn step by step and stay inspired on your creative path.
In the end, the joy of hand-painted pottery at home comes from making, learning, and sharing. You’ll find it’s not just about the final piece, but the habits you build along the way: regular practice, careful note-taking, and a steady pace. Your work can evolve from simple mugs to a full collection with pieces that tell a story. You’ll see that with small, consistent steps, you can turn clay into art and life into a studio you own, no big studio required. And if you want a community to grow with, CreativiU can be a big help along the way.
FAQ
1. What’s the easiest way to start with hand-painted pottery at home?
The easiest way to start with how to make hand-painted pottery at home is to keep it simple. Start with a single bowl or mug, a small amount of clay, and a basic brush set. Wedging well, shaping leather‑hard forms, and testing a few color layers on scrap pieces will build your confidence quickly. Use a water spray to keep surfaces smooth, and work in short sessions so you don’t fatigue. As you gain comfort, add more tools and try new techniques to expand your range and keep learning how to make hand-painted pottery at home with joy.
2. Do I really need a kiln to finish hand-painted pottery at home?
No. You don’t have to own a kiln to start learning how to make hand-painted pottery at home. You can use air-dry clay for practice or find a local kiln service to fire your bisque and glaze pieces. You can also explore kiln-free finishing options, such as oven‑safe glazes or acrylic methods for decorative pieces. If you plan to make pieces that hold liquids or food, be sure to use food‑safe glazes and follow safe cure times for your chosen method. As you grow, a kiln can dramatically expand your options, but it isn’t required at first.
3. How do I choose between acrylic paints and underglazes?
Choosing between acrylic paints and underglazes hinges on your goals for durability and finish. Underglazes are meant to be fired with a glaze to a strong, durable surface, making them ideal for true pottery pieces. Acrylics are easier to use at home and don’t require firing, which is great for practice and display pieces. If you plan to use a dish for food, go with underglazes and a proper glaze firing when possible. When you’re just starting, you can experiment with both to see how the results differ and what feels right to you. This is a good path for how to make hand-painted pottery at home with different looks.
4. How long does it take a project to dry and be ready for paint?
Drying time varies with climate and thickness. A piece that is leather hard will hold its shape but still feel slightly cool when touched. In many homes, it can take a day or two to reach leather hard, then another day or two to dry completely before firing. Patience matters. If you’re new, plan a full weekend for a small batch so you can test painting on scrap pieces as you go. Remember, drying times impact your overall project schedule and how to make hand-painted pottery at home with steady progress.
5. How can I fix cracks or warping in hand-built pieces?
Cracks come from uneven drying or air pockets. To fix, dampen the area lightly, re-wedge a little clay, and reapply with slip. For a bigger fix, score and slip along the crack, press gently, and blend with a smoothing tool. Warping happens when a piece dries unevenly. Support it with foam or a soft frame while it air-dries, and turn it occasionally. Small, slow changes reduce problems and help you get back to painting with less fear. This is part of how to make hand-painted pottery at home with patience and care.
6. Is hand-painted pottery at home safe for food use?
Food safety depends on the glaze and firing. Use true food-safe glazes and ensure pieces are fully fired when used for cooking or eating. If you’re painting for display, you can avoid food safety concerns by using acrylic paints or a decorative sealant that’s not for food contact. Always follow safety guidelines for glaze materials and firing. When in doubt, test on a small tile and consult product labels. For core guidelines on home pottery safety, reference official safety resources. This is part of understanding how to make hand-painted pottery at home safely.
7. What are quick ways to seal colors after painting?
For long-lasting results, seal colors with a clear top coat designed for ceramic surfaces. If you’re using a kiln, apply the glaze and fire according to the glaze’s directions for a durable, food-safe finish. For kiln-free methods, choose a clear acrylic sealer in light, even coats. Let each coat dry fully before applying the next. A final, even layer gives a polished look and helps protect your painted design. This helps you finish with confidence when you’re learning how to make hand-painted pottery at home.
8. How can I keep painting at home enjoyable and safe?
Keep a clean, bright workspace. Wear a mask if you’re sanding or using glaze powders. Ventilate the room well. Work in short blocks to avoid fatigue. Use a small fan to move air, and keep a jar of water nearby for cleanup. Practice on scraps first, then move to actual pieces. For ongoing growth, join a CreativiU class or community to get feedback and stay motivated. This helps you keep enjoying the process as you learn how to make hand-painted pottery at home.
Conclusion
Thanks for sticking with this guide to how to make hand-painted pottery at home. You’ve learned how to gather basic materials, wedge and shape clay, join pieces, paint with layered colors, and seal your work. You’ve seen how kiln-free options can work for beginners, while still leaving room to grow into a full pottery routine. Your next steps are simple: pick a starter project, set up a safe workspace, and start practicing. Use scrap pieces to test colors and glazes. Track what you learn with notes or photos so you can repeat the best results. If you want more depth or a guided path, CreativiU offers courses and a like-minded community to help you stay focused and inspired. And if you want a curated path, start with one of CreativiU’s beginner guides to online pottery classes. You can find practical, friendly guidance that aligns with your pace and goals. As you get more confident, you can tackle more complex shapes, layering techniques, and safe glaze options, turning your kitchen table into a thriving creative space.
FAQ Recap
If you want more on any of these topics, the FAQ at the end of this article covers quick queries and practical steps to keep you moving forward with how to make hand-painted pottery at home in your own space.
Leave a Reply