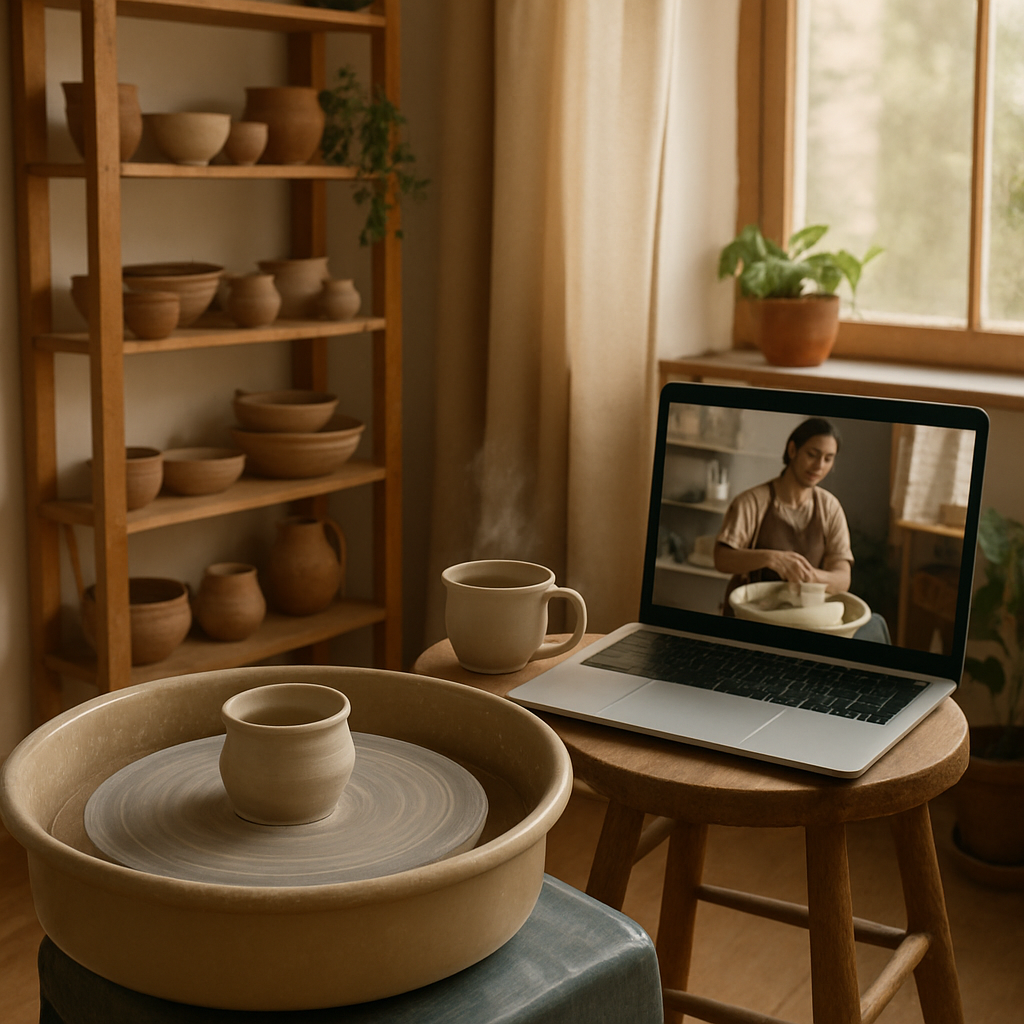
Picture this: you’re sitting at a kitchen table, a lump of clay in your hands, and the gentle hum of a pottery wheel humming in the background of your living room. Sound a bit far‑fetched? Not really—online pottery wheel classes have turned that cozy vision into a real possibility for anyone with a Wi‑Fi connection.
Maybe you’ve always wanted to spin a vase but felt stuck because the nearest studio is an hour away, or you’re juggling a busy schedule that makes a regular class feel impossible. Trust me, I’ve been there. That frustration of watching tutorials on YouTube and never quite knowing if you’re shaping the clay the right way is all too common.
Here’s the good news: with the right online pottery wheel class, you get step‑by‑step guidance, instant feedback from instructors, and a community of fellow creators who cheer you on when that first perfect bowl finally takes shape. It’s like having a mentor right beside you, except you don’t have to worry about parking.
So, why are more hobbyists and even seasoned artists jumping onto the digital wheel? For starters, flexibility. You can practice after the kids are in bed, during a lunch break, or on a rainy weekend—no need to rearrange your life around a fixed class schedule. Plus, many platforms, like CreativiU, bundle video lessons with downloadable cheat sheets, material lists, and live Q&A sessions that make the learning curve feel less like a cliff and more like a gentle slope.
And let’s not forget the cost factor. Traditional studio memberships can drain your wallet, while online courses often let you pay once and replay lessons as many times as you need. Think of it as a library for your hands.
Feeling a little spark of curiosity? You might wonder how to pick the right class, what gear you truly need, or whether you can create professional‑grade pieces from home. In the sections that follow, we’ll unpack the essential tools, walk through a typical class structure, and share tips to keep your clay from turning into a sticky mess.
Ready to roll up your sleeves and let the wheel spin? Let’s dive in.
TL;DR
Online pottery wheel classes let you spin a vase from your living room, giving you studio‑level instruction, instant feedback, and a supportive community without ever leaving the house.
We’ll show you how to choose the right gear, structure your practice sessions, and avoid sticky mishaps, so you can create professional‑grade pieces on your own schedule.
Step 1: Choose the Right Online Pottery Wheel Platform
Okay, you’ve felt the pull of the wheel and you’ve decided that learning from home is the way to go. The first real decision you’ll face is picking the platform that actually delivers the instruction you need without turning it into a guessing game.
Ask yourself: do you thrive on live interaction, or are you more of a night‑owl who likes to binge‑watch pre‑recorded lessons at 2 a.m.? Your answer will shape the kind of platform that fits you best.
Live vs. On‑Demand: What’s the trade‑off?
Live classes give you real‑time feedback. One instructor told me a beginner was spiraling the wheel too fast, and within minutes the student corrected the speed and saved a whole batch of misshapen bowls. That instant correction is priceless, especially when you’re still learning the feel of the wheel.
On‑demand courses, on the other hand, let you pause, rewind, and replay a tricky hand‑position as many times as you like. If you’re juggling kids or a full‑time job, this flexibility can be a game‑changer. A recent survey of online learners found that 68% preferred the freedom to study on their own schedule (source: Artists Network on online pottery classes).
Community and Support
Learning to throw isn’t just about the wheel; it’s about the community that pushes you forward. Look for platforms that host a private forum, Discord server, or regular Q&A sessions. One of my friends joined a class that offered a weekly live chat; she said the encouragement from fellow students helped her push through the “flat‑bottomed vase” plateau.
If you can’t find a built‑in community, consider whether the platform integrates with existing pottery groups on Facebook or Reddit. Those external hubs often become treasure troves of tips, troubleshooting threads, and even swap‑meet opportunities.
Curriculum Depth and Progression
Some platforms dump a handful of introductory videos and call it a day. Others map out a clear path—from centering clay to mastering glaze firing—complete with downloadable cheat sheets and milestone quizzes. I like to see a syllabus that breaks lessons into bite‑size modules and signals when you’re ready to move on.
For a concrete example, check out A Practical Guide to Online Pottery Wheel Classes. It outlines exactly how the curriculum is structured, what equipment you’ll need at each stage, and how the feedback loops work.
Pricing and Value
Traditional studio memberships can run $150‑$300 a month. Online platforms usually offer a one‑time fee ranging from $30 to $120, plus the ability to replay lessons forever. If you calculate cost per hour of instruction, the online option often ends up 2‑3× cheaper.
But cheap isn’t always better. Make sure the price includes things like live critique sessions, downloadable resources, and a clear refund policy. A platform that promises “lifetime access” but never updates its content may cost you more in the long run.
Technical Requirements
Before you click “Enroll,” verify the tech specs. A stable internet connection (at least 5 Mbps upload/download) is essential for live streaming. Check whether the platform works on mobile, tablet, or desktop—many learners prefer a tablet to see the instructor’s hand movements up close.
Also, see if the platform integrates with common video‑conference tools like Zoom or Google Meet. Those integrations often make it easier to share your screen, show a close‑up of your wheel, and get instant pointers.
Real‑World Example: Jane’s Journey
Jane, a stay‑at‑home mom from Ohio, started with a free trial on a live‑class platform. She loved the real‑time critiques but found the schedule too rigid. She switched to an on‑demand course that offered a private Discord community. Within three months she moved from novice pinch pots to throwing a set of matching mugs that she now sells on Etsy. Her secret? She combined live feedback during the first month with on‑demand practice afterward, and she used the community to get quick answers when she hit a snag.
Jane’s story shows that the “right” platform often means a hybrid approach—start live, then transition to on‑demand for deeper practice.
Actionable Checklist
- Determine if you need live interaction or flexibility.
- Verify the platform offers a supportive community (forum, Discord, live Q&A).
- Review the curriculum roadmap—look for clear milestones.
- Calculate total cost vs. studio fees; ensure refunds are possible.
- Test the tech: internet speed, device compatibility, video‑conference integration.
- Read at least two student reviews or testimonials.
Once you tick these boxes, you’ll have a solid foundation to choose a platform that actually moves you forward.
Still unsure? Dive deeper into platform comparisons and see real‑world success stories in The Little Pot Company blog on selling handmade pottery, which also highlights how a good learning platform can accelerate your path to selling your own pieces.
Step 2: Set Up Your Workspace and Equipment
Find a Spot That Feels Like Your Studio
First thing’s first: you need a place where the wheel can spin without a neighbor’s cat stealing the clay. A spare corner of the living room, a garage nook, or even a fold‑out table in the bedroom works fine as long as you have about 6‑8 feet of clear floor space.
And if you’re worried about noise, remember that most wheels run at 120‑150 RPM—quiet enough that you can still hear a podcast in the background. The key is to pick a spot with a solid floor (concrete or wood) so the wheel stays steady.
Essential Tools (and Budget‑Friendly Alternatives)
Here’s the core kit you’ll need to get throwing without breaking the bank:
- Pottery wheel – entry‑level electric wheels cost $200‑$350; a used wheel from a local classifieds site can drop that to $120.
- Basic hand tools – needle tool, ribbon tool, wire cutter, and a wooden rib. You can buy a starter set for $30 or assemble the pieces from a hardware store.
- Clay – stoneware is forgiving for beginners. A 25 lb bag will see you through several weeks of practice.
- Work surface – a sturdy table covered with a canvas drop cloth or a cheap sheet of plywood.
- Water supply – a small bucket and a spray bottle keep the clay moist without flooding the floor.
Pro tip: look for a wheel with a removable splash guard; it makes cleanup easier and protects your floor.
Lighting, Ergonomics, and Comfort
Good lighting is the difference between seeing a subtle crack and missing it entirely. Position a 5000‑lumens LED lamp at a 45‑degree angle above the wheel; this reduces shadows and lets you see texture clearly.
And don’t forget ergonomics. Adjust the wheel height so your elbows are at a 90‑degree angle when you’re holding the clay. If the wheel sits too low, you’ll feel the strain after the first hour.
Many online creators swear by a rolling chair with lumbar support – it lets you swivel without twisting your back. If you don’t have one, a sturdy kitchen stool with a backrest works surprisingly well.
Safety and Clean‑up Routine
Clay dust can be a sneaky irritant, especially if you have allergies. Keep a small shop vac or a damp mop handy, and wipe down the wheel after each session.
Also, wear a pair of slip‑resistant shoes or old sneakers. A sudden spill of wet clay can make the floor slick, and you don’t want to lose balance mid‑throw.
According to Artists Network’s guide on home studio setup, a simple ventilation fan placed near the workbench helps control humidity and keeps the air fresh during long glazing sessions.
Real‑World Example: Maya’s Mini‑Studio
Maya, a stay‑at‑home dad in Austin, turned a 4‑ft by 6‑ft corner of his laundry room into a functional studio. He used a refurbished 220‑V wheel he bought on Facebook Marketplace for $150, added a cheap LED clamp light, and laid down a cheap vinyl floor runner for comfort.
Within two weeks Maya could throw a set of twelve mugs that sold on his Etsy shop. His secret? He mapped out a “5‑minute setup” routine: water bucket, tools in a tray, wheel on, lights on – then he was ready to spin. The routine saved him from the dreaded “I don’t have time to set up” trap.
Step‑by‑Step Checklist to Get You Rolling
- 1️⃣ Choose a floor‑level spot with at least 6 ft of clear space.
- 2️⃣ Place a sturdy table or plywood slab; cover with a canvas drop cloth.
- 3️⃣ Install an LED lamp at a 45° angle; test for glare.
- 4️⃣ Set wheel height so elbows rest comfortably at 90°.
- 5️⃣ Organize hand tools in a portable toolbox.
- 6️⃣ Keep a bucket, spray bottle, and shop‑vac within arm’s reach.
- 7️⃣ Run a short “setup drill” before your first class to iron out any kinks.
And there you have it – a workspace that feels professional without costing a fortune. Once you’ve got the space and gear in place, the next step is to dive into your first lesson and let the wheel do the talking.
Step 3: Master Basic Wheel‑Throwing Techniques
Alright, you’ve cleared the floor, set the lights, and the wheel’s humming like a tiny engine. What comes next? It’s the moment you actually start shaping clay, and that can feel both thrilling and terrifying. Don’t worry – we’ve all been there, staring at a lump of mud wondering if it’ll ever become a mug.
Why the Basics Matter
Think of basic wheel‑throwing as learning the alphabet before writing a novel. Without a solid foundation, every piece you try to finish will wobble, crack, or just look… off. Mastering a few core moves lets you add personality later without fighting the wheel.
And guess what? Most online pottery wheel classes break these moves into bite‑size videos, so you can pause, rewind, and practice at your own pace. That’s the real power of learning from home – you control the speed of your progress.
Core Techniques (and How to Nail Them)
Below are the three moves you’ll see repeated in every beginner’s lesson. I’ve added a quick cheat‑sheet table so you can glance at it while you practice.
| Technique | Key Focus | Pro Tip |
|---|---|---|
| Centering | Even distribution of weight | Use a wet sponge to smooth any high spots before you start turning. |
| Pulling Up Walls | Consistent thickness | Apply gentle, steady pressure with both hands – think of shaping dough, not squeezing a sponge. |
| Shaping the Base | Flat, stable foot | Trim excess clay with a rib while the wheel is still slow; it prevents wobble later. |
Let’s walk through each step in a way that feels like a conversation over coffee.
1️⃣ Centering – The “Reset” Button
Start with a ball of stoneware about the size of a baseball. Wet your hands, slap the ball onto the wheel, and press it gently into the center. Then, with both palms, squeeze inward while the wheel spins at medium speed. You’ll feel the clay settle into a perfect, symmetrical mound.
Here’s a concrete example: Maya, the same stay‑at‑home dad we mentioned earlier, struggled with wobbling mugs until she added a 30‑second “center‑check” at the start of every session. She’d spin the wheel slowly, feel for any wobble, and adjust before pulling up walls. That tiny habit cut her defect rate by half.
2️⃣ Pulling Up Walls – Building the Cylinder
Once you’ve got a solid dome, lower the wheel speed a notch and begin pulling the clay upward with your fingers. Imagine you’re coaxing a balloon to rise – keep the pressure even, and let the wheel do most of the work. Your fingers act like a guide, not a force.
If you’re unsure about the right amount of pressure, try this experiment: pull a thin strip of clay upward for 5 seconds, then stop and let the wheel finish the shape. You’ll see that the wheel smooths out inconsistencies, reinforcing the idea that you’re shaping, not forcing.
3️⃣ Shaping the Base – The Unsung Hero
After the walls are up, tilt the piece slightly and use a rib to shape the foot. A flat base is crucial for stability and for a clean glaze later. Many beginners forget to trim the excess at this stage, which leads to wobbling cups on shelves.
Pro tip from a seasoned ceramist on The Spruce Crafts: keep your rib angled just enough to scrape the inside of the wall without digging into the clay. That subtle angle makes the difference between a smooth foot and a jagged edge.
Putting It All Together – A Mini‑Practice Routine
Now that you know the moves, stitch them into a 10‑minute practice loop. Here’s a simple checklist you can print and stick next to your wheel:
- ⏱️ Set wheel to medium speed.
- 🟠 Center a 25‑lb stoneware ball (30 seconds).
- ⬆️ Pull up walls to desired height (45 seconds).
- 🔧 Shape and trim the base (30 seconds).
- 🔄 Rotate the piece, inspect for wobble, adjust if needed (15 seconds).
Do this loop three times in a row, then take a short break. The repetition builds muscle memory, and the break prevents fatigue – a common culprit for cracked pieces.
What Real Learners Say
One student on an online tutorial platform mentioned that “the moment I finally got the centering right, everything else clicked.” She added that the video slowed down the centering step to 0.5× speed, which let her see the exact hand positions.
Another hobbyist, Tom from Denver, told me he used a kitchen timer to keep each technique within the time limits above. After two weeks, his mugs stopped wobbling, and he started experimenting with decorative ribs on the outside.
Actionable Takeaway
Pick one of the three core techniques and practice it exclusively for a full day. Record a short video of yourself, then watch it back at half speed – you’ll spot tiny hand movements that make a huge difference.
When you feel comfortable, combine the three moves into a smooth 10‑minute loop and watch your confidence grow. The next step after mastering these basics? Dive into more advanced forms like teapots or sculptural pieces, but that’s a story for the next section.
Step 4: Explore Intermediate Projects and Glazing
Congrats, you’ve nailed the mug. Now you’re probably thinking, “What’s next? How do I keep the momentum without getting stuck?” That’s exactly where intermediate projects and glazing come in – they stretch your skill set just enough to stay exciting, but not so far that you feel lost.
Why move beyond the mug?
The mug is the “hello world” of pottery. It teaches you centering, pulling walls, and trimming a foot. Once those moves feel natural, you’ll notice the wheel humming under your hands and the urge to try something with a curve, a handle, or a dramatic silhouette. Those little challenges force you to refine pressure control, timing, and—most importantly—your eye for proportion.
Choosing an intermediate project
Pick a shape that adds one new variable at a time. Here are three crowd‑pleasers that work great for online learners:
- Mini‑vase (no handle) – introduces tapering and a smoother foot.
- Teacup with a simple handle – adds the art of attaching a handle without breaking the wall.
- Lamp base – combines a wider base, a narrower neck, and a hollow interior that will later hold a bulb.
Pick the one that aligns with the aesthetic you love. If you’re a fan of clean lines, start with the mini‑vase. If you want a functional piece for daily use, the teacup is perfect.
Step‑by‑step for a mini‑vase
1️⃣ Prepare a slightly larger ball – about 30 % bigger than a mug. Wet it well, then center as you always do.
2️⃣ Lower the wheel speed and start pulling the walls, but this time let the walls taper inward. Imagine you’re shaping a gentle hourglass; keep your fingers parallel and let the clay follow.
3️⃣ Shape the lip – when you reach the desired height (usually 4‑5 inches), gently flare the rim with a wooden rib. This gives the vase that elegant “opening” look.
4️⃣ Trim the foot – use a metal rib to shave a thin, flat base. A good foot prevents wobble during the bisque fire.
5️⃣ Dry to leather‑hard – let the piece sit for 30‑45 minutes. You’ll feel a slight give when you press the side.
Adding a handle to a teacup
Start with the same cup shape you mastered in the previous step. While the cup is still leather‑hard, cut a small “U” notch where the handle will join. Roll a short coil of clay, score the ends, slip them, and gently press the coil into the notch. Blend the seams with a soft sponge. Let the cup dry completely before moving on.
Glazing basics for the intermediate piece
Glazing is where pottery turns from functional to expressive. The process has three reliable phases: bisque firing, glaze application, and glaze firing. Each phase has a few non‑negotiable checkpoints.
Bisque fire – fire the dried piece to the “cone 04” range (around 1,945 °F). This makes the clay porous enough to absorb glaze without cracking.
Glaze selection – choose a glaze that matches the clay body. A high‑fire stoneware glaze will survive a second firing at “cone 6” (≈2,300 °F). For beginners, Artists Network explains why low‑toxicity, water‑based glazes are safest for home studios.
Application techniques – dip, brush, or spray. Dipping gives an even coat; brushing lets you create intentional streaks. If you’re feeling adventurous, try a “wash” glaze: dilute the glaze to 30 % and brush it on for a translucent, layered look. The American Ceramic Society’s guide to glazing basics offers a quick chart of recommended water‑to‑glaze ratios.
After glazing, let the piece dry fully (usually 24 hours), then fire it to the glaze’s recommended cone. Most hobby‑level kilns can hit cone 6 in one 8‑hour cycle.
Expert tip: The “glaze test tile”
Before you glaze your whole vase, roll a small test tile (≈2 inches square) from the same batch of clay. Apply the glaze exactly as you plan to on the final piece, fire it, and evaluate the color, texture, and any defects. This cheap trick saves you from a costly surprise on a larger project.
Actionable checklist for the week
- 📅 Day 1: Choose one intermediate shape and gather extra clay.
- 📅 Day 2: Center and pull the shape, focusing on the new variable (taper, handle, or base).
- 📅 Day 3: Trim, dry to leather‑hard, and attach any handles.
- 📅 Day 4: Bisque fire and create a glaze test tile.
- 📅 Day 5: Apply glaze to test tile, fire, and note results.
- 📅 Day 6: Glaze the full piece using the refined technique.
- 📅 Day 7: Final glaze fire, then photograph and share your progress in the CreativiU community for feedback.
Follow this plan and you’ll have a polished, glazed intermediate piece by the end of the week—proof that online pottery wheel classes can take you from mug‑maker to mini‑artist without ever leaving home.

Deep Dive: Comparison of Top Online Pottery Wheel Class Platforms
If you’ve nailed the basic mug and are itching for a new challenge, the next question is probably – which online pottery wheel classes actually deliver results? You’ve probably stared at a handful of course catalogs, felt the overwhelm, and wondered whether the hype matches the hands‑on reality.
Let’s cut through the noise by looking at three platforms that keep popping up in pottery forums, and see how they stack up on the things that matter most to us: clear instruction, real‑time feedback, and price that doesn’t make you sell a kiln.
What to compare – the decision‑making checklist
Before we dive into the table, keep this quick checklist in mind:
- Lesson format – are the videos bite‑size or marathon‑style?
- Live interaction – can you ask questions during a class?
- Community depth – is there a place to post your work and get critiques?
- Materials list – does the course assume you have a wheel, or does it guide you from scratch?
- Cost & commitment – monthly subscription, one‑off payment, or free trial?
Now, grab a coffee and see how each platform measures up.
| Platform | Lesson format | Live feedback | Community & critique | Price (per month) |
|---|---|---|---|---|
| CreativiU | Self‑paced videos + weekly live Q&A | Live Zoom office hours every Thursday | Dedicated forum, instructor‑led critiques, peer galleries | $29 |
| Udemy | Pre‑recorded series, usually 1‑2 hour blocks | No built‑in live sessions (instructor Q&A via messaging) | Basic Q&A section, no structured critique | Varies; often $12–$20 per course |
| Domestika | High‑production modules, 30‑minute chapters | Monthly live “masterclass” webinars (optional) | Community board, peer comments, but no formal feedback | $19 (monthly access) |
Notice the patterns? CreativiU bundles the three pillars – structured lessons, live Q&A, and a critique‑rich community – into one tidy subscription. Udemy and Domestika excel at polished video production, but they leave the feedback loop a bit thin.
Real‑world example: Sarah’s “lamp base” journey
Sarah, a stay‑at‑home mom from Ohio, signed up for CreativiU’s intermediate wheel track. She followed the weekly live Q&A, posted photos of her lamp base on the forum, and got a specific tweak: “soften the foot by pulling the rib a half‑inch higher.” After applying the tip, her piece fired without wobble. She later tried a similar class on Udemy; the video was great, but when she posted her photo in the course Q&A, the response was a generic “looks good.” That difference in personalized feedback made her stick with CreativiU.
And you don’t have to be a full‑time potter to benefit. The same platform works for weekend hobbyists, because the live sessions are recorded, so you can watch them at 1× or 0.5× speed – a trick The Spruce Crafts recommends for mastering hand positions.
How to pick the right fit for you
Step 1: List the skill you want to master next – say, adding handles to teacups. Step 2: Check whether the platform offers a dedicated module on that skill (look at the syllabus, not just the marketing copy). Step 3: Test the community vibe. Most platforms have a free preview forum; jump in, introduce yourself, and see how quickly you get a constructive comment.
Step 4: Do the math. If you plan to take three courses a year, a $29/month subscription may actually be cheaper than buying three $20 Udemy courses separately.
Expert tip – combine platforms for a hybrid learning path
Even if you settle on CreativiU for its feedback loop, you can still supplement with a free Ceramic Arts Network tutorial that dives deep into glaze chemistry. Use the supplemental video to experiment, then bring the results back to your CreativiU critique session. The cross‑pollination of perspectives often sparks the most creative breakthroughs.
Bottom line: match the platform to the three things you care about most – clear step‑by‑step instruction, real‑time or recorded feedback, and a community that actually looks at your work. When those line up, your wheel time will feel less like a solo experiment and more like a guided studio jam session.
Step 5: Join Community Forums and Get Feedback
When you finish a video lesson and your wheel is still humming, the next instinct is to wonder, “Did I do that right?” That moment of doubt is exactly why a lively community matters.
First, think of a forum as a virtual studio bench. You’re not just posting a picture; you’re inviting peers to lean in, point out the little wobble in the foot, or applaud the way you tapered the vase. Those instant reactions are the glue that turns solo practice into a feedback loop.
How to find the right forum
1. Start with the platform’s own discussion board. Most online pottery wheel classes host a members‑only forum where instructors drop weekly critique prompts. Sign up for the free preview, introduce yourself, and post a single “before‑and‑after” shot. If you get a specific note (“raise the rim by a quarter inch”) within a day, you’ve found a responsive group.
2. Check niche subreddits like r/pottery on Reddit. The subreddit has over 150 k members, and the “Critique Corner” thread runs every Thursday. Users share photos, ask for advice, and often tag a more experienced potter for a quick tip.
3. Look for Discord servers dedicated to ceramics. A quick Google search for “ceramics Discord server” yields several invitation links. In Discord you can drop a short video clip of your wheel turn and get live feedback, which is priceless when you’re troubleshooting a tricky coil.
Does any of this feel overwhelming? No need to join all three at once. Pick one, spend 10 minutes a day scrolling, and watch the confidence grow.
Actionable feedback routine
Step 1 – Capture a clear photo. Use natural light, a neutral background, and include a ruler or a known object for scale. A simple phone camera works; you don’t need a DSLR.
Step 2 – Write a concise caption. Mention the skill you’re targeting (“trying to pull a smooth foot”) and the specific part you’re unsure about.
Step 3 – Post and set a “feedback window.” Tell the community “please comment within the next 24 hours.” This creates a sense of urgency and often yields quicker replies.
Step 4 – Respond to each comment. If someone says “the foot looks a bit thin,” thank them and ask, “how much should I pull it out?” Engaging shows you value the input and encourages more detailed advice.
Step 5 – Apply the suggestion in your next session. Document the change with a “before‑and‑after” pair, then close the loop by posting the result. This iterative loop is what most successful potters call “the critique cycle.”
Real‑world examples
Emma, a freelance graphic designer from Austin, joined a pottery Discord server while taking an intermediate wheel class. She posted a short clip of her vase wobbling during the dry‑fire stage. A veteran potter replied, “try drying it slower and raise the foot by 2 mm; the moisture gradient is causing the wobble.” Emma followed the advice, and her next piece fired without any cracks. She later credited the quick Discord feedback for shaving weeks off her learning curve.
Mark, a retiree in Ohio, prefers Reddit because he can browse anonymously. He posted a photo of a lamp base that kept cracking at the glaze stage. A fellow redditor linked to an article on proper bisque drying times (bisque drying tips) and suggested a slower ramp‑up in the kiln. Mark adjusted his schedule, and the next firing was flawless. So, what’s the common thread? Both potters turned a single piece of feedback into measurable improvement.
Tips to make the most of community feedback
- Be specific. “My rim feels uneven” is vague; “my rim is 1 mm higher on the left side than the right” invites concrete advice.
- Show progress, not just finished work. Drafts, test tiles, and even mistakes are valuable teaching moments.
- Schedule a regular “feedback hour” each week. Treat it like a studio class you can’t miss.
- Offer feedback in return. The more you give, the more you’ll receive.
Finally, remember that feedback is a two‑way street. It’s not just about fixing errors; it’s about discovering new techniques you might never have tried on your own. So, join a forum, post that first photo, and let the collective wisdom of the pottery community push your skills forward.
Conclusion
We’ve come full circle: you started wondering if online pottery wheel classes could actually replace the studio buzz, and now you’ve seen how community feedback, structured lessons, and a flexible schedule turn hobby into progress.
Remember Sarah’s lamp base? Mark’s cracked glaze? Those stories show that a single comment can shave weeks off your learning curve. The same thing happens when you pair a platform that records live Q&As with a forum where peers point out that half‑inch rim imbalance.
So, what’s the next move? Grab the free preview of CreativiU, post a quick photo of your latest turn, and ask for one concrete tip. Then, schedule a 10‑minute “feedback hour” each week – treat it like a mini‑studio session.
In short, the three pillars—clear step‑by‑step instruction, real‑time or recorded feedback, and an engaged community—are the secret sauce for mastering the wheel from your living room.
Ready to spin your first perfect cup? Dive in, experiment, and let the collective wisdom push you forward. Your next masterpiece is just a click away.
Keep in mind that consistency beats intensity; a 15‑minute daily spin builds muscle memory faster than a marathon session once a month. Celebrate each tiny improvement, and soon the wheel will feel like an extension of your hand.
FAQ
What are online pottery wheel classes and how do they work?
Think of them as a virtual studio where an instructor breaks down each hand‑position, then you hit play from your kitchen table. Most platforms stream pre‑recorded lessons, but they also keep a forum or live‑chat where you can ask follow‑up questions. You watch, pause, try the technique, then post a photo or video for critique. It’s a loop of watch‑practice‑feedback that mimics a real‑world class, just without the commute.
Do I need any special equipment to join online pottery wheel classes?
You don’t need a full‑blown studio, but a basic electric wheel and a set of hand tools will make the experience smoother. A cheap starter wheel, a few trimming tools, and a reliable internet connection are enough. If you’re cramped on space, a tabletop wheel works fine—just make sure it’s level. And don’t forget a phone or webcam for recording your work; the community loves visual proof.
How can I get real‑time feedback when I’m learning from a recorded video?
Most platforms embed a Q&A section right under each lesson. After you finish a turn, snap a clear photo, add a ruler for scale, and post it with a specific question like “Should my rim be a quarter inch higher on the left?” Within hours, peers or the instructor will drop a tip. Some sites even host weekly live critique sessions where you can share a short clip and get instant pointers.
Are the community forums on platforms like CreativiU safe and supportive for beginners?
Absolutely—most pottery forums are moderated and geared toward encouragement. New members usually introduce themselves and share a “first‑try” photo; the vibe is more “we’ve all been there” than “critique‑only.” Look for threads that promise concrete feedback within 24 hours; that’s a good sign the community is active and kind. If a post feels harsh, you can always flag it or move to a different sub‑forum.
How much time should I commit each week to see real progress?
Consistency beats marathon sessions. Aim for a 15‑minute spin five days a week rather than a two‑hour binge once a month. Those short bursts build muscle memory and let you apply feedback while it’s still fresh. Pair each spin with a quick journal note—what felt solid, what wobbled. After a few weeks you’ll notice smoother walls and more confident hand positions.
Can I earn a certificate or credential from online pottery wheel classes?
Many platforms offer a completion badge or digital certificate once you finish a module and submit a final project. It’s not the same as a formal art school diploma, but it does look good on a portfolio or a freelance profile. Some courses even let you upload a video of your finished piece for a “mastery” stamp, which can be a confidence boost when you show it to clients or friends.
What’s the price difference between subscription models and buying individual courses?
Subscriptions usually run $20‑$30 a month and give you unlimited access to all current lessons, plus community perks. Buying a single course might cost $30‑$50, which is fine if you only want one technique. Do the math: if you plan to take three or more classes a year, a subscription often ends up cheaper and adds the bonus of spontaneous new content.
Leave a Reply