Surprisingly, none of the 38 step‑by‑step guides we examined list an estimated build time or required skill level , a critical omission for beginners. In this guide you’ll walk through every stage of crafting a leather wallet, from picking the right hide to sealing the final stitch. By the end you’ll have a wallet you can be proud of and a clear checklist you can reuse for future projects.
We’ll also point out where the CreativiU Online Craft Course Library fills the missing time‑and‑skill info, so you can follow a structured learning path if you need extra guidance.
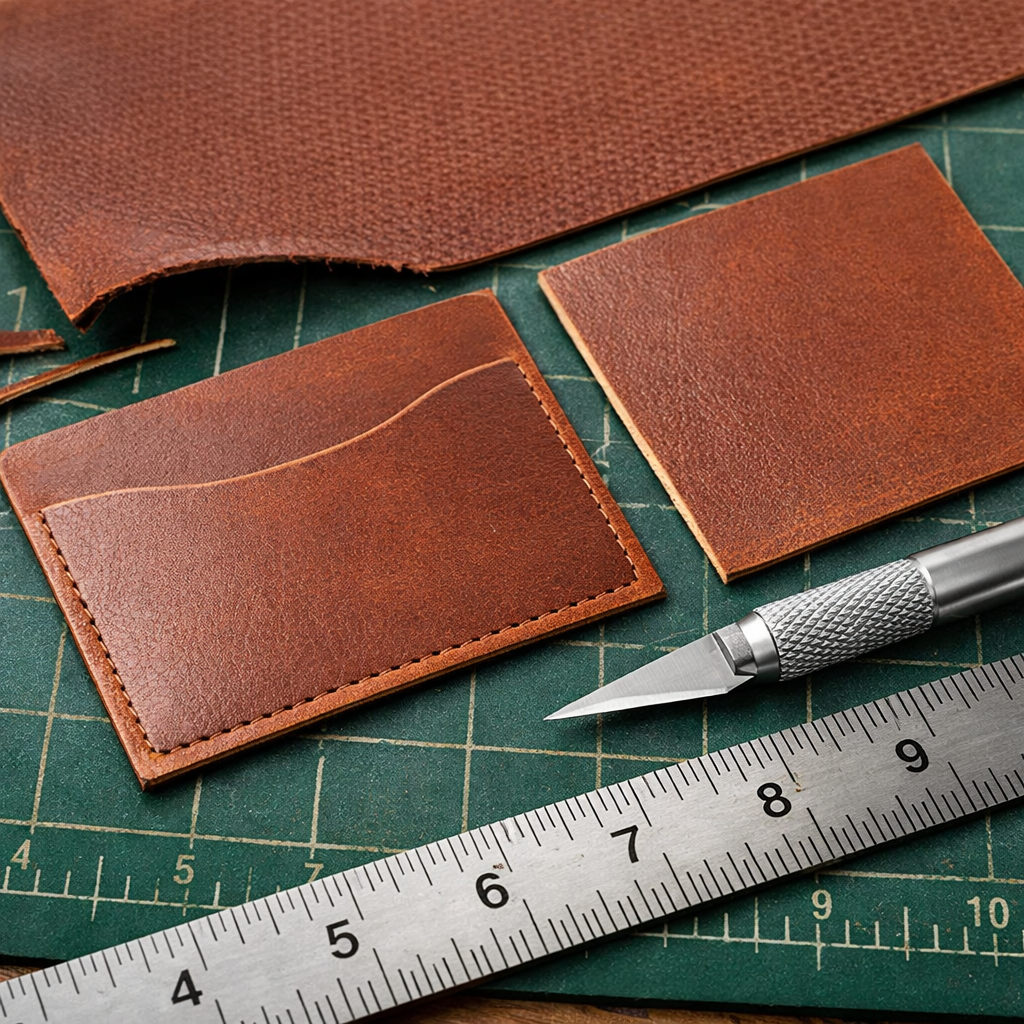
Step 1: Select Leather Type and Gather Tools
Choosing the right leather is the first decision that sets the tone for the whole project. Vegetable‑tanned leather is the go‑to for wallet makers because it accepts dye, edges can be burnished, and it stiffens nicely after conditioning. According to Wikipedia’s leather entry, vegetable tanning uses natural tannins from tree bark, giving a firm yet supple feel that works well for thin folds.
Weight matters too. A 2‑3 ounce (0.7‑1 mm) sheet works for a minimalist card holder, while 4‑5 ounce (1.5‑2 mm) is better for a bifold with multiple pockets. Thinner hides cut easier but may tear under stress, so match weight to the intended use.
Next, gather the essential tools. A self‑healing cutting mat protects your blade and work surface. A ruler with a cork backing prevents slipping while you cut. An X‑Acto or rotary knife gives clean lines; keep the blade sharp, dull blades are unsafe. You’ll also need a stitching pony, a set of stitching chisels (2 mm and 3 mm spacing work well), a slicker for edge burnishing, clamps, and a leather rougher for glue prep.
Don’t forget safety gear. Gloves protect your hands from cuts, and safety glasses shield eyes from stray leather shavings. A well‑ventilated space helps when you later apply glue or conditioner.
If you’re new to leather craft, the CreativiU platform offers a beginner‑friendly module that walks you through each tool, complete with video demos and printable checklists. The lessons break down the same tools we list here, so you can see them in action.
For a deeper look at related craft techniques, check out our Weave on a Cardboard Loom tutorial. The same precision you need for weaving translates well to cutting leather.

Step 2: Create or Print a Wallet Pattern
A pattern is your roadmap. You can draw one by hand on graph paper, or download a PDF from a trusted source. The pattern should include the main body, card slot, and any additional pockets. Scale the pattern to match the thickness of your leather; a 3 mm pattern works well for 3‑ounce leather.
Print the pattern on heavyweight paper or cardstock. This prevents tearing when you transfer it to the leather. If you prefer a digital workflow, you can design the pattern in a vector program like Inkscape (free) and print at 100 % size.
When you lay the pattern on the leather, use a scratch awl to trace the outline. The awl makes tiny dents that guide your cutting blade. For curved edges, use a flexible curve ruler or an arc template.
Mark stitching lines as well. A common practice is to mark a line 5 mm from the edge for the saddle stitch. This ensures even spacing and a neat finish.
Many beginners skip the pattern step and cut freehand, but that often leads to mismatched pieces. The CreativiU course includes printable patterns that you can customize, so you don’t have to start from scratch.
Step 3: Cut Leather Pieces Accurately
Now it’s time to cut. Place your leather on the self‑healing mat, align the pattern, and secure it with clamps. Use a straight edge to guide the blade. Press firmly but let the blade do the work; too much force can crush the hide.
For straight cuts, run the blade along the ruler in a single smooth motion. If the blade stalls, lift and reposition rather than forcing it. For curves, rotate the leather piece and use the edge of the pattern as a guide, keeping the blade at a shallow angle.
Once all pieces are cut, label them with a pencil or chalk. This prevents mix‑ups during assembly. Lay the pieces out in the order they’ll be sewn so you can see the workflow before you start.
If you have a rotary cutter, you can speed up the process, but be sure the blade is sharp; a dull rotary will tear rather than cut.
Watch this short video for a visual demonstration of cutting techniques:
After cutting, double‑check each piece against the pattern. Small errors are easier to fix now than after stitching.
Step 4: Prepare Edges and Shape Pieces
Sharp edges feel uncomfortable in a pocket, so you’ll want to bevel and burnish them. Start with an edge beveler set to the appropriate size , zero for 3‑ounce leather, one for 5‑ounce. Run the beveler along each edge, keeping the tool flat against the hide.
After beveling, sand the edges with 180‑grain sandpaper to remove any rough spots. Follow with 400‑grain for a smoother finish. Wipe away dust with a tack cloth before moving on.
Burnishing gives the edge a glossy look. Apply a small amount of leather slicker or even a dab of beeswax to a canvas cloth, then rub the edge repeatedly. The friction compresses the fibers, creating a sleek surface.
For a professional touch, you can apply a thin coat of edge paint after burnishing, especially on wallet styles that show the edges prominently.
“The best time to start building a leather wallet was yesterday.”
If you need a quick visual of edge work, the CreativiU tutorial on making a scrunchie with a sewing machine shows how to handle small fabric edges, a skill that transfers well to leather.
Step 5: Hand‑Stitch the Wallet (Saddle Stitch)
The saddle stitch is the strongest hand stitch for leather. It uses two needles that pass through the same hole from opposite sides, creating a lock that won’t pull apart.
First, choose the right thread. A 0.6 mm waxed polyester (often called “tiger thread”) works well for most wallets. If you prefer a natural look, linen thread adds a rustic feel. For heavier leathers, step up to 0.8 mm.
Needles matter too. John James needles in British size 2 are praised for smoothness and durability. As the forum discussion notes, they rarely break and glide through pre‑punched holes.
Mark stitch holes using a stitching chisel. A 3 mm spacing (about 8 SPI) gives a tight, neat look. For a looser aesthetic, you can go to 4 mm spacing (6 SPI). Consistency is key , measure once, then punch all holes with the same chisel.
Thread the needle, pull a short tail through the first hole, and start the saddle stitch: bring the left needle up through the hole, then the right needle down through the same hole, pulling the thread tight each time. Continue along the seam, keeping stitch length even.
For visual reference, on saddle stitching at Wikipedia. It breaks down the needle motion step by step.
Step 6: Finishing, Conditioning, and Troubleshooting
Finishing makes the wallet look polished and protects it from wear. Start by cleaning the leather with a leather‑specific cleaner and a soft cloth. Avoid water, which can stain the hide.
Next, apply a thin layer of conditioner. Angelus offers a popular leather conditioner that restores natural oils without darkening the color. Condition every 3‑6 months to keep the leather supple.
If the color has faded, you can re‑dye using a leather dye applied with a sponge. Test the dye on a scrap piece first to ensure the shade matches.
After dyeing, let the wallet dry completely, then apply a protective sealant. A light coat of a water‑based sealant prevents stains and adds a subtle shine.
Common issues include uneven stitches, edge cracks, and glue seepage. Uneven stitches often stem from inconsistent hole spacing , double‑check your chisel before you start. Edge cracks can be fixed by re‑burnishing and applying a bit of leather filler. Glue seepage is avoided by applying a thin, even layer of contact cement and clamping the pieces for a few minutes.
For a quick troubleshooting cheat sheet, on wallet restoration how to restore leather wallets. It covers cleaning, repairing scratches, and re‑conditioning.
For a broader view of craft care, the CreativiU site also hosts a module on leather maintenance that walks you through each step with videos.
Another useful resource is the Hand‑Painted Pottery tutorial, which shows how to work with delicate surfaces, a skill that translates to handling thin leather without tearing.
Frequently Asked Questions
What type of leather is best for a beginner wallet?
Vegetable‑tanned leather in the 2‑3 ounce range offers a good balance of flexibility and durability. It accepts dye well, so you can customize the color, and it’s forgiving enough that a small mistake won’t ruin the whole piece. If you’re unsure, start with a scrap bundle from a local tannery to practice cutting and stitching before committing to a full hide.
How long does it usually take to finish a wallet?
Because most guides omit time estimates, we’ve broken the process into stages. Cutting and edge prep take about 45 minutes, stitching another 60 minutes, and finishing (conditioning, dyeing, sealing) adds roughly 30 minutes. So a typical wallet can be completed in 2‑3 hours for an experienced maker, or 4‑5 hours for a beginner.
Do I need special needles for saddle stitching?
Yes. John James needles in British size 2 are widely recommended for their smooth eye and strong shank. They fit the standard 0.6 mm thread and slide through punched holes without catching. If you work with thicker leather, step up to size 3.
Can I use a sewing machine instead of hand‑stitching?
You can, but hand‑stitching gives a stronger seam for leather. Machine stitches tend to pull through thin leather, especially at stress points like pocket corners. If you prefer a machine, use a leather needle and a walking foot, and reinforce high‑stress seams with hand‑stitched saddle stitches.
How do I prevent glue from seeping onto the leather surface?
Apply contact cement sparingly with a small brush, and spread it evenly on both surfaces before joining. Use a thin piece of waxed paper between the pieces while the glue sets; this keeps excess from bleeding onto the visible side. Clamp the pieces firmly for 5‑10 minutes to ensure a clean bond.
What safety gear should I wear while working with leather?
Wear cut‑proof gloves to protect your hands from the knife, and safety glasses to guard against stray shards. Work in a well‑ventilated area when using glues or dyes, as some chemicals emit fumes. A dust mask helps if you’re sanding or sanding edges.
How often should I condition my finished wallet?
Condition the wallet every 3‑6 months, depending on use. If the leather looks dry or stiff, apply a light coat of conditioner and let it absorb for a few hours. Over‑conditioning can make the leather too soft, so a thin layer is sufficient.
Can I add custom designs or embossing to my wallet?
Yes. After the wallet is assembled but before conditioning, you can emboss using a heated branding iron. Test the temperature on a scrap piece first. For painted designs, use leather‑safe acrylic paints and seal with a clear leather finish.
Conclusion
Making a leather wallet is a rewarding project that blends precision, creativity, and patience. You’ve learned how to pick the right hide, create a pattern, cut clean pieces, shape edges, stitch with a strong saddle stitch, and finish with conditioning and sealing. By following this step‑by‑step tutorial you’ll avoid the common pitfalls that many beginners face, missing time estimates, uneven stitches, and weak edges.
Remember, the missing piece most guides overlook is a clear timeline and skill guide. That’s where CreativiU shines: its online courses lay out each step with videos, printable checklists, and time‑saving tips, so you can move from novice to confident leather crafter.
Grab your tools, fire up the cutting mat, and start stitching. Your first handmade wallet will be the foundation for many more custom pieces you’ll create down the road.
Leave a Reply