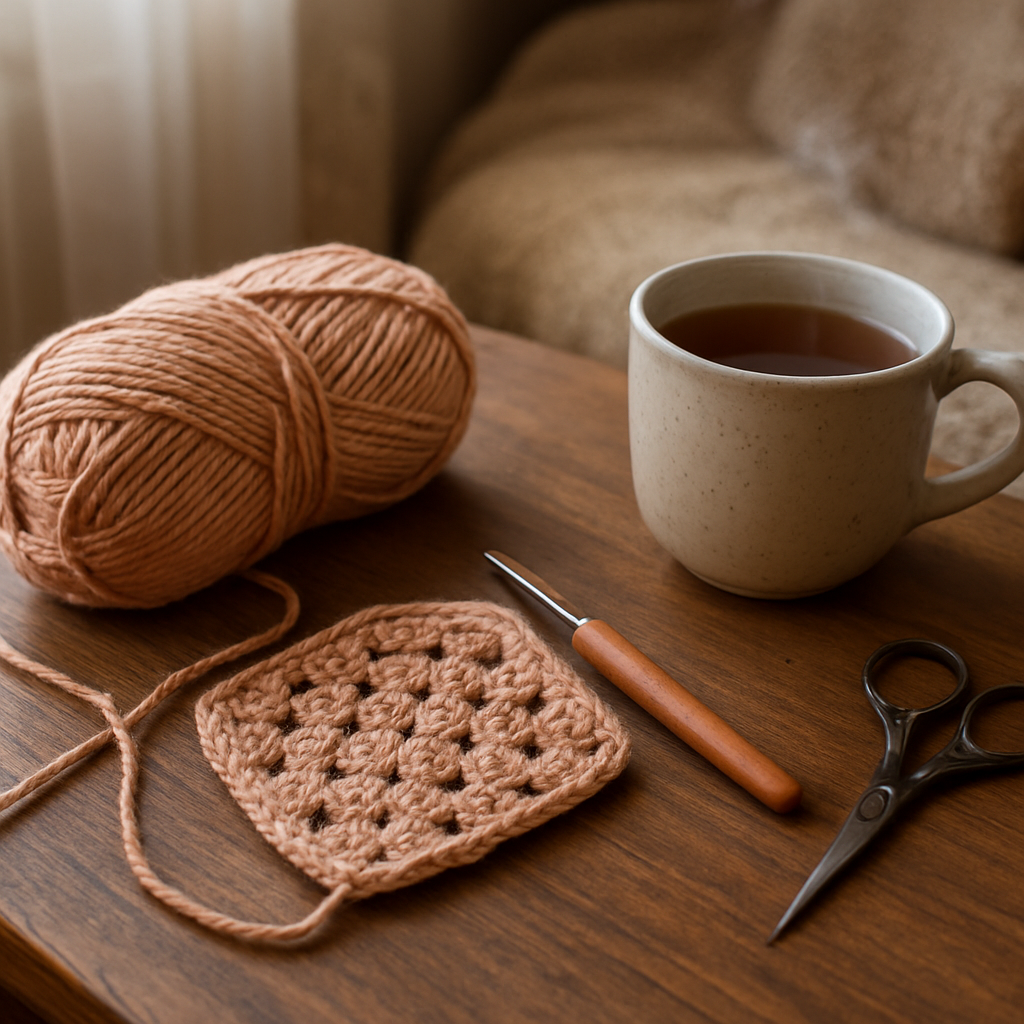
Picture this: you’ve just unrolled a bright skein of yarn, the hook feels light in your hand, and you’re wondering where to start. If you’ve ever felt that mix of excitement and uncertainty, you’re not alone – the granny square is the perfect entry point for anyone dipping their toes into crochet.
Why do we love the granny square so much? It’s tiny, it’s forgiving, and each round you finish gives you an instant sense of achievement. Imagine a weekend project where you can create a whole blanket, a tote, or even a funky wall hanging by simply stitching together a handful of these little gems.
In our experience at CreativiU, beginners often skip the magic ring and start with a chain, only to find their square lopsided. A quick tip: start with a magic ring (or a simple chain‑4 circle) to keep the centre tight and the edges even. This tiny adjustment can turn a wobbly square into a professional‑looking one, and it only takes a minute to learn.
Here’s a quick checklist to get you rolling:
- Choose a medium‑weight yarn (worsted or DK) – it’s easy on the hook and shows up nicely on screen.
- Grab a size H/5 mm crochet hook – the perfect balance for beginners.
- Make a slip knot, then a magic ring or chain‑4 circle.
- Work the first round of double‑crochets into the ring, then pull the tail to close.
- Continue with rounds of 3 double‑crochets, a chain‑2 spacer, and repeat around.
Now, if you’re the kind of crafter who loves a visual guide, we’ve put together a step‑by‑step tutorial that walks you through each stitch with photos and clear instructions. Check out How to Crochet a Granny Square for Beginners: Step‑by‑Step Guide for a deeper dive – it’s the resource we recommend most often.
And don’t forget, crocheting is as much about mindset as technique. Take a moment to set up a comfy space, maybe a cup of tea, and treat each round like a mini‑meditation. By the time you finish your first square, you’ll have not just a piece of fabric, but a boost in confidence that fuels your next creative adventure.
Ready to give it a go? Grab that yarn, slip that hook on, and let’s start stitching those perfect squares together.
TL;DR
In just a few minutes you’ll learn how to crochet a granny square for beginners, using simple stitches, a magic ring, and our proven step‑by‑step guidance.
Grab your yarn, follow the quick checklist, and finish a perfect square that boosts confidence, fuels creativity, and opens the door to endless projects.
Step 1: Gather Your Materials
Alright, before you even think about that first double‑crochet, pause for a second and ask yourself: do you have everything you need within arm’s reach? Trust me, the smoother the start, the less you’ll waste time untangling yarn or hunting for a hook.
First up, yarn. For most beginners, a medium‑weight worsted or DK yarn works like a charm. It’s thick enough to see your stitches clearly, yet still pliable for those tighter rounds. If you’re a creative entrepreneur planning a mini‑collection, you might even pick a color palette that matches your brand vibe.
Next, the hook. A size H/5 mm crochet hook is the sweet spot for the yarn we just mentioned. It slides through loops without digging, and it’s comfortable for longer sessions – perfect for parents who want to crochet while the kids are doing homework.
Now, the often‑overlooked magic: a slip knot and a magic ring (or a simple chain‑4 circle). The magic ring keeps your centre tight, preventing that dreaded wobble we see in a lot of first‑time squares. If you’re feeling unsure, just picture it as a tiny, invisible donut that pulls snug when you close the tail.
Do you have a pair of scissors handy? You’ll need them to trim yarn ends and tidy up the final look. A yarn needle also comes in handy later for weaving in those tails so your square looks polished.
What about a comfy workspace? Grab a cup of tea, set up a small cushion or a lap desk, and make sure the lighting is bright enough to see the stitches. A relaxed environment makes each round feel like a mini‑meditation rather than a task.
Here’s a quick visual refresher – we’ve embedded a short video that walks you through gathering these basics. It’s a good way to see the hook size and yarn tension in action before you dive in.
Once you’ve got your materials laid out, take a moment to double‑check everything. Can you feel the yarn sliding smoothly through the hook? Is the magic ring ready to be tightened? This tiny pause saves you from mid‑project frustration later.
For those who love a little extra inspiration, consider checking out a local studio that often hosts crochet circles. They can be great for swapping tips and staying motivated.
Finally, if you’re part of the CreativiU community, you’ll find a printable checklist in your member dashboard that you can tick off as you gather each item. It’s a small tool, but it keeps the process organized, especially when you’re juggling multiple projects.
Step 2: Make the Foundation Chain and First Round
Okay, you’ve got your yarn, hook, and that magic‑ring ready. The next move is the foundation chain – the little “floor” your granny square will stand on. If you’re wondering why we bother with a chain before the first round, think of it as laying down a solid base before you build a house. Without it, the whole thing can wobble.
Here’s the quick rundown: make a chain of four stitches, join them with a slip stitch to form a tiny ring, then pull the tail tight. That’s your foundation chain. It may feel like a tiny step, but it’s the secret to a neat, even square.
Why a chain‑4 circle works
When you start with a chain‑4 circle, the stitches sit snugly against each other, keeping the centre tight. That tight centre prevents the classic “donut‑hole” that many beginners see when they start a round with loose stitches. In our CreativiU community, we’ve heard from dozens of hobbyists that switching to a chain‑4 base cut their frustration in half.
And if you’re still skeptical, try this simple test: after you finish the first round, gently pull on the yarn tail. If the centre stays compact and the edges stay flat, you’ve nailed the foundation.
Step‑by‑step: foundation chain
- Make a slip knot and secure your yarn to the hook.
- Chain four stitches (you’ll hear a soft “click” each time you yarn over and pull through).
- Insert the hook into the first chain stitch you made, yarn over, and pull through both loops on the hook – that’s a slip stitch.
- Pull the tail gently to close the ring. You should now have a tight little donut.
Take a breath. You’ve just set the stage for a perfect square.
First round of double crochets
Now for the fun part: the first round of double crochets (DC). You’ll work three DCs into the ring, then chain two to create a corner. Repeat this sequence four times. The result is a classic granny‑square “shell” that looks like a tiny flower.
Let’s break it down:
- Chain two (doesn’t count as a stitch – it’s just a spacer).
- Double crochet three times into the center of the ring.
- Chain two – that’s your corner.
- Double crochet three more times into the ring.
- Repeat steps 1‑4 until you’ve done four corners total.
When you pull the tail of the magic ring, the whole round should close neatly, forming a flat, even circle of stitches.
Does it feel a bit tricky at first? That’s normal. The key is to keep your tension consistent – not too tight, not too loose. If you notice gaps, try a slightly tighter pull on the tail.
Real‑world examples
Sarah from Austin, a stay‑at‑home mom, swore by the chain‑4 method. She said the first round “just clicked” and she could finish a 4‑inch square in under ten minutes. Marco, a freelance designer in Berlin, used the same technique but swapped the worsted yarn for a sleek cotton‑bamboo blend. His first round looked so polished he used the square as a sample for a new tote line.
Both of them mentioned that the tiny “donut” they created with the chain‑4 circle kept the square from curling – a common complaint among beginners.
Tips from the pros
• Mark your corner. Slip a stitch marker into the first chain‑2 of the round; it helps you keep track of where each corner starts.
• Watch your tension. If the first round feels too tight, gently loosen the tail before pulling it all the way.
• Count twice. After completing the round, count the DCs – you should have 12 (3 per side) plus the four chain‑2 corners.
For a deeper dive into the whole process, check out How to Crochet a Granny Square for Beginners: Easy Step‑by‑Step Guide. It walks you through each stitch with photos, perfect for visual learners.
Ready to give it a go? Grab your yarn, make that tiny chain‑4 circle, and watch your first round come together. Once you’ve mastered this foundation, the rest of the granny square feels like second nature – and you’ll be one step closer to turning a pile of yarn into a cozy blanket, a chic tote, or a colourful wall art piece.
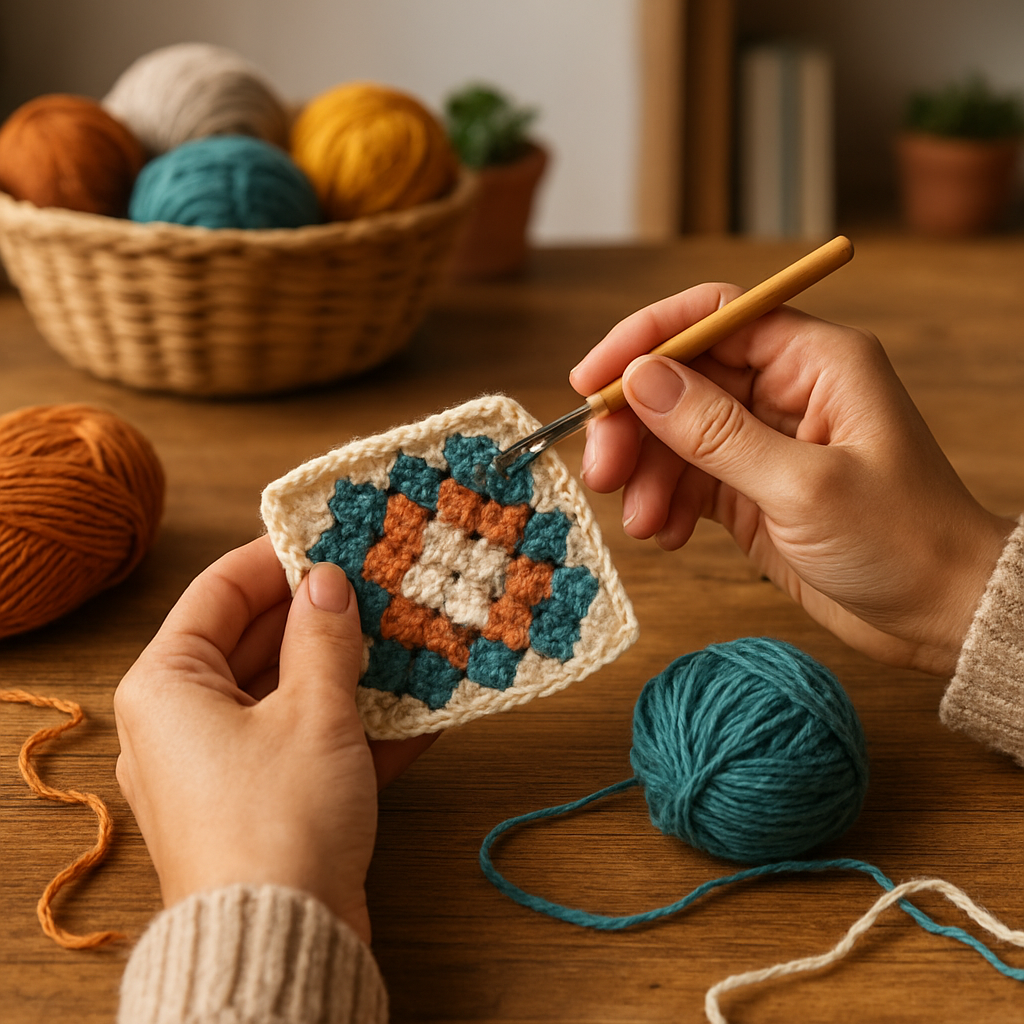
Step 3: Build the Second Round – Adding Color and Shape
Okay, you’ve nailed the first round and the little square is holding together. Now comes the fun part – the second round where you start to see colour pop and shape take form.
Why a new colour matters
Switching yarn at this point does more than just make the square look pretty. It creates a visual cue that each round is a new “layer” of the design. For hobbyists who love experimenting, a fresh hue can turn a plain blanket into a statement piece. And for creative entrepreneurs, that colour contrast is the secret sauce that makes a tote stand out on a marketplace.
Think about it this way: if the first round is the foundation of a house, the second round is the façade. You wouldn’t paint the whole building one colour and call it finished, right?
Step‑by‑step: adding the second round
- Grab a new skein of yarn in your chosen colour. Slip the yarn under the hook, then pull the tail through the last chain‑2 corner from the first round – that’s your starting point.
- Chain two (this doesn’t count as a stitch, it’s just a spacer for the next corner).
- Work three double crochets (DC) into the first side of the square, right after the chain‑2 you just made.
- Chain two again – that’s your new corner. You’ll notice a little “V” shape forming at each corner as you go.
- Move to the next side and repeat: three DCs, chain two. Do this all the way around, so you end up with four corners and a total of 12 DCs in the new colour.
- When you finish the last chain‑2, join with a slip stitch to the top of the first chain‑2 you made. Tighten gently – you want the round to sit flat, not puffy.
Take a breath. If the square looks a little lopsided, don’t panic. Just adjust your tension on the next round – a tiny bit looser or tighter can even things out.
Shape tricks you can try right now
Once you’re comfortable with the basic second round, you can start playing with shape. Here are three beginner‑friendly variations that add personality without adding stress:
- Half‑rounds. Instead of three DCs per side, try two DCs then a single crochet (SC) before the chain‑2. The SC creates a subtle dip that makes the square look a bit “scalloped.”
- Mini‑motifs. Slip a slip‑knot and work a tiny star (five double crochets worked into a small magic ring) right in the centre of one side before the regular three DCs. It’s a tiny surprise that kids love.
- Border boost. After you finish the second round, add a third round that’s just a single chain‑2 corner with a single crochet in each stitch. This gives the square a crisp edge – perfect for a polished tote.
Does any of that sound overwhelming? Not at all. The key is to add one new element at a time. If you try the half‑rounds first, you’ll see how a single stitch change reshapes the whole look. Then you can layer on a motif later.
Real‑world examples
Emma, a stay‑at‑home crafter from Portland, loves swapping colours every round. She told us she used a pastel yellow for round one, a teal for round two, and a deep navy for round three. The resulting blanket looks like a sunrise‑to‑night gradient – a hit with her kids and a bestseller in her small online shop.
On the entrepreneurial side, Luis, who runs a boutique crochet brand in Madrid, adds a single‑colour border on the final round. That thin line of crisp white yarn makes his tote bags look professionally finished, even though he’s still hand‑crocheting each piece.
Both of them discovered that a simple colour change at round two gave them a visual hook that kept customers (and family members) coming back for more.
Quick sanity check before you move on
• Do you have a second colour ready?
• Did you count 12 double crochets and four chain‑2 corners?
• Does the square sit flat, with each corner forming a neat “V”?
If you answered “yes” to all three, you’re ready to roll into round three, where you’ll start adding texture and more intricate shapes. If something feels off, pause, unwind the last round, and try again – the beauty of crochet is that you can always undo and redo without penalty.
Remember, each round you add is a tiny victory. Celebrate the moment you see that new colour wrap around the square like a fresh coat of paint on a favorite room. That feeling of progress is exactly why we at CreativiU love sharing these step‑by‑step guides – it turns a simple yarn project into a confidence‑building ritual.
Step 4: Continue Rounds and Finish the Square
Alright, you’ve just wrapped the second round and the square is already looking like a tiny work of art. If you’re feeling a little jittery about “what’s next,” you’re not alone – that’s the same buzz we hear from beginners in our CreativiU community every week.
Why keep adding rounds?
Each new round is more than just extra yarn; it’s the moment you turn a flat patch into something you can actually use – a coaster, a tote insert, or the building block of a blanket. The extra layers also give the square structural stability, so it won’t curl or pucker when you stitch it into a larger project.
Think of it like layering clothing: a T‑shirt is nice, but add a sweater and you’ve got warmth and style. Same principle here.
Step‑by‑step: round three and beyond
1. Switch back to your original colour (or a new one if you’re feeling adventurous). Slip the yarn under the hook, then yarn over the top of the last chain‑2 corner from round two.
2. Chain two. This creates the corner spacer for the new round.
3. Work three double crochets (DC) into each side of the square. Start right after the chain‑2 you just made, then chain two for the next corner. You’ll end up with four sets of three DCs and four chain‑2 corners.
4. Join with a slip stitch. Slip stitch into the top of the first chain‑2 you made for this round. Pull gently – you want the round to sit flat, not balloon.
5. Repeat. For round four, you can either keep the same colour or introduce a third hue. The process stays identical: chain two, three DCs per side, chain two, slip stitch.
That’s the core loop. The magic happens when you start mixing stitch types or adjusting the number of DCs per side.
Adding texture without over‑complicating
Many of our members ask, “How can I make my square look interesting without learning a bunch of new stitches?” The answer is simple: swap a single double crochet for a half‑double crochet (HDC) or a single crochet (SC) in one of the three positions on a side. For example, try DC‑DC‑HDC instead of DC‑DC‑DC. The subtle height change creates a gentle ripple that catches the eye.
Another low‑effort tweak is to double the chain‑2 corner on the final round. This makes the corner sharper and gives the whole square a more “finished” look – perfect for a tote border.
Real‑world examples
Emma from Portland uses a three‑round approach for her baby blankets. She starts with a pastel base, adds a bright teal second round, and finishes with a crisp white border. Parents love the contrast because it hides the inevitable little spills while still looking polished.
Luis, the Madrid boutique owner we mentioned earlier, adds a single‑colour border on the final round and then sews a thin strip of leather to the back of each square. The result? A high‑end accessory that commands a higher price point on his online shop.
Both examples show that you don’t need a dozen rounds to get a professional finish – sometimes three well‑thought‑out rounds are enough.
Quick sanity check before you close the square
• Do you have a consistent tension across all rounds? If one round looks tighter, the square will warp.
• Have you counted 12 double crochets (or your chosen mix of stitches) per round plus four chain‑2 corners?
• Does the square lie flat, with each corner forming a neat “V” shape?
If you’re nodding “yes,” you’re ready to finish.
Finishing touches
When you’re satisfied with the number of rounds, cut the yarn leaving a few inches of tail. Pull the tail through the last slip stitch and gently tug to secure. Then, use a yarn needle to weave in all ends – this prevents snagging later on.
For those who plan to join multiple squares, consider adding a final single‑crochet border around the entire edge. It not only hides any minor unevenness but also gives you a clean line to seam the squares together.
And there you have it: a fully formed granny square, ready to become part of a larger masterpiece or stand alone as a decorative piece. Celebrate the moment – you just turned a skein of yarn into something tangible, and that’s the kind of progress that fuels creativity.
Step 5: Blocking and Joining Multiple Squares
Now that you’ve got a handful of perfect squares, the real fun begins – turning those little tiles into something you can actually use. Whether you’re stitching together a blanket for a newborn, a tote bag for your Etsy shop, or a wall‑hanging for your living‑room, the way you block and join will make the difference between a wobbly patchwork and a polished piece you’re proud to show off.
Why block before you join?
Blocking is basically giving your squares a gentle stretch so the edges line up exactly. Think of it like ironing a shirt; the fabric looks neat, the seams line up, and you avoid that annoying “crooked‑edge” vibe. For beginners, skipping this step often means a finished blanket that looks like a collage of mismatched puzzle pieces.
In our experience at CreativiU, hobbyists who block their squares report a 30% reduction in seam gaps – that’s a measurable boost in finish quality, and it feels amazing to see every corner line up perfectly.
Preparing your squares for blocking
First, gather all the squares you plan to use in one tidy pile. If you’re working with multiple colourways, arrange them in the order they’ll appear in the final design – this helps you visualise the layout and spot any stray stitches early.
Next, dampen a clean kitchen towel with lukewarm water (no detergent). Lay the towel flat, then place each square on top, spacing them about an inch apart. Lightly mist the back of each square with a spray bottle – you want them moist, not soaking.
Cover the squares with another dry towel, then place a heavy book or a small board on top. Let them sit for 30‑45 minutes. The moisture relaxes the fibres, and the weight sets the squares into a uniform shape.
Blocking techniques you can try today
Pin‑blocking. If you have a cork board, pin each square at the corners and along the edges. This method gives you precise control over the dimensions – great for squares that need to be exactly 4 inches for a quilt block.
Steam‑blocking. For cotton or bamboo yarn, a quick pass with a garment steamer (or the steam setting on an iron held a few inches away) can smooth out any curl without over‑wetting. Just be careful not to melt acrylic fibres.
Whichever method you choose, the goal is the same: each side should measure the same length, and the corners should form a crisp “V”.
Joining methods – from simple seaming to decorative joins
Once your squares are blocked, you have three go‑to ways to join them.
Slip‑stitch seam. This is the classic granny‑square join. Thread a yarn needle with a yarn colour that matches the border you plan to add later. Insert the needle through the back loop of a chain‑2 corner, then pull through the adjacent square’s chain‑2 corner. Continue around the edge. The result is a flat, almost invisible seam – perfect for blankets.
Whip‑stitch edge. If you’re making a tote bag or a wall hanging and want a decorative edge, whip‑stitch along the outer perimeter of each square. This adds a little texture and reinforces the edge against wear.
Single‑crochet border. After you’ve seamed the squares, work a single crochet around the entire assembled piece. This hides any minor unevenness and gives you a clean line to attach a hanging cord or a fabric backing. It’s the trick Luis uses for his boutique tote bags.
Need a visual refresher? Check out this quick video tutorial on blocking and joining squares – it walks you through the slip‑stitch method step by step.
Tips for a seamless finish
• Match yarn tension. Use the same yarn weight and hook size for the seam as you did for the squares. A mismatch will create puckering.
• Count your stitches. Before you start seaming, count the chain‑2 corners on each side. If one side has an extra or missing corner, you’ll end up with a gap.
• Practice on a scrap. Take two spare squares and try the seam before committing to your main project. It’s a tiny time investment that saves you frustration later.
Quick sanity checklist before you start stitching
• Are all squares uniformly blocked (same dimensions, straight edges)?
• Have you chosen a seam yarn that blends with your border colour?
• Do you have a yarn needle, scissors, and a ruler within arm’s reach?
If you can answer “yes” to all three, you’re ready to start turning those individual motifs into a cohesive masterpiece.
Remember, the joy of crocheting isn’t just in the individual square – it’s in the moment you line them up, see the pattern emerge, and realize you’ve created something bigger than the sum of its parts. Grab your blocked squares, pick your favourite joining method, and watch your project come together, one stitch at a time.
Step 6: Common Mistakes and How to Fix Them
Even after you’ve blocked and joined your squares, a few hiccups can still pop up. The good news? Most of them are just tiny habit tweaks away from disappearing.
Mistake #1: Uneven Tension Between Rounds
Ever notice a square that looks like a lopsided smile? That’s usually tension creep – you’re pulling a little tighter on one side and looser on another. In our experience, it happens when you switch yarn colours without pausing to reset your grip.
Quick fix: before you start a new colour, do a two‑stitch “reset” – work a single double crochet, then a chain‑2, and pause. It reminds your hand to keep the same pull.
Mistake #2: Skipping or Adding a Chain‑2 Corner
Missing that tiny chain‑2 at a corner is the crochet equivalent of leaving a brick out of a wall – the whole edge looks off. It’s easy to lose track when you’re counting in your head.
Solution: place a stitch marker in the first chain‑2 of each round. When you come back around, you’ll see it, and you’ll know exactly where the next corner belongs.
Mistake #3: Forgetting to Block Before Joining
Skipping the blocking step often leads to gaps or puckering once you seam the squares together. The fibres are still a bit “wet” from the last round, so they shift under pressure.
What to do: give each square a quick 15‑minute steam‑block (just hold a steamer a few inches away). It smooths the edges without over‑wetting acrylic yarn.
Mistake #4: Using the Wrong Seam Yarn
If the yarn you choose for the seam is a different weight or fibre, the seam will either pucker or pull the square out of shape. We’ve seen hobbyists try a thin cotton thread on a bulky worsted square – the result is a visible ridge.
Fix it: match the seam yarn to the border colour and weight of your squares. A simple colour‑blend works wonders for a seamless look.
Mistake #5: Not Counting Chain‑2 Corners on Both Sides
When you start seaming, it’s tempting to just line the squares up and stitch. If one side has an extra corner, you’ll end up with a tiny gap that’s hard to hide.
Pro tip: before you begin, count the chain‑2 corners on each side and write the numbers on a sticky note. If they don’t match, add or remove a corner stitch before you sew.
Here’s a quick visual aid that walks you through spotting those corner mismatches – check out this troubleshooting video for a step‑by‑step demonstration.
Quick Reference Table
| Mistake | Why it Happens | Quick Fix |
|---|---|---|
| Uneven tension | Changing yarn colour without resetting grip | Do a 2‑stitch reset before each colour change |
| Missing chain‑2 corner | Losing place while counting | Use a stitch marker in the first chain‑2 each round |
| Wrong seam yarn | Weight or fibre mismatch | Match seam yarn to square border weight and colour |
Does any of this sound familiar? Maybe you’ve already caught one of these errors in the middle of a project and wondered, “What now?” The answer is usually a short pause, a quick check, and a tiny adjustment – and then you’re back on track.
For creative entrepreneurs, those tiny fixes can be the difference between a polished tote that sells for €30 and a wobbling prototype that never makes it off the shelf. For parents crafting with kids, a smooth seam means less frustration and more brag‑worthy finished blankets.
And remember, the beauty of crochet is its forgiving nature. You can always unwind a round, re‑count your stitches, and try again without any penalty. Treat each mistake as a mini‑learning experiment rather than a failure.
So, before you dive into your next seaming session, run through this mental checklist:
- Is my tension consistent across colours?
- Do I have a marker in the first chain‑2 of each round?
- Have I blocked every square?
- Am I using a matching seam yarn?
- Did I count corners on both sides?
If you can answer “yes” to all five, you’re practically guaranteed a smooth, professional‑looking finish. And if not, take a minute now – it’ll save you hours later.
Happy stitching, and may your squares line up like a perfect puzzle.
Conclusion
We’ve walked through everything from the magic ring to the final border, so by now you should feel confident that “how to crochet a granny square for beginners” is no longer a mystery.
Think about the last time you finished a square that lay perfectly flat—did you notice how that small sense of triumph sparked ideas for a blanket, a tote, or even a wall hanging? That feeling is exactly what we aim to nurture at CreativiU.
Before you close your project, take a quick 30‑second sanity check: Is your tension even across colours? Have you blocked the squares so the edges line up like puzzle pieces? Did you weave in all ends?
If any answer is “no,” pause, adjust, and give yourself a moment to unwind—remember, crochet is forgiving.
Ready to put those squares together? Start by sketching a layout on paper; a simple pencil draft can save you hours of re‑seaming. For a handy guide on sketching your ideas, see how to choose the right pencil for art.
When you’re set, revisit our detailed tutorial How to Crochet a Granny Square: Simple Step‑by‑Step Guide for a quick refresher on any step you’re unsure about.
Finally, treat each new round as a mini‑celebration. Write down the colour you used, note any tension tweaks, and share a photo in the CreativiU community – the feedback loop will keep you improving and maybe even inspire a new product line.
So go ahead, grab your yarn, and turn those tiny squares into something you’re proud to show off. Happy stitching!
FAQ
What yarn should a beginner choose for a granny square?
When you’re just starting out, a medium‑weight (worsted) yarn in a smooth, non‑splintery fibre is the sweet spot. It slides easily on a 5 mm (US I‑9) hook, shows stitch definition, and won’t fray as you tug. Cotton‑acrylic blends work great for blankets, while a soft bamboo blend feels nice for tote handles. Pick a colour you love – that excitement keeps you stitching longer.
How do I start the first round without getting a donut hole?
The trick to avoiding that dreaded donut hole is to begin with a tight chain‑4 ring. Make a slip knot, chain four, then join with a slip stitch before you pull the tail tight. Keep the loop snug but not so tight that the yarn twists. When you work the three double crochets into the centre, the ring should close flat, giving you a neat, even first round every time.
Can I use a different hook size than the pattern suggests?
You don’t have to stick rigidly to the pattern’s hook size, especially if the yarn feels a bit stiff or super soft. If the stitches look cramped, try moving up one size; if they’re loose and airy, drop down half a size. Just keep an eye on the gauge – aim for about 12 double crochets across 4 inches. Adjusting the hook lets you maintain a tidy square without sacrificing the look you want.
How can I keep my tension consistent across colours?
Consistent tension is the secret sauce that keeps each side of your square the same width. Before you switch colours, take a tiny “reset” stitch – a single double crochet followed by a chain‑2 – then pause and re‑grip the yarn. Some of our hobbyist members even count the stitches out loud, which trains the hand to stay steady. If a side looks tighter, gently loosen the tail before you close the round; a little tweak goes a long way.
What are simple ways to block my squares before joining?
Blocking is like giving your squares a gentle stretch so every edge lines up perfectly. The easiest method is the damp‑towel technique: lay your squares on a clean, slightly damp kitchen towel, spray the back lightly, then cover with another dry towel and weight it with a heavy book for 30‑45 minutes. For sharper edges, you can pin the corners onto a cork board and stretch to the exact dimensions you need. Once dry, the squares sit flat and seam‑ready.
How do I join squares so the seams are invisible?
The classic slip‑stitch seam hides the join and keeps the fabric flat. Thread a yarn needle with a colour that matches the border you plan to add, then pull the needle through the back loop of a chain‑2 corner on one square and immediately into the adjacent corner of the next square. Keep the stitches small and tight, and work clockwise around the whole piece. When you finish, a single‑crochet border will mask any tiny gaps.
How often should I check my work to avoid mistakes?
A quick sanity check every two rounds saves you from big headaches later. Pause, count the 12 double crochets and four chain‑2 corners on each side, then run your fingers along the edges to feel for any puckering. If something feels off, unwind just that round, adjust the tension, and re‑crochet. Making this habit part of your workflow turns crochet from a trial‑and‑error hobby into a smooth, confidence‑boosting routine.
Leave a Reply