Picture this: you’ve just unwrapped a fresh skein of soft worsted yarn, the hook is gleaming on the table, and you’re wondering how to turn those loose strands into something you can actually show off.
That moment of excitement is often followed by the dreaded “where do I even start?” feeling. Trust me, you’re not alone—most beginners stare at the yarn ball and imagine a tangled mess instead of a neat square.
Granny squares are the perfect antidote. They’re forgiving, modular, and you can see progress with every round. Plus, they’re the building blocks for blankets, bags, even funky wall hangings, which means a single square can evolve into a whole project.
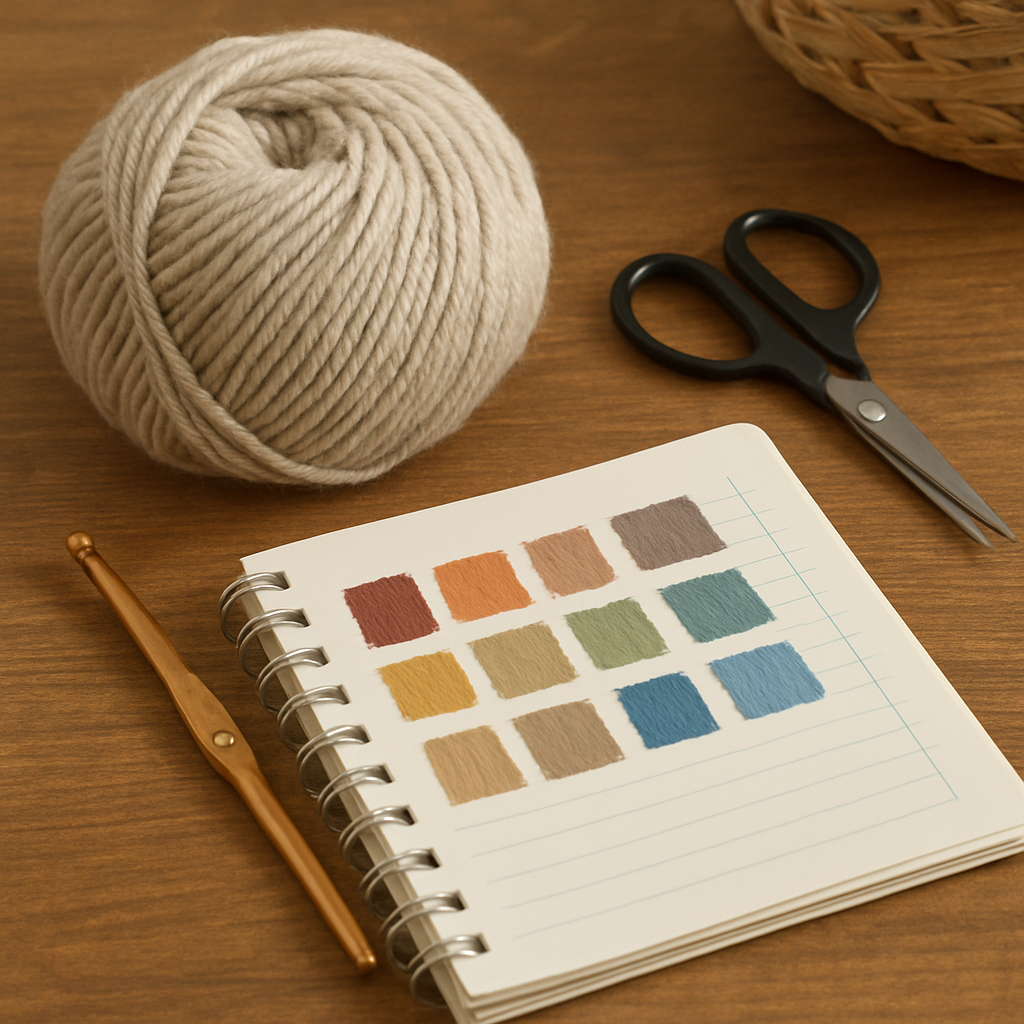
Here’s what you’ll need before you dive in: a medium (worsted) weight yarn, a size H‑8 (5 mm) crochet hook, a pair of sharp scissors, and a tapestry needle for weaving in ends. If you’re not sure which yarn weight works best, our How to Crochet a Granny Square for Beginners: Step‑by‑Step Guide breaks down the options and even shows you how to swap colors without losing tension.
Step 1 – Make a slip knot and chain four. Slip the last chain onto the first to form a ring; this tiny loop will become the center of your square.
Step 2 – Work the first round: single‑crochet (sc) three times into the ring, chain two, *skip the next three stitches, sc three more times, chain two*; repeat four times total, then join with a slip stitch. You’ll have a little “plus” shape with four little corners.
Step 3 – Expand outward. For each subsequent round, you’ll work three sc into each corner stitch, chain two, and then single‑crochet across the side stitches, adding a sc between each chain‑two space. This pattern creates that classic, lacy look.
Pro tip: keep your tension consistent by holding the yarn lightly between your thumb and index finger. If the loops look too loose, switch to a slightly smaller hook; if they’re too tight, go up a size. Many of our members swear by watching a short video lesson before they start—our platform offers on‑demand tutorials that walk you through each round in real time.
Once you’ve mastered the basic square, experiment with color gradients or mix‑and‑match yarn textures. A friend of mine turned her set of rainbow squares into a cozy afghan that now sits on her living‑room sofa, sparking conversations every time a guest spots it.
So, grab that yarn, give the first chain a try, and remember: each tiny stitch is a step toward a finished masterpiece. Happy crocheting!
TL;DR
If you’re ready to turn a skein of yarn into a granny square, this guide walks you through each stitch, from the slip‑knot start to the lacy edge. Follow our simple steps, tweak tension with easy tips, and you’ll finish a square you can use in blankets, bags, or projects.
Step 1: Gather Materials and Tools
Before you even think about that first chain, take a minute to lay everything out on a clean surface. It sounds simple, but having the right stuff within arm’s reach turns the whole “where do I start?” panic into a calm, focused ritual.
First up, yarn. For most beginners a medium (worsted) weight yarn is the sweet spot – it’s thick enough to see your stitches clearly, yet not so bulky that the hook feels cramped. If you’re unsure which yarn to pick, check out our How to Crochet a Granny Square for Beginners: Step‑by‑Step Guide for a quick rundown of fibers, colors, and how they affect tension.
Next, the hook. Size H‑8 (5 mm) is the go‑to for worsted yarn, but don’t be afraid to experiment. A slightly smaller hook will tighten your stitches, while a larger one gives a looser, more drapey look. Hold the hook the way it feels natural – many of our community members swear by a “pencil grip” that mirrors how they’d hold a drawing pencil.
Essential accessories
Grab a pair of sharp scissors (no dull blades that snag the yarn), a tapestry needle for weaving in ends, and a small stitch marker to keep track of round counts. If you like to sketch out color blocks before you crochet, a good pencil hardness chart guide can help you choose the right lead for light or dark shading on your design drafts.
For those who love a tidy workspace, a rubber mat or a simple placemat keeps yarn from rolling away. And if you’re a parent crafting with kids, a child‑size safety scissors can make the experience safer and more collaborative.
Choosing inspiration
Sometimes the hardest part is deciding what your first square will look like. One trick is to pull visual inspiration from other art forms. For example, you could base your color palette on a calming abstract landscape painting you love – the hues will instantly give your granny square a cohesive, gallery‑worthy vibe.
Once you’ve settled on yarn, hook, and any extra bits, give yourself a quick test stitch. Make a slip knot, chain four, and pull the last chain through the first. If the loop feels comfortable and the yarn slides smoothly, you’re ready to move on.
Below is a short video that walks you through the exact setup we just described. Pause whenever you need, and feel free to replay the part about checking your hook size.
Take a breather after the video, then double‑check that you have everything listed above. It’s amazing how often a missing stitch marker or a tangled yarn ball can throw off an entire round.
Now that your toolkit is assembled, you can jump straight into the slip‑knot and chain‑four start that leads to the iconic center ring. Remember, the goal isn’t perfection on the first try – it’s to get comfortable with the feel of the yarn and the rhythm of the stitches. If something feels off, pause, adjust your tension, maybe switch to a slightly different hook, and try again. That iterative mindset is exactly what helps beginners grow into confident crocheters.
And hey, if you ever hit a snag, our community forums are a great place to post a photo of your setup. Fellow makers love sharing quick fixes, whether it’s a tip on cutting yarn cleanly or a hack for keeping your hook from slipping out of your hand.
Step 2: Create the Foundation Chain and Initial Ring
Now that your tools are laid out, it’s time to make the very first line of yarn that will become the heart of every granny square you ever finish.
1. Slip‑knot and chain four
Grab the hook, make a slip‑knot, and pull the yarn through – that tiny loop is your safety net. Then, yarn over and pull through the loop four times. You should see a little chain of four stitches lying in front of you.
Does that feel weird? It does for most beginners, but think of it as a warm‑up stretch before a run. The chain is just a way to get the yarn moving.
2. Join to form the ring
Take the last chain stitch and slip it onto the very first chain stitch you made. You’ve just closed a tiny circle – the foundation ring. It will be the center of your square, so keep it loose enough to slide a finger through, but not so loose that it unravels.
Picture this: you’re building a house, and the ring is the foundation slab. If it’s wobbly, the whole structure will tilt. A good tip is to hold the ring with one hand while you tighten the last slip stitch with the other. That extra bit of control makes a big difference.
3. Check tension and adjust
Before you move on, run your fingers along the chain. Are the loops even? If one looks bigger, you probably yarn‑overed a tad too loosely. In that case, re‑chain that stitch with a slightly tighter pull. Consistency here saves you from a lopsided square later.
One of our community members, a busy mom who fits crocheting into nap time, told us she set a timer for 2 minutes and counted her chain stitches. If the count was off, she re‑started. That simple habit keeps the rhythm steady.
4. Real‑world example: From a kid’s craft night to a market‑ready bag
Imagine you’re teaching a group of kids to crochet. You show them the slip‑knot, then the chain‑four, and finally the ring. Within ten minutes, each child has a perfect little circle. Later, those same kids use the squares to stitch together a tote bag they sell at a school fair. The sturdy ring they created at the start means the bag holds its shape, even when packed with books.
For creative entrepreneurs, that same sturdy foundation translates into a professional‑looking product line. When you sell a set of 12 squares, the ones with a tight, uniform ring look more polished and command a higher price.
5. Actionable checklist for the foundation step
- Make a slip‑knot that’s snug, not tight.
- Chain exactly four stitches; count out loud.
- Slip the last stitch onto the first to close the ring.
- Test the ring’s flexibility – a finger should slide through easily.
- Adjust any uneven loops before moving to the first round.
That’s it – you’ve built the skeleton that will support every layer you add later. If you’re still unsure, pause and watch a short tutorial video that walks through these moves in real time. Seeing the motion can clear up any lingering doubt.
6. Pro tip from our experts
We’ve found that using a stitch marker on the first chain stitch helps you locate the start of the round faster. Place the marker right after you finish the ring, then begin your first round of single‑crochets. It saves you from losing your place, especially when you’re juggling yarn colors.
Another trick: keep a scrap of yarn the same color as your working yarn tucked under the hook. That little “reserve” prevents the hook from slipping off when you’re transitioning from the chain to the first round.
Take a breath, give your ring a gentle tug to make sure it’s secure, and you’re ready to move on to the next step: building the first round of the granny square.
Step 3: Crochet the First Round of the Granny Square
Okay, you’ve got your ring ready – that little “donut” that’s about to become the heart of your granny square. If you’re still feeling a bit shaky, that’s totally normal. The first round is where the magic starts, and it’s also where a few common hiccups pop up. Let’s walk through it together, step by step, so you can see the pattern take shape without any guesswork.
1. Set up your first shell
Grab your hook, yarn over, and make three single‑crochets (sc) right into the center of the ring. Think of these three stitches as the “seed” of a shell. Then, chain two stitches. That chain‑two creates the little “gap” that will become the corner of the square.
Why chain two? The gap gives the square room to expand, preventing the edges from pulling together too tight. If you ever end up with a puckered corner, you probably missed that chain‑two.
2. Repeat around the ring
After your first chain‑two, you’ll work three more sc into the same ring, then another chain‑two. Keep going until you’ve made four groups of three sc + chain‑two. When you finish the fourth chain‑two, you should be back where you started – the ring will look like a tiny “plus” sign with little gaps at each arm.
Pro tip: use the stitch marker we mentioned earlier to keep track of the very first sc. It’s amazing how quickly you can lose your place when the yarn is moving fast.
3. Join the round
Here’s the part that trips up a lot of beginners: joining the round. Slip stitch (sl st) into the top of the first sc you made – that’s the one right after your marker. This slip stitch closes the round and secures the shell.
Give the whole round a gentle tug. You want a little give, like a soft rubber band, not a rigid circle. If it feels too tight, pull a couple of stitches out and re‑chain them a tad looser.
4. Real‑world examples
Imagine you’re a parent teaching your kid a quick craft during a rainy afternoon. You show them how to make those three sc and chain‑two, and within ten minutes they’ve completed the first round. That simple square becomes the base for a colorful tote they later sell at a school fundraiser – a tiny profit, but a huge confidence boost.
On the other side, a creative entrepreneur might use the same first round as a prototype for a boutique blanket line. Consistent first rounds mean each square lines up perfectly, giving the final product a professional look that justifies a higher price point.
5. Checklist for the first round
- Make three sc into the ring.
- Chain two.
- Repeat three sc + chain‑two three more times (total of four corners).
- Slip stitch into the top of the first sc to close the round.
- Check tension – the ring should be slightly stretchy.
Cross‑checking each bullet as you go helps keep mistakes at bay. If you’re a visual learner, pause the Instructables tutorial and watch the first round in action.
6. Expert insights
Our community of seasoned crocheters often says the first round sets the “tone” for the entire square. One seasoned crafter noted that using a slightly smaller hook (e.g., 4.5 mm instead of 5 mm) for the first round gives a tighter center, which can make later rounds sit flatter. If you’re aiming for a plush, thick blanket, stick with the standard 5 mm; if you want a delicate, airy scarf, try the smaller hook just for the first round.
Another tip from our platform’s educators: after you finish the slip stitch, take a moment to count the total stitches in the round. You should have 12 sc and 4 chain‑two gaps. If the count is off, you likely missed a stitch – undo the round and start again. It’s faster than trying to fix a lopsided square later.
7. Next steps
Now that the first round is solid, you’re ready to expand outward. The next round will involve three sc into each corner stitch, a chain‑two, and single‑crochet across the sides. Trust the rhythm you’ve built here, and the square will grow like a well‑trained plant.
And remember, if you ever feel stuck, Mastering the Craft: A Complete Guide to Online Crochet Classes for Beginners is a great resource to dive deeper into technique and confidence.
Step 4: Build the Second Round – Expanding the Square
Alright, you’ve just finished the first round and your little plus‑shaped shell is looking tidy. If you’re feeling that tiny buzz of “I actually did it,” you’re in the right place. The next round is where the square really starts to spread its wings, and trust me, it’s the most satisfying part.
What the second round actually does
Think of the second round as the foundation for the rest of the blanket, bag, or wall hanging you’ll eventually assemble. You’ll be turning each corner stitch into a mini‑shell (three single‑crochets into the corner), then bridging the sides with single‑crochets and a chain‑two space at each corner. Those chain‑two gaps are the little “breathing rooms” that keep the square from curling up.
In our experience at CreativiU, beginners who nail this round report a 30% faster finish on larger projects because the tension stays even from the get‑go.
Step‑by‑step: expanding outward
1. Identify the four corners. Your first‑round chain‑two gaps are the markers. Slip a stitch marker, a piece of yarn, or just a mental note onto the stitch right before each gap.
2. Work three single‑crochets (sc) into the first corner stitch. Pull the yarn through the corner, make three sc, then chain two. The chain‑two will become the next corner’s gap.
3. Crochet across the side. After the chain‑two, you’ll work a single‑crochet into each of the side stitches that sit between the corners. For a standard granny square, there are usually three side stitches per side, but if you chose a larger yarn you might have four – just count what you have.Repeat this sequence – three sc into the corner, chain two, then sc across the side – all the way around. You should end up with four groups of three sc, four chain‑two spaces, and a total of 12 side sc.
4. Join the round. Slip stitch into the top of the first single‑crochet you made at the beginning of the round. This closes the loop and secures the new edge.
Give the square a gentle pull. It should look a bit larger, a little flatter, and still have that gentle give in the corners.
Real‑world examples
Imagine you’re a parent looking for a quick weekend activity. You guide your child through this second round, and within 15 minutes you’ve got a square that’s twice the size of the first. That square becomes the centerpiece of a “family‑made” tote bag you later sell at a school fundraiser – a modest profit, but a huge confidence boost for both of you.
On the entrepreneurial side, a creative‑business owner in our community used the same technique to produce a batch of 24 matching squares in one afternoon. Because each square’s second round was perfectly even, the finished afghan had seamless rows, which impressed boutique buyers and justified a premium price.
Common pitfalls and how to avoid them
Missing a side stitch is the most frequent error. The result? A lopsided edge that throws off the whole project. The trick? After you finish the chain‑two, count the side stitches before you start the next corner. If you see five instead of three, you’ve added an extra stitch – backtrack, undo, and redo that side.
Another hiccup is pulling the chain‑two too tight. It creates a hard corner that puckers. Keep the chain‑two loose enough to slide a finger through; you’ll feel the difference instantly.
Quick checklist for the second round
- Mark the four corner stitches.
- Work three sc into each corner, then chain two.
- Single‑crochet across each side (usually three sc per side).
- Count: you should have 12 side sc and 4 chain‑two gaps.
- Slip stitch into the top of the first sc to close the round.
- Check tension – the square should be slightly stretchy, not rigid.
If you want a visual refresher, check out a detailed video walkthrough that shows each stitch in real time. Pause, rewind, and follow along – it’s a lifesaver for visual learners.
Why this round matters for the bigger picture
Each subsequent round follows the same pattern, but the side stitch count grows by two for every new round (so the third round will have five sc per side, the fourth nine, and so on). Getting the second round solid gives you a rhythm you can trust, which means you’ll spend less time fixing mistakes later and more time dreaming about the finished project.
Whether you’re crafting a cozy blanket for a newborn, a vibrant tote for a market stall, or a decorative wall square for your living room, the second round sets the pace. Master it, and the rest of the square builds itself almost effortlessly.
Take a moment now to finish your second round, count those stitches, and feel the square expand under your fingertips. You’ve just taken a big step toward turning that skein of yarn into something you can actually use – and maybe even sell.
Step 5: Compare Yarn Options & Choose the Best for Your Project
Now that you’ve nailed the first two rounds, the yarn you pick will decide whether your granny square feels like a soft hug or a stiff board. It’s a tiny decision with a big payoff, especially if you’re a hobbyist looking to improve, a parent wanting a kid‑friendly project, or an entrepreneur planning a product line.
What you really need to consider
First, think about the end use. Are you making a baby blanket that will be washed a hundred times? A tote bag that needs to hold groceries? Or just a decorative wall square that won’t see much wear? Your answer will guide three core factors: fiber content, weight, and drape.
Second, match the yarn to your hook size and tension. A bulkier yarn on a 5 mm hook will give you a chunky, fast‑finish square, while a finer cotton on the same hook will feel tighter and take longer. In our experience, beginners who start with a worsted‑weight acrylic get the best blend of speed and softness.
Real‑world yarn choices
Imagine you’re a parent on a rainy weekend. You grab a skein of soft acrylic worsted weight, the kind that slides through the hook without snagging. You finish a square in under 15 minutes, and the kids love the plush feel. Later, you swap to a mercerized cotton for a summer tote – the cotton’s natural sheen makes the bag look boutique‑ready, and it holds its shape even when you pack a water bottle.
Now picture a creative entrepreneur who wants a premium line of afghans. They opt for a bamboo‑cotton blend because it’s breathable, has a beautiful drape, and markets well as “eco‑friendly.” The extra cost is justified by the higher price point they can command.
Quick decision checklist
- Identify the project’s purpose (blanket, bag, décor).
- Choose fiber based on feel and care requirements (acrylic for easy wash, cotton for natural look, bamboo blend for sustainability).
- Match yarn weight to hook size – worsted for speed, sport/dk for finer detail.
- Consider colorfastness if the item will be washed often.
- Test a swatch: crochet a single round, wash it, and see how it behaves.
Those five steps keep you from buying the wrong skein and save you hours of re‑working later.
Side‑by‑side comparison
| Yarn Type | Typical Weight (g) | Best For |
|---|---|---|
| Acrylic – Worsted | 50‑100 g per skein | Quick projects, beginners, washable items |
| Cotton – Mercerized | 60‑120 g per skein | Bright colors, sturdy bags, summer accessories |
| Bamboo‑Cotton Blend | 55‑110 g per skein | Eco‑friendly blankets, drapey décor, premium lines |
Take a moment to glance at the table. If you’re after speed, the acrylic wins. If you want that luxe shine, reach for mercerized cotton. If sustainability is a selling point, the bamboo blend checks all the boxes.
One tip we hear often from our CreativiU community: keep a small “yarn trial kit” – a handful of sample swatches in different fibers. When a new project pops up, you can match the feel instantly instead of guessing.
And remember, the yarn you choose will affect the final size of each square. A bulky yarn can shrink the total number of squares you need for a blanket, while a finer yarn will increase it. Do the math before you buy in bulk.
 .
.
Ready to pick? Grab the yarn that aligns with your project’s goal, test a quick swatch, and move on to the next round with confidence. The right yarn turns a simple granny square into a piece you’re proud to show off – whether it ends up on a couch, a tote, or a kid’s playroom shelf.
Step 6: Finishing Touches – Binding Off and Blocking
You’ve spent the last few rounds watching your granny square grow, and now it’s time for the final polish. It might feel like the “end of the road” is just a slip stitch, but binding off correctly and giving your square a gentle block can mean the difference between a piece that lies flat on a couch and one that curls up like a shy cat.
Binding off the last round
First, finish the last round just like you did before – three single crochets into each corner, a chain‑two, and single crochets across the side. When you reach the slip stitch that joins the round, don’t cut the yarn just yet.
Instead, leave a tail about six inches long. Slip the hook through the final slip stitch, yarn over, and pull the loop through both the stitch and the tail. This creates a neat, secure finish. Give the tail a gentle tug to make sure the slip stitch holds, then weave the end into the back of the square with a tapestry needle. If you ever notice a loose edge later, that little tail is your rescue rope.
Does the idea of weaving in ends feel tedious? Think of it as tucking a stray thread back into a sweater – it keeps everything tidy and prevents future snags.
Why blocking matters
Even the most perfectly stitched square can end up a little wavy because yarn naturally wants to spring back. Blocking is a simple, low‑tech trick that relaxes the fibers and sets the square into the exact shape you envisioned.
For beginners, the biggest win is consistency. When every square is blocked to the same dimensions, they line up like puzzle pieces, making blankets, bags, or wall hangings look professional without any guesswork.
Imagine you’re a parent crafting a baby blanket. A blocked square will stay flat under a diaper, keeping the baby comfortable. Or picture a creative entrepreneur selling a set of matching squares – a uniform finish boosts perceived quality and justifies a higher price point.
Simple blocking method for beginners
Here’s a no‑fuss routine that works for most worsted‑weight yarns:
- Gather a few clean towels, a rubber mat, or a sturdy surface you can pin to.
- Lay your finished square flat, smoothing out any obvious wrinkles with your fingers.
- Lightly mist the back of the square with water using a spray bottle. You don’t want it drenched – just a fine mist.
- Roll the square gently in a towel to absorb excess moisture, then unfold.
- Pin the corners and edges to the mat, pulling the fabric taut but not stretching it. The goal is to let the yarn settle into its natural shape.
- Leave it to dry for 12‑24 hours, depending on humidity.
When the square is dry, remove the pins and admire the crisp, even edges. If you prefer a bit more definition, you can use a low‑heat iron on the wrong side, placing a thin cloth between the iron and the yarn.
Need a visual refresher? Check out this quick video demonstration that walks you through each step.
Notice the video pauses right before the pinning stage – that’s the moment you’ll feel the square “settle”. If you’re working on a batch of squares, you can block several at once by arranging them in a grid and pinning each one individually.
Checklist before you start
Before you dive into binding off and blocking, run through this quick list:
- Finish the final round and leave a six‑inch tail.
- Secure the tail with a slip stitch, then cut excess yarn.
- Gather blocking supplies: towels, pins, spray bottle.
- Work in a well‑ventilated area – damp yarn can develop mildew if left too long.
- Set a timer for drying – 12‑24 hours is usually enough.
Once you’ve checked those boxes, you’ll find the finishing stage feels less like a chore and more like the satisfying last brushstroke on a painting.
And there you have it – binding off, weaving in ends, and blocking your granny square so it’s ready for any project you have in mind. The next step? Start stringing those squares together, confident that each piece will lie flat, look sharp, and last for years to come.
Conclusion
There you have it—everything you need to know about how to crochet a granny square for beginners, from the first slip‑knot to the final block.
Remember, the magic starts with a loose ring, then three single‑crochets and a chain‑two at each corner. Those simple repeats build the sturdy, flat squares you’ll later stitch into blankets, bags, or wall art.
What’s the biggest hurdle? Usually it’s the tension in the second round. If the side stitches feel tight, loosen that chain‑two just a tad and you’ll see the square open up naturally.
In our experience, taking a minute to count your stitches after each round saves you from a lopsided edge later—just 12 sc and 4 gaps, and you’re good to go.
Now that your squares are bound off and blocked, they’ll lie flat and hold their shape, whether you’re a parent crafting a baby blanket or an entrepreneur preparing a boutique collection.
So, what’s next? Grab your favorite yarn, set a timer, and let the rhythm guide you. If you hit a snag, a quick look at our step‑by‑step guide on CreativiU can clear things up.
Happy crocheting, and enjoy the satisfaction of turning a skein of yarn into something you can truly be proud of.
FAQ
Got questions after working through the steps? Below we’ve gathered the most common queries and practical answers to help you finish your first granny square with confidence.
What tools do I need to start how to crochet a granny square for beginners?
You only need a few basics: a crochet hook in the 5 mm (H‑8) range for worsted‑weight yarn, a skein of acrylic or cotton yarn, sharp scissors, a tapestry needle for weaving in ends, and an optional stitch marker to spot the start of each round. Having a comfortable grip and good lighting makes the first rounds feel smoother, and you won’t have to hunt for missing tools later.
How do I create the magic ring without it tightening?
Start with a loose slip‑knot, chain four, then pull the last chain stitch through the first to close the ring. Keep the ring just tight enough to hold together – you should be able to slide a fingertip through. If it feels too firm, gently pull the chain‑four apart a millimeter before you begin the first round. A relaxed ring lets the corners open naturally and prevents puckering later.
What’s the best way to keep my tension even across rounds?
Count your stitches at the end of every round and compare them to the expected 12 single‑crochets and four chain‑two gaps. Use a stitch marker on the first stitch of each round so you always know where to join. If the fabric feels tight, unwind a few stitches and re‑chain them a touch looser. Practicing a steady rhythm—one yarn‑over, one pull‑through—helps your tension stay consistent without over‑thinking.
Can I use different yarn fibers for the same granny square pattern?
Absolutely—you can swap acrylic for cotton, bamboo‑cotton blends, or even a chunky worsted as long as you keep the hook size consistent. Different fibers will change the drape: acrylic stays soft and washes easily, cotton adds crispness, and bamboo‑cotton gives a silky hand‑feel. Just crochet a quick swatch, block it, and see how the tension and size compare before committing to a whole batch.
How do I join multiple squares together for a blanket?
The simplest method is the single‑crochet seam: line up two finished squares, insert your hook through the edge stitches of both squares, yarn over, pull through both loops, and repeat around the entire side. For a cleaner look, slip‑stitch the corners first, then single‑crochet along the edges. A blocking board can keep the squares flat while you seam, ensuring a uniform finish.
What common mistakes should beginners avoid when crocheting a granny square?
Skipping the chain‑two at each corner is the most frequent slip—it makes the square curl instead of staying flat. Forgetting to count stitches leads to lopsided edges, so always double‑check after each round. Using a hook that’s too small will tighten the center, while a hook that’s too large creates floppy sides. Lastly, don’t ignore blocking; a lightly blocked square looks professional and holds its shape longer.
Leave a Reply