Want a piece of jewelry that says exactly what you feel? Stamped metal lets you add names, dates, or tiny art right onto a pendant or charm. Most free guides skip the basics , like how long a project really takes , and leave beginners guessing. This guide shows you a clear 30‑60 minute workflow, the tools you truly need, and tips to finish like a pro. By the end you’ll be ready to craft custom pieces that look store‑bought, all from your kitchen table.
Step 1: Gather Materials and Tools
First, pull together everything you’ll need before you start. Having a checklist saves you from hunting mid‑project.
Core tools
- Craft hammer , a rawhide or brass‑capped hammer gives a clean impact without denting the metal.
- Letter and shape stamps , pick a set that matches the style you want.
- Stamping board or steel bench block , a solid surface keeps the metal from bouncing.
- Metal blanks , dog‑tag or round blanks work for necklaces; smaller blanks suit keychains.
- Stamping tape , double‑sided tape that holds the blank flat while you work.
- Protective eye gear , metal shards can pop, so safety glasses are a must.
Optional but handy items include a ruler, a fine‑point marker for layout, and a pair of needle‑nose pliers for tiny adjustments.
When you shop, look for blanks made of sterling silver or brass. Sterling is durable for everyday wear, while brass is softer and easier for beginners to emboss.
CreativiU’s online course walks you through the exact same list and even offers a printable checklist you can stick on your workbench.
Wire Wrapping Jewelry Tutorial: Step‑by‑Step Guide includes a quick rundown of tools that overlap with stamping, so you can reuse pliers and a bench block for both projects.
Bottom line:Gather every tool and material first; a tidy workspace prevents interruptions.
Step 2: Prepare Your Metal Blank
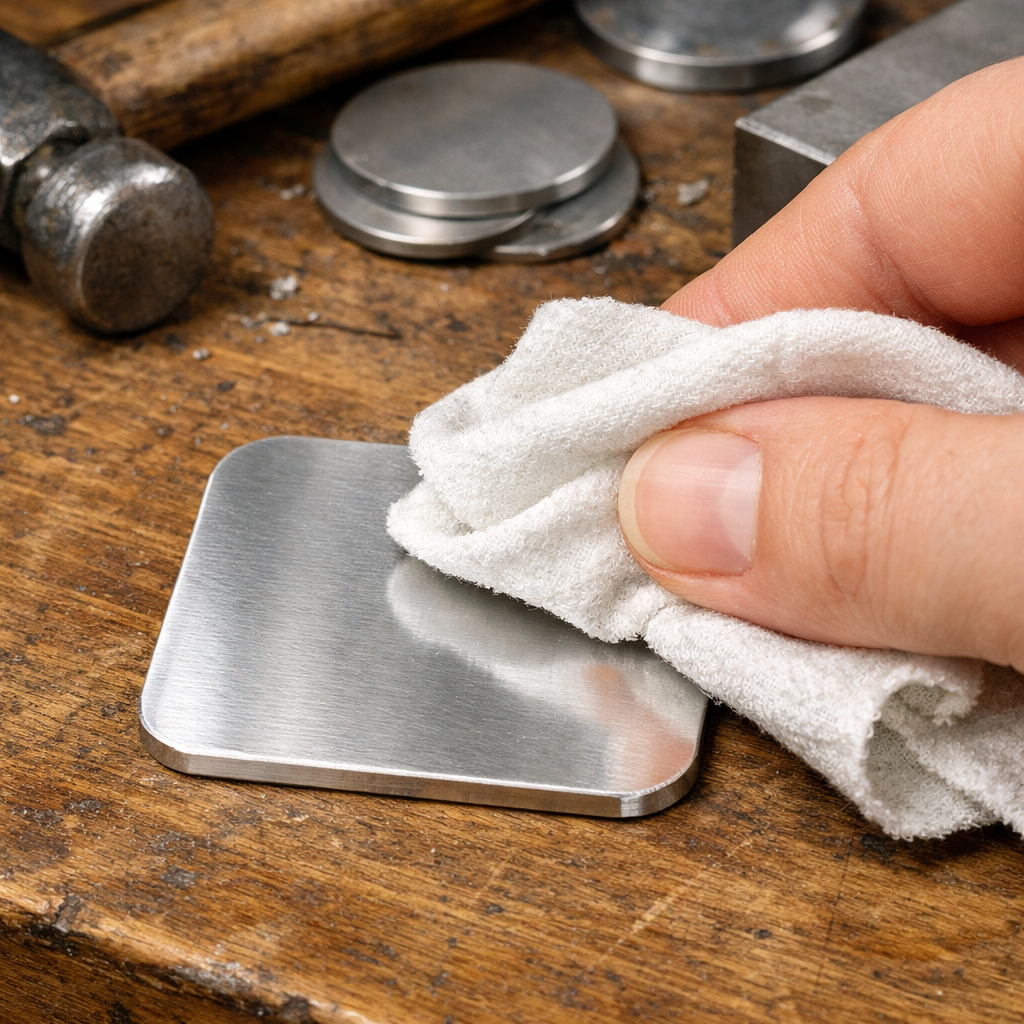
Now that you have your blanks, clean them before any stamping. Even a tiny oil film can blur a stamp.
Start with a gentle wipe using a lint‑free cloth and a drop of mineral spirits. If the blank looks glossy, follow with a warm water and mild dish soap rinse, then dry with a soft towel.
For stubborn oils, the OSHA safety guidelines recommend a brief dip in a solvent‑based degreaser, but be sure to work in a ventilated area.
After cleaning, lay the blank on your stamping board. Use stamping tape to secure it: cut a piece slightly larger than the blank, stick it to the board, then press the blank onto the tape so the surface stays flat.
If you’re using a thin sheet (under 1 mm), consider a backing plate under the tape to stop the metal from flexing while you hammer.
Check the blank for dents or scratches. Lightly sand any high spots with a fine‑grit file, then wipe again.
When the surface feels smooth and oil‑free, you’re ready to transfer your design.
Creative Project Ideas And… shows how a clean surface improves transfer quality for polymer clay, and the same principle applies here.
Bottom line:Clean and tape the blank securely; a steady base makes every stamp count.
Step 3: Design and Transfer Your Stamp
Before you hit the hammer, decide what you want to imprint. Keep designs simple for the first try , one‑ or two‑letter initials, a short word, or a basic shape.
Sketch the layout on a scrap piece of paper. Measure the distance between letters so they sit evenly on the blank. A ruler helps keep spacing consistent.
When you’re happy, transfer the sketch onto the blank with a fine‑point marker. Lightly dot the corners of each letter; these dots guide the stamp placement.
If you prefer a no‑mark method, use a piece of carbon paper under the blank. Trace the design on the carbon sheet, then lift , the imprint will appear on the metal surface for you to align the stamps.
Choose the correct stamp depth. Deeper stamps leave a bolder impression but require more force. Shallow stamps give a delicate look and are easier for beginners.
Arrange the stamps in the order you’ll use them. This saves time and prevents mixing up letters mid‑project.
For a visual reference, watch the short video below that walks through aligning stamps on a small pendant.
Once the stamps are set, give the blank a final visual check. Make sure each letter sits where you marked the dots, and that there’s enough space between characters to avoid overlapping.
Wikipedia entry on metal stamping explains how depth and pressure interact, confirming that a firm, even strike produces the cleanest lines.
Bottom line:Sketch, transfer, and arrange stamps before you start hammering.
Step 4: Stamping Technique and Pressure
With the design set, it’s time to strike. Hold the hammer with a relaxed grip , too tight and you’ll bounce the metal.
Position the stamp directly over the marked spot. Use the tip of the stamp, not the sides, to avoid blurring edges.
Give a firm, controlled blow. Aim for a single, solid hit rather than multiple light taps; this reduces vibration and yields a clean impression.
If the stamp doesn’t fully embed, pause, lift the stamp, and tap again with a slightly stronger strike. Avoid over‑hammering, which can flatten details.
Work from the center of the design outward. This prevents the blank from shifting as you move across the surface.
After each letter, check the depth by feeling the raised edge with your fingertip. It should feel slightly recessed compared to the surrounding metal.
When all stamps are in place, give the piece a gentle shake. Light dust should fall off; if any ink or debris remains, brush it away before moving to finishing.
“Consistent pressure is the secret to professional‑grade stamps,” says a veteran metal‑stamper.
Bottom line:Use firm, single blows and work outward from the center for clean, even letters.
Step 5: Finishing, Polishing, and Caring
Now the piece looks great, but a bit of polish will make it shine like a store‑bought charm.
Start with a soft polishing cloth. Rub the stamped area in circular motions to remove any faint smudges left from the marker.
If you want extra shine, use a metal polishing compound on a microfiber pad. Apply a tiny amount, then buff gently , too much pressure can wear the imprint.
For a vintage look, lightly sand the edges with fine‑grit sandpaper (400‑600 grit). This ages the metal just enough to give it character without harming the letters.
Seal the piece to protect against tarnish. A clear nail polish coat over the stamped area adds a thin, protective film that resists fingerprints.
When you’re done, store the jewelry in a soft pouch or a compartment that won’t scratch the surface.
How to Create Resin Art Jewelry at Home explains how a final clear coat can lock in color; the same idea works for metal.
Bottom line:Polish, protect, and store properly to enjoy your custom piece for years.

FAQ
What type of metal works best for beginners?
Most starters choose brass or sterling silver. Brass is soft enough to take a clean stamp with little force, while sterling silver offers durability for everyday wear. Both metals respond well to polishing compounds and clear sealants, so you can finish them quickly without special equipment.
Do I need a special hammer for metal stamping?
A rawhide‑capped hammer works best because the soft head transfers force without denting the metal. If you only have a regular steel hammer, wrap the head in a piece of leather to soften the impact. The goal is a solid strike that pushes the stamp into the metal without bouncing.
How can I prevent my stamps from slipping?
Secure the blank with double‑sided stamping tape and keep the surface flat on a steel bench block. Press the stamp firmly onto the marked spot before you hit it, and maintain a steady hand. If the stamp still moves, lightly tap it on a scrap piece of wood first to tighten the die.
Can I stamp on metal that’s already jewelry‑finished?
Yes, but you’ll want to protect any existing finish. Apply a thin layer of masking tape over areas you don’t want to mark, then stamp only the exposed metal. After stamping, remove the tape and gently polish the stamped spot to blend it with the rest of the piece.
What safety gear should I wear?
Wear safety glasses to shield your eyes from metal fragments, and use a dust mask if you’re working with metal dust or solvents. Gloves aren’t required for stamping itself, but they can help if you’re handling chemicals for cleaning or sealing.
How long does the whole process take?
According to CreativiU’s data, a complete beginner project , from gathering tools to final polish , typically takes 30‑60 minutes. The timing can vary based on design complexity, but most simple initials or shapes fit comfortably within an hour.
Conclusion
Stamped metal jewelry gives you a personal touch that mass‑produced pieces can’t match. With the right tools, a clean blank, a solid design plan, steady hammer blows, and a bit of polish, you can craft custom charms in under an hour. CreativiU’s step‑by‑step course walks you through each of these stages and even offers a printable checklist to keep you on track. So set up a small workspace, gather your kit, and start turning ideas into metal keepsakes you’ll love to wear or gift.
Leave a Reply