Resin art jewelry has exploded in popularity—and it’s no surprise why. Who wouldn’t want to craft custom, eye-catching pieces that reflect their style and creativity from the comfort of home?
But if you’ve ever wondered, “How do I even get started with resin art jewelry at home?” you’re not alone. It can seem a bit daunting at first with all the materials and techniques involved.
The good news? It’s absolutely doable, even if you’re a complete beginner. Best of all, creating resin art jewelry is not just a craft; it’s a journey that allows you to unlock your artistic potential and craft truly unique accessories that wow.
Imagine capturing a tiny flower, a splash of vibrant color, or a cherished keepsake inside a glossy resin pendant you made yourself. There’s such joy in turning simple materials into wearable art that tells your story.
Ready to jump in? In this guide, we’ll walk you through the essentials of how to create resin art jewelry at home—from picking the right supplies to mastering curing techniques and safety tips that every resin artist should know.
Along the way, I’ll share insider advice so you can avoid common pitfalls and produce stunning results you’ll be proud to show off or gift.
Wondering how to develop your skills further? CreativiU’s resin art tutorial offers an in-depth look at essential techniques that boost confidence and creativity, perfect for diving deeper once you’ve mastered the basics.
No need to feel overwhelmed—the key is starting simple, experimenting, and enjoying the process. So, what should you do next? Grab your workspace, gather your materials, and let’s dive into transforming resin into beautiful, personalized jewelry creations!
TL;DR
Wondering how to create resin art jewelry at home? It’s all about starting simple—choose quality materials, set up a clean workspace, and follow curing safety tips carefully.
This guide walks you through essentials, helping you unlock your creativity and avoid common mistakes for stunning, personalized pieces you’ll love.
Step 1: Gathering Materials and Setting Up Your Workspace
Alright, you’re ready to dive into how to create resin art jewelry at home, but where do you start? It all begins with gathering the right materials and setting up a workspace that cultivates creativity—and keeps you safe.
Start with the Essentials: What Materials Do You Really Need?
First things first, quality matters. Not all resins are created equal. For beginners, epoxy resin is highly recommended because it’s forgiving, clear, and cures nicely without fussing over tiny mistakes.
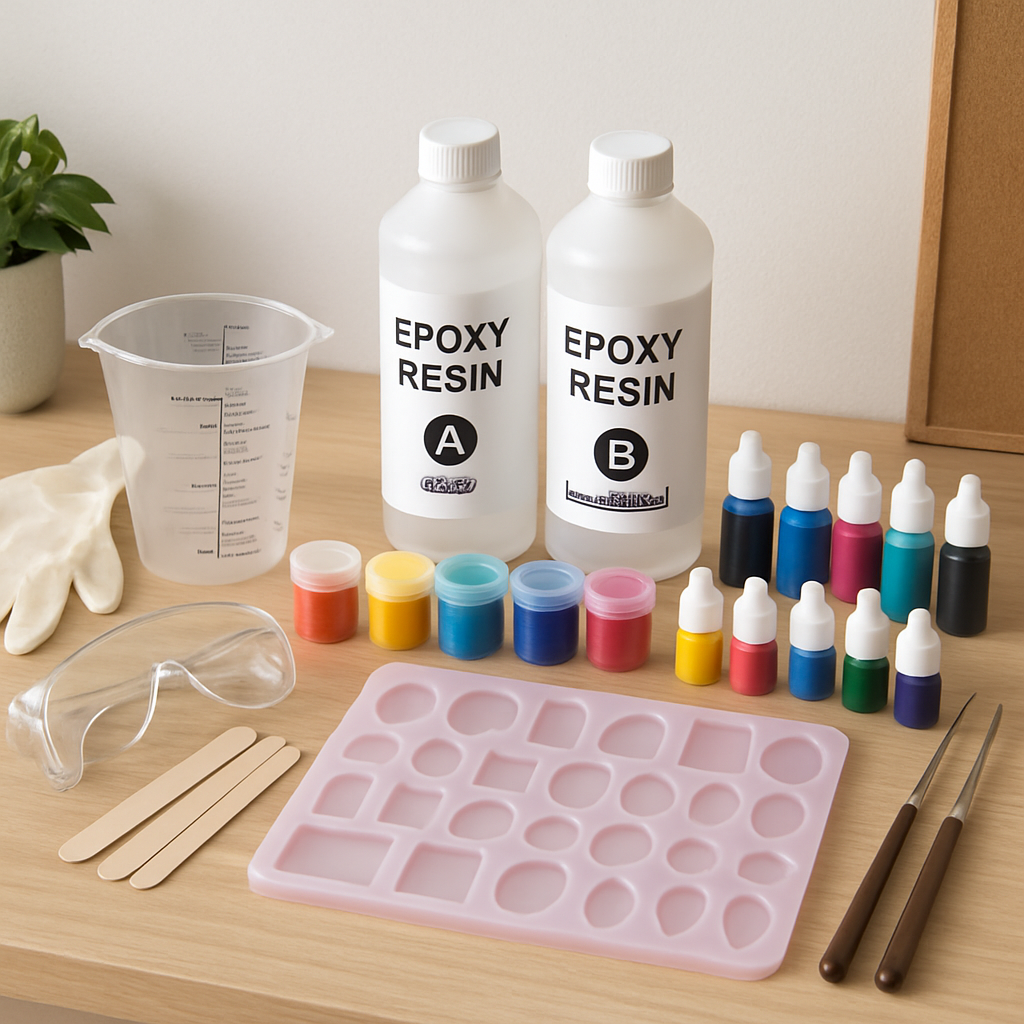
Besides the resin and hardener, you’ll want:
- Mixing cups: Transparent and marked for measurement to ensure accurate ratios
- Stir sticks: Disposable wooden sticks work great for thorough mixing without contaminating your resin
- Silicone molds or bezels: Silicone molds offer smooth surfaces and easy demolding, key for a glossy finish
- Protective gloves and a mask: Resin can irritate skin and emits fumes; safety first!
- Mold release spray: This helps your pieces pop out clean without damage to your molds
- Colorants and embellishments: Think resin pigments, glitters, dried flowers, or paper inserts—but make sure you seal porous items to prevent cloudiness
Are you guessing what you might be missing? A good starting resin kit can bundle many of these essentials. We found several all-in-one options that can smooth out your first experiences. Check if your kit includes clear, beginner-friendly instructions to avoid confusion.
Workspace Setup: Why Your Environment Makes a Big Difference
Next up, creating your artist’s haven. Your workspace profoundly impacts your resin jewelry results and overall experience.
Find a flat, level surface spacious enough to hold all your tools without crowding. An old table with a plastic or silicone mat laid over it is perfect. This protects surfaces from accidental drips and makes cleanup a breeze.
Ventilation is crucial—resin fumes aren’t your friends. Working near an open window or with a small fan directing air away helps keep your space fresh. Wearing a NIOSH-approved respirator mask adds an essential layer of protection, especially for longer sessions.
Also, lighting matters. Natural light helps you see resin clarity and colors better, but a bright LED lamp works well too. Shadows can trick you into uneven pours or missed bubbles, so good visibility is key.
So, what about controlling temperature and humidity? Resin cures best in a slightly warm, dry environment—think around 70–75°F (21–24°C). Too cold or humid, and your resin may cure slowly or turn a bit cloudy. You don’t need a lab setup, but a cozy, controlled space definitely helps.
Organizing Your Tools for Workflow Efficiency
Arrange your materials in the order you’ll use them: measuring cups, stir sticks, resin containers, molds, and finishers close at hand. Keeping a waste bin nearby makes discarding used sticks or gloves hassle-free.
Labeling small containers or trays for pigments and embellishments streamlines your creative flow and reduces accidental spills. Trust me, nothing kills momentum like scrambling for the right glitter!
Don’t Rush: Take Time to Prep with a Test Pour
Before jumping into complex designs, try a simple test pour. Pour mixed resin into a jewelry bezel or mold—no added colors or objects yet—and see how it cures. This exercise feels a bit like a warm-up but is invaluable for understanding your resin’s behavior in your space.
If your resin cures hard, clear, and smooth, you’re on the right track. If it sticks, gets tacky, or turns cloudy, troubleshooting depends heavily on your materials and environment. Resources like Resin Obsession’s troubleshooting guide offer tips on fixing common issues.
Remember, patience is your best friend here. Prematurely removing pieces or rushing steps can lead to frustration and wasted supplies.
Ready to Make It Official?
Once you’ve gathered your materials and set up your workspace thoughtfully, you’re building a rock-solid foundation for your resin art jewelry journey. This approach helps you avoid costly mistakes and keeps your creative energy focused on making beautiful pieces.
Want to level up your creativity while improving your craft basics? Check out our expert guide on mastering arts and crafts problem-solving to build skills that will serve you beyond just resin jewelry.
And don’t forget, every artist faces challenges—you’re not alone, and every mistake is a step toward mastery.
Step 2: Mixing Resin Correctly for Jewelry Making
Now that you’ve prepped your workspace and selected your materials, it’s time to get into the heart of the process: mixing your resin correctly. This step is crucial when learning how to create resin art jewelry at home because improper mixing can lead to cloudiness, sticky surfaces, or even ruined pieces.
Understanding Your Resin Components
Most resin kits come with two parts: the resin itself and a hardener, sometimes called a curing agent. Think of them as two puzzle pieces that only work perfectly when combined in exactly the right balance.
Mixing ratios are usually specified on the packaging, commonly 1:1 or 2:1 by volume. These ratios are non-negotiable; even a slight deviation can affect curing. Imagine trying to bake a cake with too much flour or too little sugar—it just won’t turn out right!
Are you ready to measure precisely? Let’s dig deeper.
Tools You’ll Need for Accurate Mixing
Grab a set of graduated mixing cups with clear measurement marks. Avoid eyeballing measurements to keep your jewelry’s finish flawless.
Use disposable silicone spatulas or mixing sticks—they ensure you can scrape every drop and clean up quickly. Some artists recommend using electronic scales to weigh the resin and hardener for maximum accuracy, especially when working with smaller quantities.
Step-by-Step: Mixing Resin Perfectly
1. Measure first: Pour the resin into your mixing cup according to the kit’s instructions. Follow immediately by adding the hardener in the exact proportion.
2. Mix slowly: Stir the blend gently but thoroughly for 3 to 5 minutes. Fast or vigorous stirring can introduce unwanted air bubbles that mar your jewelry’s clear surface.
3. Scrape the sides: Periodically scrape down the edges and bottom of your mixing cup to ensure no unmixed resin or hardener hides there. Those clumps can create soft spots later.
4. Timing matters: Mix thoroughly but don’t wait too long before pouring. A well-mixed batch starts curing inside the cup over time. If you’re not quick, it may thicken before use.
Common Mistakes and How to Avoid Them
Mixing resin isn’t always forgiving. Have you ever wondered why your resin looks cloudy or tacky after curing?
Often, it’s due to rushed or inaccurate mixing, or stirring too fast. Those bubbles and residue can trap moisture or prevent a chemical reaction needed for proper hardening.
Also, using old or improperly stored resin can cause problems—always check your resin’s expiration date and store it per manufacturer guidelines.
Tips for Bubble-free Resin Jewelry
Bubbles can be a real pain, especially when creating small, detailed jewelry pieces. Here are a few tricks:
- Mix gently and slowly to minimize bubble formation.
- Use a heat gun or even a simple hairdryer briefly to pass over freshly poured resin to pop any rising bubbles.
- Let your mixed resin sit for a minute before pouring—it allows bubbles to naturally rise and dissipate.
Are you curious about these techniques in action? Here’s a straightforward video that demonstrates mixing resin flawlessly—a must-watch for all beginners!
Pro Tip: Work in Batches
If you’re new to resin jewelry making, avoid mixing large quantities at once. Small batches help prevent waste if you make a mistake and allow you practice mixing without overwhelming pressure.
When you get comfortable, you can experiment with adding pigments, glitter, or other inclusions into your mixed resin for those personal touches.
Why Does Correct Mixing Matter So Much?
Proper resin mixing ensures your jewelry cures to a hard, glossy, and crystal-clear finish—exactly what you want for stunning wearable art.
If the ratio is off or mixing sloppy, you risk soft spots, sticky surfaces, or a milky look that will disappoint you and anyone who sees your pieces.
To guarantee success, remember that precision, patience, and careful stirring are your best friends.
If you’re serious about mastering how to create resin art jewelry at home, following these mixing steps diligently will set you apart from beginners who rush and regret.
Mixing resin right might seem like a small step, but it truly transforms your process and final pieces. So take a breath, measure carefully, and pour with confidence!
Step 3: Adding Color, Embellishments, and Designing Your Pieces
Now that you’ve mastered mixing your resin, it’s time to turn those blank canvases into stunning, personalized jewelry pieces. Adding color, embellishments, and thoughtful design elements truly brings your creations to life and lets you express your unique style. Ready to learn how to add those eye-catching visual layers?
Choosing the Right Colorants
First up: color. Deciding whether you want a translucent glow or an opaque richness sets the mood of your piece.
Resin colorants usually come in two forms: epoxy pigments and resin dyes. Epoxy pigments are powdery and often mineral-based, offering pearlescent or shimmering effects. They can give your pieces that magical iridescence, perfect for adding subtle glimmers.
On the flip side, resin dyes are liquid and more potent, offering intense, uniform colors. Little goes a long way, so it’s smart to start small and gradually build the shade until it’s just right.
Why not experiment by mixing both types? Layer shimmery pigments with vibrant dyes to create depth and dimension.
Keep in mind, however, that adding too much pigment or dye can alter the resin curing process, so always check your resin’s instructions and stick to recommended amounts.
Tip: Try mixing small sample batches before committing your whole project to a particular color mix—that way, you avoid surprises and wasted resin.
Incorporating Embellishments: What Works Best?
One of the most fun parts of learning how to create resin art jewelry at home is embedding objects. From dried flowers, glitter, and beads, to tiny charms and even ashes, the possibilities are vast.
However, not everything plays nicely with resin. Fresh plant materials or anything with moisture can cause curing issues or discoloration. The key is preparation: make sure organic items are thoroughly dried and sealed with a clear varnish to lock out moisture.
Want to preserve that delicate fern or a beloved petal? Use silica gel to dry flowers before embedding—this keeps their vibrant look intact.
For smaller inclusions like glitter or confetti, sprinkle them into the resin either mixed in or layered for texture. But take it slow—adding these too quickly can trap unsightly air bubbles.
Sometimes, elevating objects with tiny stands or embedding them in layers prevents them from floating or shifting during curing, giving you a polished, professional finish.
Pro tip: Always use items you’re okay with permanently encasing. Once sealed in resin, there’s no going back.
Designing with Layers and Effects
Here’s where your creativity really shines: resin allows you to build multi-dimensional effects by pouring in layers.
Start by pouring a thin base layer, allow it to partially cure, and then add your colorants or embellishments in successive layers. This method keeps inclusions from sinking or moving around and lets you control depth beautifully.
Have you ever tried creating a resin geode effect? Adding mica powders or alcohol inks in layers, then swirling with a toothpick, gives an organic, jewel-like patterns.
Don’t forget about adding delicate touches like metallic flakes or glow-in-the-dark pigments for wow-factor pieces that turn heads—even in the dark!
Working this way also gives you options to fix minor issues as you go. If a layer has bubbles or misplacements, you can correct before pouring the next, making your process both flexible and forgiving.
Final Touches and Curing Considerations
Before you let your pieces cure, gently pop surface bubbles with a heat gun or torch—just be careful not to overheat or burn your resin.
Keep your workspace dust-free and cover your pieces to avoid dust settling during curing, which can ruin a smooth finish.
Want to add extra shine once fully cured? A light sanding followed by polishing can elevate your work to a glossy, professional standard.
Remember, patience is your best friend! Resin curing times can vary from 24 to 72 hours depending on brand and environment. Rushing this step can lead to sticky surfaces or rings.
Learning how to create resin art jewelry at home is not just about the craft itself—it’s about honoring the process and embracing the little surprises along the way.
If you want even more tips on colorants and embedding, check out the detailed guides on best techniques for resin keychains and what objects you can safely embed in resin. These resources will boost your confidence and creativity.
Ready to keep exploring? Dive into designing now, and let every pour bring you closer to your dream resin art jewelry.
Step 4: Pouring Resin and Curing Process Explained
Ready for that satisfying pour? This is where all your prep work pays off and your resin art jewelry really begins to take shape. Pouring resin might sound straightforward, but there’s a bit of finesse to it if you want a flawless finish.
Pouring Resin Like a Pro
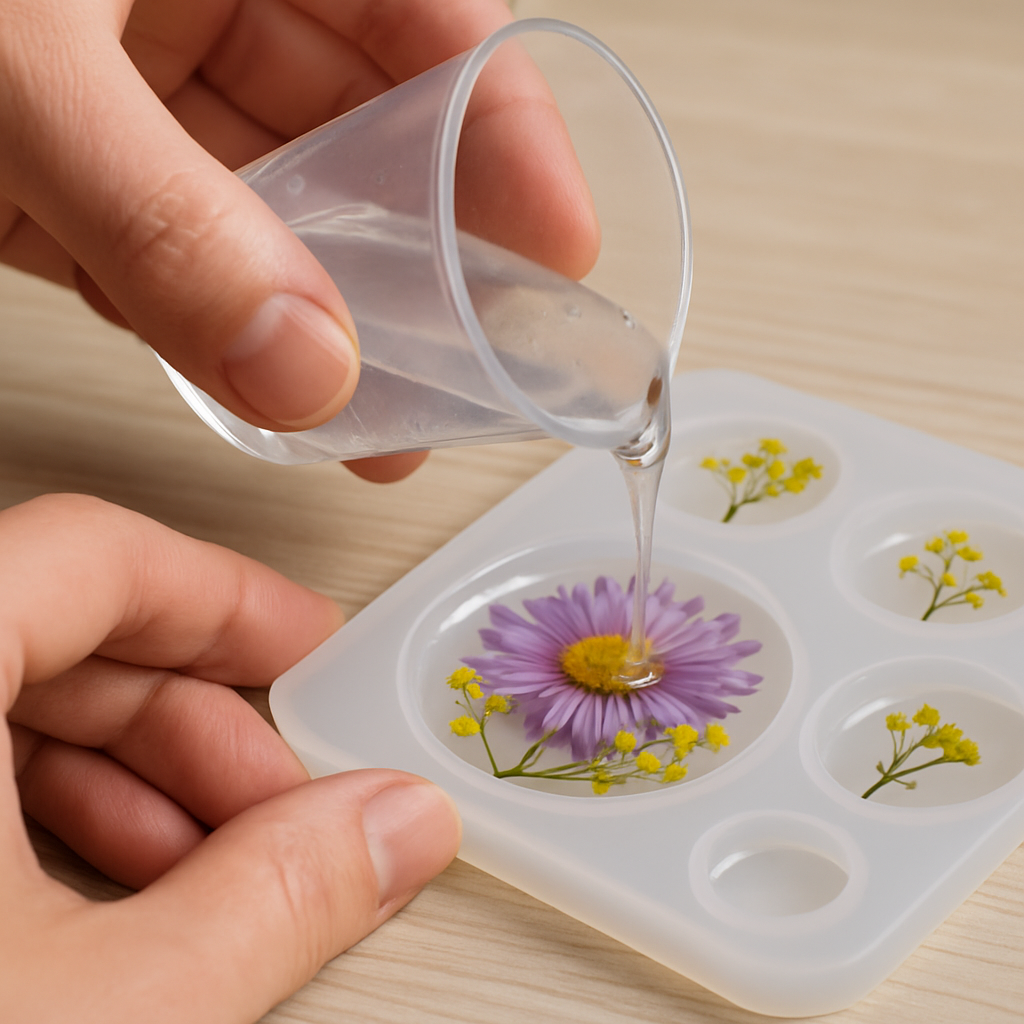
Start by slowly and steadily pouring your mixed resin into your mold or onto your jewelry base. Pour too fast, and you risk creating air bubbles or a messy overflow, which nobody wants.
If you’re embedding objects—think dried flowers, glitter, or charms—pour a thin layer first, let it settle, then add your inclusions carefully before pouring the rest of the resin. This technique helps suspend your elements beautifully within the resin instead of them sinking or floating awkwardly.
Wondering how to handle bubbles? Even with careful pouring, bubbles are inevitable but easy to manage. Use a small heat gun or a butane torch gently above the surface right after pouring. The heat helps pop bubbles before the resin starts to cure. But be cautious: quick flicks over the surface are better than lingering heat, which can cause discoloration or uneven curing.
Understanding the Curing Process
Here’s where things get really interesting. Unlike typical paint or glue that just ‘dries,’ resin goes through a chemical curing process. That means it transforms from liquid to solid through a reaction that can take time—and patience.
So, how long does it take? Most epoxies used for jewelry start to become tacky within a few hours but reach a full cure only after about 24 to 72 hours, depending on the resin brand and environmental factors like temperature and humidity. The ideal temperature range for curing resin is between 75–85°F (24–30°C). Too cold, and your resin might cure slowly or become cloudy; too hot and you risk bubbles or cracking.
Does faster curing sound tempting? Resist the urge to speed things up with extra hardener or direct heating! Adding too much hardener can make your piece sticky or soft, and heat sources like hairdryers can ruin your finish. Instead, find a warm, dust-free space to let your resin settle naturally for the best results.
Ever noticed that thicker pours seem to cure differently? That’s because larger volumes generate heat internally (called exothermic heat), which speeds up curing but can also cause cracking or yellowing if unmanaged. For deep pours, it’s smart to work in layers and allow each layer to partially cure before adding the next.
Tips to Ensure a Perfect Cure
- Keep Your Workspace Consistent: Avoid temperature swings and humidity. A stable environment means steady curing.
- Cover Your Jewelry Pieces: Dust loves to settle on tacky resin, so cover your work with a clean box or plastic wrap without touching the surface.
- Be Patient: Even if your resin looks dry after a few hours, give it the full curing time to reach maximum hardness. Rushing this step risks sticky spots or rings.
- Test Small Batches: Especially if you’re new or changing brands, do test pours to get a feel for cure times under your specific conditions.
After curing, some artists lightly sand and polish their pieces to bump up the shine and smoothness—giving your jewelry a professional, glass-like finish.
Keep in mind, curing times and conditions can vary quite a bit. For a deep dive into epoxy drying science and temperature tips that will help perfect your resin art jewelry, check out this detailed guide on how long epoxy takes to dry and cure. It’s packed with insights that save you headaches and elevate your crafting game.
Feeling confident yet? Pouring resin and curing might require some patience and practice, but mastering this step unlocks endless creative possibilities for your resin jewelry designs.
So, what should you do next? Set up your curing environment thoughtfully, pour with care, and let time work its magic—your stunning resin art jewelry will be worth the wait.
Step 5: Finishing Touches – Demolding, Polishing, and Assembling Jewelry
Congrats! You’ve patiently poured and cured your resin jewelry pieces. Now comes one of the most satisfying parts: taking your work out of the mold, polishing it to a gleaming shine, and assembling your creation into wearable art.
Carefully Demolding Your Resin Jewelry
First things first—demolding can make or break your finish. Make sure your resin is fully cured before attempting this step; a tacky or soft piece risks damage or distortion. Most standard epoxy resins cure within 24 to 72 hours but check your product’s instructions to be sure.
When ready, gently wiggle the edges of the mold to loosen the piece. If your mold is silicone, it should flex easily and release the jewelry smoothly. Avoid sharp or sudden force—slow and steady wins here.
If you encounter stubborn spots, consider chilling the mold in a refrigerator for a short while. Cooling causes slight contraction which can help your piece pop free. Just don’t freeze it, as extreme cold might cause cracking.
Polishing for a Professional, Glass-Like Finish
Now that your piece is free, you might notice a matte or uneven surface. Don’t worry—this is where polishing comes in to transform your jewelry into a professional-looking gem.
Start by sanding your piece with fine grit sandpaper (around 600 to 1000 grit). Be sure to sand gently and evenly, focusing on any edges or imperfections. Wet sanding is often best to avoid dust and keep the resin cool.
Once smooth, move on to polishing compounds or a plastic polish like Novus #2 or #3. Using a microfiber cloth or buffing wheel on a rotary tool can boost the shine dramatically. Keep the speed moderate and don’t overheat your piece—polishing resin requires patience and care.
Remember, the goal is a crystal-clear, glossy finish. That wow factor is what will make your pieces stand out!
Assembling Your Jewelry: Findings and Fasteners
So, how do you turn your polished resin charms into wearable jewelry? Here’s where jewelry findings come in—those small components like bails, jump rings, clasps, and ear wires that complete your piece.
If you want a beginner-friendly route, glue-on findings are your best friends. Just grab a strong adhesive like E6000, and attach the bail or connector pad directly onto your resin charm. Press firmly and let it dry for about 24 hours for a secure hold. It’s simple, no special tools required, and gives a balanced, professional look on your pendant or earring.
For those who love hands-on tool work, you might drill a small pilot hole in the cured resin using a rotary tool—just use a drill bit slightly smaller than your eye pin screw. Then screw in the finding and seal with adhesive for extra durability. This method hides hardware inside the resin for a sleek finish but requires some practice.
When adding jump rings, remember to allow a little wiggle room so your charms hang naturally instead of stiffly. Squeezing prong bails (also called pinch bails) around your resin piece is another option and adds a nice touch when selecting your findings.
Wondering about metal choices? Sterling silver and stainless steel are popular for their durability, but beware of tarnishing, especially if resin coatings aren’t sealed well. Gold-plated findings offer a luxurious finish but may cost more. Make sure to store your jewelry in dry, airtight boxes to keep everything sparkling longer.
Key Takeaways: Finish Strong and Shine Bright!
Mastering the finishing steps of demolding, polishing, and assembling is critical to completing your resin jewelry like a true artisan. Taking your time to handle pieces gently, polish carefully, and choose the right findings will dramatically elevate your work.
For even deeper dives into jewelry findings and assembly techniques, check out resin obsession’s detailed guide on resin jewelry findings and assembly. Their insights on the pros and cons of glue-on versus drilled-in findings can really help you decide what works best.
Also, if you have questions on polishing best practices or tools, this video tutorial on polishing resin jewelry offers clear, step-by-step demonstrations.
The art of how to create resin art jewelry at home isn’t complete without nailing these finishing touches. Ready to craft your signature pieces that shine inside and out?
| Feature | Option/Tool | Notes |
|---|---|---|
| Demolding Technique | Gentle flexing; refrigeration to loosen | Ensure full cure; avoid force; silicone molds preferred |
| Polishing Method | Wet sanding (600-1000 grit), buffing with polishing compound | Creates glass-like shine; patience essential |
| Assembly Approach | Glue-on findings vs drilled-in screw eye pins | Glue-on: easy & balanced; Drilled: sleek, hides hardware but needs tools |
Troubleshooting Common Resin Art Jewelry Issues
If you’ve started exploring how to create resin art jewelry at home, you’ve probably encountered some hurdles—cracks, yellowing, or sticky finishes can feel downright frustrating. But don’t worry! Every resin artist runs into these challenges at some point, and the key is knowing how to troubleshoot and fix them.
Why Does My Resin Jewelry Turn Yellow?
Yellowing is one of the most common issues hobbyists face, especially with epoxy resin. It can happen due to UV exposure, heat, or even certain chemicals in your environment.
Not all resins are created equal—some come with UV inhibitors to slow yellowing, like ArtResin, which many artists swear by for clearer, longer-lasting pieces. You can read a deep dive on this from a seasoned resin crafter explaining how different additives delay yellowing here.
Want to avoid yellowing? Store your jewelry out of direct sunlight and in airtight containers. Also, be mindful of using pure white or hefty clear layers in your design—these tend to reveal discoloration faster.
What Causes Sticky or Tacky Surfaces?
Have you demolded your piece only to find it still tacky, like it’s refusing to fully cure? This usually signals under-curing or using resin and hardener in the wrong ratios.
Resin cures best in a warm, dry environment. If your workspace is cold or humid, cure times can extend or remain incomplete. Make sure you’re measuring your resin and hardener precisely with a scale—weighing beats eyeballing every time.
If you’ve accidentally mixed your resin poorly or cured too thick a layer at once, you might need to sand back the sticky surface and pour a thin, fresh layer to seal the piece. For a quick fix on tacky resin, gentle heat from a hairdryer can sometimes help complete the cure, but don’t overdo it.
How to Handle Cracks and Bubbles?
Cracking happens when your resin shrinks unevenly or cures too fast. Thick pours and sudden temperature changes are common culprits. Try to pour your resin in thinner layers, allowing each to cure fully before adding the next.
Bubbles love to crash your resin party but can be banished with some tricks. After mixing, let your resin sit for a few minutes to allow bubbles to rise to the surface, then pop them gently with a heat gun or torch—but be careful not to burn the resin.
Sometimes your mold texture or debris is the sneaky cause of trapped bubbles. Using high-quality silicone molds and cleaning your components before mixing can save you headaches.
Can I Fix Resin Jewelry Mistakes After Curing?
The good news: yes! Minor surface scratches can be smoothed out with wet sanding using fine-grit sandpaper, followed by polishing compounds that restore that glass-like shine. If your piece has cloudiness or slight imperfections, a thin topcoat of clear resin can often revive its clarity.
Remember, perfection in resin art often comes from patience and practice. If you’re dedicated to learning how to create resin art jewelry at home, troubleshooting is part of the journey toward beautiful, professional-looking pieces.
Ready to tackle these common issues head-on? Embrace your trials as opportunities to sharpen your skills. Need more expert help? This quick video tutorial walks through practical fixes for resin imperfections, while a community of resin artists at CreativiU thrives on exchanging tips and tricks to keep your creations flawless.
Conclusion
Mastering how to create resin art jewelry at home isn’t just about following steps; it’s about embracing the creative journey with all its little mishaps and triumphs. Each bubble popped, every sanding done, and all those layers poured build your skills and confidence. Remember, no masterpiece was ever created without a few trials along the way.
Think about this: every time you fix a scratch or revive cloudiness with a clear resin topcoat, you’re not just repairing your piece—you’re learning to adapt and innovate. That flexibility is what turns a hobbyist into an artist and, eventually, a creative entrepreneur if you choose to monetize your craft.
Feeling stuck? Don’t let frustration stop you. Use every challenge as a chance to improve and reach out to communities like CreativiU, where passionate creators share advice, tips, and inspiration to keep your momentum going strong. After all, creating resin art jewelry at home is a skill best grown with support and experimentation.
So, what’s next? Grab your resin kit, get your molds ready, and jump back in. Your next stunning creation is just a pour away. Keep practicing, stay curious, and most importantly, have fun making jewelry that reflects your unique style and creativity.
FAQ: Answering Your Top Questions About Creating Resin Art Jewelry at Home
Getting started with resin art jewelry at home can be both thrilling and a bit intimidating. You probably have a ton of questions—Don’t worry! Let’s tackle some of the most common questions so you can craft with confidence.
How long does resin take to cure completely?
Resin curing time varies based on the type and brand you use, but most epoxy resins take anywhere from 24 to 72 hours to fully harden. Keep in mind that while your piece might feel solid within 12 hours, it’s best to wait the full curing period before handling or finishing it to avoid fingerprints or dents.
What’s the best way to avoid bubbles in resin jewelry?
Bubbles can be pesky, but they’re not a dealbreaker. To minimize them, mix your resin and hardener slowly and thoroughly, avoiding vigorous stirring. After pouring, using a heat gun or a small torch carefully can help pop the bubbles at the surface. Even simply blowing gently or tapping the mold on your work surface encourages bubbles to rise and pop.
Can I add colors or inclusions to my resin pieces?
Absolutely! That’s part of the fun. You can use resin dyes, mica powders, alcohol inks, or pigments designed for resin. Adding dried flowers, glitter, tiny charms, or metal flakes makes your jewelry truly unique. Just remember not to overload the resin with inclusions or the curing process may be affected.
Is resin jewelry safe to wear, especially for people with sensitive skin?
Once fully cured, resin jewelry is generally safe to wear. However, an undercured piece can cause skin irritation, so patience during curing is key. Also, some people may be allergic to certain pigments or additives, so testing a small piece or using hypoallergenic molds and materials can help you avoid issues.
How do I clean and maintain resin jewelry?
Resin jewelry is pretty durable, but it still needs gentle care. Clean with a soft cloth and mild soapy water. Avoid harsh chemicals or prolonged exposure to sunlight, which can cause yellowing over time. Storing your pieces in a cool, dry place extends their life and keeps colors vibrant.
What mold materials work best for resin jewelry?
Silicone molds are the gold standard—they’re flexible, non-stick, and easy to demold. You can find specialized jewelry molds in various shapes and sizes. If you’re feeling adventurous, you can even make your own molds with silicone mold kits for custom designs.
How to fix mistakes like cloudiness or scratches?
Don’t panic if your resin ends up cloudy; often, a light sanding followed by a fresh layer of clear resin can restore shine and clarity. Scratches can also be buffed out or covered with a resin topcoat. These fixes are part of learning how to create resin art jewelry at home and will get easier with practice.
Still wondering about how to enhance your resin crafting journey? Connect with passionate creators at CreativiU who share tips, tricks, and inspiration—that community support can make all the difference.
Ready to turn questions into creative confidence? Your next resin art jewelry masterpiece is waiting to happen!
Leave a Reply