Ever stared at a swirl of colors on a canvas and thought, “How on earth do I make that happen?” If you’re new to acrylic pouring, that moment of wonder is the perfect starting line.
We’ve all felt that mix of excitement and uncertainty—like opening a fresh box of paints and not knowing which technique will give you those smooth, marble‑like flows or bold, candy‑color bursts. The good news? The basics are surprisingly simple, and a few mindful steps can turn the chaos into gorgeous art.
First, get comfortable with your materials. A good quality acrylic, a pouring medium, and a few silicone drops are the core trio. In our experience, beginners who use a 1:1 mix of paint to medium notice less cracking and more fluid movement. And don’t forget to protect your workspace; a drop cloth or old sheet keeps the floor happy.
Next, experiment with the “dirty pour” method. Pour each color into a single cup, then tip the cup onto the canvas and let gravity do the work. I remember a hobbyist who tried this on a coffee table and ended up with a stunning galaxy effect that sold for $45 on Etsy. That’s the kind of real‑world payoff that keeps us motivated.
But if you prefer more control, the “flip cup” technique lets you tilt the canvas and guide the flow. Try swirling with a palette knife or a straw for extra texture. A quick tip: work in a slightly humid room; the extra moisture slows drying and gives the paint more time to mingle.
Feeling stuck? Check out Getting Started with Online Acrylic Pour Painting Classes for Beginners for a step‑by‑step walkthrough that covers everything from supply lists to troubleshooting common issues.
And while you’re building confidence with pours, you might wonder about the other tools in your kit. Understanding how to choose the right pencil for sketching can improve your layout before you even pour. A quick read on Understanding and Using the Pencil Hardness Chart gives you a solid foundation for all your drawing and painting projects.
So grab your brushes, pour a little courage into the mix, and let the colors speak. The next page of your creative journal is just a splash away.
TL;DR
Acrylic pouring techniques for beginners let you turn simple supplies into mesmerizing, fluid art with just a few easy steps.
Follow our quick guide, experiment with dirty and flip‑cup pours, and watch your confidence grow as each vibrant swirl reveals the creative potential you’ve been craving right now for you.
Step 1: Gather Materials
Before the first pour, the most important thing isn’t the technique—it’s having the right stuff at hand. Imagine you’re about to bake a cake and you realize you left out the flour; the whole process stalls. The same goes for acrylic pouring.
So, what exactly should you gather? Below is a quick checklist that covers everything a beginner needs, from the basics to a few optional extras that can level up your first experiments.
Core Supplies
• Acrylic paints – any brand works, but choose colors with good pigment load. Fluid “pour” paints are a bonus because they require less thinning.
• Pouring medium – this is the secret sauce that gives the paint its flow without cracking. A 1:1 mix of paint to medium is a reliable starting point.
• Silicone oil – just a few drops create those mesmerizing cells that make a pour look like a nebula.
If you’re on a budget, you can start with a single set of 6–8 colors and a generic medium you find at your local craft store. As you get comfortable, you’ll swap in higher‑quality pigments or specialty mediums that extend drying time.
Tools and Protective Gear
You’ll also need a few tools that keep the process smooth: a sturdy canvas or board (12×12” is a friendly size for beginners), a set of disposable cups for mixing, stir sticks or wooden craft sticks, and a silicone‑tipped spatula for adding texture. A pair of nitrile gloves protects your hands from sticky paint, and a mask can help if you’re working in a small, poorly ventilated room.
Don’t forget the mess‑management gear: a drop cloth or old sheet, painter’s tape to mask edges, and a plastic sheet or zip‑top bag for covering your supplies when you step away. Trust me, the cleanup is way less stressful when you’ve planned for splatter.
Now that you know what to collect, let’s see those items in action. Watching a quick walkthrough helps cement the list in your mind before you head to the store.
In the video, you’ll see the exact order we recommend: lay out the canvas, arrange the cups, pour a test swirl, and add silicone. Notice how the host pauses to explain why a 1:1 paint‑to‑medium ratio prevents cracking—something we’ve observed with hundreds of CreativiU members.
While you watch, grab a notepad and jot down any questions. Do you wonder whether you need a specific type of silicone? Or how much water to add if you’re using a thinner paint? Jotting these down makes the actual pour feel less intimidating.
Optional Extras
Once you’ve mastered the basics, you might experiment with additives like alcohol inks for extra color bursts, or use a heat gun to push cells into dramatic shapes. These aren’t required, but they’re fun upgrades once you’ve got the core kit humming.
A quick tip from our community: keep a small squeeze bottle of water nearby. A light mist over the canvas can revive a pour that’s starting to dry too fast, especially in a dry winter studio.
Ready to gather everything? Here’s a visual snapshot of a perfectly organized pour station—think of it as your creative launchpad.
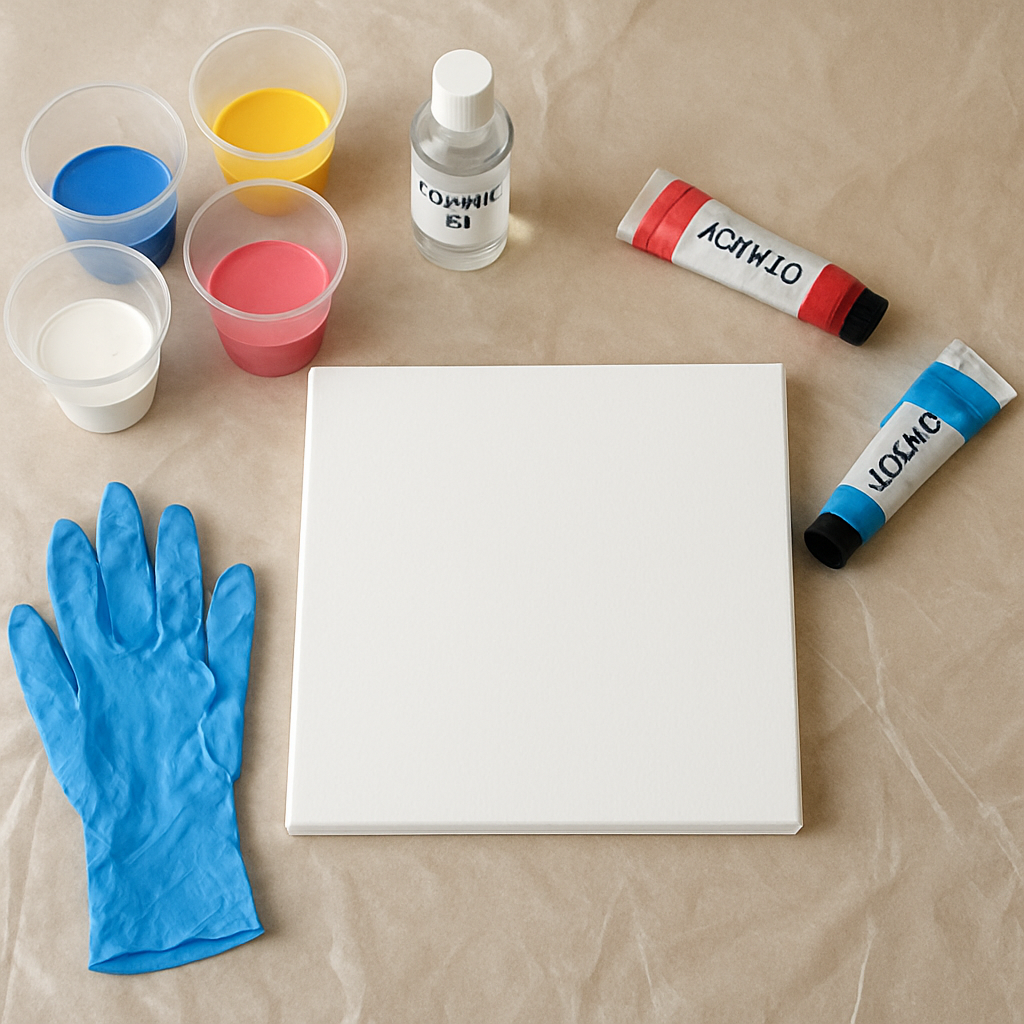
When you set up your space like this, you’ll spend less time hunting for a missing cup and more time watching the paint dance. And that’s exactly how the journey from “I have no idea” to “I just created a galaxy on canvas” begins.
Step 2: Prepare Your Workspace
Alright, you’ve got the paints, the medium, the cups – now it’s time to turn a chaotic kitchen into a pouring studio. I know the thought of splatters on the floor can make anyone hesitate, but a little planning means you’ll spend more time creating and less time cleaning up.
First thing’s first: choose a surface that can handle a splash. A sturdy drop cloth (the cheap canvas drop cloth you can pick up at any hardware store works fine) should cover the floor, and a large piece of wax paper or a silicone baking mat can double‑purpose as a secondary barrier on the table. If you’re in a small apartment, the dining table is a gold mine – just make sure you’ve cleared away any dishes or paperwork.
Map out your zones
Think of your workspace as three zones: mixing, pouring, and drying. In a recent post on creating a small‑space studio, the author describes setting up a mixing station by the kitchen sink (easy water access), a pouring zone on the dining table, and a drying rack on a nearby shelf. Replicate that layout:
- Mixing zone – keep water, paper towels, and a small trash bin within arm’s reach.
- Pouring zone – lay down your drop cloth, then place a shallow tray or aluminum pan to catch any stray drips.
- Drying zone – a vertical easel or a simple propped‑up canvas on a sturdy board lets gravity do its thing without the paint pooling.
When you see the zones clearly, you won’t have to sprint across the room mid‑pour, and you’ll keep your tools organized.
Lighting and ventilation
Good lighting isn’t just for Instagram; it helps you see subtle color shifts and bubbles. A bright desk lamp or daylight‑balanced LED panel positioned at a 45‑degree angle eliminates shadows. And don’t forget ventilation – open a window or run a small fan. Even though acrylics are low‑odor, the pouring medium can release fumes, especially if you use a torch.
Pro tip: keep a small spray bottle of water nearby. A quick mist can slow drying if the room feels too warm, giving the colors more time to mingle.
Tool organization
Label your cups before you start mixing. I use a permanent marker and a simple number system (1 for primary red, 2 for secondary orange, etc.). This tiny habit saved me countless minutes when I was halfway through a flip‑cup pour and wondered, “Which cup was that teal?”
Stir sticks can be grouped in a zip‑lock bag, and silicone drops in a tiny silicone bottle with a dropper – no more hunting for the right piece mid‑session.
Safety first
Gloves are a must, especially if you’re using a torch. Nitrile gloves protect your skin without leaving latex residue on your work. A simple mask (a basic N95 works) guards against any fine particles. If you have kids around, keep the supplies on a high shelf or inside a closed cabinet when you’re not using them.
Now, let’s talk about a real‑world example. One of our community members, a stay‑at‑home parent, turned a tiny balcony into a pouring haven. By using a folding table, a reusable drop cloth, and a portable fan, she could pour every weekend without worrying about the apartment’s carpet. Her secret? She stored all her cups and sticks in a clear tote that slid under the table – a tidy, portable “pour kit.”
Quick checklist before you dive in
1️⃣ Lay down a drop cloth and set up a shallow tray.
2️⃣ Arrange mixing, pouring, and drying zones.
3️⃣ Label cups and gather all tools within arm’s reach.
4️⃣ Turn on good lighting and open a window or fan.
5️⃣ Slip on gloves, mask, and keep a spray bottle handy.
When you follow these steps, the workspace itself becomes part of the creative process – you’ll feel relaxed, organized, and ready to let the paint flow.
And once your piece is dry, you’ll want to showcase it. A natural next step is learning how to hang your canvas without damaging walls. Check out this guide on how to hang canvas without nails – it’s a perfect companion to your new studio setup.
Ready to set up? Grab that drop cloth, label those cups, and give yourself a tidy, safe space to experiment. The first pour will feel smoother, and you’ll be one step closer to mastering acrylic pouring techniques for beginners.
Step 3: Mix Paint and Pouring Medium
Now that your space is set up, it’s time to turn those dry pigments into a river‑ready liquid. The moment you scoop paint into a cup and add the medium feels a bit like a chemistry experiment – you’re about to watch colors come alive.
Choose the right ratio
For most beginners, a 1:1 mix of acrylic paint to pouring medium gives a smooth flow without being too runny. If you’re using a thicker student‑grade paint, you might nudge the ratio to 1:1.5 (one part paint, one‑and‑a‑half parts medium) to keep the “melted‑ice‑cream” consistency the community loves.
Why does that matter? Too thin and the paint will run off the canvas; too thick and it will clump and hide the cells you’re after. The sweet spot feels like warm honey – you can lift the cup and it drips slowly, not in a stream.
Measure, don’t guess
Grab a small measuring cup or use the markings on a reusable silicone cup. Pour the medium first, then add paint until the cup is about half full. Give yourself a quick visual check: the mixture should coat the back of a stir stick without sliding off.
If you’re adding silicone oil for those dreamy cell patterns, drizzle two or three drops into the cup and give it a light swirl. Avoid over‑stirring; a quick fold is enough for the silicone to stay as tiny islands that will later resist the paint.
Stir, don’t over‑mix
Here’s a quick trick: lift the cup and let a small stream fall onto a piece of cardboard. It should spread out in a thin, even line and then pause before it runs off. If it’s still too thick, add a drop of distilled water and stir gently. If it’s too runny, sprinkle in a dab of extra paint.
Remember, each brand behaves a little differently. Craft paints may need less water, while professional grades can handle a tad more medium. Trust your eyes and the feel of the mixture.
Label and organize
Before you move on to the next color, slap a tiny piece of masking tape on the cup and write the color name or number. This tiny step prevents the classic “which cup was teal?” panic right in the middle of a flip‑cup pour.
For a visual reference on how to achieve the perfect consistency, check out step‑by‑step mixing guide.
Humidity can be your secret ally or your worst enemy. In a dry room the paint dries too fast, so give it a light mist with a spray bottle every few minutes. In a humid space let the paint sit a bit longer before tilting – you’ll see richer blends and more pronounced cells.
Final checklist
- Measure medium and paint (1:1 or 1:1.5)
- Stir gently, add silicone if desired
- Test flow on cardboard, adjust with water or paint
- Label each cup before you move on
- Keep a spray bottle handy for humidity control
Once your paints are humming at the right texture, you’re ready to move onto the actual pour. The next step feels like the moment a chef pours batter into a hot pan – the magic really starts now.
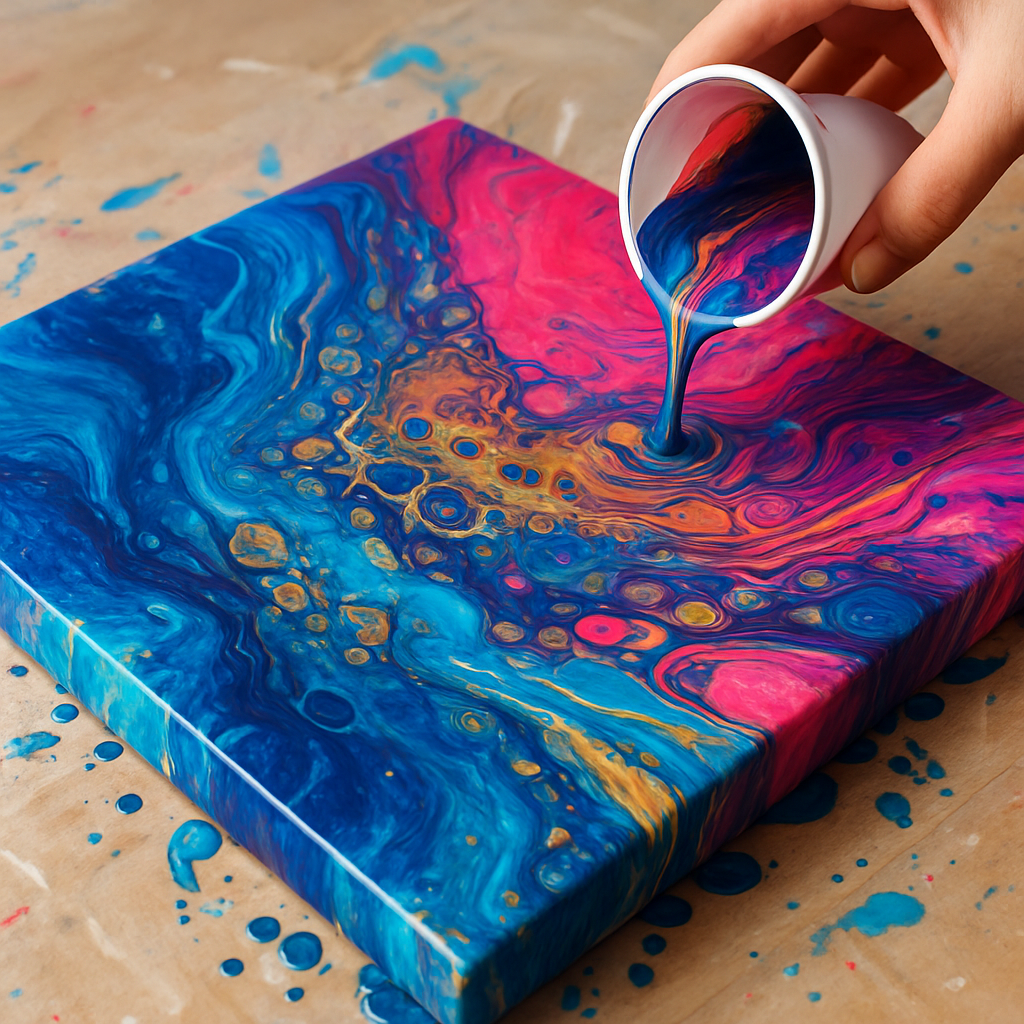
Step 4: Create the Pour
Now the mixture is humming, it’s time to actually get that liquid rainbow onto the canvas. This is the moment where the “magic” really starts, and a little planning can keep the excitement from turning into a mess.
Set up your canvas for the pour
Place the canvas on a flat surface or a painter’s pyramid so it can tilt easily. If you’re using a wooden panel, lay a sheet of wax paper underneath – it catches drips and makes cleanup a breeze. Make sure the surface is level; a wobble will send paint sliding off the edges before you’ve even tilted.
Pro tip: tape the corners of the canvas to the table with painter’s tape. It gives you a quiet border and prevents paint from seeping onto the floor. Many hobbyists I’ve chatted with say that a simple “border” trick saved them hours of scrubbing later.
Pick the pour method that feels right
There are three go‑to techniques for beginners: dirty pour, flip‑cup, and puddle pour. The dirty pour is the easiest – you simply layer your colored mixtures back‑to‑back in one cup, then dump the whole thing onto the canvas. Flip‑cup gives you more control; you flip the cup upside‑down and let gravity pull the paint across. Puddle pour works best when you want distinct color pools that later blend as you tilt.
Imagine you’re a parent helping a child create a “galaxy night.” A dirty pour creates a spontaneous swirl that feels like a cosmic explosion, while a flip‑cup lets you guide the stars into a more intentional shape. Choose the method that matches the story you want to tell.
Control flow and timing
Once you’ve decided, it’s all about timing. Tilt the canvas slowly at first – a gentle angle lets the paint spread evenly. If the paint seems to be drying too fast, give it a light mist with a spray bottle (remember the humidity tip from step 3). On the other hand, if it’s running too far, pause the tilt and let the colors settle before you continue.
One of our CreativiU members shared that using a timer helped her keep the pour within a 2‑minute window, which produced the most vibrant cells. You don’t need a fancy stopwatch; a phone timer works just fine.
For a quick visual reference on timing, check out this YouTube tutorial on pour timing. It shows how a 30‑second pause can change the whole look.
Fine‑tune with silicone and tools
If you love those honey‑comb cells, add a few drops of silicone oil to each cup before you pour. Swirl it gently – you want tiny islands, not a fully mixed slurry.
Use a palette knife or a straw to create lines or bubbles after the initial pour. A quick flick of the knife can break up a large blob into a network of smaller, more interesting shapes. This is where you really get to “play” with the medium.
Quick checklist before you lift the canvas
- Canvas on a stable, level surface or pyramid
- Edges taped for a clean border
- Chosen pour method ready (dirty, flip‑cup, puddle)
- Timer set for 1‑2 minutes of active pouring
- Spray bottle on hand for humidity control
- Silicone drops added if you want cells
- Palette knife or straw within reach for extra texture
When you finally lift the canvas, step back and watch the colors mingle. That first swirl is the payoff of all the prep you just did. If something looks off – maybe a streak is too heavy or a color pooled too much – don’t panic. You can always tilt the canvas a bit more, or use a torch briefly to pop stubborn bubbles.
Now that the pour is done, let the piece dry flat for at least 24 hours before handling. Once it’s dry, you’ll see how the cells have settled and how the colors have blended. That’s the sweet spot where a beginner’s effort turns into a gallery‑ready piece.
And remember, each pour is a little experiment. The more you practice, the better you’ll read the paint’s behavior, and the more confidence you’ll gain as a creative entrepreneur or a hobbyist looking for that next wow‑factor.
Step 5: Manipulate the Flow
Now the paint is sitting on the canvas, but the real magic happens when you start nudging it around. Think of the paint as a river – you’re the gentle hand that guides it to carve new paths. This is where you turn a decent pour into a truly dynamic piece.
Tilt, Twist, and Pulse
Start with a slow, deliberate tilt. A 10‑degree angle lets the colors slide evenly; a sharper 30‑degree tilt creates dramatic runs. After a few seconds, pause, then reverse the direction. The back‑and‑forth motion creates those coveted marbled veins you see in gallery‑ready work.
Pro tip: set a phone timer for 30‑second intervals. One of our CreativiU community members, a freelance Etsy seller, said the timer helped her stay within a 2‑minute active‑pour window, which produced the richest cells.
Tools That Give You Control
A palette knife or a clean straw can be a game‑changer. Drag the knife across wet paint to break up large blobs, or blow through a straw to push bubbles toward the edges. If you have a small heat gun, a quick flash (no more than a second) will pop stubborn bubbles without scorching the surface.Imagine a creative entrepreneur who sells custom phone skins. She uses a heat gun after each pour to ensure a flawless finish, then photographs the piece for her online shop. The extra polish translates directly into higher sales.
Humidity and Timing Hacks
Room humidity is the silent partner in every pour. In a dry apartment, mist the canvas lightly every 45 seconds with a spray bottle. In a humid studio, give the paint a few extra seconds before you start tilting. This tiny adjustment can be the difference between a muted blend and a vibrant, cell‑rich explosion.
Rush & Ramble notes that a simple mist “slows drying if the room feels too warm, giving the colors more time to mingle” (see their dirty pour basics). It’s a cheap, repeatable trick that works for anyone, from parents doing weekend projects to hobbyists chasing that perfect galaxy effect.
Cell‑Boosting Tricks
Silicone oil is the secret sauce for big, glossy cells. Add 2–3 drops to each color cup, then give it a gentle swirl – don’t over‑mix, or the silicone will dissolve into the paint. When you tilt, the silicone repels the acrylic, forming the characteristic bubbles.
Mont Marte’s guide reminds us that the torch should stay at least 5 cm away and only touch the paint for a split second, otherwise you risk over‑cooking the cells (cell‑boosting tips from Mr Goodriddance). If you’re new to the torch, start with a single flash on a test swatch before moving to your masterpiece.
| Technique | Tool / Add‑on | Best‑For |
|---|---|---|
| Gentle tilt | Painter’s pyramid, timer | Even color flow, subtle veins |
| Knife swipe | Palette knife, straw | Breaking up blobs, creating texture |
| Cell boost | Silicone oil, blow torch | Large, glossy cells and bubble pop |
When you feel the flow is stuck, ask yourself: “Am I tilting enough? Do I need a little mist? Should I add a flash of heat?” The answer often lies in a quick adjustment, not a complete overhaul.
Here’s a quick, actionable checklist to keep the flow moving:
- Set a timer for 30‑second tilt intervals.
- Keep a spray bottle within arm’s reach.
- Have a palette knife, straw, and torch ready.
- Add 2‑3 drops of silicone oil per cup for cells.
- After each tilt, pause and observe – let the paint settle before the next move.
Finally, once you’re happy with the composition, let the canvas dry flat for 24‑48 hours. If you’re looking for finished inspiration, check out the stunning abstract pieces at Gratitude Studios. Seeing how other artists manipulate flow can spark new ideas for your next project.
If you want a deeper dive into class options that walk you through these flow‑manipulation tricks step by step, take a look at How to Get Started with Online Acrylic Painting Classes for Beginners. It’s a handy resource for hobbyists and creative entrepreneurs alike.
Step 6: Finishing Touches
You’ve coaxed the colors, popped the bubbles, and now your piece is almost ready to join the wall. But the final moments matter just as much as the pour itself—this is where the work becomes a polished artwork instead of a wet mess.
Let it cure, don’t rush
One of the biggest mistakes beginners make is moving a piece before it’s fully cured. A recent poll on AcrylicPouring.com showed that 103 artists let their work sit for three to four weeks before sealing. That extra time lets the paint harden evenly, reduces the risk of cracking, and gives the cells a chance to settle into those glossy, honey‑comb patterns we all love.
If you’re itching to display your piece sooner, aim for at least 24‑48 hours of flat drying, then check the surface with a gentle touch. If it feels tacky, give it another day. Patience here pays off when you later apply a varnish or hang the canvas.
Seal the deal (literally)
Sealing protects the colors from UV fade and dust, especially if you plan to sell or gift the artwork. Choose a clear acrylic varnish—matte for a soft look, gloss for extra sparkle, or satin for a balanced finish. Apply in thin, even strokes using a soft brush or a spray can, depending on the size of your piece.
Pro tip: test the varnish on a small hidden corner first. Some cheap sprays can yellow over time, and you don’t want that surprise after weeks of admiration.
Adding the finishing details
Now’s the moment to add any extra flair. A quick swipe of a dry brush can highlight raised cells, while a fine‑tip metallic pen can outline subtle veins for a more defined look. If you’re a creative entrepreneur, these tiny details can become signature touches that set your brand apart on Etsy or Instagram.
Parents often ask how to involve kids in the final steps without risking safety. A simple water‑based gloss medium applied with a sponge lets little hands add a shiny accent without dealing with fumes or flammable solvents.
Protect your workspace for the next round
While the piece cures, clean your tools while the paint is still wet. Rinse brushes in warm, soapy water, wipe silicone drops from cup rims, and store your torch in a safe metal holder. This habit not only extends the life of your equipment but also speeds up setup for your next experiment.
And don’t forget to label the canvas with the date and any mix ratios you used. Future you will thank you when you compare a three‑month‑old piece to a fresh pour and notice how the cells evolved.
Display or store?
If you’re ready to hang, use a sturdy easel or a picture‑hanging system that supports the canvas weight. For pieces that need more time, store them flat in a climate‑controlled area—avoid basements that swing between damp and dry, as humidity can cause the paint to soften.
Creative entrepreneurs often photograph their finished work on a lightbox to capture the true color and cell depth. A quick snap with natural light and a neutral background makes the image pop on social feeds, attracting more eyes to your shop.
Quick finishing checklist
- Leave the canvas flat for at least 24‑48 hours.
- Check the surface for tackiness before sealing.
- Choose matte, satin, or gloss varnish based on desired look.
- Apply varnish in thin, even coats; let each coat dry fully.
- Add optional accents (dry brush, metallic pen) while varnish is still wet.
- Clean tools, store torch safely, and label the piece.
- Decide whether to hang immediately or store flat for further curing.
When you follow these finishing touches, the difference between a “nice pour” and a “gallery‑ready piece” becomes crystal clear. So take a breath, give your artwork the care it deserves, and watch it shine the way you imagined.
Conclusion
We’ve taken you from gathering supplies to that final varnish coat, and you can now see why acrylic pouring techniques for beginners feel like a friendly experiment rather than a high‑stakes lab.
What you’ve learned
First, a solid workspace saves you time and stress. Second, mastering the 1:1 (or 1:1.5) paint‑to‑medium ratio gives you that honey‑like flow that makes cells pop. Third, the simple tilt‑and‑pause rhythm, plus a few drops of silicone, turns ordinary colors into cosmic swirls.
And remember: patience wins. Letting the canvas rest flat for 24‑48 hours before sealing is the difference between a sticky mess and a gallery‑ready piece.
So, what’s next?
Pick one of the techniques you’ve tried—dirty pour, flip‑cup, or puddle—and plan a small series. Document each mix ratio in a notebook; you’ll be amazed at how tiny tweaks change the whole vibe.
If you’re a creative entrepreneur, consider snapping a quick photo in natural light and sharing the story on your socials. That authentic behind‑the‑scenes glimpse often draws the most engagement.
Feeling inspired? Grab your cups, set a timer, and let the next pour be the one that finally feels like “my signature style.” Happy pouring!
Every time you revisit these acrylic pouring techniques for beginners, you’ll notice subtle shifts—maybe a richer hue, a tighter cell pattern, or a smoother transition between layers. That’s the beauty of practice: the canvas becomes a journal of your growth. So keep a habit of cleaning your tools right after each session, label your color mixes, and don’t be afraid to experiment with new silicone ratios or even a touch of glitter. The more you play, the more your personal style will shine through.
FAQ
What supplies are absolutely essential for acrylic pouring techniques for beginners?
You don’t need a full art studio to get started. Grab a few student‑grade acrylic paints, a pouring medium (or a DIY mix of PVA glue and water), silicone oil for cells, a set of sturdy plastic cups with lids, wooden stir sticks, nitrile gloves, and a drop cloth. A canvas or primed wooden panel works best, but a smooth MDF board will do in a pinch. Having these basics on hand lets you focus on the fun rather than a shopping list.
How do I achieve the right paint consistency without a fancy calculator?
Think of the mix as honey that drips slowly off a spoon. Start with a 1:1 ratio of paint to medium; if the mixture feels too thick, add a splash of distilled water, one teaspoon at a time, stirring gently. If it runs too fast, toss in a bit more paint. A quick test on a piece of cardboard helps – you want a thin line that holds its shape before it runs off.
Can I use silicone oil safely, and how much should I add?
Silicone oil is the secret sauce for those glossy cells we all love, and it’s safe when used in tiny amounts. Add 2‑3 drops per cup of mixed paint, then give the cup a gentle swirl – don’t over‑mix or the silicone will dissolve. Too much silicone makes the paint repel each other and creates huge, uncontrollable blobs. A little goes a long way, and the result is those honey‑comb bubbles that make your pour pop.
What’s the best way to keep bubbles from ruining my pour?
Bubbles love to hide in thick paint, especially after you stir. After mixing, let the cup sit for about 30 seconds; the bubbles will rise to the surface. Then give it a gentle tap on the table or use a straw to blow a quick puff across the top. If you notice stubborn bubbles during the pour, a quick flash from a heat gun or a kitchen torch (held a few centimeters away) will pop them without scorching the colors.
How long should I let my piece dry before I seal it?
Patience really pays off here. Let the canvas sit flat for at least 24‑48 hours; the paint will fully cure and the cells will settle into their final shape. If you live in a humid climate, add an extra day. Once the surface feels dry to the touch and no longer tacky, you can apply a thin coat of clear varnish – matte, satin, or gloss, whichever matches your aesthetic.
Do acrylic pours work on surfaces other than canvas?
Absolutely! You can experiment with primed wood panels, smooth ceramic tiles, even glass (just use a glass‑specific primer first). The key is that the surface is non‑porous and properly primed so the paint adheres and doesn’t soak in. For parents working with kids, a sturdy cardboard sheet is a mess‑friendly option that still shows off those swirling colors without breaking.
How can I turn my hobby pours into a small side business?
Start by documenting each pour – note the paint ratios, silicone drops, and any tweaks you made. Those records become your portfolio and make it easy to reproduce popular designs. Snap a natural‑light photo, share the behind‑the‑scenes story on Instagram or TikTok, and include a short “how‑to” caption. When orders roll in, use a protective mailing tube and seal the piece with a clear acrylic varnish for durability. Consistency and storytelling are what turn a hobby into a thriving micro‑brand.
Leave a Reply