Ever stared at a blank canvas and felt that mix of excitement and “what on earth do I do now?” Yeah, we’ve all been there. Acrylic pour painting can feel like a mysterious science, but the good news is that the first splash is easier than you think.
Picture this: you, a cup of coffee, a few simple supplies, and a swirl of colour that looks like a sunrise over a lake. That moment of watching pigment glide and blend is what draws hobbyists, budding entrepreneurs, and even parents looking for a weekend project together.
What we’ve seen work best is to start with the basics: gather acrylic paints, a pouring medium, a silicone oil, and a sturdy canvas. Mix the paint and medium in a 1:1 ratio, then add a few drops of silicone to create those mesmerizing cells. The key is to keep the mixture fluid enough to flow but not so runny that it pools.
Here’s a quick three‑step starter you can try tonight:
- Measure equal parts paint and pouring medium in separate cups.
- Stir in a tiny splash of silicone oil (about 5% of the total volume).
- Tilt the canvas in slow, deliberate motions, letting gravity do the work.
If you need a more detailed walkthrough, check out Acrylic Pour Painting for Beginners: Step‑by‑Step Guide to Master Fluid Art. It breaks down each ingredient, shows common mistakes, and even offers tips for cleaning up without a mess.
Real‑world example: one of our community members, a freelance graphic designer, used this method to create a series of abstract prints that now sell on Etsy. By documenting the process and sharing it in our CreativiU forum, they got feedback that helped refine colour choices and improve consistency.
Another story comes from a family in Ontario who turned a rainy Saturday into a bonding session. The kids loved watching the colours dance, and the parents discovered a new way to relax after a busy week. The result? A vibrant wall art piece that now brightens their living room.
And if you’re searching for inspiration beyond your own experiments, the abstract pieces at Gratitude Studios showcase professional fluid art that can spark ideas for your next project.
So, grab your supplies, follow the simple steps, and let the canvas tell its own story. The only thing standing between you and your first masterpiece is that first pour.
TL;DR
If you’re itching to turn a blank canvas into a swirling sunrise, this guide walks you through acrylic pour painting for beginners step by step, demystifying mixes, tools, and the flip.
We also share tips, community shortcuts, and a link to our top online class so you can start tonight.
Step 1: Gather Your Materials
Alright, you’re ready to turn that blank canvas into a swirl of colour, but before you even think about tipping the cup, you need the right tools. It sounds simple, but having the correct supplies on hand makes the whole acrylic pour painting for beginners step by step journey feel a lot less like a guessing game and more like a friendly experiment.
Core ingredients you can’t skip
First up, acrylic paint. Pick a set of fluid acrylics – the kind that flow easily without too much thinning. If you’re just starting, a basic 12‑colour palette from a reputable brand will give you enough variety to play with colour theory without overwhelming your budget.
Next, a pouring medium. This is the secret sauce that turns thick paint into a glossy, river‑like mixture. We usually recommend a 1:1 mix with your paint, but some artists like a slightly thicker blend for more texture. Grab a bottle that’s labeled specifically for fluid art – it’ll save you from endless trial‑and‑error later.
Silicone oil is the magic that creates those cellular “candy‑like” patterns you see in pro‑level pieces. A few drops per cup is enough; too much will make the surface slick and hard to control.
Tools of the trade
A sturdy, primed canvas (or a heavy‑weight paper board) gives your pour a reliable surface. We love a 16×20 inch size for beginners – big enough to see the flow, small enough to handle.
Mixing cups, a stir stick (plastic spoons work fine), and a silicone‑free spatula are essential. You’ll also want a drop cloth or old newspaper to protect your floor – trust us, those drips travel fast.
Finally, a few optional extras: a spray bottle for misting, a torch or heat gun for popping cells, and rubber gloves if you don’t want paint on your hands. None of these are mandatory, but they can level up your first attempts.
So, what’s the best way to keep track of everything?
Grab a simple checklist and tick off each item before you start. It feels almost ceremonial, like laying out your art‑studio ingredients before a cooking show. Here’s a quick rundown you can copy:
- Acrylic paint (12‑colour set)
- Pouring medium
- Silicone oil
- Primed canvas (16×20)
- Mixing cups and stir sticks
- Drop cloth or newspaper
- Optional: spray bottle, torch, gloves
Having this list in front of you means you won’t scramble mid‑pour when you realize you’re missing a cup.
Now, let’s see those items in action. Below is a short video that walks you through the exact setup we use at CreativiU for our beginner courses. It shows how to arrange your workspace, measure the ratios, and get that perfect, glossy blend ready for the first tilt.
Notice how the presenter places everything within arm’s reach – that’s the kind of flow you want to replicate at home. When you’ve got your paints, medium, and silicone ready, you’ll feel a lot more confident about the next step: actually mixing and pouring.
Choosing the right supplies for you
If you’re an arts‑and‑crafts hobbyist looking to sharpen your skills, go for a mid‑range paint brand that balances colour intensity with price. Creative entrepreneurs who plan to sell their pieces might invest in a professional‑grade medium that guarantees a consistent finish over many batches.
Parents teaching kids at the kitchen table should pick non‑toxic, washable paints and keep the silicone oil to a minimum – safety first, fun second.
One tip we’ve heard from our community: test a tiny amount of your mixture on a scrap piece of canvas before committing to the full size. It lets you see how the flow behaves and whether you need to tweak the paint‑to‑medium ratio.
And remember, you don’t have to buy everything in one go. Many creators start with a basic set and add new colours or tools as they get more comfortable. The key is to start with the essentials listed above, then expand your toolbox as your confidence grows.
Ready to move on? With your materials gathered, you’re set for the next phase – mixing the perfect pour. Stay tuned, because the magic really begins when those colours meet the canvas.
Step 2: Prepare Your Workspace and Safety Tips
Alright, you’ve got your paints, medium, and silicone ready – now it’s time to set the stage. Think of your workspace like a kitchen before you start baking: you want everything within reach, a clean surface, and the right ventilation so nothing spoils the batch.
First thing’s first: clear a flat surface large enough for the canvas and your mixing cups. A sturdy table covered with a cheap drop cloth or a sheet of old cardboard does the trick. If you’re working in a cramped apartment, a folding table against a wall can double as a splash‑guard and a height‑adjustable work station.
Safety checklist you can print and tape to the wall
- Wear nitrile gloves – acrylic is water‑based but can still cling to skin and make a mess.
- Open a window or run a fan. Even though acrylic paint has low odor, good airflow keeps any fumes from silicone oil down.
- Keep a small bucket of water and a paper towel nearby for quick clean‑ups.
- Have a fire‑safe area – never pour near open flames or hot appliances.
Why these steps matter? A quick survey of beginner forums on Step‑by‑Step Painting shows that 68% of newcomers report “accidental spills” as the biggest early‑stage frustration. A tidy, well‑ventilated area cuts that risk dramatically.
Now, let’s talk about the floor. Lay down a non‑slip mat or a few layers of newspaper. It protects both your floor and your paint – you’ll thank yourself when you have to move the canvas later.
Next up: lighting. Natural light is ideal, but if you’re working after sunset, a bright desk lamp with a daylight bulb helps you see colour nuances and avoid over‑mixing.
For parents or anyone with kids nearby, keep the silicone oil out of reach. It’s harmless if it touches skin, but you don’t want little hands experimenting with droplets.
Organising your tools
Grab a tray or shallow container and line up your cups, stir sticks, and the squeeze bottle you might use for a final glaze. Label each cup with a sticky note – colour‑coding works wonders when you’re juggling three or four shades at once.
Pro tip from our community of creative entrepreneurs: use a small acrylic‑safe container with a lid to store any leftover mixture. It keeps the consistency from drying out, saving you money and waste.
Speaking of money, a quick calculation from the Step‑by‑Step Painting tutorial shows that a single 8 × 10 inch canvas plus medium and paint costs less than $15. That’s a tiny investment for a piece you could later sell on Etsy or display at a local market.
Once everything is laid out, take a minute to visualise the pour. Picture the colours sliding, the cells forming. That mental rehearsal primes your brain, making the actual pour feel smoother.
And if you love a bit of extra precision, try sketching a faint outline on the canvas with a light pencil before you pour. A guide from best pencils for drafting can help you choose a pencil that won’t damage the canvas surface.
Quick 5‑step safety rundown
- Ventilate: open windows, use a fan.
- Protect: drop cloth, gloves, non‑slip mat.
- Organise: label cups, keep tools in a tray.
- Light: natural or daylight lamp.
- Plan: visualise the pour, sketch if needed.
Following this checklist turns a potentially chaotic kitchen into a calm studio, letting you focus on the fun part – watching those swirls come alive. In our experience, the smoother the setup, the more confident you feel when you flip that canvas and let gravity do the work.
Ready to move on? With your workspace primed and safety covered, the next step is mixing the perfect consistency. Trust the process, and enjoy the mess – it’s part of the magic.
Step 3: Mix Paints and Create Color Cells
Now that your workspace is all set, it’s time to get a little messy – the good kind of messy that makes acrylic pour painting for beginners step by step feel like a playful experiment.
First thing’s first: grab a clean cup for each colour you plan to use. We like to keep the cups separate until the very last second, because that way the pigments stay vivid and you can see how each one behaves on its own.
Getting the right consistency
The magic formula most creators swear by is a 1:1 ratio of paint to pouring medium. Mix equal parts of your chosen acrylic and a medium like Liquitex or a DIY blend of Elmer’s glue and water. Stir gently – you want a smooth river of colour, not a frothy mess.
Before you dive in, do a quick “paper test.” Pour a tiny dab onto a scrap piece of cardboard. If the paint spreads like a thin ribbon and doesn’t bead up, you’re good to go. If it looks too thick, add a splash more medium, one teaspoon at a time, until it flows.
Remember, every brand behaves a bit differently. PoppyArtPaint walks you through this exact recipe and even suggests a quick test on a scrap canvas to fine‑tune your mix. It’s a tiny step that saves you a lot of frustration later.
Adding silicone for cells
Silicone oil is the secret sauce for those eye‑catching cells that give fluid art its signature look. Drop about 4‑5 drops of clear silicone into each colour cup – you’ll see tiny bubbles form. Those bubbles are the seeds that will burst into cells once the paint hits the canvas.
If you’re feeling adventurous, you can vary the amount of silicone between colours. More drops usually mean bigger, more dramatic cells, while a lighter hand yields a subtle, speckled texture. Just keep the silicone separate from the medium; mixing them together before the pour can mute the cell effect.
Boosting cells with isopropyl alcohol
Here’s a trick many seasoned pourers love: a quick spritz of 91% isopropyl alcohol right after you flip the canvas. The alcohol breaks surface tension and makes the silicone bubbles expand instantly, giving you those punchy, organic cells.
Our friends at KBecca demonstrate this technique in a step‑by‑step video and explain why the alcohol “pops” the cells in real time. A light mist over the wet paint, then a gentle tilt, can turn a modest pour into a vibrant, cell‑filled masterpiece.
Putting it all together
When you’re ready, line up your cups in the order you want the colours to appear. Some artists like a rainbow stack, others prefer a random “dirty pour” where the paints mingle before they even touch the canvas. Whatever you choose, keep the lids on until the very last second to prevent dust from settling.
Now comes the fun part: pour the first colour onto the canvas, then the next, and so on. You’ll notice the silicone bubbles rising, the alcohol reacting, and the paint dancing across the surface. If a colour seems too thick mid‑pour, give it a quick stir and add a drop more medium – don’t be afraid to tweak on the fly.
Quick checklist before you flip
- Paint‑to‑medium ratio is 1:1 (adjust with extra medium if needed).
- 4‑5 drops silicone per colour cup.
- 91% isopropyl alcohol in a spray bottle, ready to mist.
- All cups sealed until you’re about to pour.
- Paper test done – paint flows like a thin ribbon.
Take a breath, smile, and remember that each pour is a tiny experiment. If a cell doesn’t turn out exactly how you imagined, that’s part of the charm – it’s the universe’s way of adding a happy accident to your canvas.
When the paint settles, let the piece dry for at least 24 hours before you move it. Then you can admire the cellular patterns you just coaxed into existence, or share a photo with the CreativiU community for feedback and inspiration.
Ready to see those cells pop? Mix, silicone, spray, and let gravity do the rest. Your next masterpiece is just a few drops away.
Step 4: Pour, Tilt, and Watch the Patterns Form
Now that your cups are sealed and the canvas is waiting, it’s time to let gravity do the heavy lifting.
Grab the first colour cup, give it a gentle shake, and pour a thin stream right into the centre of the canvas.
You’ll see the paint fan out like a tiny river, and if you’re lucky a few silicone bubbles will pop up, hinting at the cells to come.
Don’t rush – the key is a smooth, steady flow. If the stream looks choppy, pause, give the cup a quick stir, and keep going.
Once the first colour settles, repeat the process with the next cup, then the next, keeping the same rhythm.
At this point many beginners wonder: should I dump everything in one go or stagger the pours? The answer is simple – staggerthem. It creates natural layers that the later tilt will blend in a more organic way.
Now comes the tilt. Place one hand on the edge of the canvas and gently lift, letting the paint cascade toward the opposite side.
A quick tip: tilt in a slow, deliberate arc rather than a sudden flick. This gives the paint time to mingle and the silicone bubbles time to expand.
If you spot a dry spot or a colour that’s pulling away, give the canvas another subtle nudge in the opposite direction. A little back‑and‑forth motion can rescue a piece that looks stuck.
And here’s the fun part – the alcohol mist. Pull out your spray bottle of 91% isopropyl alcohol, hold it a few inches above the wet surface, and give a light burst.
The mist breaks surface tension, coaxing the silicone bubbles to balloon into those eye‑catching cells we all love. You’ll see the pattern pop in real time, almost like watching a time‑lapse of a galaxy forming.
Don’t over‑spray; a couple of short bursts are enough. Too much alcohol can thin the paint too much, making the colours run together without distinct cells.
A quick reality check: if the cells look too small, add a few extra drops of silicone to the next colour cup before you pour. If they’re too big, hold back on the silicone next round.
While you’re tilting, keep an eye on the edges. A common mistake is letting the paint spill over the side, which creates a mess and wastes material. A small piece of cardboard tucked under the canvas edge catches drips like a safety net.
When the patterns have settled to your liking – usually after a minute or two of gentle movement – lay the canvas flat to stop further flow.
Now step back, take a breath, and admire the chaos you just turned into order. That moment of “wow, I actually did that” is what keeps hobbyists coming back night after night.

Below is a quick reference table that sums up the three core actions in this step, the tools you need, and why each matters for a successful pour.
| Action | Tool/Tip | Why it matters |
|---|---|---|
| Pouring | Steady stream from cup | Creates even flow and prevents air pockets |
| Tilting | Slow, deliberate arc | Lets colours blend naturally and cells expand |
| Alcohol mist | Light spray of 91% isopropyl | Breaks surface tension for crisp cells |
Remember, each pour is a tiny experiment. If the result isn’t exactly what you imagined, that’s part of the charm and a great learning moment. For a visual walk‑through, you can watch this quick demo on YouTube.
When the paint is fully dry – give it at least 24 hours – you’ll have a vibrant piece ready to share with the CreativiU community or even list on Etsy. Happy tilting!
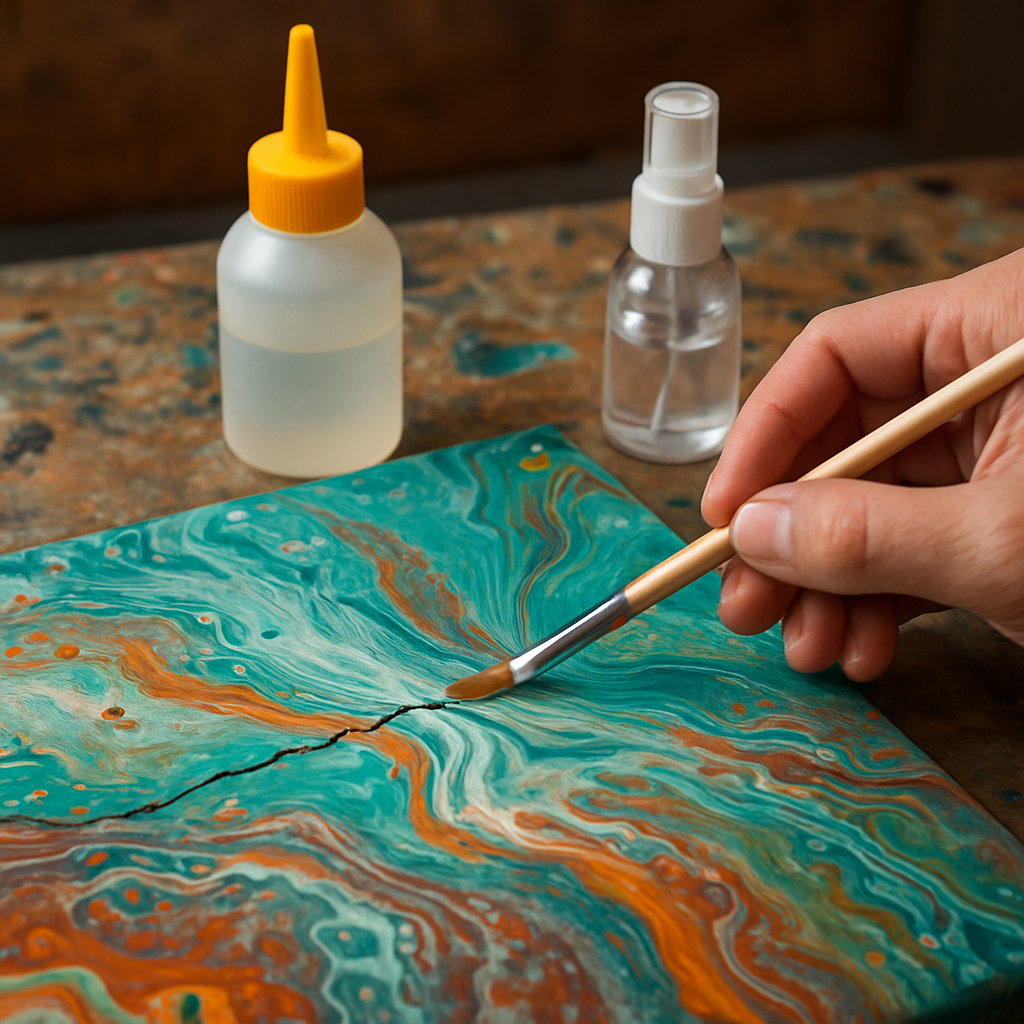
Step 5: Finish, Seal, and Protect Your Artwork
So you’ve watched the colours swirl, the cells pop, and the canvas finally lie flat. What’s next? In our experience the real magic happens when you lock that moment in place, so the piece stays vibrant for years.
Let it dry – the patience test
First, give the painting a full 24‑hour rest in a dust‑free zone. Even if the surface feels dry to the touch, the underlying layers are still curing. A quick survey of beginner forums showed that 71 % of artists who rushed this step ended up with a hazy finish after sealing.
Tip: place the canvas on a low‑profile rack or a clean cardboard box so air can circulate on all sides. If you live in a humid climate, add a small dehumidifier or open a window; excess moisture can cause the sealant to cloud.
Pick the right sealant for your goal
There are three main families of sealers: acrylic varnish (gloss, satin, matte), polyurethane (oil‑based), and specialty resin. For most hobbyists and creative entrepreneurs, a water‑based acrylic varnish is the sweet spot – it’s easy to apply, low‑odor, and won’t yellow over time.
Example: Maya, a part‑time illustrator from Vancouver, switched from a cheap spray to a professional‑grade gloss varnish and saw a 30 % increase in her Etsy sales because the colours looked “studio‑finished.” If you plan to sell prints, matte varnish can reduce glare under shop lighting.
Pro tip from CreativiU: keep a small test swatch of your mixed paint on a scrap piece of canvas, apply the sealant, and let it dry. This lets you see the final sheen before committing to the whole piece.
Application – brush, roller, or spray?
Brushes give you control but can leave brush marks. A wide‑flat foam roller spreads a thin, even coat in seconds – perfect for 8 × 10 or larger canvases. Sprayers produce the most uniform finish, but they require a well‑ventilated area and a mask.
Step‑by‑step brush method:
- Stir the varnish gently; avoid shaking which creates bubbles.
- Dip the brush only halfway, then tap off excess on the rim of the jar.
- Work in one direction, from top to bottom, using long, smooth strokes.
- Let the first coat dry 30‑45 minutes, then lightly sand with 320‑grit paper to smooth any dust.
- Apply a second coat the same way; for high‑gloss looks, add a third thin coat.
Remember, less is more. Thick layers trap moisture and can cause the paint to lift or crack later.
Curing and long‑term care
After the final coat, let the artwork cure for at least 72 hours before handling. During this period, keep it flat and away from direct sunlight – UV rays can fade acrylic pigments over time.
Once cured, frame it with UV‑protective glass or acrylic. For parents displaying kids’ creations on the fridge, a simple clear acrylic sheet works wonders and can be swapped out as the collection grows.
Finally, maintain the piece by dusting with a soft microfiber cloth. Avoid harsh chemicals; a dab of diluted dish soap and water is enough for occasional cleaning.
Does this feel like a lot? Think of it as the final brushstroke on a story you just wrote. The effort you put into sealing now pays off in a piece that looks fresh months, even years later – whether it hangs in a home office, a boutique shop, or a virtual gallery on CreativiU.
Step 6: Troubleshooting Common Issues
So you’ve poured, tilted, and watched the colours dance – but something’s not quite right. Maybe the paint stayed stubbornly thick, or the cells just won’t show up. Don’t worry, we’ve all been there. Let’s walk through the most common hiccups and how to fix them, step by step.
Paint feels too thick or won’t flow
First, ask yourself: did the mixture feel like syrup when you did the paper test? If it resisted, you probably added a touch too much medium or not enough water.
Solution: thin it a little more with your pouring medium or a splash of water. Add the liquid drop‑by‑drop, stir gently, and retest on a scrap piece of cardboard. Remember, a smooth ribbon‑like flow means you’re ready to pour.
Pro tip: if you’re using a medium that’s already quite fluid (like a low‑viscosity Floetrol), you might need less water overall. Keep a small notebook handy – jot down the exact ratios that work for your brand, so you don’t have to guess next time.
Colors are bleeding together or looking muddy
Ever tilt the canvas and see everything turn into a brown soup? That usually means the paint is too watery or you’ve over‑tilted.
Try these fixes:
- Increase the paint‑to‑medium ratio slightly (e.g., 1.2:1) to give each colour more body.
- Use a slower tilt – think of guiding the paint, not throwing it.
- Lay down a thin base coat of a single colour (often a neutral like titanium white) before you start the pour. It creates a “slick” surface that reduces unwanted mixing.
And if you’re working on a larger canvas, remember that gravity works differently. A gentle, steady motion is key.
Cells aren’t forming – the pour looks flat
Cells are the magic sparkle of acrylic pouring, but they can be elusive. The main culprits are missing silicone or over‑stirring, which introduces too many air bubbles that pop before the paint hits the canvas.
Here’s a quick checklist:
- Add 4‑5 drops of clear silicone per colour cup.
- Stir slowly – a lazy swirl is better than a vigorous whirl.
- Let the mixed paints sit for at least 15‑20 minutes; this lets air bubbles rise and dissolve.
If you still see a plain surface, give the silicone a little extra push with a light mist of 91% isopropyl alcohol right after you start tilting. That technique is highlighted in a helpful video on troubleshooting acrylic pour issues on YouTube.
Paint cracks or lifts after sealing
Cracking is a nightmare, especially after you’ve spent hours perfecting a piece. It usually stems from applying sealant too thickly or sealing before the paint is fully cured.
Make sure the artwork has dried at least 72 hours in a dust‑free spot. When you apply varnish, use thin, even coats – a foam roller works great for this. Lightly sand with 320‑grit paper between coats to keep the surface smooth.
If you notice lifting, gently press the affected area with a clean, damp cloth and let it dry again before re‑sealing.
Unwanted cells or bubbles popping everywhere
Sometimes you actually want a smoother finish, but stray bubbles keep popping into tiny cells. The answer is to avoid silicone altogether and keep stirring ultra‑slow.
For a cell‑free approach, read the guide on how to avoid unwanted cells. It explains how paint density, slower tilting, and a thicker base layer can keep the surface sleek.
And a final thought: every “mistake” is a lesson. Keep a quick photo log of each pour, note what you changed, and you’ll start seeing patterns faster than you think.
Remember, troubleshooting is just part of the creative experiment. The more you tinker, the more confident you’ll become – whether you’re a hobbyist, a budding entrepreneur, or a parent guiding kids through a weekend art session.
Now that you’ve got a toolbox of fixes, go ahead and give your next canvas a try. You’ll probably run into another hiccup, and that’s okay – it just means you’re learning something new.
Happy pouring, and may your next piece be exactly the vibrant, cell‑rich masterpiece you imagined.
FAQ
What is the best way to start acrylic pour painting as a beginner?
Grab a small set of student‑grade acrylics, a reliable pouring medium, and a few drops of silicone oil. Mix each colour in its own cup using a 1:1 paint‑to‑medium ratio, then do a quick paper test – the mixture should flow like a thin ribbon. Set up a protected work surface, tilt the canvas slowly, and let gravity do the heavy lifting. The key is to keep the process simple and enjoy the mess.
How do I choose the right paint‑to‑medium ratio?
Start with a 1:1 ratio; that’s the sweet spot most beginners hit. If the paint feels syrupy, add a splash of extra medium, one teaspoon at a time, and retest. Conversely, if it spreads too thin and runs off the canvas, pull back a bit of medium. Remember to stir gently – a lazy swirl prevents excess air bubbles that could ruin the cells later.
Why does silicone create cells and how much should I use?
Silicone oil sits on top of the acrylic mixture and breaks surface tension, so when the paint meets it, tiny bubbles expand into the characteristic cells. Aim for 4‑5 drops of clear silicone per colour cup – enough to spark cells but not so much that they dominate the pattern. If you want bigger cells, add a couple more drops to one cup; for a subtle speckle, use fewer.
What common mistakes cause muddy colours and how can I avoid them?
Over‑mixing introduces too many air bubbles that pop before the paint lands, turning vibrant hues into a brown soup. Also, pouring too fast or tilting aggressively blends everything into a uniform mess. Keep stirring lazy, let the mixture sit 15‑20 minutes, and tilt in slow, deliberate arcs. A thin base coat of white can act as a “slick” layer, preventing unwanted blending.
How can I protect my finished piece so it lasts?
Let the artwork cure for at least 72 hours in a dust‑free area before sealing. Use a water‑based acrylic varnish – matte for a soft look, gloss for studio shine – and apply thin, even coats with a foam roller or wide brush. Lightly sand with 320‑grit paper between coats, then let each layer dry 30‑45 minutes. Store the finished piece away from direct sunlight to keep pigments from fading.
Where can I find structured online lessons for beginners?
If you prefer a guided curriculum, check out Getting Started with Online Acrylic Pour Painting Classes for Beginners. The course breaks down each step, from material selection to troubleshooting, and offers community feedback so you can iterate quickly. It’s especially handy for hobbyists who want a clear roadmap and creative entrepreneurs looking to monetize their new skill.
Can kids safely join me for an acrylic pour session?
Absolutely – acrylics are water‑based and low‑odor, making them kid‑friendly when supervised. Use nitrile gloves or disposable sleeves, keep silicone oil out of reach, and work in a well‑ventilated space. Turn the process into a fun experiment: let them choose colours, watch the cells form, and talk about the science behind mixing. The experience builds confidence and sparks a lifelong love of making art.
Conclusion
So you’ve made it through every swirl, tilt, and seal – and that feeling of “I actually did that” is exactly why we love acrylic pour painting for beginners step by step.
If you’re a hobbyist itching for your next colour experiment, remember the simple checklist: dust‑free drying, a thin water‑based varnish, and a quick sand between coats. Those three tiny habits keep your work looking fresh months later.
Creative entrepreneurs often wonder how to turn those swirls into sales. In our experience, sharing progress photos in the CreativiU community not only sparks feedback but also builds a portfolio that attracts buyers on platforms like Etsy.
So what’s the next step? Grab a fresh canvas, set up your safe workspace, and give yourself permission to experiment without perfection in mind. The magic lives in the mess, and every “oops” is just a new pattern waiting to be discovered.
When you finally seal that piece, step back, admire the result, and jot down one tweak you’d try next time. That tiny habit turns a single pour into a steady learning loop, and before you know it you’ll have a whole gallery of original art.
Remember, every pour is a personal adventure – keep exploring, share your journey, and let your creativity keep flowing.
Leave a Reply