Ever found yourself staring at a blank canvas, wondering if you’ll ever create something that looks as stunning as those swirling acrylic pour paintings you see online? Trust me, you’re not alone. That mix of excitement and intimidation? It’s exactly why online acrylic pour painting classes for beginners exist—to take that “Where do I even start?” feeling and turn it into “Wow, I actually made this!” moments.
Here’s the thing: acrylic pour painting is one of those magical processes where you don’t have to be a pro to create mesmerizing art. It’s fluid, it’s experimental, and it lets you play with color in ways that feel more like watching a wave crash on the shore than painting in the old-fashioned brush-scrub style. But jumping in without some guidance is like trying to surf on your first day without a lesson—you’ll wipe out more than ride the wave.
So, why choose online classes? Well, besides the obvious comfort of learning at home in your pajamas, online acrylic pour painting classes connect you to expert techniques, tips, and troubleshooting that can make all the difference. Plus, you get to progress at your own pace, which honestly can’t be beaten. No pressure, no comparison, just you and the flow of the paint.
What’s even cooler is that there’s a whole supportive community out there cheering you on, sharing insights, and celebrating each “aha” moment. CreativiU, for example, offers a thoughtful platform where beginners can find clear lessons tailored especially for those first steps. If you’ve ever felt stuck on how to get started with acrylic painting, you might find their how-to guide for online acrylic painting classes for beginners incredibly helpful.
Feeling a bit overwhelmed? That’s normal. But here’s a little secret: once you start pouring, mixing, and watching the colors blend, the process itself becomes addictive in the best way. It’s not just about making art—it’s about unlocking creativity you didn’t know you had.
So, ready to ditch the hesitation and dive into this vibrant, flowing world of colors? Let’s get you set up for success, step by step. And hey, if you ever wonder how perfecting a skill feels in other fields too, check out insights like those in Mastering the Japanese Presentation Style: A Step-By-Step Guide—sometimes, learning from different crafts sparks unexpected inspiration.
TL;DR
Feeling stuck about where to start with acrylic pour painting? Online acrylic pour painting classes for beginners offer a pressure-free way to learn the basics, experiment with colors, and build confidence at your own pace.
With CreativiU’s supportive community and clear step-by-step lessons, you’ll soon trade hesitation for those “wow” pours you didn’t think you could make. Ready to pour your creativity out?
Step 1: Gathering Essential Materials for Acrylic Pouring
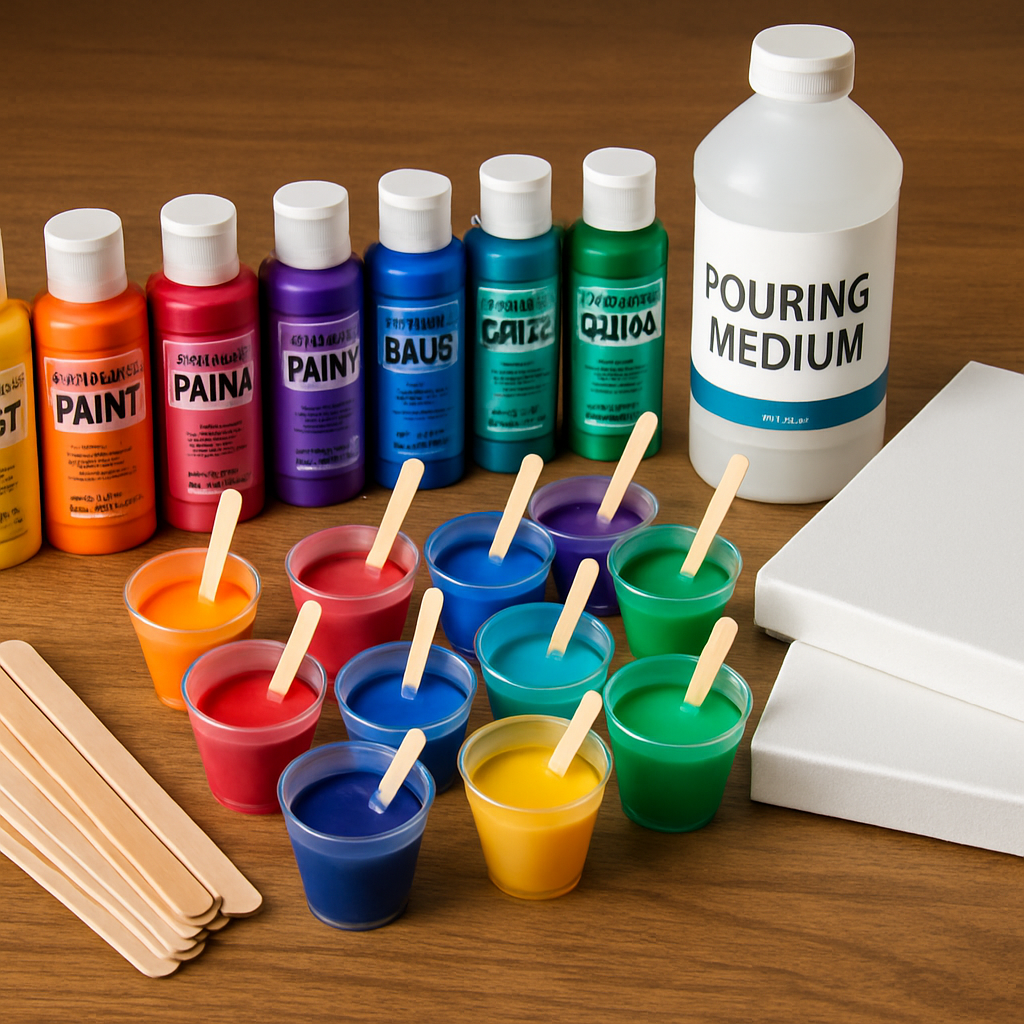
Starting something new can feel like standing at a huge buffet with so many choices, right? Acrylic pouring is exactly that—a beautiful mess of colors, textures, and flow. But before you dive into swirling paint, let’s get you set up with the right essentials. Trust me, the secret sauce to those stunning pours is not just your creativity—it’s the materials you pick and how you prepare them.
The Paint — More Than Just Color
First up, acrylic paint. It’s tempting to grab cheap craft paints, especially when you’re just testing the waters. But here’s the catch—craft paints often lack the pigment punch and binder quality needed for fluid art. This usually means dull colors or mixed mud instead of those vibrant cells and flowing patterns you see online.
So, what kind of paint should you grab? Go for student-grade or artist-grade acrylics. They’re richer in pigment, have better binders, and dry with long-lasting vibrancy.
If you want recommendations, brands like Pebeo Studio Acrylics and Amsterdam come highly praised among pour artists for their beautiful finish and color stability. And if you’re wondering about premixed pouring paints, they’re convenient but pricier and less flexible for advanced techniques. It’s worth learning how to mix your paints yourself—it opens up a world of control.
Pouring Medium — The Fluid Magic
Now, you’ve got paint, but to pour it beautifully, you need a pouring medium. Think of it as the paint’s best friend that loosens it up, improves flow, and helps it dry evenly without cracking. Without this, your acrylics would just be thick blobs—no flowing rivers of color or delicate cells.
There are commercial options made by reliable brands like Liquitex and Golden, designed specifically for acrylic pouring. They tend to be pricier but offer archival quality, meaning your artwork won’t yellow or crack over time.
If you’re on a budget, you might come across alternatives like Floetrol, which, while affordable and popular among beginners, can dull your colors and have limited longevity. Remember, it’s fine for practice pieces or testing new techniques, but if you want your art to last, investing in quality mediums pays off.
Mixing Tools and Containers — Don’t Skip These
Okay, so you have your paints and fluid medium. Next, you need a few practical tools to mix and manage your creations. Wooden craft sticks or plastic spoons work great for stirring—sturdy enough to break up clumps and mix thoroughly.
For containers, silicone or reusable plastic cups with lids are the way to go. They help keep your mixtures fresh if you want to prep multiple colors or save leftovers. Plus, silicone cups are eco-friendly since you can peel dried paint off and reuse them.
Paper cups are a more biodegradable option if you want to stay green, but be mindful—they aren’t as durable if you plan on prepping large batches of paint.
Choosing Your Canvas and Setup
Most beginners start with stretched canvases, and that’s a solid choice. Just make sure they’re tightly stretched so the paint flows smoothly without puddling. Wooden panels are another option—just remember to seal and prime them first with gesso.
Elevate your canvas using painter’s pyramids or even overturned plastic cups so excess paint can drip off freely. This small step can make a big difference in how your painting dries and looks.
And don’t forget to protect your workspace! Acrylic pouring gets messy fast, so newsprint, plastic tarps, or even cardboard can save you a headache. This prep keeps the focus on the fun, not the cleanup.
Quick Peek: Safety and Extras
One last word—while acrylic pouring is generally safe, gloves can prevent paint from drying on your skin and annoying you later. Good ventilation is crucial, especially if you’re using a torch or heat gun to pop bubbles or enhance effects. Safety first doesn’t mean less fun—just smarter fun.
There’s a ton to experiment with, and the supplies list can feel overwhelming. But once you get your hands on the essentials, your confidence will grow fast. If you want a solid guide that breaks down all these materials and the science behind them, check out this detailed acrylic pour painting supplies guide by Olga Soby. It’s like having a mentor in your corner.
And while acrylic pouring might feel like a free-for-all of creativity, having the right tools sets a foundation for consistent success. All the tips and tricks you’ll pick up in online acrylic pour painting classes for beginners from CreativiU build on this solid start.
So, ready to gather your supplies and get those hands messy? It’s easier than you think, and every item you pick is a step closer to your first mesmerizing pour.
And just a quick aside—while you’re building that creative setup, here’s an unexpected tip I picked up: sometimes, looking outside your art world can spark new ideas. For example, there’s an interesting step-by-step guide on mastering the Japanese presentation style that really nails how careful preparation transforms outcomes. It’s not paint, but it’s about crafting a flow—something we all could use.
Step 2: Setting Up Your Workspace for Online Painting Classes
Alright, let’s get real for a second. You’ve got your paints and supplies, but have you thought about where you’re actually going to pour your art magic? Setting up your workspace isn’t just about cleanliness—it’s about creating a zone where creativity flows without a hitch. Trust me, you don’t want to be scrambling midway through, trying to find a rag or wrestling with a wobbly table.
First things first: choose a spot that feels inspiring but practical. Ideally, it’s a well-ventilated area with good natural or bright artificial light. Nothing kills the vibe faster than struggling to see what colors you’re actually mixing. If you can, pick a space that’s easy to clean—because acrylic pouring gets messy. Plastic drop cloths or even an old shower curtain on the floor and tabletop work wonders here.
Think about the surfaces, too. You want a flat, sturdy table that’s big enough to hold your canvas, your paints, and all the accessories without feeling cramped. Remember that moment when you accidentally knocked over your cup of silicone oil? Yeah, we both have. Keep your mixing tools and paints organized in containers or trays for quick reach, and to avoid those frustrating spills that make you want to give up.
How about lighting? If natural light isn’t an option, grab a daylight-balanced lamp—this helps you see your colors as they truly are and spot details that might otherwise slip by. A lamp with adjustable height and angle can be a game changer, letting you zoom in on your masterpiece’s finest parts.
And hey, don’t forget your seating. This might sound obvious, but standing or sitting comfortably during your class makes a huge difference. You want to avoid slouching or stiff necks—that’s no fun when you’re trying to pour with precision. An adjustable chair or a cozy cushion can save your back and keep you focused.
Now, here’s a neat trick I picked up from some online acrylic pour painting classes for beginners: a little extra workspace or “drying station” nearby saves you from the art-juggling act. You’ll want somewhere safe to put your finished pours to dry flat and undisturbed. It can be a dedicated shelf or a simple cookie sheet covered with plastic wrap.
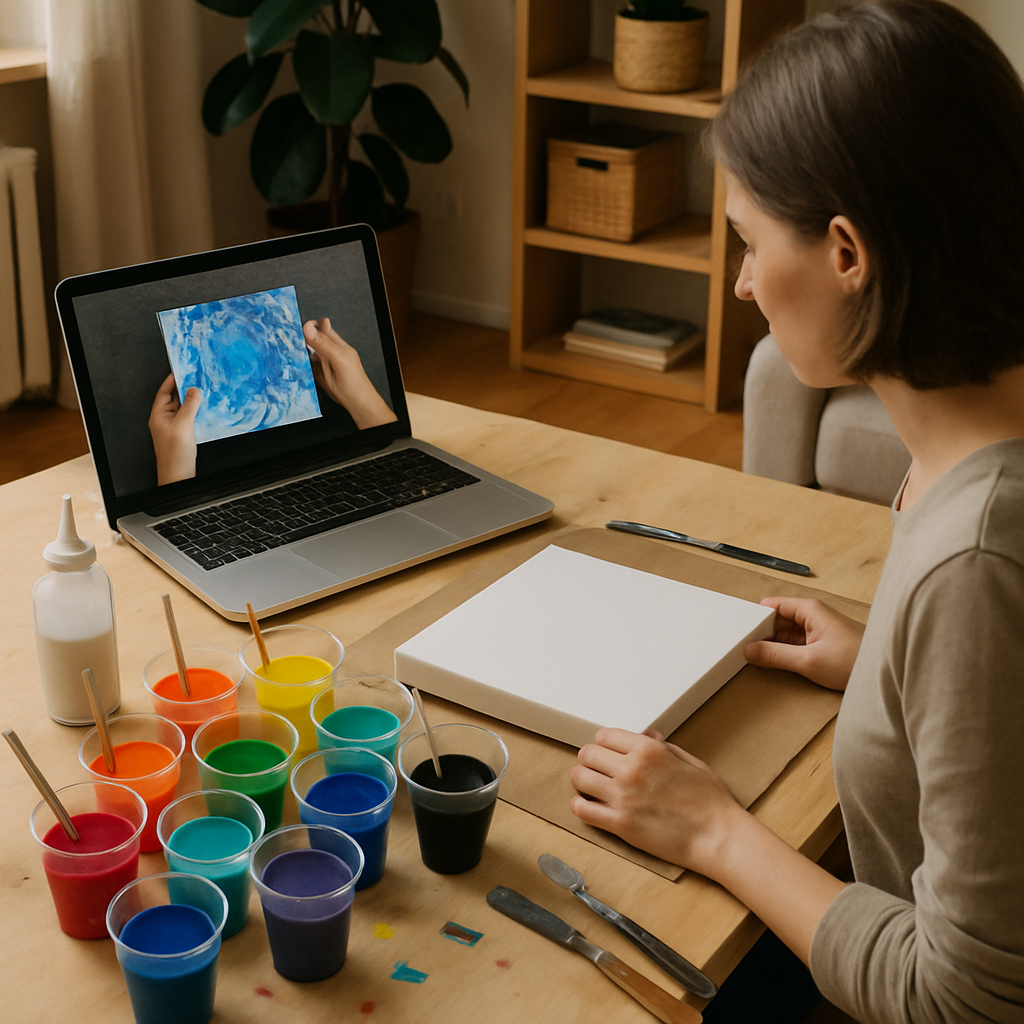
Since we’re talking about online classes, make sure you set up your tech gear the right way, too. Your laptop or tablet should sit at eye-level so you don’t strain your neck while following along with the video tutorials. And if you can, position your device so you can easily glance at the screen and your canvas without constantly twisting around. Pro tip: use a stand or stack some books to keep that screen steady.
Wondering what tools and supplies to have really close? Aside from your paint and pouring mediums, keep paper towels, plastic cups for mixing, wooden sticks for stirring, and gloves within arm’s reach. It saves you from those awkward breaks mid-pour and keeps your flow steady.
Lastly, don’t underestimate the power of a little prep ritual. Having your workspace ready and organized before class starts can seriously boost your confidence and chill out those nerves. And you can focus on the fun stuff—the actual painting.
If you want a more in-depth look at creating the perfect acrylic pouring setup, there’s a fantastic guide detailing the best supplies and workspace tips for beginners over at Soby Art Academy’s acrylic pour painting supplies guide. It’s packed with practical advice and might just save you time and frustration down the line.
Also, tapping into the knowledge from Olga Soby’s Fluid Art Mastery course is a brilliant way to level up your pouring techniques and workspace setup simultaneously. It’s full of nuggets on how to optimize your materials and environment for the best results.
So, what’s the takeaway? Treat your workspace like your creative cockpit. Set it up thoughtfully, keep it organized, and make sure it fuels your artistic flow rather than trips you up. Sound doable? Good—because now you’re ready to pour your heart out!
Step 3: Learning Basic Acrylic Pour Techniques and Mixing Formulas
Alright, so you’ve got your workspace set up and ready to roll. Now it’s time to dive into the really fun part—actually learning those basic acrylic pour techniques and how to mix your formulas. I know this part can feel a bit like stepping into unknown territory. Mixing paint ratios, using the right tools, figuring out the different pouring styles—it’s a lot. But stick with me here; we’ll break it down together.
Let’s start with the mixing formulas because, honestly, that’s the foundation for any successful pour painting. You want your paint to flow smoothly, but not so runny that it all blurs into a muddy mess. Getting that balance right is like finding the perfect cup of coffee—it’s a little trial and error, but once you nail it, everything tastes (or pours) just right.
What’s the Mixing Game?
At its core, acrylic pour paint isn’t just straight paint from the tube. It’s a mix of acrylic paint, pouring medium, and sometimes a little water to get the consistency just right. The pouring medium is like your secret sauce. It thins the paint without losing color vibrancy or making it too watery.
Here’s a simple formula to start with: Mix 2 parts acrylic paint to 1 part pouring medium. Then add small amounts of water if it feels too thick. But don’t go wild with water—it can mess with how your paint layers and cells develop.
Wondering why the pouring medium matters so much? It helps your paint glide over the canvas, blend seamlessly, and continue flowing even after you pour. Trust me, a stiff, gloopy pour will frustrate you fast.
Getting to Know Your Basic Pour Techniques
Once you have your paints mixed right, the next step is understanding the pour methods themselves. And there are a few common ones you’ll want to try first:
- Dirty Pour: This means layering different colors right in one cup before you pour it onto the surface. It’s like a paint parfait, and when you pour, you get this wild intermixing flow.
- Flip Cup: You fill the cup with your mixed paints, place the cup upside down on the canvas, and then lift it to let the paint spill out. This creates those beautiful cells and interesting color blends.
- Swipe Technique: After pouring paint onto your canvas, you drag a tool (like a palette knife or a paper towel) across the surface. It pulls the colors along new paths and creates stunning effects.
If you’re thinking, “Sounds neat, but how do I know when to stop or mix different paints?” you’re not alone. The trick is to experiment in layers. Pour a bit, then tilt your canvas slowly, letting gravity do its magic. Don’t rush—some of the best effects come from letting the paint evolve on its own.
Also, keep an eye on your tools. Wooden sticks or silicone spreaders work great for stirring and swiping. And remember: gloves aren’t just for cleanliness; they also keep you moving freely without worrying about sticky hands.
Practice Makes Pourfect (Yeah, I Went There)
Don’t expect to master these techniques on your first try. Each pour will teach you something new—maybe you’ll notice how one paint ratio gives better cells or how a slower pour creates more delicate patterns.
Try setting up mini experiments where you change one variable at a time. Mix your paints thicker one time, thinner the next. Do a dirty pour, then try a flip cup. Jot down what you liked and what you’d do differently next time. This kind of hands-on approach is exactly what many artists in popular pour painting tutorials suggest for beginners.
If you want a fuller guide on mixing ratios and step-by-step demos, the tutorials by experienced acrylic pouring artists are a goldmine. Watching someone paint live, explaining their process, means you can almost hear them say, “Try this,” or “Don’t make my mistakes.” It’s like having your own art buddy right there.
The good news is, online acrylic pour painting classes for beginners usually provide this kind of interactive, detailed guidance. You get cues, tips, and personal feedback—all the things that take you from random splotches to something you actually want to hang on your wall.
Here’s a Quick Cheat Sheet for Your Mixing and Pouring Journey:
- Start with 2 parts acrylic paint to 1 part pouring medium; add water sparingly.
- Mix gently to avoid bubbles but enough to get a smooth, creamy consistency.
- Try the dirty pour, flip cup, and swipe techniques to find what clicks for you.
- Watch experienced artists online to see these techniques in action.
- Take notes on each pour to track what works and what doesn’t.
- Be patient. Your paint’s behavior changes with temps, brands, and humidity.
Does this really work? From my own spills and countless pours, I can say yes. The more you experiment with your formulas and techniques, the more you’ll start to predict how your paint behaves. And that’s where the real magic kicks in because you’ll stop guessing and start creating with confidence.
So, next time you log into your chosen online acrylic pour painting classes for beginners, you’ll know exactly what to listen for and practice. And hey, that makes the whole learning journey way more exciting.
Step 4: Following Along with Online Acrylic Pour Painting Classes
Ever sat down with a fresh canvas, paint ready, and wondered, “Okay… now what?” That’s the exact moment where online acrylic pour painting classes for beginners become your safety net. They’re like having a friend guiding you through every swirl and splash, but without the pressure of an in-person studio. And trust me, following along with a class can turn confusing blobs into something that actually feels like *your* art.
So, how do you make the most out of these classes? It’s not just pressing play and hoping for the best.
Start Slow, Watch, Then Dive In
Here’s what I learned: resist the urge to rush through. At first, just watch. Notice how the instructor handles the paint—how it drips, tilts, spreads. Watch the timing between steps, like when they wait for one pour to settle before starting the next.
Think about it this way: it’s like learning a dance. You don’t jump in full force on day one. You watch the moves, feel the rhythm. The same goes here.
Replay tricky parts. Slow down the video if you can. Sometimes those subtle wrist flicks or the exact moment they lift the cup make all the difference.
Gather Your Materials Ahead of Time
Another no-brainer but easily overlooked: prep your space like it’s sacred ground. Pouring is messy. You’ll thank yourself later for having a big drop cloth, plenty of cups, and your paint/prepared pours ready before hitting play.
It might sound obvious, but switching back and forth between the class and hunting for stuff can break your flow completely. And the beauty of online acrylic pour painting classes for beginners is they’re flexible—you can pause, prep, and play at your own pace.
Use Your Notes as Your Secret Weapon
Got a notebook or your phone handy? Jot down what you see and what you want to try. Maybe the instructor mentions trying a “dirty pour” with a thinner consistency or warns about bubbles forming if you mix too hard.
These little nuggets of wisdom are gold. Writing them down sticks them in your brain better, and you build your personal recipe for success.
Want to know a trick? Keep a small journal board nearby to track your mixes, colors, and pouring styles. Over time, you’ll spot patterns—like how a bit more water changes your paint’s behavior or which colors bloom best together.
Don’t Be Afraid to Pause and Experiment
No class is a race, no matter how snappy the instructor seems. The moment you feel lost? Pause. Try that step, even if it feels weird or awkward.
And here’s the thing: each pour is its own little adventure. What works for the instructor might not do the same for you because of your paints, room temperature, or even humidity.
So, embrace the ‘oops’ moments. They’re where you learn the most.
Engage with the Community for Extra Boost
One perk of online acrylic pour painting classes for beginners is the community vibe. Where CreativiU shines is in its interactive spaces where you can ask questions, share pics, and get real feedback from both peers and pros.
Don’t just lurk. You gotta dive in. Comment on posts, ask for tips if your pours look more like a Rorschach test than a masterpiece. Somebody else has been there, I promise.
This back-and-forth is what turns a solo art project into a shared adventure.
Pick Classes with Clear Visuals and Step-by-Step Guidance
Online classes come in all shapes and sizes. Some are fast-paced and flashy; others are slow and detailed. For beginners, it’s gold to find ones where the instructor zooms in on the pours, explains every little move, and even notes when they mess up (because that’s real life).
Look for lessons like those at CreativiU where pacing respects your learning curve and allows you to rewind or rewatch key moments.
Here’s a bonus: learning platforms that let you download resources or have printable guides can really help keep your practice on track.
Wondering whether this really works?
From my own experience stumbling through countless online videos, those classes that combine solid instruction, community support, and the freedom to pause and practice turned my “just messing around” sessions into ones where I began to have a vision for my pieces.
Not only that, but studies show that interactive, on-demand learning helps with retention and skill building according to creative education insights. Plus, communities centered on acrylic pouring, like this Facebook group for beginners, spill all the real-life advice you won’t get from a solo tutorial.
So, if you’ve been hesitating or thinking you’re just not “artsy” enough, let the structured, interactive nature of online acrylic pour painting classes for beginners guide you. You’ll find your groove. Your messes will turn into moments of discovery.
Ready to get back to your canvas with fresh confidence? Start with choosing a class that feels like a conversation, not a lecture. Grab your paints, your notebook, and don’t forget—the best pours come from patience, practice, and a splash of curiosity.
Step 5: Comparing Popular Online Acrylic Pour Painting Course Options
Alright, so you’ve dipped your toes into the world of acrylic pouring, and now you’re thinking about taking a class. But with so many choices out there, how do you pick the right one? Especially when you’re looking for online acrylic pour painting classes for beginners that won’t leave you scratching your head or overwhelmed.
Let’s be honest — not all courses are created equal. Some offer quick overviews, while others walk you through every paint swirl and varnish step like a patient friend. I want to help you spot the gems and avoid the courses that promise a lot but leave you wondering, “Wait, what do I do now?”
What to Look for When Comparing Courses
First off, think about your learning style. Do you want detailed, step-by-step video tutorials you can pause and rewatch? Or are you more into community-driven classes where you can ask questions and get feedback? Some courses throw in both, while others focus on one or the other.
Also, check if the course covers not just the pouring techniques but also the finishing touches — like varnishing your work so it looks polished and lasts longer. This part can be surprisingly tricky, and some courses nail it better than others (more on that in a bit).
Popular Course Options — What Sets Them Apart?
Let’s break down three broad types of online acrylic pour painting courses you’ll encounter:
- Basic Technique-Focused Courses: These are great for pure beginners who want to master the pour itself — think paint mixing ratios, creating cells, and pouring methods. They’re usually quick to get through but might not dive deep into finishing or troubleshooting.
- Comprehensive Skill-Building Courses: These cover the pouring basics plus more advanced tips, color theory, layering, and often include how to varnish your paintings flawlessly. For example, a course like the Varnish Mastery course by Olga Soby is perfect if you want to learn that polished finish that turns your pieces into gallery-ready works. It even teaches you the secret “dual varnish” technique for a wow-worthy look.
- Community-Centered Interactive Classes: Some platforms offer not just videos, but active forums, live Q&A sessions, and peer feedback — really helpful if you thrive on connection and real-time support. This can make learning feel less lonely and more like an art hangout.
So, how do you decide? If you’ve ever felt stuck trying to protect your paintings with varnish — or worried about ruining a piece right at the finish line — a course with detailed varnishing guidance might be a lifesaver. After all, knowing how to seal your art properly can save you from heartbreak and wasted materials.
Pricing and Accessibility
Keep in mind that some courses range from free tutorials up to hundreds of dollars for an in-depth experience with lifetime access and downloadable resources. Are you looking for something budget-friendly, or are you ready to invest in a course that promises a deep dive into techniques and finalizing your art professionally? Both can be great, depending on how serious you are and your goals with acrylic pouring.
And accessibility matters too — look for courses that you can pause, rewind, or revisit anytime. It’s frustrating when you have a question and can only get answers once a week on a live call, especially when you want to keep the creative momentum going.
Comparing Course Features at a Glance
| Feature | Basic Technique Courses | Comprehensive Skill-Building Courses | Community-Centered Classes |
|---|---|---|---|
| Content Depth | Covers pouring basics and paint mixing | Includes advanced techniques, color theory, and varnishing tips | Varies widely; often combines basics with group discussions |
| Varnishing & Finishing | Usually minimal or none | Detailed modules teaching varnish application and finishes, e.g., Varnish Mastery | May include expert input; depends on group focus |
| Community Interaction | Limited or none | Some include forums, but mostly video-centric | Highly interactive with peer and instructor feedback |
| Cost Range | Often free to low-cost | Moderate to high, reflecting depth | Varies, sometimes subscription-based |
| Accessibility | Usually on-demand videos | On-demand plus downloads and lifetime access | Mix of live and recorded sessions |
Ultimately, the best course for you is the one that fits your learning style, artistic goals, and, honestly, your gut feeling. Do you want to skim the surface or get cozy with acrylic pouring and mastering those tricky varnish finishes? Courses like Olga Soby’s Varnish Mastery stand out because they tackle that real pain point with detailed, friendly guidance. So, if you’ve been hesitant about varnishing or just want that confident final coat, this might be a good direction to explore.
Now, ask yourself: are you ready to move beyond “good enough” pours and start creating artworks that you’re proud to show off and preserve for years? If yes, dig into these courses with fresh eyes. Take your time. And remember, the pouring part is only half the fun — sealing your masterpiece is what makes it truly lasting.
Step 6: Tips and Troubleshooting for Beginners in Acrylic Pour Painting
Starting with acrylic pour painting feels like stepping into a world where colors flow and blend like magic. But then, reality hits — the paint doesn’t spread as smoothly as you hoped, or weird little cells pop up where they shouldn’t. Sound familiar? You’re definitely not alone. Nearly every beginner faces these quirks before getting into the groove.
Get Your Paint Consistency Just Right
Here’s the thing — the secret sauce to smooth pours is in the mixing. If your paint’s too thick, it’s like trying to swim in syrup; too thin, and you’ll end up with cracking or colors that just don’t play nice together.
A good rule of thumb is to add your pouring medium slowly, starting with just a few drops and mixing well before adding more. This helps avoid clumps and keeps everything silky. And if you’re using water to thin paints, mix it with a little pouring medium too — it protects the paint’s binding qualities so your pour won’t crack or craz.
Got Clumps or Dried Paint? Here’s a Hack
Old paint or floetrol can get clumpy, and those little bits show up as annoying blemishes on your canvas. Before pouring, filter your paint through fine material — like stretched pantyhose or a tea infuser. It sounds odd, but it works wonders to clear out those stubborn chunks and keep your pour beautifully smooth.
Position and Pour With Purpose
When you’re layering paints in a cup for a dirty pour or flip cup, try tilting that cup slightly by propping it with a spoon or stick. This diagonal layering changes how the colors mingle and can lead to some stunning effects you might not get otherwise.
Also, don’t underestimate the power of filling your cup right to the brim. Any empty space inside means the paints might swirl unpredictably as you flip — sometimes great, sometimes frustrating.
Patience Isn’t Just a Virtue, It’s Your Best Tool
Pouring isn’t a race. Move slow, be deliberate, and resist the urge to overwork your piece as it dries. Remember, acrylic pours change as they cure — sometimes what looks chaotic wet turns into a masterpiece dry.
And check your workspace lighting. The colors you mix can look very different under daylight versus soft white bulbs, so match your painting spot to where you plan to display the final work.
When Things Go Sideways: Quick Fixes
Made a pour that’s “meh”? No worries. You can always pour over it once it’s dry or add accents with a brush to bring things back to life. Also, remove paint drips gently with a palette knife or scraper while it’s still wet to avoid messes later.
If your painting dries with thick edges or paint running, make sure your canvas was level. An uneven surface can turn your masterpiece into a melted wax figure — definitely not the look you want.
Finally, keep a journal. Track the paint brands, mixing ratios, and techniques for every piece. Over time, you’ll see patterns and stop guessing what worked. It’s a game changer for consistent, rewarding results.
For a deep dive into these tips and how to troubleshoot common problems like paint consistency and layering techniques, this guide on acrylic pouring tips and tricks is packed with insights that really help.
Also, since you’re exploring online acrylic pour painting classes for beginners, don’t forget that many courses give you real-time feedback and community support — invaluable when you hit those “what went wrong?” moments.
So, are you ready to mix your next batch of paint with confidence? To make the pour feel less like guesswork and more like a creative dance? Keep these tips close, experiment without pressure, and you’ll be amazed at how quickly you start turning out pours you’re proud of.
Conclusion
By now, you’ve got a solid sense of what it takes to dive into online acrylic pour painting classes for beginners. But here’s the real deal—this isn’t just about learning a new hobby; it’s about tapping into something that feels messy, exciting, and totally yours. Remember that first time you swirled paint and didn’t know if it’d turn out? Yeah, that’s part of the magic.
And honestly, the beauty of these classes is how they let you move at your own pace, without the pressure to produce perfection right away. You can mess up, reflect, and try again—like a conversation rather than a test. That journal you keep? It becomes your personal guidebook, showing you how to transform happy accidents into intentional art.
So, what’s next for you? Maybe it’s signing up for a class that gives you real-time feedback, or joining a community where you can share your pours and get inspired. The trick is to keep showing up and embracing those unpredictable flows of paint and creativity.
At CreativiU, our online acrylic pour painting classes for beginners are designed just for that—supporting your unique journey and helping you build confidence with every pour. Ready to pour your first masterpiece? Let’s make it happen, one swirl at a time.
FAQ
What supplies do I need to start online acrylic pour painting classes for beginners?
Pretty simple stuff to begin with: acrylic paints, pouring medium, canvas or painting surface, cups for mixing, and something to protect your work area—think plastic sheets or newspaper. You don’t need fancy or expensive materials right away. It’s about getting your hands messy and learning the flow before upgrading.
Oh, and don’t forget about gloves and something to level your canvas on—tilting is the secret sauce in pouring.
Can I really learn acrylic pour painting online without any prior experience?
Absolutely. Online acrylic pour painting classes for beginners are designed precisely for people like you who’re starting from scratch. The beauty here is you can hit pause, rewind, and try again as many times as you want. No judgment, no pressure to be perfect. It’s like painting with a friend who walks you through every swirl and drip.
How do I know if I’m doing the pours correctly when I’m on my own?
That’s the tricky part, right? Honestly, you learn by seeing and doing. Most good online classes, like those at CreativiU, offer video demos from multiple angles, step-by-step instructions, and sometimes even live feedback. And hey, mistakes aren’t failures—they’re clues. Look at what went sideways and adjust. You’re learning a new language here, and it’s normal to fumble.
How much time should I dedicate weekly to these classes?
This really depends on your schedule and how deep you want to dive in. But, if you set aside 2–3 sessions of about 30-45 minutes a week, you’ll see progress without feeling overwhelmed. Plus, letting your pieces dry and reflect on them is part of the process—you don’t have to be painting every day.
Are these classes suitable for kids or beginners of all ages?
Yes! These classes welcome anyone who’s curious, including kids. Of course, younger painters might need a bit of supervision, especially around pouring mediums and cleanup. But that hands-on, creative mess is perfect for sparking imagination in all ages. Plus, painting side-by-side can be a blast.
Can I get personalized help if I’m stuck or confused?
One of the best things about platforms like CreativiU is the community and support. Many courses have forums or live sessions where instructors answer questions, and you can share your work. Don’t be shy about asking—it’s how you move forward. Remember, even the pros started where you are now.
Will these online acrylic pour painting classes for beginners help me build confidence?
For sure. Confidence grows as you see those unpredictable pours turn into something uniquely yours. The more you practice, the more you trust your instincts. It’s less about rules and more about your own creative voice. And that’s something you can’t learn overnight, but bit by bit, every pour gets you closer.
Feeling ready to pour yourself into this creative adventure? Grab your paints, maybe a cup of coffee, and let’s get swirling.
Leave a Reply