Ever caught yourself staring at those delicate, swirling paper designs wondering, “How on earth do they make that?”
You’re not alone. Paper quilling might look intricate and a bit intimidating at first glance, but guess what? It’s one of those crafts that’s surprisingly approachable once you get the hang of the basics.
Imagine rolling thin strips of paper into shapes that magically transform into flowers, ornate patterns, or even tiny little animals. There’s something almost hypnotic about watching the paper curl and unfold under your fingers.
But here’s the real kicker — you don’t have to hunt down rare supplies or enroll in expensive workshops downtown. With a step by step online paper quilling course for beginners, you can start from zero right in the comfort of your living room.
Now, I know what you’re thinking: “Is this just another overwhelming, tech-heavy tutorial that leaves me more confused than when I started?” Nope. The beauty here is in methodical, bite-sized lessons designed just for folks like you who want to learn at their own pace without frustration.
And the best part? You get to pause, rewind, and try again — no pressure, no judging eyes. Plus, you’ll find community support if you ever feel stuck or want to share your quirky, imperfect first attempts (we all have them!).
Ever heard of CreativiU? They specialize in courses that don’t just teach you how to craft. They guide you through unleashing your creativity authentically, with science-backed methods that actually help you grow.
So, why not give it a shot? Paper quilling isn’t just about pretty art; it’s a calming, almost therapeutic process that sharpens your focus and lights up your creative spirit.
If you’re curious about the broader world of creative learning—how to keep the spark alive and get better with every project—check out this guide on mastering arts and crafts problem solving. It’s packed with insights that turn any craft challenge into pure fun.
Ready to roll those first strips of paper and see where your creativity leads? Let’s dive in and discover step by step how this amazing art form works, starting from the very basics. You’ll be surprised how quickly you turn into a paper quilling pro.
TL;DR: Quick Overview of Learning Paper Quilling Online
Thinking about starting a step by step online paper quilling course for beginners? It’s all about breaking down those delicate paper strips into simple loops and swirls at your own pace — no rush, no stress.
You’ll learn techniques that turn tiny curls into stunning art, while enjoying the freedom to pause and retry until it clicks. Plus, the supportive community keeps you inspired when things get tricky or your fingers fumble.
Ready for a creative escape that’s both calming and rewarding? This online path makes it easy and fun to unlock your crafty side, whether it’s your first roll or you’re picking up skills again.
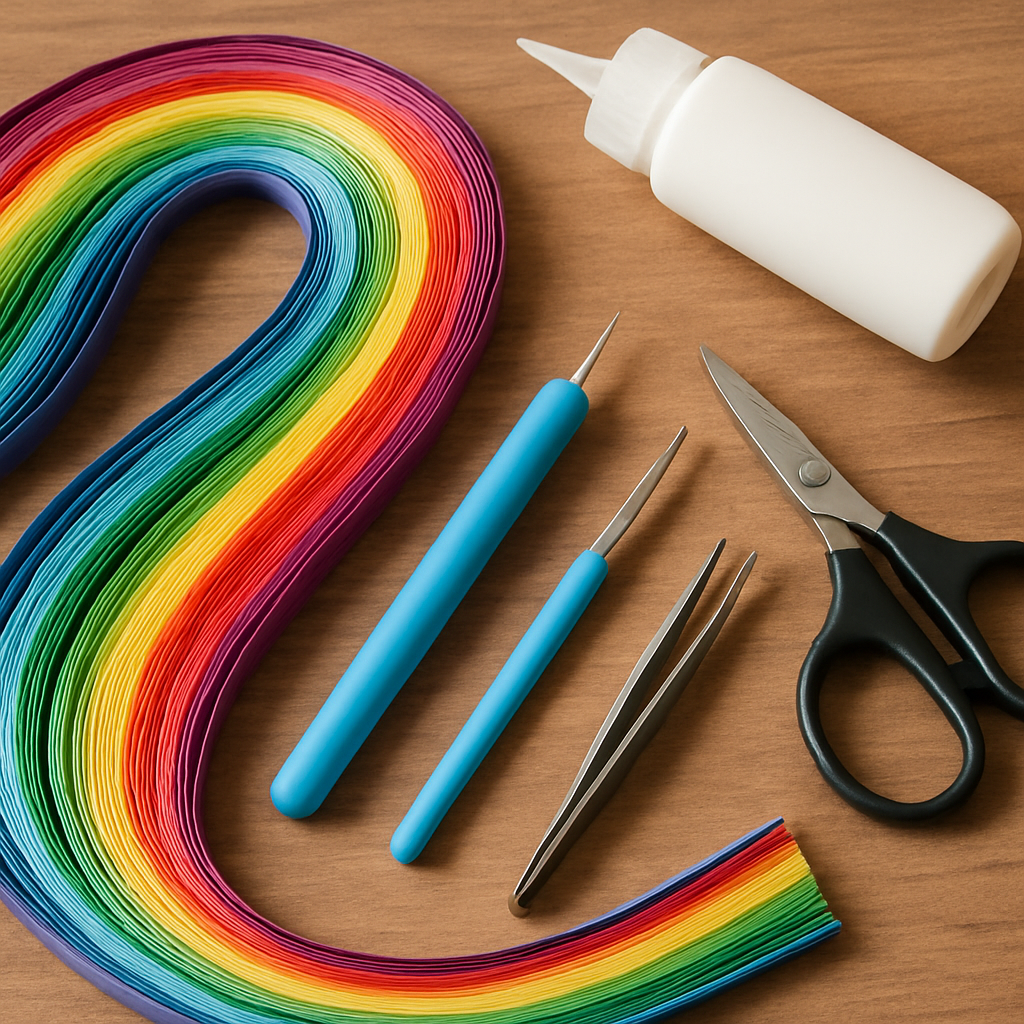
Step 1: Gather Essential Paper Quilling Supplies for Beginners
Getting started with a step by step online paper quilling course for beginners is seriously exciting—but it can also feel a bit overwhelming when you’re staring at all the possible tools and materials out there. I get it. That moment when you open your craft cupboard and wonder, “What do I actually need to start quilling?” Let’s clear that up now, so you don’t get stuck hunting for supplies or buying stuff you won’t use.
First things first, the heart of paper quilling is, well—paper. You’ll need specialty quilling paper strips. These aren’t your regular printer paper strips; quilling paper is thin, lightweight, and usually cut to exact widths like 1/8 inch, 3/16 inch, or 1/4 inch. Thickness matters because it affects how easily your paper curls and folds. Don’t sweat finding them in physical stores; quilling paper packs come in vibrant colors and various lengths online, so it’s pretty easy to gather a colorful palette to play with. (If you want to get into customizing later, you can even cut your own strips, but more on that when you’re ready!)
Tools—anyone else find that picking the right ones can feel like a mini science project? You don’t really need a ton of fancy stuff to start. A basic quilling needle tool or slotted tool is often enough. The slotted tool holds the paper strip for you as you roll, making it beginner-friendly. Others prefer the needle tool for better control, so getting both plugged in to see what clicks with your style isn’t a bad idea. And all these fit snugly under $10.
Glue is next, and here’s a little secret: you don’t have to overthink this either. Most quillers love extra-strength white glue. It dries fast but still lets you shift things slightly—perfect for newbies. Some even keep small bottles of tacky glue or clear-drying glue for those 3D projects or darker paper strips. Pro tip? Grab a glue bottle with a fine tip nozzle; it helps you control the glue flow without making a sticky mess.
What about scissors and tweezers? Glad you asked. Small, sharp scissors come in super handy for trimming those imperfect coil edges—because, spoiler, your rolls won’t be perfect every time, and that’s okay. Tweezers might seem like an extra, but believe me, they’re a lifesaver for picking up tiny coils or tucking in small shapes without squishing your work. It’s one of those “why didn’t I get this sooner?” tools.
And here’s something I didn’t realize until after several projects: a cutting mat or a ruler right at your workspace totally changes the game. It keeps your strips neat and helps you tear strips consistently without measuring every single time. Plus, having a corkboard or a foam board to pin your pieces for drying adds a peaceful rhythm to your flow—it’s like giving your project a little breathing room while you sip your coffee.
Does this sound like a lot? Honestly, it’s just a handful of essentials to get rolling—literally! Once you have these basics, you’ll see how easy it is to jump into the lessons and enjoy the process of shaping your creativity.
And since you’re serious about learning, you might want to peek at this excellent guide on beginner quilling toolkits. It digs deeper into what works for beginners and gives you options if you want to gradually add specialty tools.
Oh, and while paper quilling is quite different from painting, getting some hints from other arts like watercolor can be surprisingly helpful, especially in understanding materials and layering techniques. For example, this beginner-friendly watercolor supplies guide shares a similar philosophy on picking essential but manageable kits—not spending a fortune but still setting yourself up for success.
Gathering your supplies isn’t just about buying stuff. It’s about creating a workspace that makes learning smooth and fun. If you want some ideas on setting up a creative learning environment or how to blend traditional arts with new techniques, you’ll find inspiration in our detailed guide on mastering arts and crafts techniques. It’s a goldmine for beginners eager to turn small steps into big artistic wins.
So, what’s the takeaway? Start with the essentials: quality quilling paper, a basic tool or two, some trusty glue, scissors, and tweezers. Keep your supplies accessible and organized, because the less you have to hunt mid-project, the more you’ll enjoy those peaceful moments rolling paper into art. From here, you’ll be ready for your first official lesson in the step by step online paper quilling course for beginners—and trust me, that moment when you finally see the first coil take shape is magic.
Ready to hunt down those supplies? Set up your cozy crafting nook, snag your toolkit, and dive in. Creativity’s already knocking.
Step 2: Learn Basic Paper Quilling Techniques Online
You know that feeling when you’re staring at those colorful paper strips and wondering how on earth to turn them into something that actually looks like art? Yeah, been there. Learning paper quilling can seem tricky at first, but that’s exactly why taking a step by step online paper quilling course for beginners is such a game-changer. It pulls back the curtain on all those little twists and folds so you don’t have to guess or feel lost.
Let’s break it down. When you’re just starting out, it’s all about getting comfortable with the basic techniques — coil shaping, looping, forming teardrops, and those delicate scrolls. These building blocks are like letters in an alphabet. Master them, and you can start writing your own artistic stories with paper.
Start With the Fundamental Shapes
What’s the first move? Learning how to create those classic coils. Here’s what I mean: you take a strip of thin paper and wind it tightly around a slotted tool or a simple toothpick. Then, with a gentle nudge, loosen the coil to the size you want — not too tight, not too loose. From there, you can pinch and shape it into teardrops, eyes, or swirls. These little shapes might seem basic, but trust me, they’ll soon turn into flowers, leaves, or even tiny animals.
Videos are your best friend here. Watching someone’s hands work the paper gives you a clearer sense of the tension and rhythm. If you want a clear, beginner-friendly guide, this detailed video tutorial breaks down the key shapes step by step. It’s like having a patient friend walking you through every twist and turn.
Practice Makes Perfect (But Don’t Overthink It)
Here’s a little secret: your first few coils probably won’t look perfect. And that’s totally okay. Paper quilling is hands-on and forgiving. It’s about feeling the paper, understanding how tight the coil should be, or how much glue is just enough without turning into a sticky mess.
Try this: set a timer for 10 minutes and just make as many coils as you can without worrying about mistakes. It’s oddly calming, and you don’t realize how quickly muscle memory kicks in. Plus, it stops you from overthinking every move — which can kill creativity before it even starts.
Oh, and about glue: a fine-tip applicator is your best pal here. A tiny dab where strips join saves you from big blops or drips. You’ll find that using tweezers to hold delicate shapes while the glue dries keeps your fingers clean and your shapes neat.
Find Your Favorite Online Course and Community
So, does learning these techniques online really work? Absolutely. Many beginners report that guided courses help them progress faster than fumbling through random tutorials. Plus, when you’re part of a community—where you can ask questions or share your progress—it’s way easier to stay motivated.
If you want something that thoughtfully combines clear instructions with support, look no further than CreativiU’s curated offerings. They deliver scientifically-designed lessons that guide you from zero to confident quiller in no time. And the best part? You get to learn at your own pace, popping in whenever inspiration strikes.
Also, explore free resources like this approachable tutorial for alternative techniques and fresh ideas. Watching different instructors can add variety to your skillset and keep boredom at bay.
Here’s What to Do Next
Ready for the fun part? Bookmark a trustworthy step by step online paper quilling course for beginners, gather your supplies, and dive in with small, manageable goals. Practice those coils until they feel natural, then start experimenting with simple shapes to make flowers or leaves. It’s a bit like unlocking a new language—you don’t have to be fluent right away, just start with the alphabet.
And hey, don’t stress the ‘perfect’ results just yet. This journey is as much about relaxing and enjoying the process as it is about creating something pretty.
So, grab your paper strips, fire up those tutorials, and let’s roll!
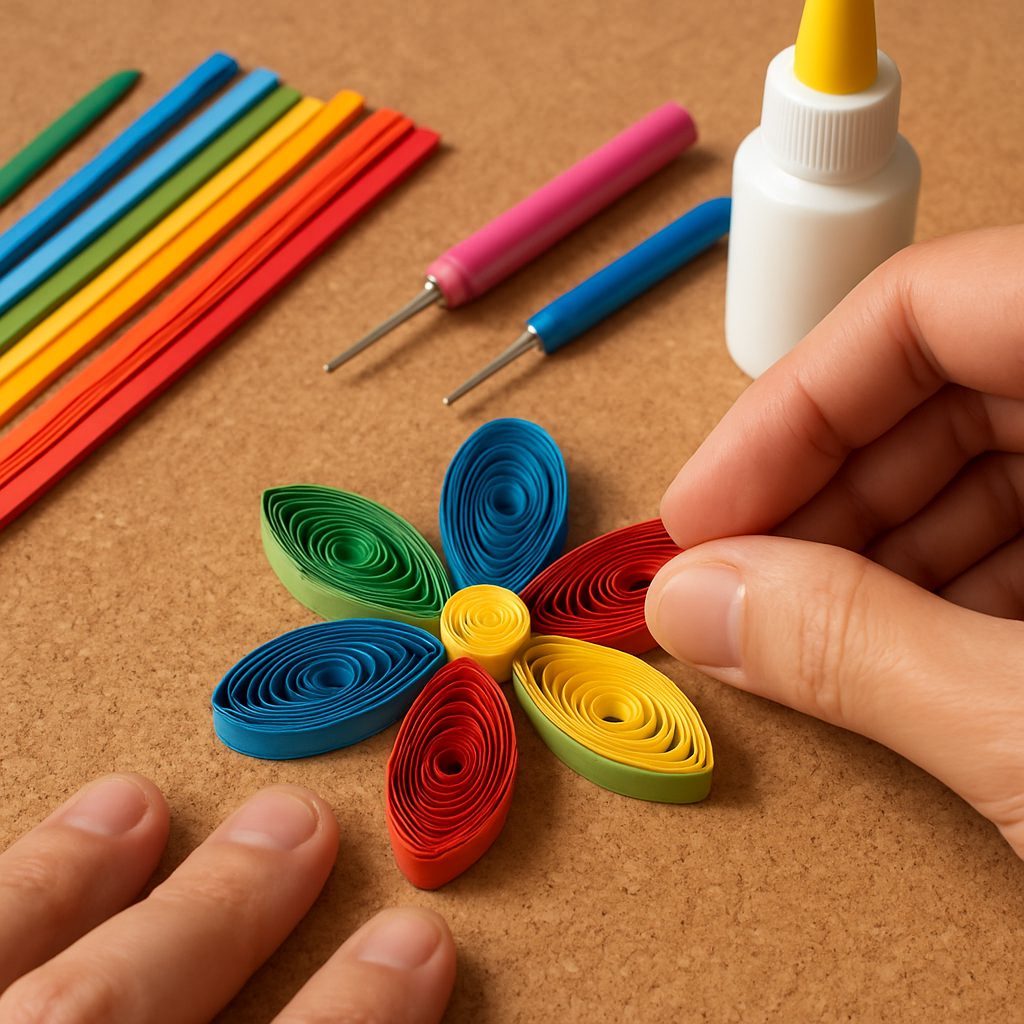
Step 3: Practice Creating Basic Paper Quilling Shapes and Patterns
Alright, so you’ve got your strips of paper, a quilling tool (or even just a toothpick if you’re in a pinch), and you’ve watched a few intro tutorials from your step by step online paper quilling course for beginners. Now what? It’s time to roll up your sleeves and actually start shaping those paper strips into something delightful.
You know that moment when you first hold a little coil of paper between your fingers and realize it feels… oddly satisfying? That’s the magic of quilling. But here’s the catch: these basic shapes are your building blocks, like letters in a new language. And just like learning to write, you’ve got to practice them until they become second nature.
Start with the Classic Shapes
Don’t rush to complex designs right away. Focus on these foundational shapes first: tight coil, loose coil, teardrop, marquise (or eye shape), and the simple scroll. Each one teaches you control over your paper’s tension and form. For example, a tight coil is all about keeping consistent pressure as you wind the paper, while a loose coil lets some air in to create its signature gap. It’s fascinating how small tweaks change the whole shape.
Practice rolling coils by wrapping your paper strip tightly around the quilling tool, then gently releasing it to form a loose coil. Pinch one side to make a teardrop, pinch two for a marquise. Don’t worry if your shapes aren’t perfect—honestly, most beginners’ first attempts look more like quirky blobs. That’s okay. It’s about training your hands and eyes.
Creating Patterns from Basic Shapes
Once you feel comfortable making a handful of shapes, try arranging them into simple patterns. Flowers are the quiller’s classic starting point—they’re forgiving and visually rewarding. For instance, glue together five teardrops around a small tight coil center to make a flower petal cluster. Leaves usually use marquise shapes, fanning them out to create natural curves.
Wondering how to keep everything together without glue mishaps? Use a thin applicator or a wooden toothpick to apply just a dot of glue at the tips or where shapes meet. Trust me, less is more here. You want to avoid soggy paper or parts that slip out of place before drying.
Why Does This Practice Matter?
Think about your fingers like an athlete’s muscles—they need repetition to build memory and finesse. Spending quality time practicing these shapes means your future projects, like elaborate cards or 3D art, will feel easier and more fun. Plus, getting these basics locked down can make the whole process more meditative—and who doesn’t need a little calm in their craft time?
And if you’re craving more ideas or want to see other artists’ techniques, peek over at free options like this paper quilling tutorial on YouTube—sometimes a fresh view makes all the difference in solving a tricky fold or perfecting a shape.
Try This Small Challenge:
Set aside just 20 minutes a day (or whenever you have a spare moment) to roll coils and build simple patterns. Keep a small notebook or photo album of your shapes—seeing progress is crazy motivating. Before you know it, you’ll breeze through those beginner stages.
Ready to see how these shapes stack up? Check out this quick comparison to help you focus your practice:
| Shape | How to Make It | Best Used For |
|---|---|---|
| Tight Coil | Wrap strip tightly around tool, glue end to hold | Flower centers, small details |
| Loose Coil | Wrap, then let paper loosen before gluing end | Petals, fill areas with airy texture |
| Teardrop | Pinch one side of a loose coil | Flower petals, raindrop effects |
| Marquise (Eye Shape) | Pinch two opposite sides of a loose coil | Leaves, feathers, eyes |
| Scroll | Curve strip into S or C shapes without coiling | Decorative flourishes, stems |
Before wrapping up this step, remember: patience is your best friend here. Paper quilling isn’t about rushing the craftsman’s hand; it’s about pacing your creativity so it breathes. It’s totally normal to have “what am I even making?” moments.
Keep practicing, enjoy the process, and trust that your skills will bloom naturally. In the next step, you’ll learn how to combine these shapes into fuller designs that really pop. But for now, just roll with it—literally.
Step 4: Assemble Simple Paper Quilling Projects Step by Step
Okay, now that you’ve got the basics down—those coils and shapes are starting to feel like old friends—let’s talk about actually putting those pieces together. This is the part where your quiet moments with paper turn into something pretty magical.
First off, pick a simple design. Think a flower, a heart, or maybe a little butterfly. Don’t rush to tackle a sprawling masterpiece just yet. It’s like baking your first cake: you want to get the hang of each ingredient before mixing up a dozen layers.
Start with a clean workspace. This might sound trivial, but believe me, it saves headaches later. Have your strips, glue, quilling tool, and a pair of tweezers ready—these little tools will help you tame those tiny shapes without losing your mind.
Step 1: Lay Out Your Design
Sketch a rough outline on paper or print one out if you found a pattern online. You don’t have to be a Picasso here—think stick figures and doodles. This gives you a roadmap, breaks down the chaos.
Then arrange your basic shapes on top, like puzzle pieces. Ask yourself: which shapes fit where? Sometimes you’ll tweak a shape on the fly—maybe that teardrop needs to be a little narrower, or a coil tighter.
Step 2: Glue with Care
When you’re ready to stick those shapes down, go slow. Use a toothpick or a tiny brush to apply a dab of glue—too much, and you’re fighting a wet mess. And don’t rush—hold each piece down for a moment so it bonds properly. Patience here really pays off.
If you’re nervous about glue getting everywhere, try using a craft mat or some scrap paper underneath. It makes cleanup way easier.
Step 3: Build Up Layers
Start layering your shapes gently. For example, with a flower, glue a tight coil down first, then add petals around it. Play with overlapping shapes for depth—this little trick breathes life into your design.
Remember, your shapes don’t have to be perfect. A slight unevenness or imperfection gives character and tells your story.
Step 4: Finishing Touches
Step back and take a breath—look closely. Fill small gaps with tiny coils or scrolls if you like. Sometimes less is more, though. Don’t overdo it until you feel the design has “spoken” to you.
Seal your project with a light layer of clear-drying glue or varnish if you want it longer-lasting or a little glossy. This is optional but feels pretty nifty.
Wondering if you need fancy tools? Honestly, basic supplies and a little creativity go a long way. See this beginner-friendly guide on assembling quilling projects to get more tips and variations from experts who’ve been there at HoneysQuilling’s free tutorial.
And if you want a bit of visual inspiration right now, this video walkthrough of a basic paper quilling assembly breaks it down step-by-step in a way you can actually follow along with.
At the end of the day, assembling these simple projects is about feeling your way through. Expect some “oops” moments—maybe a coil slips or glue blobs up. It’s all part of the charm. With each try, you’ll get smoother, faster, and more confident.
Now, grab your paper strips and tools, set aside 30 minutes, and create a small project you can proudly call yours. It’s not just craft—it’s a gentle practice of turning patience into art.
Step 5: Troubleshooting Common Problems in Paper Quilling
Look, we’ve all been there. You’re halfway through rolling a delicate coil when suddenly it pops up like a mountain or your glue turns into a sticky mess. It’s frustrating, right? But don’t sweat it — mastering paper quilling means learning how to face these hiccups head-on. In this part of your step by step online paper quilling course for beginners, we’re diving into the actual problems you’ll likely bump into and, more importantly, how to fix them without losing your cool.
Glue Going Wild? Here’s What Helps
First off, if your glue is dripping everywhere or your paper is soggy—take a deep breath. A little glue goes a long way, honestly. It’s paper, so you only need tiny dots to make things stick. If you’re still wrestling with glue blobs, try switching to a needle-nosed glue bottle. It’s a total game-changer for controlling those tiny dots. Plus, having a thin paintbrush nearby helps to quickly wipe off any extra glue before it dries and becomes that crusty mess you hate dealing with.
Also, this might sound obvious, but keeping your fingers clean is huge. Gluey fingers are the sneaky culprits behind a lot of dried glue flakes on your final piece. Keeping a moist towel handy lets you wipe off any residue — your fingers and your project will thank you.
Coils Turning Into Cones (When You Don’t Want Them To)
Here’s a classic: you roll what you think is a tight coil and then, bam, the center pops up like a little volcano. If you’re not aiming for that 3D cone effect, it’s probably about how you’re releasing the coil from your tool or shaping it. Instead of pulling your paper off the slotted quilling tool, try sliding it off gently. Also, when you’re shaping coils, hold the center steady with one hand and pinch with the other so the coil stays flat and even.
Pro tip: using a quilling template workboard helps keep your coils uniform. That way, they won’t wander off into uneven shapes, and if you see minor wrinkles or bumps, a quick rub with the flat end of a craft knife can smooth things out before it’s too late.
Paper Wrinkling and Buckling? Try This
Paper that wrinkles or waves can be a dealbreaker, especially on your final presentation. Usually, this happens because the paper is too thin to handle the glue or moisture. One quick fix is to opt for thicker paper or double up your strips by gluing two together — it really ups the sturdiness.
And when you’re mounting your quilling onto a backing board, use a thick mat board instead of flimsy paper. It can withstand glue without bending and gives your art a solid base. Remember, apply glue sparingly—tiny dots, not a whole layer. If you find your mounted piece is a bit crooked, it’s okay to trim the background slightly or even remount it carefully. It’s about making your piece look right to your eyes, not perfection on paper.
What About Those Persistent Raised Sections?
Sometimes, parts of your quilled shapes might pop up off the workboard as they dry, making your design uneven. It’s nerve-wracking, but don’t panic. Before it completely sets, try gently pressing down or use a thin craft knife to carefully separate the glued areas, then reglue as needed. Yes, it’s tricky and requires a steady hand, but it saves your piece from permanent wonkiness.
To avoid this altogether, regularly check your work while it’s drying. A quick tap or smoothing with your finger can keep everything nestled in place.
Wondering If These Fixes Really Work?
Honestly, these tips come straight from quilling enthusiasts who’ve been in your shoes. Managing glue with a needle-nosed bottle or tackling uneven coils with a workboard are common practices shared by the community. You can dive deeper into these troubleshooting strategies and more at The Papery Craftery’s detailed guide on quilling mistakes. If you prefer a visual walkthrough, this step-by-step paper quilling tutorial on YouTube covers common problems and how to solve them gently.
So next time you hit a snag, remember: quilling is as much about patience and persistence as it is about creativity. Keep your supplies simple, your glue minimal, and your hands clean. These small habits turn “oops” into “aha!” moments. Ready to tackle your next quilling project with more confidence? Let’s get rolling—flat coils and all.
Conclusion: Taking Your Paper Quilling Skills to the Next Level
So, you’ve made it through the basics—and maybe even wrestled with some stubborn coils along the way. That moment when your fingers finally shape that perfect scroll? It’s like magic, right? But here’s the truth: paper quilling isn’t just about getting the technique down—it’s about making it yours.
Think about what you’ve learned through this step by step online paper quilling course for beginners. Each coil, every careful glue dab, is a building block, but what really takes you to the next level is experimenting. Don’t just follow patterns—play with colors, textures, and shapes until you find your own style. It’s in those happy accidents that the magic happens.
Wondering how to really level up? Challenge yourself with new projects that push your limits a bit. Try combining quilling with other crafts—like scrapbooking or card making. You’ll discover fresh ways your skills can shine.
And hey, don’t forget the power of community. Sharing your progress, swapping tips, or just showing off a wild idea can make a huge difference. At CreativiU, we know that learning together keeps the spark alive and helps you grow faster.
Ready to roll up your sleeves and dive into your next project? Keep your supplies handy, trust your instincts, and remember: every masterpiece starts with a single coil.
FAQ: Common Questions About Online Paper Quilling Courses for Beginners
So, you’ve been wondering if an online course can really teach you paper quilling from scratch. Totally fair question. It’s like deciding whether to learn guitar online or in person—both work, but the right fit depends on you.
Do I need any special supplies before starting?
Not at all. Almost every step by step online paper quilling course for beginners kicks off by telling you exactly what to get—usually just basic quilling paper, a slotted tool, glue, and maybe a pair of tweezers. The trick is starting simple and upgrading as you go. No need to break the bank upfront.
Can I really learn the techniques just by watching videos?
Here’s the thing: online courses, especially ones designed step by step, are built to guide you through every coil, every curve, kind of like having a patient friend showing you the ropes. You can pause, rewind, and try again until it clicks. Plus, CreativiU’s platform often has community features where you ask questions or get feedback—that’s a game changer.
What if I’m not very artistic or creative?
Honestly? Paper quilling isn’t about being Picasso. It’s about patience and play. We all start somewhere, and online courses break down each move so you’re not overwhelmed. Think of it as building muscle memory—before you know it, you’re shaping scrolls and patterns without overthinking.
How long does it usually take to finish a beginner course?
That really depends on you and your pace. Some folks dive in daily and wrap up in a week or two. Others spread it out over a month or more, fitting lessons between work or family. The beauty of an online course is that you set the rhythm. No pressure.
Are these courses suitable for kids or absolute beginners?
Yes, and yes. Many step by step online paper quilling course for beginners are designed with total newbies in mind. If you’re teaching kids, look for courses that emphasize simple shapes and safe tools. That way, crafting stays fun, not frustrating.
What’s the biggest challenge beginners face, and how can I avoid it?
Patience—or lack of it—is usually the tough part. It’s easy to get discouraged with fiddly coils or glue messes. But here’s a tip: embrace those hiccups as part of the learning curve. Remember, every expert started with a wonky scroll or two.
Will I be able to create my own designs after completing the course?
Yep! The goal of a well-crafted step by step online paper quilling course for beginners isn’t just to copy patterns but to spark your own creativity. Once you know the basics, you’ll start mixing shapes, colors, and textures like a pro.
If you want to see how some beginners transformed their skills—and turned their inspiration into real projects—check out this popular beginner quilling course for inspiration. And when you’re ready to level up, exploring new challenges keeps the spark alive.
Remember, paper quilling online is all about taking it one coil at a time while enjoying the ride. Got more questions? Don’t hesitate to reach out or dive into the community—sometimes the best answers come from others just like you.
Leave a Reply