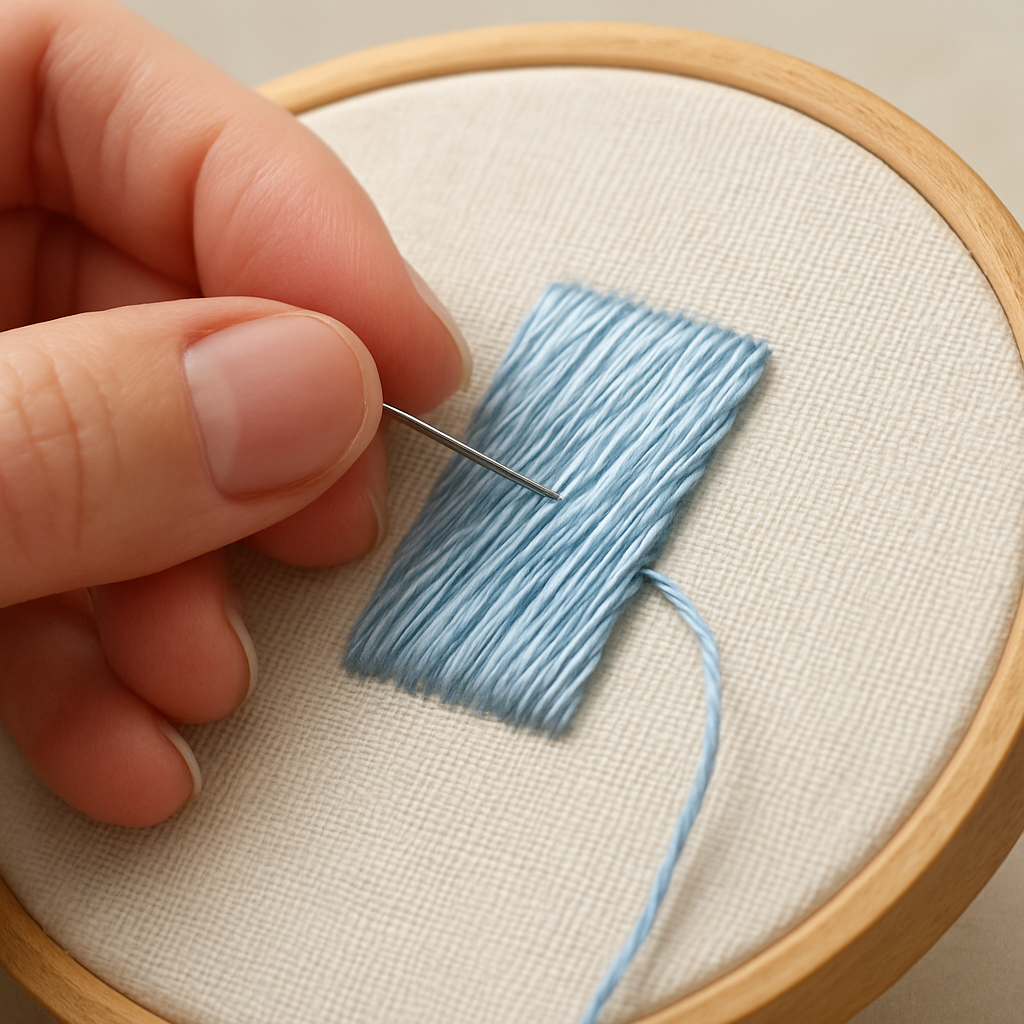
Ever stared at a smooth piece of fabric and wondered how to turn that blank canvas into a glossy, eye‑catching design? That’s exactly the feeling many of us get when we first encounter the satin stitch – it promises that sleek, satiny finish but can feel a bit intimidating at first.
Imagine you’re customizing a set of throw pillows for a friend’s living room. You’ve picked a soft, pastel linen, and you know a satin stitch can give those little motifs a polished, almost painted look. The trick is mastering the tension and stitch length so the thread lies flat without puckering.
Here’s the good news: the satin stitch is all about consistency, and you can train your eye and hand with just a few focused exercises. First, practice on a scrap piece of the same fabric you plan to use. Pull the needle through, then lay down a row of evenly spaced stitches, keeping the thread tension steady. If the stitches look wavy, pause and adjust – a little tension tweak can make a world of difference.
Pro tip: use a hoop to keep the fabric taut. It eliminates slip‑away moments that ruin the smooth finish. And don’t forget to choose a thread that matches the weight of your fabric; a heavy cotton‑floss on light chiffon will create bulk, while a fine silk on denim can look delicate.
Real‑world example: one of our community members used a satin stitch to embellish a set of kitchen curtains, adding a subtle border of tiny flowers. The result? A professional‑looking finish that turned a plain window treatment into a focal point. If you’re thinking about applying your new skill to home textiles, check out this handy guide on how to measure curtains length and width – it pairs perfectly with a satin‑stitched border.
Want a quick reference for other basic stitches? Our Embroidery Stitches for Beginners: A Step‑by‑Step Guide breaks down the fundamentals, so you can see how the satin stitch fits into the broader stitch family.
Actionable steps to get you started right now:
- Gather a hoop, fabric scrap, and a satin‑weight thread.
- Set the hoop tight enough that the fabric doesn’t sag.
- Mark a straight line with a water‑soluble pen where you’ll place the satin stitches.
- Practice a row of stitches, checking tension after each.
- Adjust and repeat until the row looks smooth and uniform.
Once you’ve nailed that first row, expand outward, layering additional rows to build depth. Before you know it, you’ll have a glossy, satin‑finished design that looks like it was done by a pro.
TL;DR
In this embroidery satin stitch tutorial we walk you through mastering smooth, glossy stitches, from setting tension to layering rows for a professional finish. By the end you’ll confidently stitch decorative motifs on pillows, curtains, or any fabric, turning plain pieces into eye‑catching art and share them proudly with friends.
Step 1: Gather Materials and Tools
Alright, let’s talk about what you actually need before you even think about pulling that satin stitch across your fabric. It sounds simple, but the right tools make the difference between a glossy finish and a tangled mess.
First up, the hoop. A 6‑inch wooden hoop works for most pillow projects, but if you’re tackling a larger curtain panel, grab a 9‑inch one. The key is tension – you want the fabric taut enough that it doesn’t sag, but not so tight it puckers. If you’re unsure how much tension is right, our interactive online embroidery hoop art workshop walks you through the sweet spot with video demos.
Next, the fabric. Choose something that drapes nicely and can handle a bit of weight – think cotton‑linen blends or a medium‑weight linen. Avoid overly stretchy knits; they’ll distort your satin rows.
Thread matters, too. Satin‑weight rayon or silk gives that glossy sheen we’re after. Match the thread weight to the fabric – a fine silk on a light cotton works, but a bulky cotton‑floss on a delicate chiffon will look clunky.
Now, the needles. A sharp, size 7 or 8 embroidery needle is ideal; the eye should be big enough for your thread but not so large that it makes holes. And don’t forget a pair of small, sharp scissors – you’ll be trimming thread tails constantly.
Marking tools are often overlooked. A water‑soluble fabric pen lets you draw straight guide lines that disappear after you rinse. If you prefer a more temporary method, a light pencil works on darker fabrics, just be ready to brush away any faint marks later.
Do you have a cutting mat? It’s not required, but it protects your work surface and gives you a firm base for trimming excess fabric.
So, what should you actually do right now? Grab a scrap piece of the same fabric you’ll use for the final project. Set up your hoop, thread your needle, and draw a short 5‑cm line with your pen. Then, practice a single row of satin stitches, paying attention to even spacing and consistent tension. If the row looks wavy, pause, adjust the hoop tension, and try again.
Here’s a quick checklist you can print out:
- Wooden embroidery hoop (6‑9 inches)
- Fabric (cotton‑linen, medium weight)
- Satin‑weight thread (rayon or silk)
- Sharp embroidery needle (size 7‑8)
- Water‑soluble fabric pen
- Small sharp scissors
- Cutting mat (optional)
Once you’ve got those basics down, you’ll feel a lot more confident moving on to the actual design.
Thinking ahead, you might want to apply your new satin‑stitch skills to a home‑textile project like curtains. Measuring those correctly is crucial, so check out this handy guide on how to measure curtains before you cut any fabric.
And if you ever need inspiration for a finished piece you could gift or sell, browse the curated collection at Midnight Scriber. They showcase handcrafted embroidered gifts that can spark ideas for your own creations.
Ready to see the process in action? Below is a short video that walks you through setting up the hoop and threading the needle – perfect for visual learners.
After you watch, go back to your scrap piece and try a second row, this time offsetting the stitches slightly to start building depth. Remember, the satin stitch looks best when each row slightly overlaps the previous one – think of it as layering paint for a richer color.
Finally, give yourself a quick quality check. Hold the fabric up to the light; the stitches should look flat and reflective, without any visible gaps or loops. If you spot any bumps, gently pull the thread on the back side to smooth it out.
That’s it for Step 1. You’ve gathered your materials, set up your workspace, and practiced the first row. In the next step we’ll dive into transferring your design onto the fabric and planning stitch length. Keep that hoop tight and your excitement higher – you’re well on your way to mastering the embroidery satin stitch tutorial.
Step 2: Preparing Your Fabric and Hoop
When you move from gathering tools to actually getting your canvas ready, the difference shows up instantly. A loose fabric will make your satin stitches wobble, while a snug hoop turns the whole process into a smooth, almost meditative flow.
First, give your chosen fabric a quick wash and iron it flat. Even a tiny wrinkle can become a bump under the needle, and you’ll notice it the moment you try to lay down that glossy row.
1. Choose and prep your fabric
Pick a fabric that matches the weight of your thread. Medium‑weight cotton or linen works great for most satin‑stitch projects; silk blends give that extra sheen but can slip if the hoop isn’t tight enough.
Now, cut a piece that’s at least two inches larger than your hoop diameter. This extra margin lets you pull the edges without tearing the cloth and gives you room to adjust tension later.
2. Set up the hoop correctly
Place the inner ring on your work surface, lay the fabric over it, then position the outer ring. Pull the fabric gently but firmly until you feel a slight give – you want it drum‑tight, not strangled.
A quick trick: tap the outer ring with a wooden dowel while you pull. You’ll hear a soft click that tells you the tension is just right. If the fabric sags when you release, tighten a hair more.
Before you start stitching, double‑check the fabric’s alignment. The grain should run parallel to the edge of the hoop, and any printed pattern you plan to follow should sit squarely in the center. This prevents crooked rows later.
The short video below walks you through the exact hand‑on steps, so pause and follow along with your own hoop. Seeing the tension in action makes it easier to replicate the feel on your own project.
When the hoop is set, secure the fabric with a few small pins at the back of the hoop. Pins keep the cloth from shifting as you pull the needle through, especially on stretchy fabrics like cotton blends.
Run a test stitch across a corner of your fabric. The stitch should lie flat, the thread tension even, and the edges of the satin line should meet without gaps. If you see puckering, loosen the hoop just a notch and try again.
The diary of a Northern Belle also suggests starting in the center of the shape to maintain even tension (satin stitch tutorial).
| Tool | Recommended Setting | Quick Tip |
|---|---|---|
| Fabric | Pre‑washed, ironed, 2” larger than hoop | Leaves room for adjustment |
| Hoop | Drum‑tight, no sag | Tap outer ring with wooden dowel |
| Pins | 2‑3 small pins at back | Prevent shifting on stretchy cloth |
Keep this quick checklist handy: fabric pre‑washed, hoop size right, tension drum‑tight, test stitch passed, pins in place. With those bases covered, you’ll notice your satin stitches glide like a paintbrush on canvas, and the learning curve flattens dramatically.
If you’re working with a patterned fabric, consider using a lightweight tear‑away stabilizer behind it. It adds support without bulk, and you can peel it away once you’re done. For kids’ projects, a simple piece of non‑stick baking mat works just as well.
And remember, the hoop is your best friend – treat it gently, and it will reward you with flawless satin rows every time.
Step 3: Stitching the Satin Stitch – Techniques and Tips
Now that your fabric is snug and your hoop is humming, it’s time to actually lay down those glossy satin rows. If you’ve ever watched a pro make a satin stitch look like a single brushstroke, you know there’s a rhythm behind the smooth finish. Let’s break that rhythm down into bite‑size habits you can practice tonight.
Pick the Right Stitch Length
First tip: keep your stitch length consistent. For motifs under an inch, aim for 2‑3 mm stitches; for larger blocks, 4‑5 mm works best. Too short and you’ll end up with a cramped, “stair‑case” look, too long and the thread can pull the fabric unevenly. A quick way to test is to draw a ruler‑line on scrap fabric, stitch a row, and measure the gaps with a pair of tweezers.
Second tip: follow the shape of your design, not the opposite way. When you’re filling a leaf, start at the tip and work toward the stem, laying each stitch side‑by‑side. This keeps the thread tension pulling in the same direction, which prevents puckering at the edges. If you accidentally stitch backward, you’ll see a tiny ridge where the thread changes direction—just lift the needle and redo that line.
Third tip: use the “anchor stitch” method for curves. Begin with a short anchor stitch at the curve’s apex, then add the remaining stitches in a fan‑shaped sweep. The anchor holds the curve’s geometry, so the rest of the row follows naturally. I tried this on a butterfly wing for a client’s tote bag, and the wing’s edge stayed crisp without any wobble.
Real‑world example: Maya, a hobbyist from Ohio, wanted to add a satin‑stitched border to a set of napkins for her bridal shower favors. She chose a 10‑inch hoop, cotton‑floss thread, and a simple wave pattern. By applying the consistent‑length rule and anchoring each wave at the crest, she finished in under an hour and the guests called the napkins “studio‑quality.” Her secret? A tiny piece of non‑stick silicone mat behind the fabric to keep the back from sticking while she worked.
If you’re dealing with a patterned fabric, remember to place your satin rows on the plain background whenever possible. The satin stitch reflects light, so a busy print can become visually noisy. One of our community members stitched a satin‑filled sun on a vintage floral tea towel, but she limited the sun to the solid white field; the result was a striking focal point that didn’t clash with the surrounding pattern.
Managing Thread Tension on the Fly
Even with a drum‑tight hoop, tension can shift as you fill a larger area. The trick is to “reset” every few rows: pull the fabric gently outward, then re‑tighten the outer hoop ring just a millimeter. You’ll hear a soft click—think of it as your stitch’s “heartbeat.” If you hear a sighy looseness, pause and give the fabric another gentle pull before you continue.
A handy tip from a seasoned embroiderer is to keep a second needle threaded with the same thread ready in your hand. When the needle tip starts to look frayed or the thread feels snagged, switch to the fresh needle without breaking your flow. This small habit saved me on a silk‑blouse project where the needle tip would catch the delicate weave after fifteen stitches.
For extra control, try the “double‑stop” technique: after completing a row, stop the needle just before the last stitch, pull the thread taut, then finish the final stitch with a tiny backstitch. The backstitch anchors the row and eliminates the tiny gap that sometimes appears at the edge of a satin block.
Finishing Touches & Cleaning Up
When you’ve filled the shape, give it a once‑over with a clean, dry brush to lift any stray fibers. If you used a stabilizer, peel it away gently; the satin stitches should stay flat because they’re already locked in tension. A quick press with a warm iron (cloth side up) will smooth any microscopic ridges—just avoid direct heat on the thread to prevent melting.
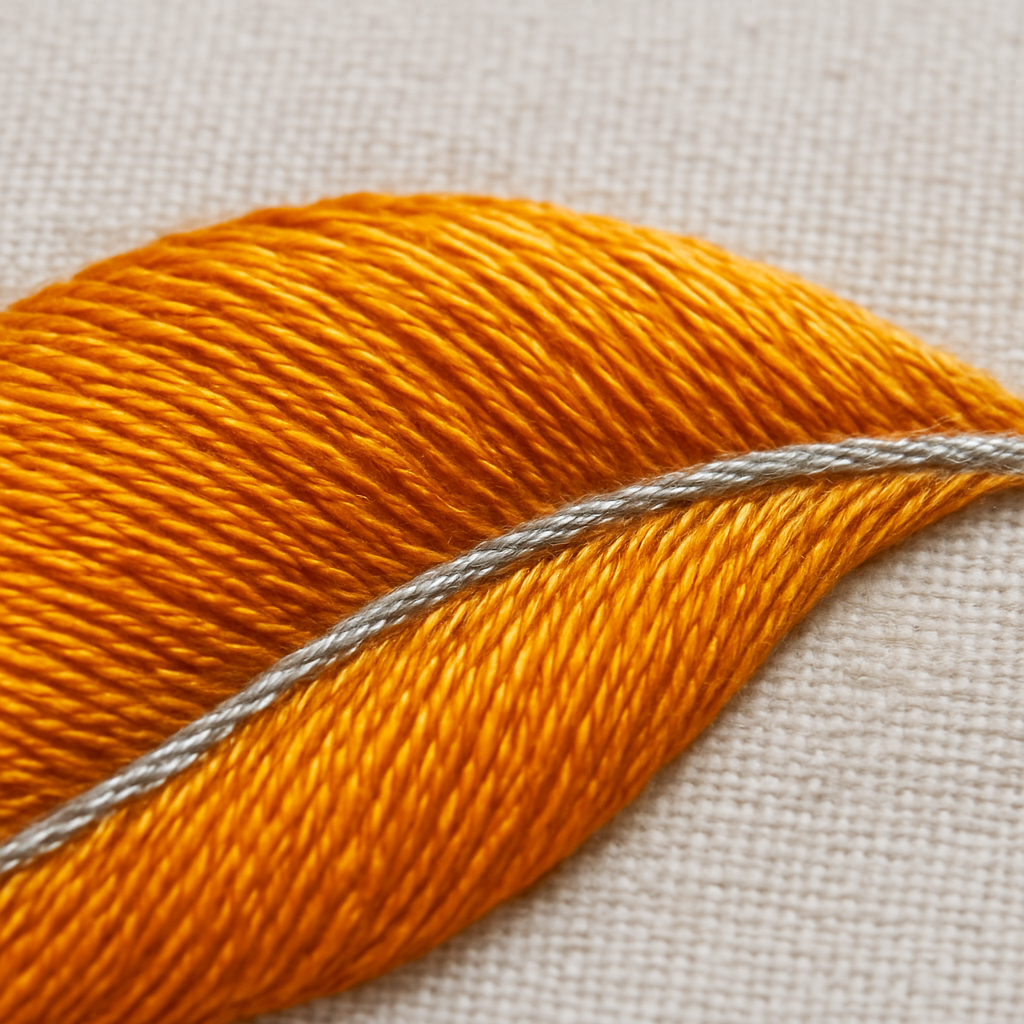
Pro tip: add a tiny “highlight” line of a contrasting thread along the outer edge of the satin block. This mimics the way light catches a real satin surface and adds depth without extra rows. I used a single‑strand metallic floss on a navy satin‑stitched star for a kids’ backpack, and the star practically glowed.
Finally, if you ever feel stuck, there’s a concise quick video walkthrough that demonstrates these exact techniques in real time. Watching the needle move can clarify the hand‑position and speed you should aim for, especially when you’re learning the anchor‑stitch method.
Step 4: Adding Shading and Finishing Details
Now that your satin blocks are smooth and solid, it’s time to give them that little extra pop that makes a design feel three‑dimensional. Think of shading as the whisper of light on a satin‑finished surface – a subtle line here, a faint highlight there, and suddenly your embroidery looks alive.
Why shading matters
Without a hint of depth, even the most perfectly executed satin stitch can look flat, like a printed graphic. A tiny contrast thread or a carefully placed break in the row creates the illusion of curvature, especially on rounded shapes like flowers or leaves.
So, how do we add that magic without overcomplicating the stitch?
Step‑by‑step shading technique
1. Choose a highlight thread. Pick a strand that’s either a shade lighter or a metallic variant of your main color. One strand of pearl cotton works wonders on a navy base, while a silver floss can turn a simple star into a sparkle.
2. Mark the highlight line. Using the same water‑soluble pen you used for the main outline, draw a thin line just inside the outer edge of your satin block. This will be the guide for your highlight stitches.
3. Stitch the highlight. Work a single row of satin stitches parallel to the edge, but keep the stitch length a touch shorter than the main rows. Shorter stitches catch more light and create a crisp border.
4. Blend with a subtle shadow. If you want extra depth, add a second row of a slightly darker thread right beneath the highlight. Use two strands instead of six – the thinner line stays discreet while still suggesting a shadow.
5. Finish with a gentle brush. Once the shading rows are in place, give the piece a soft brush‑off to lift any stray fibers. This step also helps the highlight sit flush against the fabric.
Does this feel like extra work? Think of it as the finishing coat on a painting – a few extra strokes that elevate the whole piece.
Real‑world example
One of our community members, Maya, was stitching a satin‑filled moon on a kids’ night‑light cover. She used a deep indigo thread for the main block, then added a single‑strand silver floss as a highlight along the crescent’s edge. The result? The moon seemed to glow in low light, and the kids loved it so much they asked for a matching star.
Another example: a small business owner created a line of embroidered tote bags with navy satin‑stitched monograms. By adding a thin copper thread highlight, the letters caught the sun on the beach, making the bags a hit at a local market.
Common pitfalls and how to avoid them
— Too many strands on the highlight. Using all six strands will make the border look heavy and defeat the purpose of a delicate accent. Stick to one or two strands.
— Uneven spacing. If the highlight line wobbles, the effect looks messy. Double‑check your guideline before you start, and use a stitch ruler if you have one.
— Heat damage. Remember, metallic floss can melt under high heat. If you need to press the piece, use a low‑heat setting and place a cloth between the iron and the embroidery.
Feeling stuck? A quick visual walkthrough shows the exact hand‑position for adding highlights. Check out this video demonstration of shading techniques for a clear picture.
Quick checklist before you seal the project
- Highlight thread selected (lighter shade or metallic).
- Guideline drawn just inside the outer edge.
- One‑strand or two‑strand satin stitches for the highlight.
- Optional shadow row with a darker, thin thread.
- Brush off stray fibers and press low‑heat if needed.
When you’ve added those tiny touches, step back and admire the way light dances across the surface. That’s the moment you know your satin stitch has graduated from “nice” to “wow.”
Step 5: Caring for and Displaying Your Finished Piece
Congratulations, you’ve just brought a satin‑stitch design to life. It’s that moment when you step back, see the light catch the glossy rows, and think, “Wow, I actually did that.” But the work isn’t over – a beautiful piece deserves a little TLC so it stays vibrant for years to come.
Cleaning and storing without ruining the shine
First thing’s first: don’t toss the finished piece straight into the washing machine. Even a gentle cycle can pull at those tightly‑packed stitches and cause the fabric to pucker. Instead, spot‑clean with a soft, damp cloth. If a stain is stubborn, dab (don’t rub) with a tiny bit of mild soap diluted in water. Rinse the cloth, dab again, and let the area air‑dry completely before you touch anything else.
When it comes to long‑term storage, think of your embroidery like a piece of art. Roll it loosely around a clean cardboard tube rather than folding it. The roll prevents creases that could stress the satin rows. Slip a piece of acid‑free tissue paper between the roll and the fabric for extra protection, especially if you’re storing it in a closet where humidity can fluctuate.
Protecting the satin stitch from light and heat
Metallic or light‑reflective threads love sunlight, but too much UV can fade them. Hang your work in a spot that gets indirect light, or use UV‑filtering glass if you’re framing it. Heat is another sneaky villain – a hot iron pressed directly on the thread can melt metallic floss. If you need to press the back of the piece, place a clean cotton cloth between the iron and the embroidery, and set the iron to low or silk heat.
One tip from seasoned embroiderers: after a press, give the fabric a quick “fluff” with a soft paintbrush. It lifts any tiny fibers that might have settled during ironing and restores that satin‑smooth look.
Choosing a display method that shows off the sheen
Now comes the fun part – deciding how to show off your work. A simple framing job works wonders for wall art, but you have to choose the right mat. A neutral, matte mat lets the satin stitch shine without competing for attention. If you’re proud of a small motif, consider a shadow‑box frame; the extra depth gives the stitches room to “breathe” and adds a museum‑like feel.
For functional pieces like pillow covers or tote bags, think about mounting them on a backing board. A lightweight foam board adds structure so the satin rows stay flat, and you can hang the finished item with a decorative hook. And if you love the idea of a rotating gallery, a hanging clip system (think art‑gallery rails) lets you swap pieces in and out without rehanging nails each time.
Need more inspiration on how to present your work? Check out Mastering Your Craft: A Complete Resource for Online Embroidery Classes for Beginners – it walks you through styling tips alongside technique tutorials.
Real‑world examples that proved the point
Take Maya’s embroidered tea‑towel set. After finishing a satin‑stitched sun motif, she rolled the towels in acid‑free tissue and stored them in a linen drawer. Six months later, the sun still glimmered, and she displayed one on a kitchen wall using a simple wooden frame with a white mat. The result? Guests always asked where she got the “custom art,” and the towels became a conversation starter at dinner parties.
Another example: a boutique owner turned a batch of satin‑stitched monogrammed napkins into a mini‑gallery at a local market. She used clear acrylic stand‑up frames that let the napkins stand on their own. The glossy satin catch‑the‑light effect drew shoppers in, and she sold out before the market closed.
Quick care checklist
- Spot‑clean with a damp cloth; avoid submerging.
- Press on low heat, cloth side up; never iron directly on metallic floss.
- Store rolled with tissue paper; keep away from direct sunlight.
- Choose a matte mat or shadow box for wall display; avoid glossy frames that compete with the stitch.
- Re‑brush the surface after any press to lift stray fibers.
Follow these steps, and your satin‑stitch masterpiece will keep its glossy charm, whether it lives on a pillow, hangs on a wall, or travels to a friend’s house as a cherished gift.
Conclusion
By now you’ve seen how a satin stitch can turn a plain square of fabric into a glossy little masterpiece.
If you ever felt that first row was shaky, remember the tension trick—pull the hoop just a hair tighter every few rows and the stitches settle into that smooth, paint‑brush feel we all love.
So, what’s the next step? Grab a scrap, set your hoop, and run a quick test swatch. That tiny experiment tells you the perfect strand count, stitch length, and whether you need a highlight thread for that extra pop.
When the work is done, treat it like a piece of art: spot‑clean, roll it in acid‑free tissue, and choose a matte mat or shadow box that lets the satin shine without competition.
And don’t forget the little details—brush off stray fibers after each press, store rolled away from direct sun, and add a single‑strand metallic edge if you want that subtle glimmer.
You’ve got the tools, the technique, and the confidence. Keep experimenting, share your finished pieces with the CreativiU community, and let each stitch be a stepping stone toward bigger projects.
Remember, every satin stitch you master brings you closer to turning everyday textiles into standout statements you’ll be proud to showcase.
FAQ
What exactly is a satin stitch and why is it called “satin”?
Think of the satin stitch as a row of tiny, side‑by‑side stitches that fill a shape, kind of like a brushstroke of thread. When the stitches sit flat and close together, they catch the light and give that smooth, glossy finish we associate with satin fabric – hence the name. It’s perfect for petals, leaves, or any area where you want a sleek, polished look.
How do I choose the right thread weight for my satin stitch?
Start by matching the thread’s thickness to your fabric’s weight. A medium‑weight cotton floss (six strands) works well on cotton or linen, while a finer silk floss (one to three strands) is better for delicate silks or lightweight blends. If you’re filling a large area, you can keep all six strands for speed; for fine detail, strip it down to avoid bulk.
My stitches keep looking wavy – what’s going on?
Wavy rows usually mean tension is off or the fabric isn’t snug in the hoop. Pull the outer hoop ring just a hair tighter every few rows – you’ll feel a soft click. Also, make sure the fabric is drum‑tight and the hoop sits flat on your work surface. A quick test stitch on the edge can reveal any puckering before you dive into the full design.
Can I use a satin stitch on patterned fabric without it looking messy?
Absolutely, but the trick is to place the satin‑filled shapes on the plain parts of the pattern. The satin stitch reflects light, so a busy background can become noisy. If you really love a patterned area, try using a slightly lighter thread or add a subtle highlight line to separate the stitch from the print. It creates a clean contrast that lets the design breathe.
How do I add depth with highlights or shadows in a satin stitch?
After you finish the main block, thread a single‑strand of a lighter (or metallic) floss and stitch a thin row just inside the outer edge. Keep those stitches a tad shorter than the main ones – they’ll catch the light and act like a highlight. For a shadow, add a second row with a darker thread right beneath the highlight, using one or two strands. The combination gives a three‑dimensional feel without extra embroidery techniques.
What’s the best way to clean and store a satin‑stitched piece?
Spot‑clean with a damp cloth; avoid submerging the piece. When it’s dry, roll it loosely around a clean cardboard tube with a sheet of acid‑free tissue in between. This prevents creases that could stress the satin rows. Keep the roll out of direct sunlight and away from heat sources. A quick brush with a soft paintbrush after any pressing will lift stray fibers and restore that glossy look.
Where can I find more guidance if I get stuck while stitching?
Our CreativiU community is a great place to share photos, ask questions, and get feedback from fellow stitchers. You can also revisit the step‑by‑step tutorial sections you’ve already read, or join one of our live Q&A sessions where an instructor walks you through common hiccups in real time. Remember, every snag is just a stepping stone to smoother satin rows.
Leave a Reply