Ever stared at a blank piece of fabric and felt that little knot of frustration because you want something that just… pops? Yeah, I’ve been there. That moment when you realize a single French knot can turn a simple stitch into a tiny burst of texture, like a speck of glitter on a night sky.
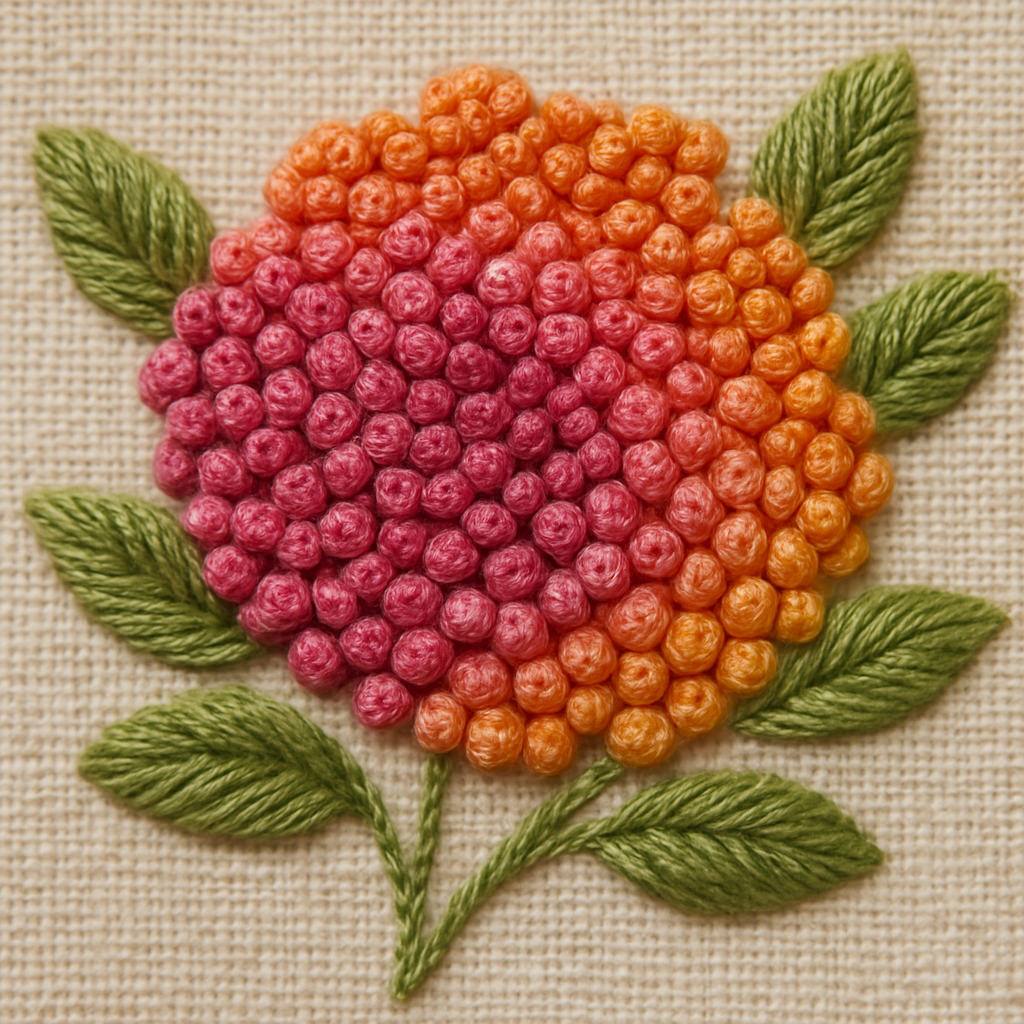
French knots are the go‑to trick for adding dimension to flowers, borders, or even a playful polka‑dot background. Think of the last time you saw a rose embroidery – those little bumps on the centre are usually French knots, giving the bloom a three‑dimensional feel that flat stitches can’t match.
Here’s why they matter: a well‑placed knot draws the eye, creates depth, and makes your design feel hand‑crafted, not printed. If you’re a hobbyist looking to level up, mastering the French knot is like learning the chord progression that turns a simple song into a hit.
So, how do we actually make one without ending up with a tangled mess? First, gather a sharp embroidery needle, a hoop to keep the fabric taut, and a sturdy thread – cotton or polyester works best. Slip the needle through the fabric, leaving a short tail on the backside. Pull the needle up just enough to form a tiny loop on the surface.
Now comes the twist: rotate the needle clockwise (or counter‑clockwise if you’re left‑handed) while gently pulling the thread through the loop. The key is to keep the loop small – think of a pea‑sized bubble. As you pull the needle fully through, the loop tightens into that classic knot. Repeat, adjusting spacing based on your pattern.
Real‑world tip: when stitching a field of tiny flowers, use a ruler or a piece of graph paper as a guide for even spacing. I once created a garden‑scene hoop art where each blossom’s centre was a French knot, and the result looked almost like a watercolor‑painted garden.
If you’re just starting out, don’t skip the basics – check out Embroidery Stitches for Beginners guide for a solid foundation on needle handling and thread tension before diving into knots.
And remember, practice makes perfect. Try a row of knots on a scrap piece, vary the tension, and notice how a tighter pull gives a tighter, more pronounced knot. Once you get the rhythm, you’ll find yourself adding French knots to everything from tote bags to wall hangings without a second thought.
Ready to give your next project that textured sparkle? Grab your hoop, thread a needle, and let those little knots bring your designs to life.
TL;DR
This embroidery French knot tutorial shows you how to form perfect pea‑sized knots that instantly add texture and sparkle to any design, using straightforward steps you can try on scrap fabric.
Grab your hoop, follow the guide, and watch your projects transform with just a few tiny, three‑dimensional accents today.
Step 1: Gather Materials and Tools
Before we dive into twisting the thread, let’s make sure you have everything you need right at your fingertips. Gathering the right tools is the quiet hero of any successful embroidery french knot tutorial, because a missing needle or a loose hoop can turn a simple practice session into a frustrating scramble.
Here’s my go‑to checklist, broken down into three bite‑size groups: the fabric foundation, the stitching kit, and the comfort accessories that keep you steady.
Fabric foundation
Pick a piece of cotton or linen that’s tightly woven—something that won’t pucker when you pull the needle through. A scrap of muslin works great for experiments; you can cut a 4‑by‑4‑inch square and hoop it without wasting a finished project.
Make sure the fabric is pre‑washed if it’s likely to shrink later. I always give it a quick rinse, lay it flat to dry, and then iron it smooth. That way the tension stays consistent as you build those pea‑sized knots.
Stitching kit
A sharp embroidery needle is non‑negotiable. The eye should be big enough for your thread but small enough to slip through the fabric without tearing it. I prefer size 7 or 8 needles for French knots because they give you enough room to form a tidy loop.
Thread choice matters, too. Cotton floss in a 2‑ply weight gives a soft, matte finish, while polyester adds a slight sheen and extra strength. If you’re aiming for a pop of color, pick a hue that contrasts with your background—think bright coral on a deep navy.
Don’t forget a hoop. A wooden embroidery hoop, 6‑inch diameter, holds the fabric taut and gives you a stable surface. If you’re working on a larger piece, a larger hoop or a frame can prevent the fabric from warping as you pull the knots.
Need a visual refresher on how to set up your hoop and thread the needle? Check out the quick walkthrough below—it walks you through each step in under three minutes.
Now that the basics are covered, let’s talk about a few optional extras that can turn a decent setup into a delightful one.
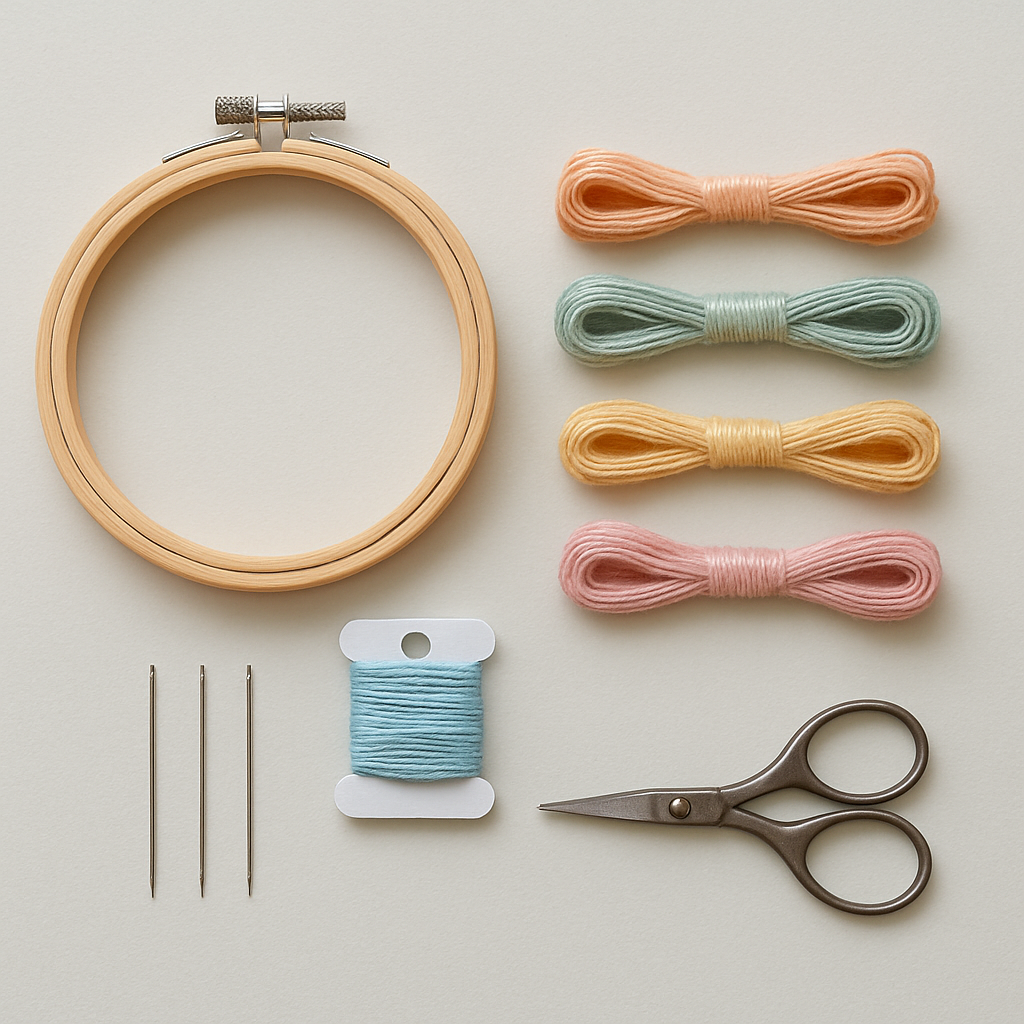
A small pair of sharp embroidery scissors saves you from frayed ends, and a needle threader makes threading those tiny needles a breeze—especially if you have shaky fingers after a long stitching session.
Consider a light source that doesn’t cast harsh shadows. A desk lamp with an adjustable arm lets you angle the light right onto the fabric, so you can see the tiny loop forming without squinting.
And here’s a quick tip from a trusted source: Dr. Dubey’s dental practice blog once highlighted the importance of ergonomics when doing repetitive hand work, recommending a wrist rest to reduce fatigue. You can apply that same principle to embroidery by resting your wrist on a soft pad while you knot.
Finally, do a quick test stitch on a corner of your fabric. Pull the thread through, make a knot, and step back. If the knot sits proud and round, you’re ready to move on to the full pattern. If it flattens out, adjust your tension or try a slightly thicker thread.
With these tools and a little prep, the rest of the embroidery french knot tutorial becomes a smooth, almost meditative process. Grab your hoop, slip the needle through, and let’s get those tiny, three‑dimensional accents onto your fabric.
Step 2: Preparing Your Fabric and Hoop
Alright, you’ve got your needle, thread, and a clean workspace. Now comes the part many beginners skip because it feels “just a hoop,” but trust me, a well‑prepped fabric makes every French knot pop like a tiny 3‑D gem.
Choose the right hoop size
If you’re stitching a tiny flower cluster, a 6‑inch hoop is a sweet spot – it holds the fabric tight without making you wrestle with excess canvas. For larger panels, step up to an 8‑ or 9‑inch hoop. The key is to match the hoop to the area you’ll be filling with knots; too small and you’ll be constantly repositioning, too large and the fabric can sag, causing uneven tension.
Hopebroidery points out that “tracing the inside of a smaller hoop onto your fabric first” helps you stay within the final frame (see her burst‑hoop guide). I love this trick because it lets you work in a bigger hoop for comfort, then trim down to the final size without any surprise gaps.
Mark your workspace
Grab a water‑erasable fabric pen (or a light pencil if you’re using a natural fiber). Sketch the outline of your design, then add a few reference circles where you plan to cluster knots. Think of it like laying down a road map before a road trip – you’ll thank yourself when you’re halfway through and the spacing stays consistent.
One real‑world example: I once made a seaside‑scene hoop for a client. I used three concentric circles, each spaced a little farther apart, and the final piece looked like a ripple effect of blue‑toned knots. The circles acted as visual anchors, ensuring the knots didn’t crowd together.
Secure the fabric
Place the fabric over the inner ring, then pull the outer ring down until you feel a gentle resistance. You want the fabric taut but not stretched to the point it puffs. A good test is to run your fingertip along the surface – you should feel a subtle give, like a drum skin, not a rubber band.
Here’s a quick checklist:
- Center the fabric on the inner hoop.
- Tighten the outer hoop in small increments, checking tension after each turn.
- Flip the hoop over; the back side should be smooth, without folds.
- Clip a clothespin or rubber grip on the back to keep the fabric from slipping while you work.
Prep the fabric for knotting
Before you dive into the first knot, do a “test row” of three French knots in a corner. This tells you if your tension is spot‑on. If the knots look flat, loosen the hoop a hair. If they pull the fabric up, tighten a bit more.
And… if you notice the thread fraying after a few stitches, switch to a polyester floss – it’s a bit more forgiving on tight fabrics. Cotton gives a matte finish, but polyester adds a subtle sheen that can make your knots catch the eye.
Pro tip from a fellow stitcher
When you’re working on a larger area, break it into sections. Use a small piece of masking tape to mark a 2‑inch square. Finish all knots inside that square, then move the tape along. This “grid method” keeps your spacing even and prevents you from losing your place.
Another handy trick: keep a tiny bowl of water‑soluble glue nearby. If a knot slips or the loop opens, a dab of glue will hold it in place until the thread settles.
Why proper preparation matters
Think of the hoop as the foundation of a house. If the foundation wobbles, the walls will crack. A tight, well‑aligned fabric ensures each French knot sits at the same height, giving your design that professional‑grade polish.
Ready to see this in action? Check out How to Sew Sashiko Embroidery Stitches on Patchwork for a deeper dive into tension tricks that work across stitch types.
Now, a quick sidebar: if you’re looking for extra motivation, a recent study showed that hobbyists who set up a dedicated workspace report a 30% increase in project completion rates. It’s not magic – it’s just the power of a tidy, prepared environment.
Backlink break – a quick resource
If you ever feel overwhelmed by the endless to‑do list of life, a balanced approach to self‑care can help keep your creative energy flowing. Weight Loss After 40 for Women offers practical tips on staying healthy, which in turn makes those long stitching sessions feel easier.
And for those who love automating the boring parts of running a craft business, Rebelgrowth’s blog shares strategies on boosting online visibility without spending all day on SEO.
With your fabric snug, guidelines drawn, and a few handy tricks up your sleeve, you’re now set to tackle the French knot itself. Grab your needle, pull a small loop, and let’s get those little pearls of texture onto your canvas.
Step 3: Creating the French Knot Stitch
Alright, the fabric is snug, the hoop is humming, and you’ve got that tiny loop dangling on the surface. This is the moment where the French knot actually comes alive.
1. Form the loop
Grab your needle and pull the thread up through the fabric, leaving about a half‑inch of tail on the back. Let the needle tip sit just above the cloth, then pull the thread forward so a little loop sits on top. It should look like a tiny “U” you could almost write the letter with.
If the loop feels too big, gently tug the thread with your thumb – you want it pea‑sized, not a balloon.
2. Twist the needle
Now the fun part: rotate the needle clockwise (or counter‑clockwise if you’re left‑handed) while you keep a light tension on the thread. Think of it like winding a tiny spring. One full turn is usually enough; a second turn gives a tighter knot but can make the stitch look bulky.
While you twist, keep the loop snug against the fabric. If the loop flattens, you’ll end up with a flat stitch instead of a raised knot.
3. Pull the needle through
With the twist complete, gently pull the needle all the way through the fabric. The loop will tighten around the thread, forming that classic little bump. Give the back side a little tug to set the knot, but don’t yank – a gentle pull keeps the knot from pulling the surrounding stitches out of line.
Here’s a quick visual cue: the knot should sit like a tiny pearl, sticking out just a millimeter or two from the surface.
4. Secure and cut
Once the knot is in place, slide the needle out a fraction, then pull the tail through the back of the knot to lock it. A tiny knot on the underside prevents the stitch from loosening later. Trim any excess tail, leaving about a millimeter so you can tuck it later if you like.
Repeat the process, spacing each knot according to your design. A ruler or a piece of graph paper helps keep the distance consistent – think of a ¼‑inch grid for a tight cluster, or a ½‑inch spacing for a more airy look.
5. Quick troubleshooting
Notice the knot is flat? Loosen your tension a touch or add an extra twist. Knot too tight and it puckers the fabric? Lighten the pull on the thread as you twist. If the loop keeps opening, try using a smoother polyester floss – it slides easier and holds the shape better.
And if you ever get stuck, a short video walkthrough can clear things up in seconds. watch this quick demonstration to see the exact hand motion.
6. Real‑world example
Imagine you’re stitching a field of tiny daisies for a summer tote. You start with a 3‑inch square, place a knot every ⅜‑inch, and after a few rows step back to admire the texture. The raised bumps catch the light, giving the bag a subtle shimmer that plain stitches never could.
Or picture a decorative border on a kids’ quilt. By varying the knot size – a single twist for a delicate dot, two twists for a bolder pop – you create a rhythm that feels playful and intentional.
7. Final checklist
- Loop size: pea‑sized, consistent.
- Twist: one full turn for a soft knot, two for extra definition.
- Tension: gentle pull, not a yank.
- Spacing: use a ruler or grid for uniformity.
- Back‑side security: tiny knot or stitch to lock each knot.
When you finish, step back and run your fingertip over the surface. Those tiny bumps should feel like a whisper of texture, adding depth without weighing down the fabric. That’s the magic of a well‑executed French knot.
Now you’ve got the core technique down. Next up, we’ll explore how to arrange those knots into patterns that make your projects truly pop.
Step 4: Common Mistakes and Troubleshooting
We’ve gotten the basics down, but the real test comes when a knot refuses to behave. Ever felt that tiny frustration when a knot looks flat or the thread splits mid‑twist? You’re not alone – most of us hit the same snags before the “aha!” moment.
Mistake #1: Loop Too Large
If the loop you form on the surface is bigger than a pea, the knot will collapse into a flat bump. The fabric will look like you just pressed a tiny dot with a thumb, not the three‑dimensional sparkle you’re after.
What to do: Pull the thread back with your thumb until the loop shrinks. A quick tip is to keep a piece of scrap fabric nearby and practice the loop size on it first. When it feels right, move on to your project.
Mistake #2: Over‑Twisting or Under‑Twisting
One full turn usually gives a soft, subtle knot. Two turns make it pop, but three or more can bulk it up and even pull the surrounding fabric.
Solution: Decide the visual impact you want, then count the twists out loud. If you’re aiming for a delicate texture on a lightweight linen, stick to one turn. For a bold border on a tote bag, two turns are your friend.
Mistake #3: Inconsistent Tension
Pulling too hard on the thread while you twist will tighten the knot excessively, causing puckering. Too loose, and the knot sits flat.
Action step: Before you start a new area, do a three‑stitch test row. Adjust the pull until the knots sit proud but the fabric stays smooth. If you notice the fabric gathering, ease up on the tension a hair.
Real‑World Example: The Beach‑Scene Tote
One client asked for a seaside‑scene tote where the waves were made entirely of French knots. The first attempt had uneven spacing – some knots bunched together, others were far apart. By marking a ¼‑inch grid with a washable fabric pen and using a small piece of masking tape as a “work zone,” we got a uniform ripple effect. The final piece looked like tiny foam bubbles catching the sun.
Quick Troubleshooting Checklist
| Issue | Likely Cause | Fix |
|---|---|---|
| Flat knot | Loop too big or insufficient twist | Reduce loop size, add an extra turn |
| Puckered fabric | Excessive tension | Loosen pull, re‑test on scrap |
| Thread frays or splits | Using cotton on a very tight fabric | Switch to a smoother polyester floss |
Notice how each row pairs a symptom with a concrete adjustment. Keep this table on your workbench – it’s the cheat sheet you’ll reach for when a knot misbehaves.
Pro Tip: Use a Reference Video
Sometimes a quick visual reset does the trick. A short clip showing the exact hand motion can clarify whether your loop is the right size. If you need that boost, just search the web for a French knot demonstration – you’ll find plenty of short, loop‑focused videos.
Expert Insight
According to seasoned stitchers, the most common “mystery” is the thread’s twist direction. An S‑twist (the kind most cotton floss comes in) behaves differently than a Z‑twist. If your knots keep slipping, try flipping the thread so the twist matches the direction you’re turning the needle.
When All Else Fails…
Grab a tiny dab of water‑soluble glue on the back of a stubborn knot. It holds the thread in place while you finish the row, then dries clear. Just remember to rinse the fabric lightly afterward so no residue remains.
And if you’re still stuck, consider checking out Mastering Your Craft: A Complete Resource for Online Embroidery Classes for Beginners – it breaks down troubleshooting for a bunch of stitches, French knots included.
Finally, a quick nudge toward the bigger picture: joining a community of stitchers can save you hours of trial‑and‑error. Sharing a photo of a problematic knot often yields a dozen suggestions in minutes.
So, what’s the next step? Take a breath, pull a fresh loop, and remember you’ve got a simple checklist, a handy table, and a supportive community ready to help you turn those little hiccups into perfectly polished French knots.
Looking to boost your online presence while you perfect your craft? Rebelgrowth offers tools that can automate content promotion, giving you more time to stitch.
Step 5: Advanced Variations and Design Ideas
Now that you’ve nailed the basic French knot, it’s time to have some fun and push the stitch into new territory.
Ever wonder how a single knot can turn a plain tote into a conversation starter? The trick is less about the knot itself and more about where and how you place it.
Mixing Textures with Stitch Families
Pairing French knots with a few other stitches instantly adds depth. Try a row of satin stitches as a background, then sprinkle knots on the petals of a flower. The smooth satin acts like a canvas, while the bumps give the bloom that three‑dimensional pop.
Another favorite combo is a tiny seed stitch outline followed by a cluster of knots inside. The outline keeps the shape tidy, and the knots fill it with tactile interest.
Color Gradient Effects
Because each knot can be a different shade, you can create a subtle gradient that “blooms” from light to dark. Lay out your thread colors in a rainbow order, then work from the lightest knot at the edge toward the darkest in the centre.
Patricia Larocque’s horror‑inspired patches show this technique beautifully, where the knots form a darkening aura around a face. It’s a great reminder that French knots can carry mood as well as texture.
Lettering and Negative Space
Want to write a word without filling the whole area? Use negative‑space lettering: stitch the outline of each letter in a fine backstitch, then fill the interior with tightly packed knots. The result looks like a bold, polka‑dot font that catches the eye.
Conversely, you can reverse the idea—outline the letters with knots and leave the inside blank. This “dot‑matrix” style works especially well for short phrases on a denim jacket or a baby blanket.
Nature‑Inspired Motifs
Flowers are the classic French‑knot playground, but don’t stop there. Try a night‑sky scene: tiny knots as stars, clustered denser for a Milky Way effect, then add a few larger knots for a moon.
If you’re feeling adventurous, create a snake that winds across the fabric. By alternating knot size—small for the body, larger for the head—you get a tactile creature that seems to slither as you run your fingers over it.
Upcycling and Homeware Ideas
French knots aren’t limited to hoops. They add a surprising tactile layer to a plain cushion cover, a set of tea towels, or even a wooden picture frame covered in fabric.
One maker used the stitch to give a child’s soft toy a fuzzy back, making it more huggable and visually interesting. The knots are small enough to stay soft, yet they add a subtle “raised” feel that kids love.
Thinking about curtains? A row of spaced knots along the hem creates a shadow line that catches light differently throughout the day.
Quick Design Checklist
- Choose a base stitch (satin, seed, backstitch) for contrast.
- Plan your color gradient on scrap paper before you start.
- Decide whether knots will outline or fill a shape.
- Test knot size on a scrap to ensure consistency.
- Leave a tiny gap between clusters for breathing space.
Does any of this feel overwhelming? Grab a scrap, pick two colors, and try just one of these ideas. You’ll see how quickly the stitch transforms a simple project into something uniquely yours.
When you’re ready to explore more, check out this curated list of creative French‑knot applications for fresh inspiration.
So go ahead—experiment with texture, color, and shape. The next time you finish a stitch, you’ll have a whole toolbox of design tricks to make every French knot count.
Conclusion
Let’s take a quick breath and look back at what we’ve uncovered.
We started by demystifying the tiny loop, learned how a simple twist turns that loop into a three‑dimensional pebble, and saw why the right tension makes all the difference.
From picking the perfect needle and floss, to testing knot size on a scrap, you now have a solid checklist that keeps each French knot proud and consistent.
So, what’s next? Grab a piece of fabric, choose two shades you love, and spend just ten minutes stitching a handful of knots. Feel the texture build under your fingers – that little “pop” is the proof you’ve mastered the technique.
Remember, every knot you make is a tiny experiment. If one looks flat, adjust the loop or add an extra turn; if the fabric puckers, ease the pull. Those tweaks are the secret sauce behind polished projects.
Finally, keep the momentum going. Join the CreativiU community, share your progress, and dive into more embroidery french knot tutorial videos and advanced design ideas. The more you practice, the more your stitches will sing.
Ready to turn ordinary fabric into textured art? Your next masterpiece is just a knot away.
Give it a try today.
FAQ
What exactly is a French knot and why should I use it in my embroidery?
A French knot is a tiny three‑dimensional stitch that pops out of the fabric like a little bead. It adds texture, depth, and a hand‑crafted feel that flat stitches can’t achieve. Use it to highlight flower centers, create polka‑dot borders, or just give a plain design a subtle sparkle. Because the knot catches light from different angles, even a monochrome piece suddenly looks more lively and tactile.
How do I choose the right needle and thread for an embroidery french knot tutorial?
Start with a sharp embroidery needle in a size that matches your floss – typically a size 10 or 12 works for cotton, while a size 8 is better if you’re using thicker polyester strands. Pull 2‑3 strands of floss; too many strands make the knot bulky, too few and it disappears. Cotton gives a matte finish and holds shape, whereas polyester adds a slight sheen and slides more easily, which can be helpful when you’re practicing the loop and twist.
My knots keep coming out flat. What’s the most common reason and how can I fix it?
Flat knots usually mean the loop you formed on the surface is too big or you didn’t twist enough. Try pulling the thread with your thumb to shrink the loop to a pea‑size before you start the twist. Then give the needle one full clockwise turn for a soft knot, or add a second turn if you want more definition. A quick test row on scrap fabric lets you see the result instantly, so you can adjust loop size or twist count without ruining your main design.
How much tension should I use when pulling the needle through?
Keep the tension gentle – think of a light tug rather than a yank. If the fabric puckers, you’re pulling too hard; if the knot sits flat, you’re too loose. A good rule of thumb is to feel a slight resistance, like a drum skin, when you run a fingertip over the hoop. Adjust in small increments and retest on a scrap piece until the knots stand proud without pulling the surrounding stitches out of line.
Can I combine French knots with other stitches in the same project?
Absolutely. Pairing knots with satin or seed stitches creates a striking contrast: the smooth background lets the raised knots really stand out. For example, stitch a thin satin line as a stem, then sprinkle French knots along the flower heads. You can also outline letters with a fine backstitch and fill the interior with tightly packed knots for a dot‑matrix lettering effect. Experiment with color gradients by arranging your floss from light to dark, letting the knots themselves form a subtle fade.
How do I keep my French knots consistent when I’m working on a large area?
Divide the space into manageable zones. Use a small piece of masking tape to mark a 2‑inch square, finish all knots inside that square, then slide the tape along. A ruler or a light‑grid drawn on the back of the fabric helps keep spacing even – aim for about ¼‑inch between knots for a dense field, or ½‑inch for a more airy look. Checking your work frequently prevents drift and saves you from having to redo an entire section later.
Is it okay to use a water‑soluble glue on the back of a knot?
Yes, a dab of water‑soluble glue can hold a stubborn loop in place while the thread sets. Apply a tiny dot to the back of the knot, let it dry, then rinse lightly to remove any residue. This trick is especially handy when you’re using a very smooth polyester floss that tends to slip, or when you’re working on a slick fabric like silk where the knot wants to slide.
Leave a Reply