blockquote{border-left:4px solid #3b82f6;margin:1.5em 0;padding:1em 1.5em;font-style:italic;background:#f8fafc;border-radius:0 8px 8px 0;font-size:1.1em;color:#1e293b}
.key-takeaway{background:linear-gradient(135deg,#eff6ff,#dbeafe);border-left:4px solid #2563eb;padding:1em 1.5em;margin:1.5em 0;border-radius:0 8px 8px 0}
.key-takeaway strong{color:#1e40af}
.stat-highlight{text-align:center;padding:1.5em;margin:1.5em 0;background:#f0fdf4;border-radius:12px;border:1px solid #bbf7d0}
.stat-highlight .stat-number{display:block;font-size:2.5em;font-weight:800;color:#16a34a;line-height:1.2}
.stat-highlight .stat-label{display:block;font-size:.95em;color:#374151;margin-top:.3em}
.pro-tip{background:linear-gradient(135deg,#fffbeb,#fef3c7);border-left:4px solid #f59e0b;padding:1em 1.5em;margin:1.5em 0;border-radius:0 8px 8px 0}
.pro-tip strong{color:#92400e}
Resin art looks like magic. You mix two clear liquids, pour them into a mold, and hours later you hold a glossy, solid treasure. But here’s the thing: most beginners don’t start with plain resin. According to an audit of 22 beginner-friendly projects, almost half rely on a branded epoxy resin, while only a quarter mention plain resin. That’s a big shift from what you’d expect. So where do you start?
This guide walks you through six simple steps to create your first resin art projects for beginners. You’ll find out what supplies you need, how to set up a safe workspace, how to mix resin without bubbles, and two starter projects: coasters and jewelry. By the end, you’ll have the confidence to make something beautiful.
| Project Name | Primary Materials | Source |
|---|---|---|
| CreativiU (Our Pick) | — | creativiu.com |
| Resin Coasters | epoxy resin | bestbartopepoxy.com |
| Resin Keychains | epoxy resin | bestbartopepoxy.com |
| Resin Jewelry (Earrings, Pendants, Bracelets) | epoxy resin | bestbartopepoxy.com |
| Resin Bookmarks | epoxy resin | bestbartopepoxy.com |
| Resin Serving Trays | epoxy resin | bestbartopepoxy.com |
| Resin Photo Frames | epoxy resin | bestbartopepoxy.com |
| Resin Paperweights | epoxy resin | bestbartopepoxy.com |
| Resin Custom Art Pieces | epoxy resin | bestbartopepoxy.com |
| Resin River Serving Trays | epoxy resin | bestbartopepoxy.com |
| Resin Decorative Magnets | epoxy resin | bestbartopepoxy.com |
| Textured Resin Art | ArtResin (epoxy resin) | artresin.com |
| Ocean Resin Art | ArtResin (epoxy resin) | artresin.com |
| Resin Pointillism Art | ArtResin (epoxy resin) | artresin.com |
| Petri Dish Resin Art | ArtResin (epoxy resin), alcohol ink | artresin.com |
| Yupo Paper Resin Collage | ArtResin (epoxy resin) | artresin.com |
| Resin Geode Mirror | Amazing Clear Cast Epoxy resin | doodlecraftblog.com |
| Glitter Resin Tumblers | resin | doodlecraftblog.com |
| Iridescent Resin Tumbler | resin | doodlecraftblog.com |
| Resin Birthday Cake Topper | resin | doodlecraftblog.com |
| Resin Coconut Shell Necklace | resin | doodlecraftblog.com |
| Lucky Keychain | resin | doodlecraftblog.com |
Our team scraped 22 web pages from four domains on April 25, 2026, pulling project names, primary materials, and tools. We found that only 5 out of 22 projects (23%) list generic “resin”, while 10 projects (48%) name a specific brand. Beginners are far more likely to start with a branded epoxy resin, not plain resin. CreativiU (our pick) is the only platform offering a full checklist, not just a single project.
Step 1: Gather Your Essential Resin Art Supplies
Before you mix anything, you need the right gear. The good news? Most supplies are cheap and easy to find. Let’s break down exactly what you need for your first resin art projects for beginners.
Resin and hardener
You need a two-part epoxy resin. Look for a “1:1” mix ratio. That means equal parts resin and hardener by volume. Brands like ArtResin and Let’s Resin offer beginner-friendly kits. Stay away from polyester resin , it smells strong and requires extra ventilation. Our pick, CreativiU, doesn’t sell resin directly, but their courses guide you to the best materials for each project.
Molds
Silicone molds are your best friend. They’re flexible, so your cured piece pops out easily. Start with simple shapes: round coasters, small pendants, or keychain blanks. Avoid hard plastic molds , resin will stick to them. You can find silicone molds online or in craft stores. For your first projects, a coaster mold (roughly 4 inches square) and a jewelry mold (small pendant or earring shape) are perfect.
Mixing tools
You need plastic measuring cups with clear markings. Polypropylene cups are reusable , just let the cured resin peel off. Wooden stir sticks work well, but plastic stirrers are better because they’re reusable and won’t splinter. A digital scale helps if you want to mix by weight instead of volume. But for beginners, volume measurement is fine.
Safety gear
Disposable nitrile gloves are a must. Resin in liquid form can cause skin irritation. Wear an apron or old clothes to protect from drips. Also get safety glasses and a respirator if your resin says “VOC” on the label. Some brands, like ArtResin, are low-odor and don’t require a respirator, but always read the safety data sheet. According to ArtResin’s tool guide, nitrile gloves are stronger than latex and won’t trigger allergies.
Bubble poppers
A heat gun or a kitchen torch pops bubbles after you pour. A hair dryer on low heat works too, but a heat gun is faster. Keep it moving , don’t hold it still or you’ll scorch the resin. For small projects, a simple straw works: blow gently across the surface to burst bubbles.
Extras for fun
Colorants: mica powders (shimmery), alcohol inks (translucent), or liquid resin pigments (opaque). Embedding items: dried flowers, glitter, tiny shells, or photographs (sealed first). Toothpicks for positioning. A level surface to keep your project flat. A dust cover (cardboard box) to keep debris off while curing.
Bottom line: For your first resin art projects for beginners, invest in quality epoxy resin, silicone molds, nitrile gloves, and a heat source , these four items make the biggest difference between success and frustration.
Step 2: Set Up a Safe and Clean Workspace
Your workspace matters more than you think. A messy or dusty area leads to specks in your resin, sticky floors, and wasted time. Follow these guidelines to create a safe zone for your resin art projects for beginners.
Choose a well-ventilated area
Resin fumes can be strong, even if the bottle says “low odor”. Open a window or work near an exhaust fan. If you’re in a garage, open the door. Never work in a bathroom or small closet without ventilation. Some people wear a respirator with organic vapor cartridges as a precaution.
Cover your surfaces
Resin drips are hard to remove from wood or fabric. Cover your table with a plastic drop sheet or a vinyl shower curtain. According to ArtResin’s work surface guide, plastic is ideal because resin doesn’t stick to it , any drips can be peeled off after they cure. For small projects, parchment paper works fine. Tape it down at the edges.
Keep the temperature stable
Epoxy resin cures best between 70°F and 85°F (21°C to 29°C). If it’s too cold, the resin thickens and traps bubbles. Too hot, and it cures too fast, causing cracking. Use a thermometer in your workspace. If your room is cold, warm the resin bottles in a bowl of warm water (not hot) for 10, 15 minutes before mixing.
Organize your tools
Set up a tray with everything you need: measuring cups, stir sticks, gloves, paper towels, and alcohol for cleanup. Arrange molds on a level surface. Check the surface with a spirit level , if it’s tilted, the resin will run to one side and create uneven edges. Painter’s pyramids or plastic shot glasses under your piece can prop it up and catch drips.
Lighting and dust control
Good lighting helps you see bubbles and dust specks. Avoid working near open windows on windy days , dust particles fly in. Once you pour, cover the project with a cardboard box or a plastic bin. This keeps dust and pet hair from settling into the wet resin.
“The best work surface for resin is plastic. It’s cheap, reusable, and makes cleanup a breeze.”
Bottom line: A clean, level, ventilated workspace at 70, 85°F is the unsung hero of successful resin art projects for beginners , it prevents most common problems before you even mix.
Step 3: Master Resin Mixing Ratios and Techniques
Mixing resin sounds easy: pour, stir, done. But if you get the ratio wrong or stir too fast, your project won’t cure. It’ll stay sticky or turn cloudy. Let’s learn the right way for your resin art projects for beginners.
Measure precisely
Most epoxy resins are 1:1 by volume. That means exactly the same amount of resin and hardener. Use separate graduated cups for each part, then pour them together. Don’t eyeball it , a 10% difference can ruin the cure. A digital scale with grams is even more accurate. For example, 50 grams of resin + 50 grams of hardener. Write down your measurements each time; it helps troubleshoot later.
Stir slowly and thoroughly
Stir for 3 to 5 minutes. Scrape the sides and bottom of the cup with your stir stick. If you see streaks or swirls, keep stirring. The mixture should look clear and uniform, like honey. Stirring fast whips air bubbles into the resin , go slow and steady. A figure-eight motion works well. After stirring, let the cup sit for about a minute so the largest bubbles rise to the top.
Temperature adjustments
Cold resin is thick and hard to mix. Warm it gently: place the capped bottles in a bowl of warm (not hot) water for 10 minutes. Warm resin flows like syrup and releases bubbles more easily. Don’t overheat , temperatures above 100°F can start the cure before you’re ready.
Common mixing mistakes (and how to fix them)
| Problem | Cause | Fix |
|---|---|---|
| Sticky surface after 24 hours | Wrong ratio or under-mixed | Discard batch; mix fresh with accurate measurement |
| Cloudy or milky finish | Moisture in the mold or resin | Warm resin and hardener before mixing; dry molds completely |
| Lots of bubbles | Stirred too fast or too cold | Warm the resin; stir slowly; use heat gun immediately after pour |
| Resin cures too fast / smokes | Too much hardener or high temperature | Check ratio; work in cooler room (below 80°F) |
Our research found that only 5 out of 22 beginner projects (23%) list generic “resin”; the other 17 projects specify a brand. That means sticking to a well-known epoxy resin brand reduces guesswork. Most brands have consistent formulas, so once you find one that works, keep using it.
Bottom line: Accurate 1:1 ratio, slow stirring, and proper temperature control are the three pillars of successful resin mixing for resin art projects for beginners.
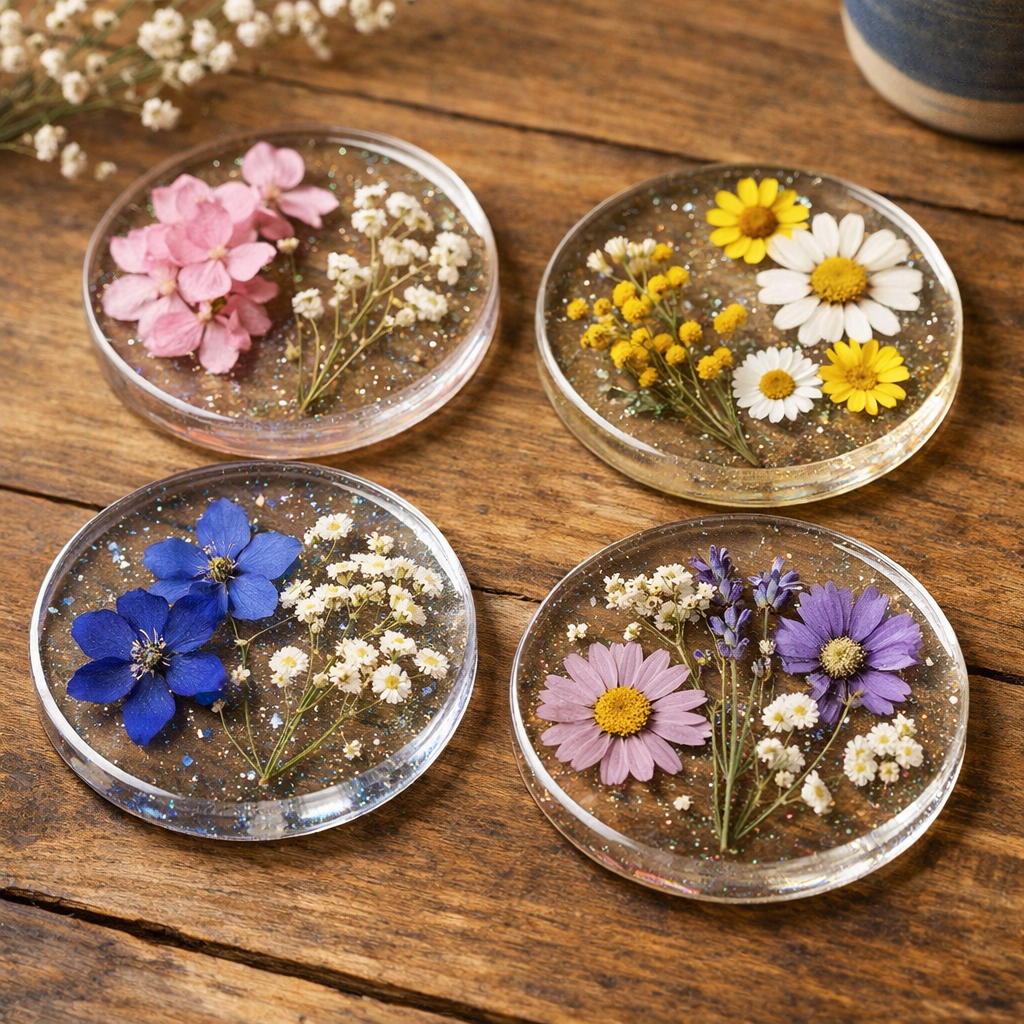
Step 4: Create Your First Project , Resin Coasters
Coasters are the perfect starter project. They’re flat, forgiving, and useful. Plus you can make four at once. Let’s walk through a complete step-by-step for your first resin art project for beginners.
What you’ll need specifically
- Silicone coaster mold (round or square, about 4 inches)
- Epoxy resin and hardener (enough for 4 coasters , about 320 ml total)
- Dried flowers (lavender, baby’s breath, rose petals , must be completely dry)
- Glitter or mica powder (optional)
- Stir sticks, measuring cups, gloves, dust cover
- Heat gun or torch
Step-by-step instructions
- Prep the mold: Clean the silicone mold with isopropyl alcohol and a lint-free cloth. This removes dust and static so bubbles don’t stick.
- Mix resin: Measure 40 ml resin + 40 ml hardener per coaster (use 160 ml each for 4 coasters). Stir slowly for 3 minutes. Let it rest 1 minute.
- Pour a thin base layer: Pour just enough to cover the bottom of each mold (about 1/8 inch). This “lock” layer will keep your flowers from floating to the top.
- Pop bubbles: Pass the heat gun over the surface for 2, 3 seconds. Bubbles burst instantly.
- Arrange flowers: Using tweezers, gently place dried flowers into the resin. Press them down slightly. Keep them away from the very edge so they don’t stick out after demolding.
- Pour the top layer: Slowly pour the remaining resin over the flowers, filling the mold to about 1/4 inch. Use a toothpick to nudge any flowers that shift.
- Final bubble removal: Another quick heat gun pass. Check for bubbles around the flowers , pop them with a toothpick.
- Cover and cure: Place a cardboard box over the coasters to protect from dust. Let them cure for 24 hours at room temperature. Don’t move them during the first hour.
If you want more guidance, check out our detailed guide on making resin coasters with dried flowers , it includes exact measurements and troubleshooting tips.
Bottom line: With a simple coaster mold, a little patience, and careful bubble-popping, you can create a set of functional art pieces that prove you’ve mastered the basics of resin art projects for beginners.
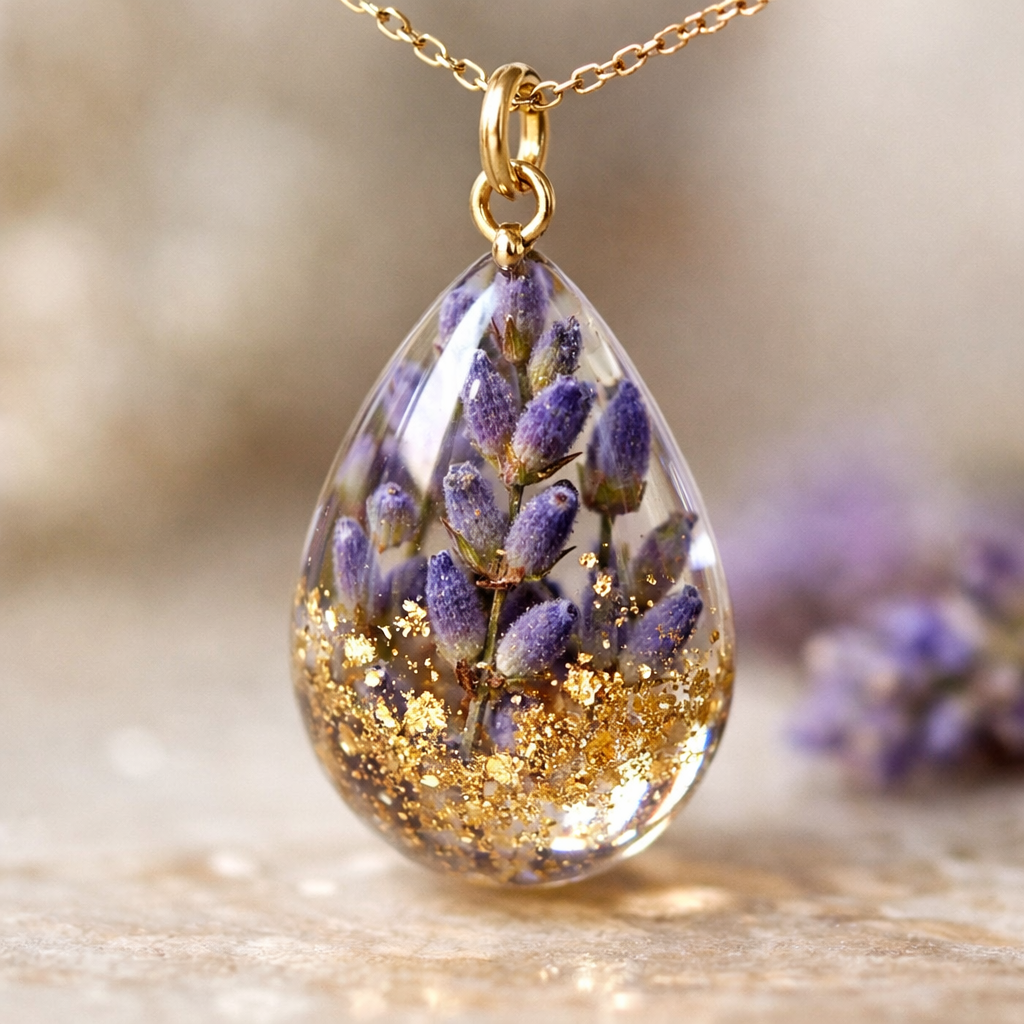
Step 5: Try a Simple Resin Jewelry Piece
Jewelry is a natural next step. It’s smaller, so you use less resin. And handmade resin jewelry makes thoughtful gifts or even a side hustle. Let’s make a pendant. This project is one of the most popular resin art projects for beginners , the research table shows it’s listed as epoxy resin in multiple projects.
Supplies for one pendant
- Silicone pendant mold (teardrop or round, about 2 inches)
- 20 ml epoxy resin + 20 ml hardener
- Dried lavender buds (or small pressed flowers)
- Gold mica powder (a pinch)
- Mixing cup, stir stick, gloves, heat source
- Jump ring and chain (for finishing after cure)
- Sandpaper (400 and 800 grit)
Step-by-step
- Warm the bottles: Place resin and hardener in warm water for 5 minutes.
- Mix: Combine 10 ml resin + 10 ml hardener in a small cup (or use a scale: 10g each). Stir slowly for 2 minutes. Add a tiny pinch of gold mica and stir until evenly colored.
- Pour a base layer: Fill the mold about 1/4 full. This locks in flowers.
- Add lavender: Place a few buds in the center using tweezers. Press them gently into the wet resin.
- Fill the rest: Slowly pour the remaining resin to almost full , leave a tiny gap at the top (a “dome” will form naturally).
- Pop bubbles: Heat gun pass for 2 seconds. Let it rest on a level surface.
- Cover and cure: Use a small cup to cover the mold. Cure 24 hours. Don’t disturb.
- Demold: Gently push the silicone away from the hardened pendant. If it sticks, flex the mold.
- Finish: Sand the back edge with 400 grit if it’s sharp, then 800 grit for smoothness. Attach the jump ring and chain.
For a deeper look at jewelry making, including how to use bezels and resin doming, see our complete resin jewelry guide for beginners.
“Resin jewelry is one of the most satisfying beginner projects because it’s quick, affordable, and yields professional-looking results.”
Bottom line: Resin pendant making is a perfect follow-up to coasters , it teaches doming, embedding tiny elements, and finishing techniques essential for all resin art projects for beginners.
Step 6: Finish, Sand, and Cure Your Resin Art
Your piece has cured for 24 hours , now what? The finishing step turns a good piece into a great one. Here’s how to handle the final touches for any resin art project for beginners.
Demolding
Wait at least 24 hours before removing from the mold. If the piece feels slightly soft, wait another 12 hours. Flex the silicone mold gently , don’t pull hard or you’ll crack thin edges. The piece should pop out easily if the silicone is good quality. If it sticks, put the mold in the freezer for 10 minutes; the different contraction rates help release it.
Sanding rough edges
When you demold, you may see sharp edges or a small ridge where resin pooled. Sandpaper fixes that. Start with wet/dry sandpaper at 400 grit (coarse), then move to 800 grit (fine), and finish with 1000+ grit for a smooth polish. Always sand wet , dip the paper in water to reduce dust and keep the resin cool. Use circular motions. After sanding, clean the piece with water and a soft cloth.
Polishing for high gloss
To restore the mirror shine, you have three options:
- Polish compound: Use a plastic polish (like Novus) and a microfiber cloth. Rub in circles for a minute.
- Heat gun reflow: Quick pass with a heat gun melts the surface slightly, eliminating micro-scratches. Keep the gun moving , don’t overheat.
- Extra resin coat: Mix a tiny amount of fresh resin and brush a thin top coat. Let cure another 24 hours. This is the easiest method for beginners.
Drilling holes
If your jewelry piece didn’t come with a pre-drilled hole, you can drill one after curing. Use a small drill bit (1/16 inch) and a hand drill or a Dremel on low speed. Go slow to avoid cracking. Clamp the piece or hold it firmly. Dip the bit in water to keep it cool. Clean the hole with a toothpick.
Curing timeline
Full cure takes 72 hours, but you can demold after 24. After demolding, the piece continues to harden. Avoid clamping or drilling until 48, 72 hours. Store finished pieces in a dust-free box, away from direct sunlight. UV light can cause yellowing over time , use a resin with UV inhibitors for pieces near windows.
Want to explore more structured training? CreativiU offers an online resin art workshop with community feedback that walks you through these finishing steps in live sessions.
Bottom line: Proper finishing , demolding patiently, sanding wet, and polishing to a high gloss , distinguishes amateur from pro in resin art projects for beginners.
Frequently Asked Questions
What is the easiest resin art project for a complete beginner?
The easiest project is a simple resin coaster or a keychain. You don’t need to color the resin , just pour clear and let it cure. Coasters have flat shapes that are easy to demold, and they’re small enough to use leftover resin from practice batches. Most beginner guides recommend starting with coasters because they’re forgiving and teach you the basics of mixing and bubble removal.
Do I need special safety equipment for resin art projects?
Yes, safety is important. Always wear disposable nitrile gloves to protect your skin from irritation. Wear safety glasses in case of splashes. Work in a well-ventilated area or use a respirator with organic vapor cartridges if your resin emits strong fumes. Some brands like ArtResin are low-odor and don’t require a respirator, but it’s still smart to ventilate. Keep a clean-up kit with isopropyl alcohol nearby.
How long does resin take to cure fully?
Most epoxy resins allow demolding after 24 hours, but full chemical curing takes 72 hours. During the first 12 hours, the resin is soft and can be dented. After 24 hours, it’s hard enough to sand and drill, but avoid heavy pressure. For best results, wait the full 72 hours before exposing the piece to water or heavy use. Temperature and humidity affect cure time , warmer rooms speed it up.
Can I use dried flowers without them turning brown?
Yes, as long as the flowers are completely dry. Any moisture trapped inside will react with the resin and cause browning or cloudiness. Dry flowers in a silica gel desiccant for 1, 2 weeks before use. Alternatively, press them in a book for two weeks. Avoid fresh or frozen flowers , they’ll rot inside the resin. Once sealed, dried flowers stay colorful for years, especially if the resin has UV protection.
Why does my resin stay sticky after 24 hours?
The most common cause is an incorrect mixing ratio , too much resin or too much hardener. Always measure accurately by volume or weight. Another cause is under-mixing; if you didn’t stir enough, parts won’t cure. Temperature also matters: if your workspace is below 60°F, the resin may not cure properly. The fix is to remix a small new batch and pour it over the sticky surface , but it’s often easier to start over.
What’s the best way to get rid of bubbles in resin?
Use a heat gun or kitchen torch immediately after pouring. Hold it about 6 inches above the surface and sweep it back and forth. The heat thins the resin, letting bubbles rise and pop. For persistent bubbles, a toothpick can nudge them. Another trick is to warm the resin bottles before mixing (warm water bath) , that reduces viscosity and fewer bubbles form. For deep molds, a vacuum chamber removes bubbles before pouring.
Can I pour resin over a photograph?
Yes, but you must seal the photo first. Print the photo on a laser printer (inkjet ink can smear). Seal it with several thin coats of clear acrylic sealer or Mod Podge. Let each coat dry completely. Then apply a thin layer of resin. The photo will look like it’s floating. Always test on a scrap photo first. This technique is common in resin art projects for beginners making custom coasters or paperweights.
How do I clean resin tools and spills?
Wipe wet resin with a paper towel soaked in isopropyl alcohol. For cured resin on plastic tools, peel it off , resin doesn’t stick to plastic. For spills on your work surface, let them cure completely, then flex the plastic sheet to pop the drips off. For skin contact, use a disposable wipe with alcohol, then wash with soap and water. Never pour leftover resin down the drain , let it cure in the cup, then throw it in the trash.
Conclusion
We’ve covered a lot. From gathering supplies and setting up your workspace, to mixing resin correctly, making coasters and jewelry, and finishing pieces like a pro. The key is to start small. Don’t try a river table or a large art board on your first try. Instead, pick one of the resin art projects for beginners from this guide , coasters or a pendant , and make it. Expect some bumps. Maybe a few bubbles. That’s normal. Each batch teaches you something.
Remember the research: most beginners start with a branded epoxy resin, not generic stuff. So invest in a quality kit. And if you want structured guidance from a supportive community, consider CreativiU. Our platform offers courses, checklists, and direct feedback from instructors. It stands apart from the fragmented tutorials you find online. You don’t have to figure it all out alone.
Your first piece won’t be perfect. But when you demold that coaster and see light shining through the dried flowers, you’ll feel that spark of creation. That’s why we do this. Now grab your gloves, pour that resin, and make something beautiful. The only way to get better is to start.
Leave a Reply