Watercolor painting is a timeless art form cherished for its delicate translucency and fluid charm.
But what exactly are watercolor techniques for beginners, and how do you master them with confidence?
In this guide, you’ll find a complete cheatsheet of essential watercolor techniques to kickstart your painting journey.
Some are foundational washes that bring smooth gradients to life.
Some are playful color blending tricks that create magical effects.
Some are layering secrets that add depth and dimension effortlessly.
Some are simple brush control tips that keep your strokes clean.
Let’s dive right in.
Table of Contents
- What Are Watercolor Techniques for Beginners?
- Essential Watercolor Supplies to Get Started
- How to Paint a Watercolor Wash: Flat, Graded, and Variegated
- Wet on Wet vs Wet on Dry: Understanding Your Painting Surface
- Mastering Color Blending Techniques in Watercolor
- Common Beginner Mistakes and How to Avoid Them
- Adding Depth and Details with Glazing and Splatter Techniques
- Simple Watercolor Projects to Practice Your Skills
- FAQ About Watercolor Techniques for Beginners
- What’s Your Next Step?
What Are Watercolor Techniques for Beginners?
If you’re new to watercolor, you might wonder: what exactly are these techniques? Simply put, watercolor techniques are the various ways you apply pigment and water to paper to achieve different effects and expressions in your artwork. Unlike other media, watercolor is transparent and reactive, making brush control, water ratios, and layering vital elements.
Beginner techniques focus on controlling water flow, creating smooth washes, blending colors softly, and managing paint drying times. Mastering these basics will build a strong foundation to create everything from loose abstract artworks to delicate florals.
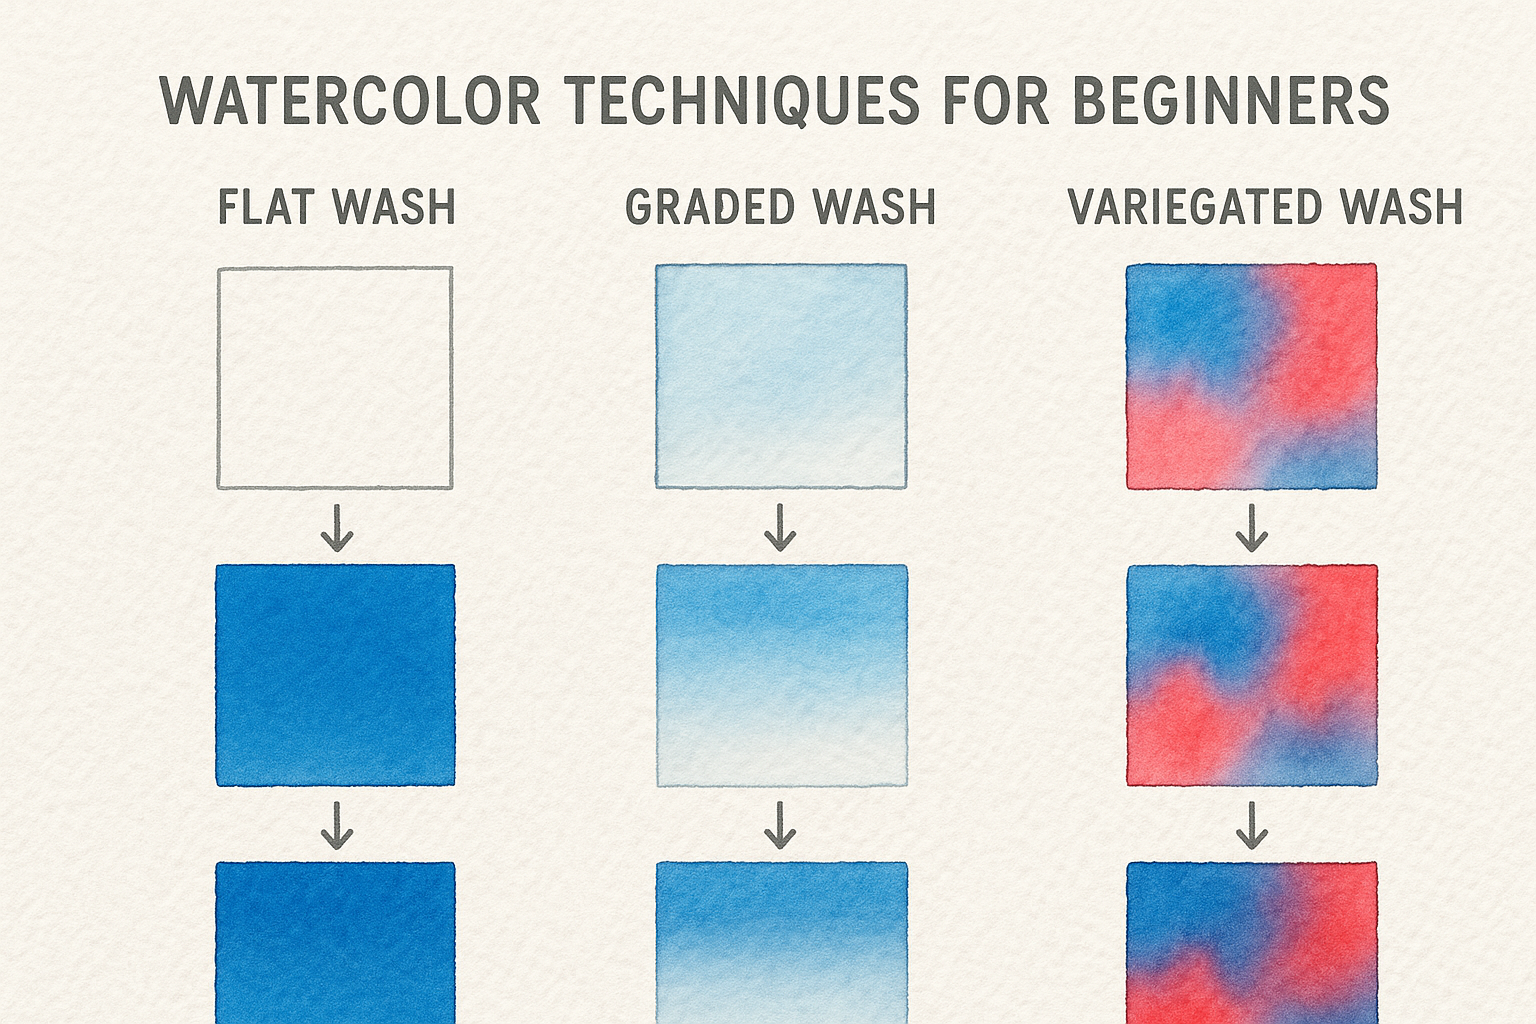
Watercolor washes are the backbone of many paintings. According to expert advice on Watercolor Affair, washes are painted areas of uniform or graduating color, classified mainly into flat, graded, and variegated washes. Understanding them is crucial for beginners.
Why Are Washes So Important?
Washes build the layers your painting relies on – whether a soft sky or a subtle background. A good wash has no harsh lines or streaks and blends smoothly across the paper.
Essential Watercolor Supplies to Get Started
Before mastering techniques, let’s ensure you have the right tools. You don’t need expensive brushes or paint sets to start. Beginners should focus on these essentials:
- Watercolor paper: Use cold press (slightly textured) paper around 300gsm for successful washes without warping.
- Brushes: Large soft wash brushes like 1-inch flat or mop brushes, and a smaller round brush (#8) for details.
- Quality paints: Basic watercolor pans or tubes with good pigment quality.
- Two jars of water: One for rinsing your brush, one with clean water for mixing and wetting the paper.
- Board and masking tape: To stretch or secure your paper, helpful for controlling paint and preventing buckling.
More detailed supply recommendations can be found in beginner guides like those from Jenna Rainey.
How to Paint a Watercolor Wash: Flat, Graded, and Variegated
Washes are your first big hurdle in watercolor. Let’s break down the three key types every beginner should try.
1. Flat Wash
A flat wash is a uniform area of color, the same tone and hue throughout. It’s what you’d paint for a solid background or simple shapes.
How to paint a flat wash (wet on dry):
- Secure your paper on a tilted board (around 30 degrees).
- Mix more paint than you think you’ll need to avoid running out mid-wash.
- Load a large wash brush generously and paint a horizontal stroke at the top of your area.
- Maintain a “bead” of paint at the bottom of each stroke – this wet edge keeps the color flowing smoothly.
- Continue alternating horizontal strokes downward, slightly overlapping each previous stroke, pushing the bead downward.
- At the end, blot the bead up with a dry brush to avoid backruns (unwanted feathery edges).
Key tip: Speed matters! Paint fast enough to keep your wash wet and avoid streaks.
2. Graded (or Gradient) Wash
A graded wash changes in intensity, usually from dark at the top to light at the bottom – think of a sunset sky or soft shadows.
Steps for a graded wash (wet on dry):
- Start with a strong color mix and begin painting the top with a fresh, loaded brush.
- Slowly dilute your paint mixture with water while making horizontal strokes down the paper, lightening the tone as you go.
- Maintain the paint’s edge moisture for smooth gradients.
- End by blending pure water to finish the lightest area.
- Blot excess moisture at the bottom to prevent backruns.
3. Variegated Wash
This wash blends two or more colors with smooth or random transitions. Landscapes with rich skies or floral backgrounds often use variegated washes to add interest.
To paint a variegated wash:
- Prepare two mixes of paint in your palette.
- Start with the first color, painting a flat wash on wet or dry paper.
- Quickly paint the second color into the damp edge or adjacent space, allowing blending and mingling.
- Let the colors flow naturally or tilt your paper to control their movement.
- Work fast to avoid the paper drying and causing unintended blooms.
For a detailed breakdown of these washes and their techniques, see the comprehensive resource at Watercolor Affair.
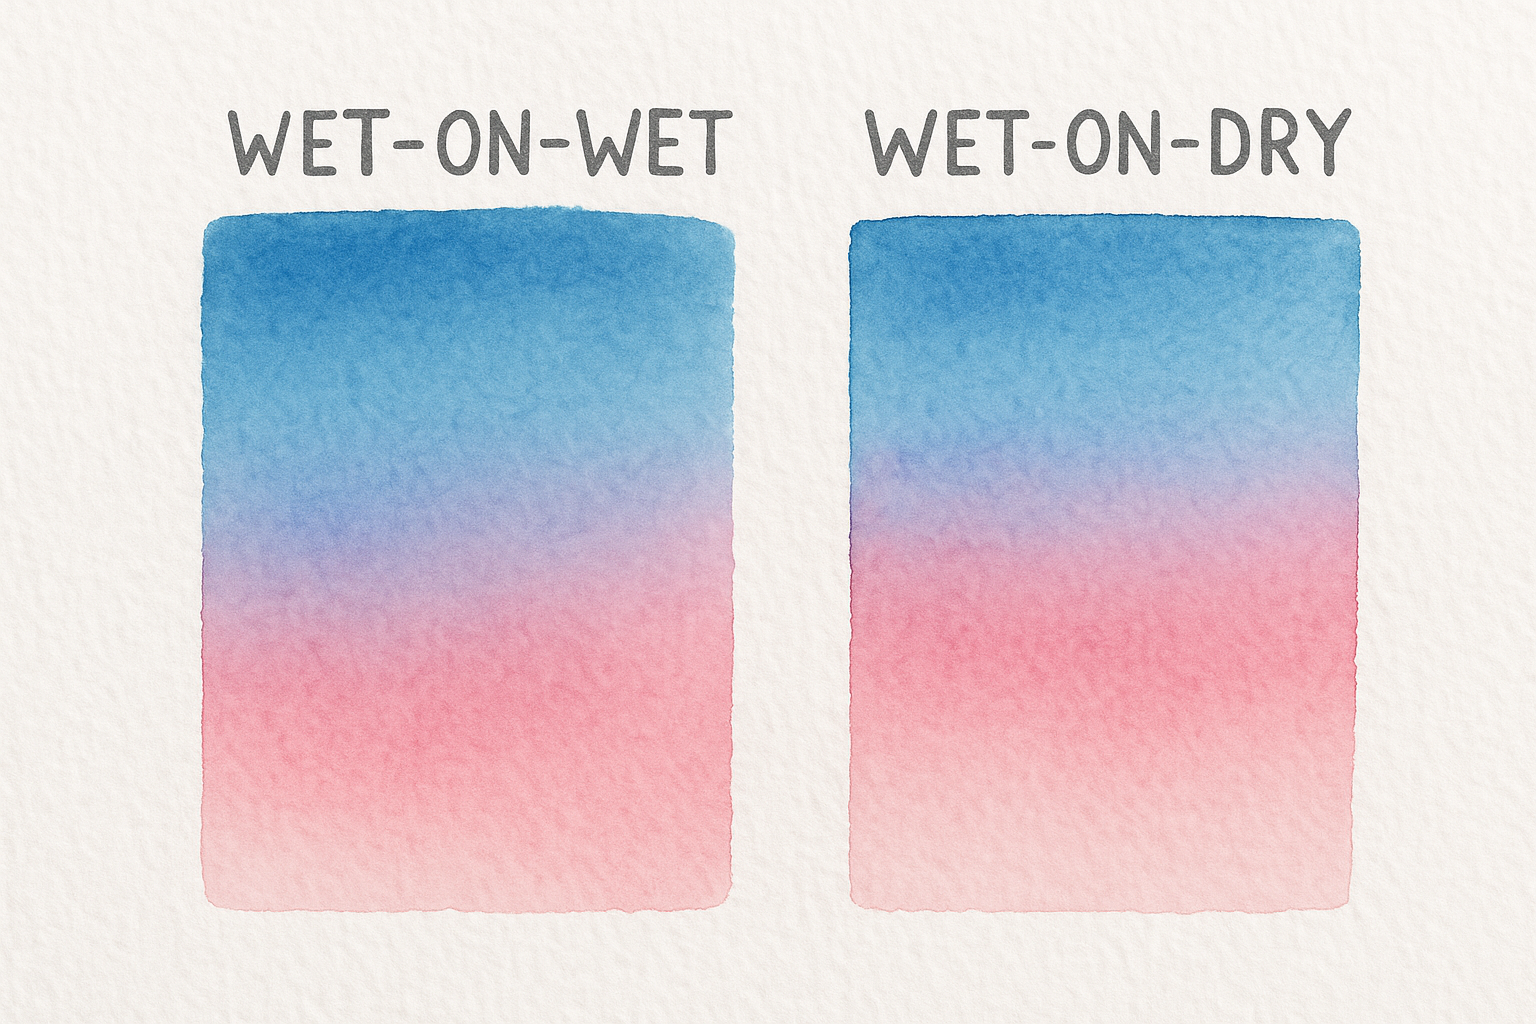
Wet on Wet vs Wet on Dry: Understanding Your Painting Surface
Watercolor washes also depend heavily on whether you paint wet on wet or wet on dry. This choice impacts how your colors blend and behave.
Wet on Dry
Painting wet paint onto dry paper gives more control and sharper edges. It is often used for detailed work or precise washes.
- Paint a wash quickly and evenly to maintain a wet edge.
- Requires faster movement to avoid streaking and drying lines.
- Ideal for flat or graded washes where smooth gradients and uniform color are needed.
Wet on Wet
Here, you paint wet paint onto wet paper, allowing pigments to spread, mix, and create softer edges naturally.
- First, pre-wet the paper with clean water evenly, but not so much to cause puddles.
- Apply stronger color mixes to compensate for dilution.
- The pigment flows freely, resulting in smooth blends and organic textures.
- It’s more forgiving and allows corrections by tilting or adding water while still wet.
- Requires stretched or heavy paper to prevent buckling caused by excess water.
A study in watercolor technique emphasizes that while wet-on-wet is easier for beginners because of its blending properties, wet-on-dry can produce crisper, more controlled washes once mastered (Watercolor Affair).
Which Method Should Beginners Choose?
Experiment with both. Wet on wet offers more forgiveness and beautiful natural blends, great for skies and backgrounds. Wet on dry offers precision for smaller sections and sharper shapes.
Mastering Color Blending Techniques in Watercolor
Blending is the secret sauce that defines the beauty of watercolor paintings. Smooth transitions and merges between colors create depth and vibrancy.
According to blending expert Jake’s tutorial (YouTube), there are four primary blending methods:
1. Forced Blending
This method gives you direct control. You paint adjacent wet areas and use your brush to blend where they meet. It creates clear but controlled transitions.
2. Wet in Wet Blending
Activate your paper with water then paint multiple colors next to each other. The colors blend naturally, creating soft, seamless effects, perfect for skies or florals.
3. Blend Into Flat Wash
Paint a flat wash first, then apply your second color on still damp paper, letting it bleed gently into the first. It’s excellent for shadows and gentle gradients.
4. Dry Blend
Use a dry brush dampened with water to lift and soften hard edges, useful for smoothing transitions after the paint has partially dried.
Practicing these blending methods is key to mastering watercolor’s unique look. Be patient and embrace the medium’s natural flow and unpredictability.
Common Beginner Mistakes and How to Avoid Them
Even seasoned artists were once beginners, making mistakes is part of the journey. The key is to avoid frustration by knowing what to watch for:
1. Leaving Wet Edges
Painting new wet areas next to semi-dry paint can cause unwanted pigment spreading (called backruns). Allow sufficient drying time when painting adjacent sections or use wet-on-wet blending intentionally for soft edges (YouTube).
2. Too Much or Too Little Water
The water-to-pigment ratio is a delicate balance. Too watery, and pigment loses vibrance and control; too thick, and blending suffers. Practice testing your mix on scrap paper to find the right consistency.
3. Overworking the Paint
Fiddling with wet paint can lift pigment, cause streaks, or muddy colors. Learn to accept some happy accidents and try not to fuss over every brushstroke.
4. Ignoring Paper Choice
Using thin or non-watercolor paper leads to buckling and uneven textures. Invest in quality cold-pressed or hot-pressed watercolor paper for smoother washes.
5. Not Stretching Paper for Wet-on-Wet
Wet on wet uses a lot of water. Without stretched paper, your sheet will warp. Stretch your paper in advance or use heavy 300gsm sheets.
6. Misunderstanding Pigment Properties
Granulating pigments create texture naturally, while staining pigments blend smoothly. Knowing these will help you plan areas for detail or texture (YouTube).
Curious? How do you balance water and pigment in your washes? Experimentation combined with mindful observation accelerates mastery.
Adding Depth and Details with Glazing and Splatter Techniques
Once you have your washes and blending down, adding depth can make your artwork truly pop.
Glazing
Glazing involves layering a thin transparent color over a dry wash to increase color depth and shadow without losing the light of the underlying layers.
- Allow previous layers to dry fully before applying glaze.
- Use transparent colors for subtle shadows or tonal variation.
- Multiple layers build richness gradually.
Splatters and Texture
Splatters add interest and organic texture reminiscent of nature like flower petals or rough surfaces.
- Load a brush with paint and gently tap or flick it over the paper.
- Use different brushes (including toothbrushes) for finer or coarser specks.
- Control water load to change the intensity and size of splatters.
Adding deliberate imperfections like splatters can elevate your painting from flat to vibrant. Try this especially in loose florals and landscapes as demonstrated by watercolor artist Scotty (YouTube).

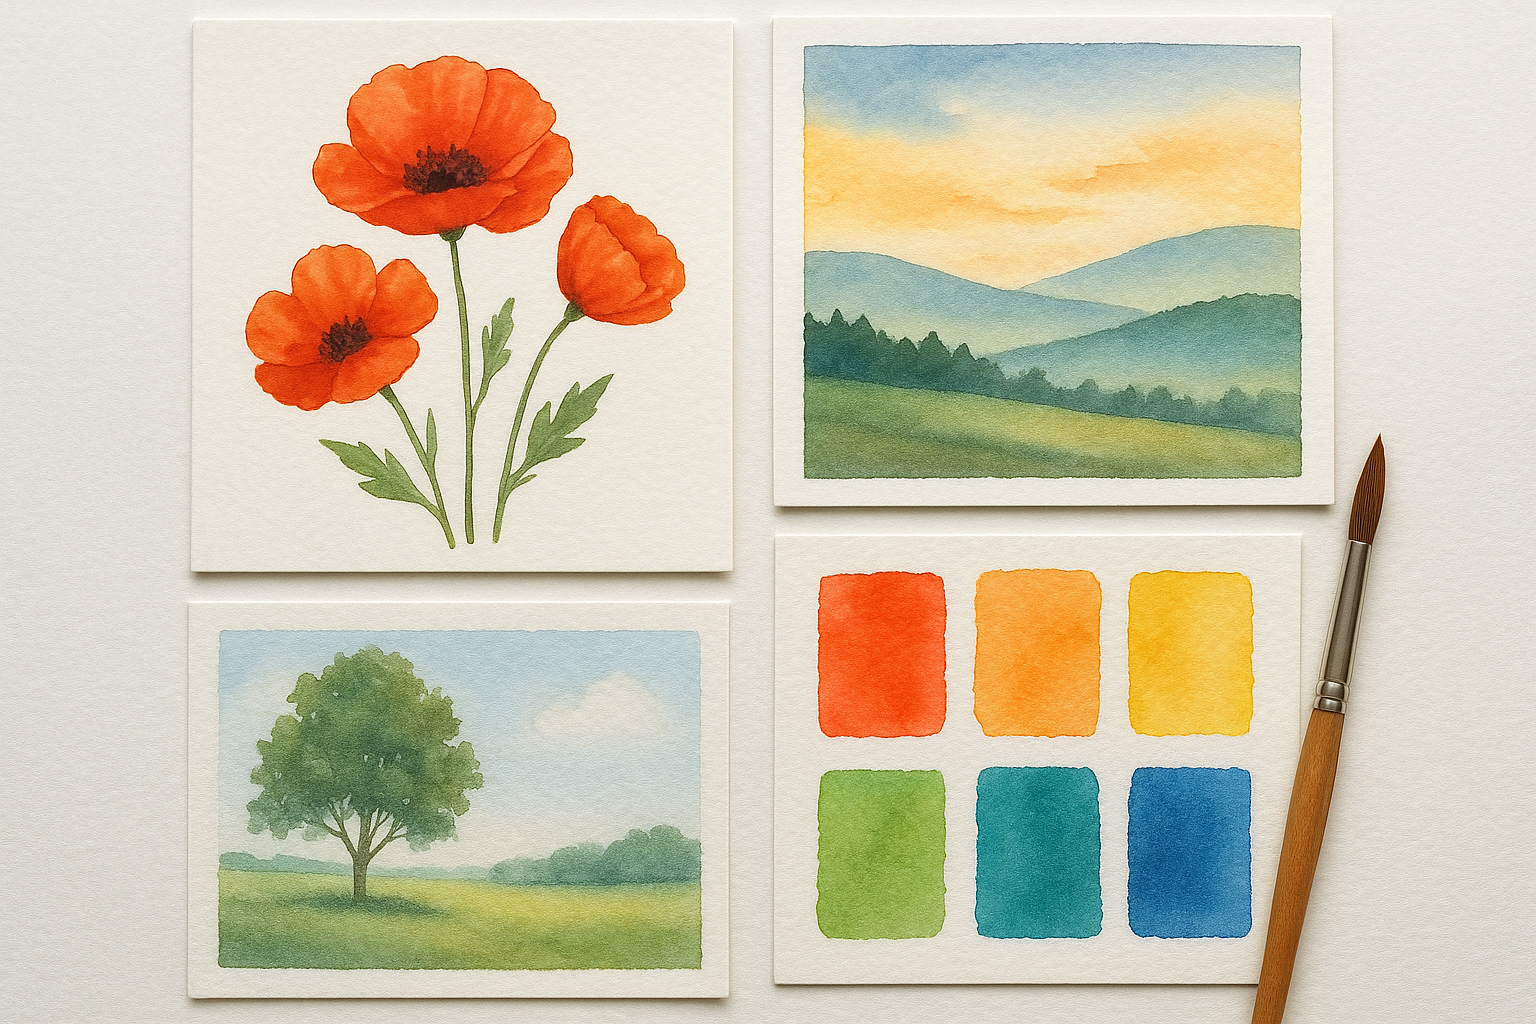
Simple Watercolor Projects to Practice Your Skills
Practicing techniques in small projects builds both skill and confidence. Here are some beginner-friendly ideas:
- Colorful Abstracts: Just play with wet on wet blending by dropping colors on wet paper and see what happens.
- Loose Florals: Paint basic flower shapes with graduated washes and splatter petals for a relaxed look.
- Simple Landscapes: Use graded washes for skies and flat washes for basic shapes like hills.
- Geometric Shapes: Practice flat washes, then add glazing for shadows to get volume.
These projects allow you to apply washes, blending, glazing, and splattering without pressure. For detailed step-by-step projects, check out resources like those shared by Jenna Rainey that emphasize technique over complicated steps (Jenna Rainey).
Ready for more? You may also find it helpful to explore mastering the art of acquiring skill, blending creativity and disciplined practice for rapid growth.
FAQ About Watercolor Techniques for Beginners
What is the easiest watercolor technique for beginners?
Wet on wet washes are generally the easiest for beginners, as the wet surface allows colors to blend and correct themselves naturally.
How do I avoid streaky watercolor washes?
Keep a wet edge by painting quickly and maintaining a bead of paint at the edge of your brush strokes. Load your brush generously and work in consistent overlapping strokes.
Do I need expensive brushes and paper to start watercolor painting?
No. Basic cold-pressed paper and a few quality synthetic brushes are enough to begin practicing the core techniques.
Why is my watercolor paper buckling?
Too much water on thin paper causes buckling. Use heavier watercolor paper (300gsm) or stretch your paper before painting, especially for wet on wet techniques.
How long does it take to master basic watercolor techniques?
With regular practice focused on washes, blending, and glazing, beginners can see significant progress within a few weeks. Consistency and experimentation are key.
What’s Your Next Step?
Tell us in the comments: How will you apply this to your watercolor techniques for beginners? For personalized advice, consider exploring the in-depth resources and creative guides available through art communities and workshops.
Leave a Reply