Ever found yourself scrolling through endless jewelry feeds, wishing you could wear something you actually made yourself?
I get it – the idea of shaping tiny earrings from polymer clay can feel both exciting and a bit intimidating, especially when you’re not sure where to start.
The good news is that you don’t need a professional studio or expensive tools; a few household supplies and a pinch of patience are enough to turn a lump of colorful clay into a pair of earrings you’ll be proud to show off.
Think about the last time you bought a pair of handmade earrings on Etsy – maybe they were a splash of neon or a delicate marble swirl that perfectly matched your spring outfit. Now picture yourself creating that exact vibe, customizing the colors, textures, and even adding tiny charms that mean something personal.
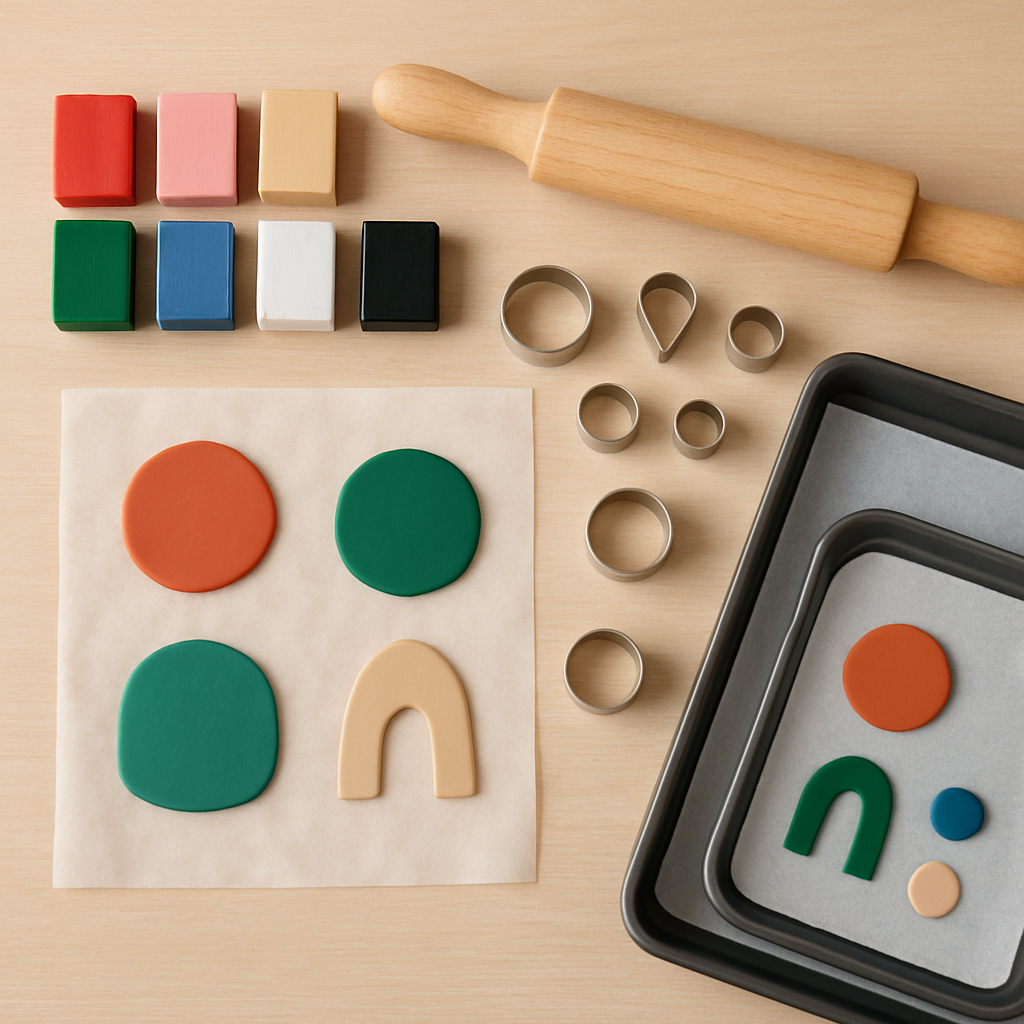
So, how do we go from a blank sheet of polymer clay to a polished pair of dangle or stud earrings? First, gather the basics: a brand of polymer clay (Sculpey, Fimo, or Cernit work great), a clean work surface, a rolling pin or pasta machine, and a set of earring findings – posts, hooks, and jump rings.
Next, condition the clay by kneading it until it’s smooth and pliable – think of it like warming up dough before you roll it out. Roll the clay to a uniform 1/8‑inch thickness, then use a cutter or a homemade template to shape your design, whether it’s a simple circle, a leaf, or a geometric pattern.
Now comes the fun part – baking. Preheat your oven according to the clay’s instructions (usually around 275°F/130°C) and pop the pieces on a parchment‑lined tray. After the recommended bake time, let them cool completely before you start drilling holes or attaching findings.
If you’re wondering where to find a clear, beginner‑friendly walkthrough, check out this step‑by‑step polymer clay earring guide that walks you through each stage with photos and pro tips. By the end, you’ll have a pair of earrings that not only look great but also carry the satisfaction of having crafted them yourself.
TL;DR
Learn how to make polymer clay earrings by conditioning the clay, rolling it to a thin slab, cutting your designs, baking them, then drilling holes and attaching findings for a personalized, handcrafted accessory. Follow our quick guide and you’ll create unique earrings that showcase your style and boost creative confidence.
Step 1: Gather Materials
Before we get our hands dirty, let’s talk about the toolbox you’ll need. Having everything ready up front saves you from those “where’s that tiny pin?” moments that can break your flow.
First off, you’ll need a brand of polymer clay you trust – Sculpey, Fimo, or Cernit are all solid choices. They’re flexible enough to condition but sturdy enough to hold detail once baked.
Next, grab a clean, flat surface. A silicone mat works great because it’s non‑stick and easy to clean. If you don’t have one, a piece of parchment paper or even a smooth countertop will do.
Rolling the clay is smoother with a rolling pin or a pasta machine. A simple kitchen rolling pin is cheap and effective, but a pasta machine gives you consistent thickness with the turn of a knob – a real time‑saver when you’re making multiple earrings.
Cutting tools are your next heroes. A set of cookie cutters, a craft knife, or even a homemade template cut from cardboard will let you shape circles, leaves, or geometric motifs in seconds. Keep a spare set of cutters handy; they dull fast if you’re working with harder clay.
Now, think about color. If you love gradients, grab a few shades that blend well together. You can also add a tiny splash of glitter, mica powder, or even a dab of liquid polymer clay for a glossy finish.
Don’t forget the safety basics: a pair of nitrile gloves if you’re sensitive to the clay, and a well‑ventilated space for baking. Your oven should have a reliable temperature setting – most clays bake around 275°F (130°C).
And here’s a little insider tip: a small piece of wax paper tucked under your rolling pin reduces sticking and makes cleanup a breeze.
Wondering where to see these tools in action? Check out this detailed polymer clay earring tutorial for a visual walk‑through of each material.
Before you start, do a quick inventory: clay, mat, rolling pin, cutters, colors, glitter, gloves, oven thermometer. Write it down on a sticky note or your phone. That tiny list will keep you from running to the kitchen mid‑project.
Got kids around? Let them help choose colors or press the clay gently – it turns the whole process into a fun family activity and they’ll love wearing the finished earrings.
Finally, set up a small “drying zone” where your cut pieces can sit for a minute before baking. This prevents them from sliding on the tray and helps the surface stay crisp.
One more thing that trips beginners up is oven temperature drift. Even a few degrees off can make the clay too soft or too brittle. Pop a cheap oven thermometer inside before you preheat; when it reads the exact 275°F, you know you’re good to go. While you wait for the oven, give your clay a quick knead one more time – this re‑warms any cold spots and keeps the texture consistent. And if you’re working on a rainy day, keep a dry towel nearby to blot any excess moisture from your hands; a dry grip makes cutting cleaner and reduces the chance of cracking later.
Step 2: Condition the Clay
Alright, you’ve got your tools laid out, and the clay is still a bit stiff from the box. Before you roll it into a slab, you need to bring it to that buttery, pliable state where it almost feels like play‑dough. That’s what we call conditioning, and trust me, it’s the difference between a smooth, crack‑free earring and a little lump that snaps in the oven.
So, why does conditioning matter? When polymer clay is cold, the pigments can lock up and the polymer chains stay rigid. Kneading warms the material, aligns the particles, and releases trapped air. The result? A more even bake, richer color, and a surface that takes detail without cracking.
Quick reality check
Ever tried to roll a fresh block of clay straight out of the package? It’s like trying to roll out a rock with a rolling pin – you’ll end up with uneven thickness and a lot of frustration. A quick conditioning session solves that in minutes.
Step‑by‑step conditioning
1. Warm your hands. Rub them together for a few seconds; warm fingers transfer heat to the clay faster.
2. Break off a manageable piece. About the size of a grape works well – big enough to knead, small enough to control.
3. Start the knead. Press the clay between your palms, fold it over, and repeat. Think of making bread dough: press, fold, press, fold. After 30‑45 seconds you should feel the resistance drop.
4. Add a little oil if needed. A drop of vegetable oil or a dab of clay softener can help if the clay feels stubborn. Just rub it in evenly; you don’t want a greasy surface later.
5. Test the texture. Pinch a corner; it should stretch slightly without snapping. If it feels gritty, keep kneading a bit longer.
Here’s a tip many seasoned makers swear by: condition each color separately before blending. That way, the pigments stay true and you avoid muddy hues. If you’re mixing two shades, condition each one, then roll them together like a sandwich before blending.
Need a visual guide? This video tutorial on conditioning polymer clay walks you through the motion step by step, so you can see the exact hand positions.
Real‑world examples
One of our CreativiU members, Maya, shared that she always conditions her pastel blues for at least a minute before making daisy‑shaped studs. She says the extra minute prevents the tiny petals from cracking during baking, especially when she stacks multiple layers.
Another example: Jake, a hobbyist who sells mini‑earrings on Etsy, found that conditioning his metallic‑infused clay for 20 seconds less than usual caused micro‑cracks that showed up as faint lines after baking. After extending his kneading time, his pieces looked flawless and his return rate dropped dramatically.
Tools that make conditioning easier
If you love a little extra help, a silicone “conditioning mat” provides a non‑stick surface and a bit of give, making the kneading motion smoother. Some makers also use a small rolling pin to “pre‑roll” the clay after the initial knead – it’s like a warm‑up sprint before the marathon.
Below is a quick comparison of common conditioning aids and when you might want to reach for them:
| Tool/Method | Best For | Pro Tip |
|---|---|---|
| Hand kneading (no tools) | All clay types, especially small batches | Warm hands first to speed up the process |
| Silicone conditioning mat | Clay that feels sticky or when you’re working on a slick surface | Rotate the mat while kneading to keep the clay moving |
| Oil or clay softener | Very firm or cold clay straight from storage | Use only a drop; excess can affect the final finish |
Once your clay feels supple, you’re ready to roll it out to a uniform 1/8‑inch slab and move on to cutting your designs. If you need a refresher on the whole workflow, check out How To Make Polymer Clay Earrings – Raising Nobles for a full walkthrough of the process.
Step 3: Shape and Sculpt Designs
Now that your clay feels buttery smooth, it’s time to let your imagination run wild. This is the part where you turn a flat slab into a tiny work of art you’ll actually wear. If you’ve ever stared at a blank canvas and thought, “What do I even start with?” – you’re not alone. The trick is to break the process into bite‑size moves and let each one guide the next.
Choose a technique that matches your vibe
There’s no one‑size‑fits‑all approach. Some makers love the clean lines of cookie‑cutter shapes, while others swear by the organic flow of hand‑rolled marbling. The Paper and Stitch guide shows a handful of easy‑to‑recreate methods – from simple color‑block rectangles to swirly marble beans – that work beautifully for earrings.
Pick one that feels right for the pair you’re dreaming up. Want sleek studs? Grab a 1‑inch round cutter. Craving boho‑vibes? Try the marbled “kidney bean” technique. The key is to keep the thickness consistent – aim for 1/16‑to‑1/8 inch across the whole piece so the final earring isn’t too fragile.
Step‑by‑step shaping workflow
1. Roll out your base. Lightly flour your silicone mat (or just use parchment) and roll the conditioned clay into an even slab. Use a pasta machine if you have one; the first few turns will flatten, the later turns let you set the exact thickness.
2. Prep your colors. If you’re mixing shades, roll each hue into a short “snake.” Wrap the snakes around a core piece of white or neutral clay, then fold and roll repeatedly until the colors blend into a smooth marbled ribbon. The more you stretch‑fold, the tighter the swirl.
3. Lay out your design. For block shapes, simply place two cylinders side by side, press them together, and roll the composite sheet flat. For organic shapes, roll a single marble blob into a thick cylinder, then gently press it with a rolling pin to a kidney‑bean outline. You’ll notice the edges softening – that’s the perfect canvas for cutting.
4. Cut, trim, and refine. Use metal cookie cutters, a craft knife, or even a clean old toothbrush handle to press out circles, leaves, or rectangles. If you don’t have a cutter that size, roll a small ball and flatten it with a flat surface – you’ll get a neat disc. Trim excess with a precision knife; a clean edge means fewer sanding steps later.
5. Add texture (optional). Before baking, you can press a textured mat, a leaf imprint, or a stippling tool into the surface for extra visual interest. Just be gentle – you don’t want to flatten the whole piece.
Real‑world examples to spark ideas
Emily, a hobbyist from Ohio, loved the marble technique. She rolled teal, gold, and white snakes together, sliced the slab into ¼‑inch circles, and ended up with a set of “ocean‑kiss” studs that sold out on Etsy within a week.
Meanwhile, Carlos, who runs a small boutique in Texas, prefers crisp geometric shapes. He uses a 1½‑inch hex cutter, layers a thin stripe of black on a pastel base, and bakes the pieces for a modern, minimalist look that matches his brand’s aesthetic.
Pro tips you won’t find in a basic tutorial
• Work on a cool surface. If your kitchen is warm, the clay can get overly soft and lose definition. A chilled silicone mat (pop it in the fridge for 5 minutes) gives you a little extra control.
• Use a light hand for holes. When you need a pilot hole for a post, the tip of an earring post works better than a drill – you’ll avoid cracking the thin edges.
• Plan for shrinkage. Most polymer clays shrink 1‑2 % after baking. If you need a precise size (like a 5 mm stud), add a tiny margin before you cut.
Watch the process in action
Take a moment after you’ve shaped your pieces to step back and admire them. Does the color blend feel just right? Is the edge clean enough? If something feels off, you can always roll the slab a bit more and re‑cut – that’s the beauty of polymer clay: it’s forgiving.
When you’re satisfied, line the finished shapes on a parchment‑lined tray and get ready for the bake. The next step will lock in every detail you’ve just sculpted, turning soft clay into a durable, lightweight earring you can actually wear.
Step 4: Bake and Finish Your Earrings
Alright, the pieces are shaped, the colors are just the way you want them, and the tiny holes are ready for posts. Now it’s time to lock everything in with a good bake and then give your earrings that polished, wear‑ready finish.
Set the oven and prep the tray
First, preheat your oven to the temperature recommended on the clay package – usually 275°F (130°C) for Premo or Fimo. If you have a convection setting, turn it off; the fan can create hot spots that cause uneven baking.
Line a baking sheet with parchment or a silicone mat. Some makers sprinkle a thin layer of cornstarch or baking soda under the pieces; it acts like a cushion, prevents the clay from rolling around, and reduces the chance of flat spots (Jessama’s guide to baking polymer clay).
Timing is everything
Place the tray in the center of the oven and set a timer for the minimum bake time – typically 15 minutes for 1/8‑inch thick pieces. Resist the urge to open the oven door; each peek drops the temperature and can cause cracking.
After the timer dings, add an extra minute or two if you’re baking a batch that’s slightly thicker or if you live at a high altitude. The goal is a uniform, matte finish, not a glossy surface – glossy means you’ve under‑baked.
Cool down, then inspect
When the bake is done, turn the oven off and let the tray sit for another 5 minutes. This gentle cooldown helps the clay release internal stresses that could otherwise lead to cracks later.
Slide the tray out and let the earrings cool completely on the mat. While they’re cooling, check the edges. If you see a rough spot, you can gently sand it with a fine‑grit sanding stick – but do it before you attach any findings.
Drilling or punching holes (if you missed them)
Most people punch holes while the clay is still soft, but if you forgot, you can still drill a clean hole after baking. Use a tiny hand‑drill with a 0.5 mm bit, go slow, and keep the piece supported on a rubber mat. A quick press of the earring post tip works for most studs – just give it a firm tap with a small hammer.
Finishing touches: sanding, polishing, sealing
Now for the fun part: turning a baked slab into a jewelry‑grade piece. Start with a gentle sand using a sanding block or a piece of fine‑grit sandpaper (400‑600 grit). Move in circular motions, focusing on any visible seams.
Once the surface feels smooth, you can polish it with a soft cloth or a polishing compound. If you love a matte look, skip the polish and move straight to sealing.
Sealing protects the color and adds a bit of shine. Jessama recommends a thin coat of polymer‑clay‑specific varnish or a dab of clay wax. The wax is especially good for matte textures because it deepens color without making the piece look slick (Jessama’s finishing techniques).
Attaching the findings
While the seal dries (usually 10‑15 minutes), gather your findings. For studs, push a stainless‑steel post through the hole with a pair of pliers, then secure the backing. For dangles, open a jump ring, slide the hook onto the hole, and close it snugly.
Give each earring a quick tug to make sure the post or hook is firmly seated. If anything feels loose, a dab of clear glue can reinforce the connection without adding bulk.
Real‑world examples
Emily, a hobbyist from Ohio, baked a set of teal‑and‑gold marbled studs and finished them with a light coat of matte wax. The wax kept the swirl vivid and the studs survived a week of daily wear without any chips.
Meanwhile, Carlos in Texas prefers a high‑gloss finish for his geometric hexes. He sands lightly, polishes with a microfiber cloth, then sprays a clear polymer‑clay varnish. The result is a glass‑like shine that catches light on every angle.
Pro tip checklist
- Use a silicone mat or parchment – it prevents sticking and makes cleanup easy.
- Add a pinch of cornstarch under the pieces to avoid flat spots.
- Never exceed the recommended bake time – over‑baking makes the clay brittle.
- Sand before you seal; once sealed, sanding will ruin the finish.
- Test a single piece first if you’re trying a new sealer.
When you’ve attached the findings and the seal is dry, you’ve got a pair of earrings that are not only beautiful but also durable enough for everyday wear. And if you’re still curious about the whole workflow, check out How To Make Polymer Clay Earrings – Raising Nobles for a full step‑by‑step walk‑through.
Take a moment to admire your finished pieces, maybe slip them on and watch how they catch the light. You’ve just turned a lump of plastic into a wearable work of art – that’s the magic of polymer clay.
Step 5: Attach Findings and Care Tips
Now that your baked pieces are smooth, sealed, and looking glossy, it’s time to give them a home on a earring post. This step feels a little like putting a finishing jewel on a crown – it’s where the art meets the wear‑ability.
Secure the findings without stress
First, grab the right size post or hook. A 0.8 mm stainless‑steel post works for most 10‑12 mm studs, while a 0.6 mm jump‑ring is perfect for delicate dangles. Slip the post through the hole you pre‑punched (or gently tap a fresh hole with the post tip). Use flat‑nose pliers to push the post all the way through so there’s no wobble.
Next, snap the backing onto the stud. Give it a tiny tug – if it feels loose, a drop of clear jewelry glue will seal the gap without adding bulk. For dangles, open a jump‑ring, slide it onto the hole, then close it snugly. A quick pinch with the pliers makes the closure invisible.
Does this feel a bit fiddly? Think of it like threading a needle; a little patience goes a long way. If the hole is stubborn, warm the post tip with a hair‑dryer for a second; the metal expands just enough to slide in smoothly.
Quick check before you seal the deal
- Make sure the post sits flush against the clay; any gap can catch on hair or clothing.
- Verify the backing sits tight – a loose back is a fast track to losing an earring.
- Test the movement: a well‑attached stud should spin a fraction without falling out.
Once everything feels solid, let any glue cure for 10‑15 minutes. While you wait, give the surface one last once‑over with a soft cloth to remove fingerprints.
Cleaning and storage tips that keep your art alive
Polymer clay is surprisingly resilient, but it does have a soft spot for moisture and harsh chemicals. Marissa Hernandez recommends keeping earrings away from water, hairspray, and perfume to avoid tarnishing the metal findings and softening the clay surface her care guide explains. A damp cloth (just barely moist) is enough to wipe away dust – never soak or scrub.
Here’s a simple daily routine:
- Wipe each earring with a slightly damp, non‑abrasive cloth after wearing.
- Pat dry with a lint‑free tissue.
- Store them in a zip‑top pouch or a dedicated jewelry box where they can’t get smushed or scratched.
Avoid bending the pieces, even though polymer clay has a little give. Bending stresses the internal polymer chains and can cause cracks over time the same source notes. Likewise, don’t wear them in the shower, while sleeping, or during high‑impact activities – the combination of water and movement is a recipe for breakage.
Pro‑level care hacks for the extra‑careful crafter
If you want your earrings to last years, consider a thin coat of clear varnish after the findings are attached. This adds a protective barrier without changing the matte or glossy look you already achieved. Test on a spare piece first; you’ll see the finish lock in the color and make the metal less likely to oxidize.
Another tip: rotate your earrings every few weeks in the storage pouch. This prevents one side from staying under constant pressure, which can cause uneven wear.
Finally, if you ever notice a tiny chip or a loose backing, a quick dip in a 5 % nail polish remover applied with a cotton swab can smooth the edge. Just be sure the remover doesn’t touch any painted details, as it can lift the pigment.
So, what’s the next move? Attach those findings, give them a gentle clean, and stash them safely. In a few minutes you’ll have a pair of earrings that not only look stunning but also stand the test of daily wear – proof that a little care goes a long way.
Ready to see the whole process in action? Check out this quick video walkthrough that shows the finding‑attachment step from start to finish on YouTube.
FAQ
What basic tools do I need to start making polymer clay earrings?
At a minimum you’ll need a block of polymer clay (Sculpey Premo or Fimo work well), a clean flat surface, a rolling pin or a pasta machine, a set of cookie‑cutter shapes, a needle‑size drill or earring‑hole punch, and a basic findings kit (posts, jump rings, backs). A pair of tweezers, sandpaper, and a small brush for cleaning up are nice extras that make the process smoother.
How do I prevent my clay pieces from cracking during baking?
The biggest culprits are uneven thickness and rushed cooling. Roll the slab to a uniform 1/8‑inch thickness, and use a timer so you don’t under‑ or over‑bake. After the timer dings, let the tray sit in the turned‑off oven for five minutes before opening the door; this gradual cooldown reduces internal stress. Also, avoid sudden temperature changes by letting the earrings cool completely on the silicone mat.
Can I use a regular kitchen oven, or do I need a special one?
A standard home oven works fine as long as you follow the clay’s temperature guidelines (usually 275 °F / 130 °C). Set the oven to “bake” rather than “broil,” and turn off any convection fan because hot spots can cause one side to darken or warp. If you share the oven with food, place the tray on the middle rack and keep a low‑heat setting to avoid accidental overheating.
What’s the best way to attach findings without breaking the holes?
Start with a clean, dry piece. Push the post through the hole using flat‑nose pliers; a gentle tap with the hammer end of the pliers helps the metal expand just enough to glide through. For jump rings, open them with a ring‑opening tool, slip the hook onto the hole, then close it snugly. If the post feels tight, warm the tip with a hair dryer for a second – the metal expands and slides in easily.
How often should I clean and store my finished earrings?
After each wear, wipe the surface with a barely damp, lint‑free cloth to remove oils and dust. Pat dry, then tuck the pair into a zip‑top pouch or a compartmentalized jewelry box. Rotating the earrings every few weeks prevents one side from staying compressed, which can lead to uneven wear. Avoid water, perfume, and hairspray because they can soften the polymer or tarnish the metal findings.
Is a clear varnish necessary for long‑lasting earrings?
A thin coat of clear, polymer‑clay‑compatible varnish adds a protective barrier that guards against moisture and minor scratches, especially if you plan to wear the pieces daily. Apply with a soft brush, let it dry 10–15 minutes, then re‑attach the findings. Test the varnish on a spare scrap first – you’ll see whether it shifts the matte or glossy look you already love.
What common mistakes should beginners watch out for?
First, skipping the conditioning step leaves the clay stiff and prone to cracks. Second, drilling holes after baking without a proper hand drill can splinter the surface. Third, using cheap, low‑quality clay often leads to color fading or brittleness. Finally, forgetting to let the bake cool inside the oven can cause sudden contraction, resulting in hairline cracks. Keep these pitfalls in mind and you’ll see far fewer “oops” moments.
Conclusion
By now you’ve seen how a simple block of polymer clay can become a pair of earrings you’re proud to wear or sell.
Remember the three golden habits: condition the clay until it feels buttery, bake at the exact temperature for the recommended time, and seal or varnish the piece before attaching the findings.
Does any step still feel fuzzy? Grab a scrap piece, run through the same process, and you’ll see the difference instantly – that’s the best way to lock in confidence.
One final tip: keep a tiny notebook of the colors, thicknesses, and bake times you use. Over weeks you’ll notice patterns, like how a 1 mm thicker slab needs an extra minute in the oven, or which varnish gives the matte look you love.
When you’re ready to share your creations, a quick photo on CreativiU’s community board can spark feedback and even sales – the platform was built for makers just like you.
So, what’s the next step? Pick a fresh idea, follow the workflow we’ve outlined, and give yourself permission to experiment. The more you play, the sharper your skill at how to make polymer clay earrings becomes.
Happy crafting, and don’t forget to store your finished pieces in a lint‑free pouch to keep them looking fresh for the next wear.
Leave a Reply