Macrame has fascinated crafters for centuries with its blend of simplicity and creative expression.
But what exactly makes it so appealing and accessible?
We’ve compiled a complete guide covering essential knots, materials, and beginner-friendly tips so you can start your macrame journey confidently.
Some are simple knots that can transform plain cords into beautiful art.
Some are decisions about the perfect material that make crafting easier and results neater.
Some are mindful steps ensuring you enjoy the process and develop your skills naturally.
Some are expert secrets that beginners often overlook.
Some are project ideas that fit your level and keep frustration at bay.
Let’s dive right in.
What Is Macrame and Why Should You Learn It?
Macrame is the art of knotting cords or strings into decorative patterns.
It’s a hobby that anyone can pick up, offering a mix of creativity, relaxation, and rewarding results.
Unlike weaving or knitting, macrame doesn’t require complex tools—just your hands, some cord, and a little patience.
Whether you want to add a handcrafted touch to your home décor or explore a fun new craft, macrame opens up endless possibilities.
Plus, crafting with macrame fosters mindfulness; tying knots repeatedly calms the mind and lets you focus.
Ready to Roll? What You Need to Get Started
Before jumping into your first macrame project, it’s important to gather the right tools and materials.
Choosing the correct cord can be daunting; there are cotton strings, twisted ropes, and braided cords—each behaves a bit differently.
For absolute beginners, natural cotton cords in 3 to 5 mm thickness provide the best balance of strength and ease of knotting.
Natural cotton is soft, holds knots well, and looks classic in macrame art.
You’ll also need a support to anchor your work—this can be a wooden dowel, a metal ring, or even a sturdy branch.
Scissors, a tape measure, and a tape or clip to hold cords in place will make your process smoother.
Resist the urge to start with complex projects; instead, start simple to build your confidence.
A keychain or a small wall hanging are excellent starter projects.
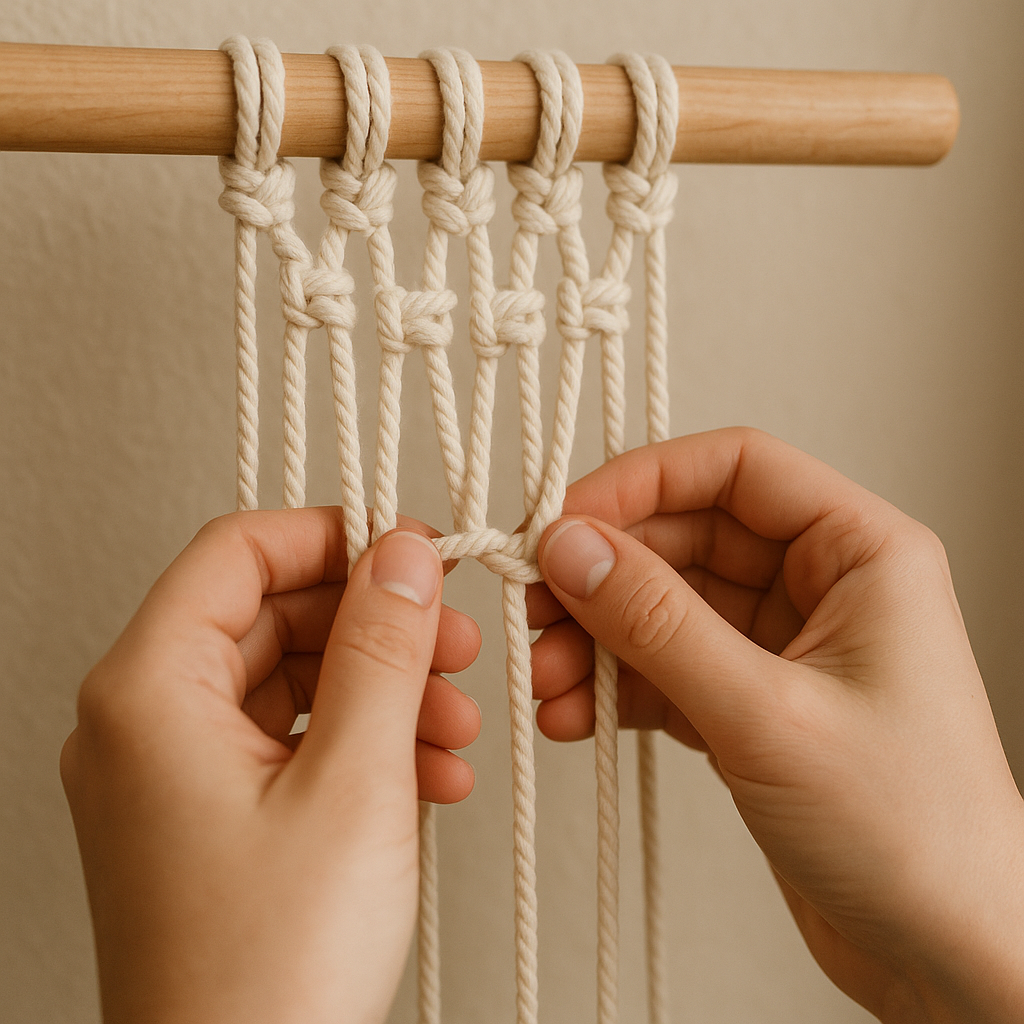
How to Tie the 5 Basic Knots Every Beginner Must Know
Tackling macrame without mastering the basic knots is like trying to paint without brushes.
To create beautiful pieces, focus on learning these foundational knots thoroughly. They are your building blocks.
- Lark’s Head Knot: The entry point for cords onto your support. Fold your cord in half, loop it around the support, then pull the ends through the folded loop and tighten. This anchors your cords securely.
- Square Knot: Made from four cords—two in the center and two working cords on the sides. One side crosses over the center cords, then the other under and through to create a firm, square-shaped knot.
- Half Square Knot: Similar to the square knot but only tied halfway, creating a spiraling effect when repeated.
- Double Half Hitch Knot: A cord called the lead cord is tied over adjacent cords called filler cords, creating tightly packed lines suitable for curved or straight designs.
- Wrapping Knot (optional but useful): Used to bundle cords neatly or create decorative wraps.
Practice these knots slowly at first, focusing on tension and neatness—this will make your finished projects look professional.
Here’s a helpful video tutorial that illustrates these knots clearly and walks you through combining them into patterns:
How Do You Know Which Cord to Choose?
Choosing your cord is more than just color and texture—it affects how easy or challenging your macrame experience will be.
Try not to overcomplicate this at first. Stick with what your pattern recommends, especially for beginners.
String (single-strand cotton): Gorgeous but tends to untwist and can be tricky to keep tidy.
Twisted cotton rope: Strong and durable; great for plant hangers and medium-weight projects.
Braided cord: Stretchy and fun to work with but requires careful measuring.
Size matters too. Macrame cords come in millimeters, usually between 1 mm to 25 mm thickness.
Most beginner-friendly projects use 3–5 mm cords as they provide a sturdy feel without being too bulky.
Remember, if your project calls for a specific cord size, try to stick to it exactly or you’ll need to adjust your cord lengths.
Ultimately, your best bet is to start with recommended cords before experimenting.
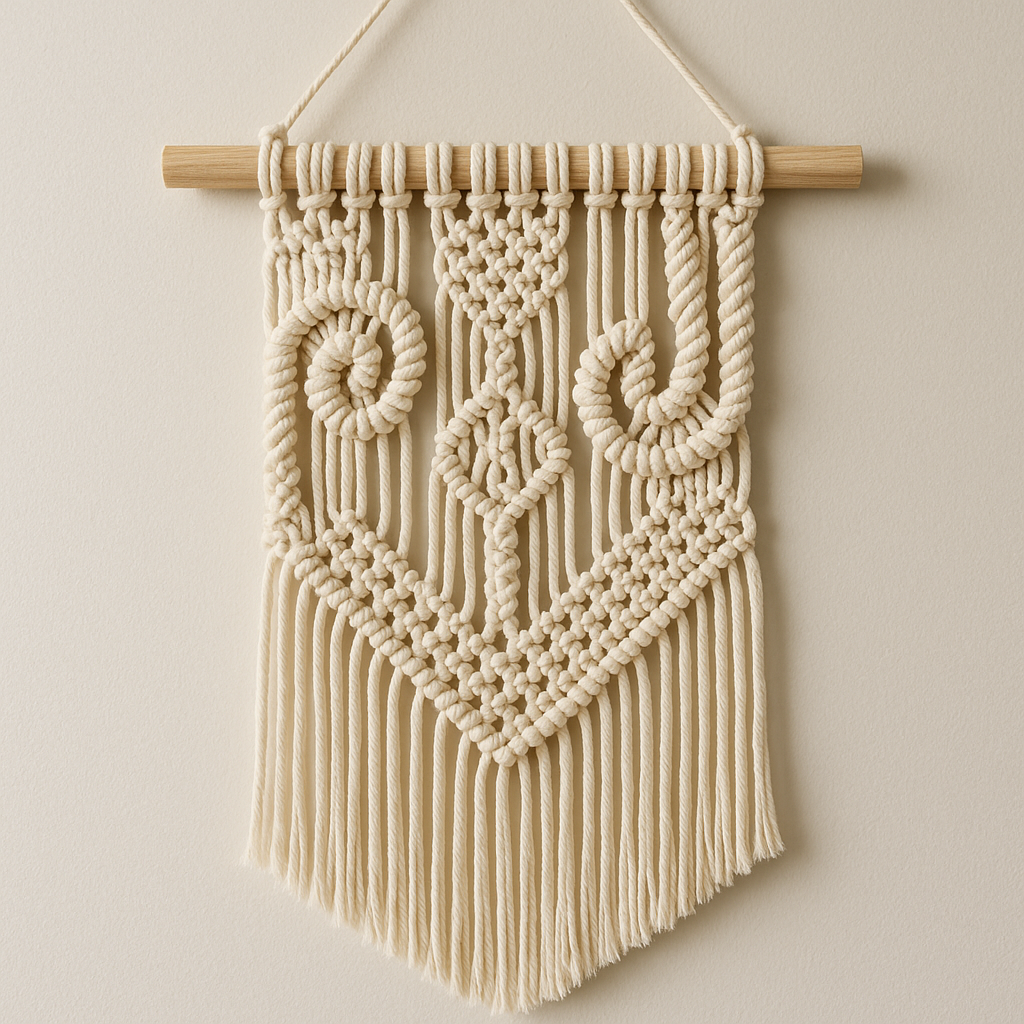
Step-by-Step: Creating Your First Simple Macrame Project
Let’s bring your skills together with a beginner-friendly project—a macrame keychain or small wall hanging.
Here’s a basic process outline:
- Measure and cut your cords. For example, cut 4 cords about 1 meter in length each. Accuracy is less critical initially but keep them uniform.
- Attach cords to your support with Lark’s Head knots. Fold cords in half, loop over the dowel or ring, and pull ends through.
- Begin tying square knots. Use the outer cords to tie around the center two. Repeat to create rows and the texture.
- Practice half square knots to create spiral designs. Keep starting with the same side cord to achieve the twist.
- Use double half hitch knots to add curves or outlines if desired.
- Finish off with trimming or a wrapping knot to secure ends.
As you repeat knots, watch how your cords shape the project. Adjust tension as you go; consistent tightness makes a neat pattern.
Don’t fret over imperfections. They add character and with practice, your skill will rapidly improve.
What Are the Biggest Challenges for Macrame Beginners?
Many newcomers wonder why their knots don’t look right or their projects twist oddly.
These are common hurdles that even experienced makers face at times.
1. Uneven tension: Pulling one part too tight or too loose will distort the pattern.
2. Incorrect knot order: Skipping steps or mixing knot sides can confuse the design.
3. Cord choice and length miscalculations: Using the wrong cord type or cutting too short causes trouble mid-project.
4. Working with spirals: Half square knots create natural twists that beginners might find awkward to manage.
The secret is patience and consistent practice.
Try to observe your knots after every few repetitions and adjust before continuing.
How Can I Improve My Macrame Knotting Skills Fast?
Improvement comes with deliberate practice and learning from each project.
Here are expert-backed ways to speed up your progress:
- Start small and build complexity gradually: Master keychains before moving to intricate wall hangings.
- Repeat the same knot many times: Repetition builds muscle memory and confidence.
- Watch slow-motion tutorials: Videos showing each knot step in detail, like the tutorial here, help tremendously.
- Join macrame communities: Share your progress and get tips from others.
- Track your progress: Keep a crafting journal noting what felt easy or hard to focus your practice.
Remember, every artisan started exactly where you are now.
What Projects Should I Make as a Beginner?
Choosing beginner-friendly projects ensures you won’t get frustrated and stay motivated.
Here’s a progression guide:
| Project | Key Skills Practiced | Estimated Time |
|---|---|---|
| Simple Keychain | Lark’s Head, Square Knot | 1-2 hours |
| Small Wall Hanging | Square Knot rows, Half Square Knot spiral | 3-5 hours |
| Macrame Plant Hanger | Square Knots, Double Half Hitch Knot, Cord management | 4-6 hours |
| Decorative Curtain or Tapestry | Advanced knots, pattern repetition, cord length planning | Several days to weeks |
Focus on completing each before moving on. Mastery builds foundation for more complex builds.
Are you ready to take your macrame skills to new heights? Remember, every knot you tie is a step towards creating stunning handmade art.
How Can Mindfulness Help You Enjoy Macrame More?
Many crafters find macrame is more than just a hobby—it’s a meditative practice.
Focusing on repetitive knot-tying calms the mind and reduces stress.
As Crystal, a macrame influencer, puts it, “Macrame really helps center me, calming my crazy brain by focusing on tying knots.”
Allowing yourself to relax during crafting improves both the quality of work and personal enjoyment.
If you feel overwhelmed, try breathing deeply and slowing down your knots.
Making space to enjoy the creative process is just as important as the finished product.
Can You Mix Macrame with Other Crafts?
Absolutely! Macrame pairs beautifully with other arts and crafts.
Try adding beads, feathers, or fabric bits to your cords for extra flair.
Macrame also complements woodworking—perfect for creating wrapped handles or decorative accents for furniture.
For those who enjoy experimentation, combining macrame with embroidery or painting creates unique texture and dimension.
If you want inspiration on blending traditional craft with modern creativity, explore resources like Mastering Smarts and Crafts: The Ultimate Guide to Blending Tradition with Technology.
Macrame Supplies Shopping Guide
Finding reliable suppliers for quality macrame cord is crucial for enjoyable crafting.
While online marketplaces like Amazon offer convenience, reviews are mixed—some cords can have unpleasant chemical odors or inconsistent quality.
The macrame community often recommends specialized shops in the U.S. such as Git and Noma Studio for natural cotton cords.
Different countries have varying retailers, so checking local craft stores or online specialty shops is a good starting point.
Be cautious of pricing that seems too good to be true, as low-quality cords can cause frustration.
Trouble-Shooting Common Macrame Problems
Encountering snags? Here’s how to solve them:
- Knots too loose or too tight: Adjust by practicing knot tension on scrap pieces before your project.
- Cords twisting uncontrollably: Use rope instead of string for beginner projects, or untwist cords regularly while working.
- Unequal cord lengths: Measure carefully, and always cut extra length initially.
- Project twisting during half square knot spirals: Rotate the piece as you work to keep it manageable.
- Finished edges fraying: Secure ends by trimming neatly and using wrapping knots or glue.
For deeper insights, watch comprehensive tutorials that address these challenges and show practical fixes like this beginner macrame knot tutorial.
How Do You Progress from Beginner to Advanced in Macrame?
Progression comes naturally when you embrace consistent practice and curiosity.
Try combining the five basic knots in novel ways to create complex patterns.
Experiment with larger projects and different cord materials.
Consider enrolling in structured courses that guide you step-by-step from core skills to advanced designs.
Remember, professional macrame artists often build portfolios with hundreds of practice pieces.
Document your projects, share photos with community groups, and ask for feedback.
CreativiU offers extensive resources to help you along this path—explore how to enhance your arts and crafts skills effectively by checking out Mastering the Arts and Crafts of Problem Solving: A Comprehensive Guide.
What Tools Can Make Your Macrame Journey Easier?
Aside from the essential cords and supports, a few handy tools save time and improve precision:
- T-pegs or clips: To hold cords in place on a work surface.
- Measuring tape: For accurate cord length cuts.
- Comb or brush: To fluff out and tidy tassels or fringe.
- Small ruler or knot gauge: To maintain consistent knot size.
- Macrame board: A flat surface especially useful for larger projects.
Developing your toolkit over time allows smoother progress across diverse projects.
How Long Does It Take to Learn Macrame Basics?
The basics can be grasped surprisingly quickly if you focus.
An average beginner can learn the 5 essential knots in a few hours, but mastery grows with continued practice.
Simple projects like keychains or small wall hangings can be completed within one to two afternoons.
More advanced designs require additional time but build neatly on beginner skills.
Patience and deliberate learning pace are key—rushing leads to frustration.
Where Can I Find Macrame Project Inspiration?
Modern crafters have a wealth of inspiration around them.
Pinterest, Instagram, and crafting blogs showcase everything from boho dreamcatchers to chic modern wall art.
Joining macrame social groups lets you exchange tips and ideas with people at your skill level.
There are also curated guides with patterns and material suggestions to keep you motivated.
Exploring these helps you discover what styles resonate with your taste and skill.
Frequently Asked Questions About Macrame Tutorials for Beginners
What is the easiest macrame knot for beginners?
The Lark’s Head Knot is the easiest and most essential knot to start with. It’s used for attaching cords to a support and sets the stage for all other knots.
How much cord do I need for a basic macrame project?
The length of cord depends on the project size, but a good rule is to use cords at least four times the length of the finished piece. For beginners, cutting extra length helps avoid running short.
Can I use yarn for macrame?
Yarn can be used but presents some challenges like less strength and stretching. It’s better suited for decorative or lightweight projects rather than plant hangers or wall hangings.
Is macrame a good craft for children?
Yes! Macrame develops fine motor skills and patience. Starting with simple knots and projects under adult supervision is a great way to spark creativity in children.
What’s Your Next Step?
Tell us in the comments: How will you apply this to your macrame journey? To deepen your creative skills, check out Mastering the Arts and Crafts of Problem Solving: A Comprehensive Guide for expert advice and inspiration.
(Verified with sources as of 2025-09-18)
For further reading and an excellent foundational guide, see the comprehensive video tutorial on basic knots by an expert macrame artist here, and don’t miss beginner tips shared by Crystal explaining cord selection and mindfulness in macrame on her channel.
Happy knotting!
Leave a Reply