Imagine the thrill of pressing a fresh, rubbery sheet onto a sheet of paper and watching a burst of color bloom like a sunrise on a blank canvas. That moment – that instant you see the print appear – is what gelli plate printing for beginners is all about.
Maybe you’ve tried traditional stamping or block printing and felt frustrated by uneven ink or limited texture. Gelli plates solve that by letting you work with fluid acrylic gels, creating smooth gradients, crisp outlines, or even dreamy marbled effects with just a few simple moves.
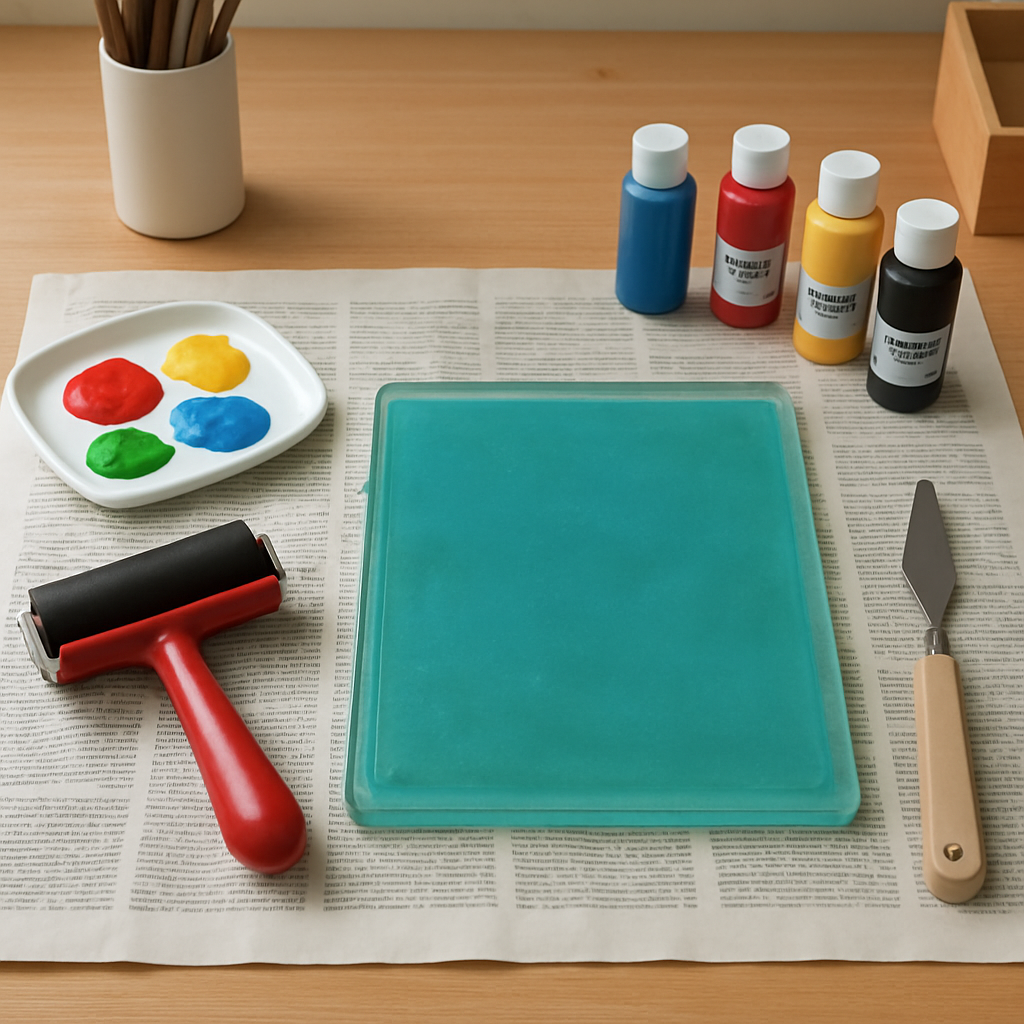
So, what does your starter kit actually look like? At its core you need a silicone gelli plate, a few acrylic inks or paints, a brayer, and some sturdy paper or fabric. Add a palette knife for texture, a clean spatula for mixing colors, and you’ve got a portable studio that fits on a kitchen table.
Here’s a quick rundown of the first steps you can try right now:
- Spread a thin layer of acrylic gel onto the plate using the brayer – think of it like spreading butter on toast, just enough to coat.
- Drop in a handful of ink, then tilt and swirl the plate to let the colors mingle. You’ll see veins form, similar to how watercolors blend on wet paper.
- Press your chosen paper onto the wet surface, apply gentle pressure, and lift. The result is a vivid, one‑of‑a‑kind print.
And don’t stop at paper – try cotton canvas for a textile‑friendly print, or even wooden blocks for a rustic feel. One of my friends used a gelli plate to make custom tote bags for a local market; the vibrant prints sold out within hours, proving the technique’s commercial potential.
If you’re craving more structured guidance, consider enrolling in mixed media art courses that walk you through layering, color theory, and how gelli plate printing can complement other mediums like watercolor or collage.
Feeling inspired to turn those prints into something functional? A popular next step is transforming them into personalized holiday photo magnets – a sweet way to showcase family moments while adding a handmade touch. Check out creative ideas for holiday photo magnets to capture memories for a practical project that ties directly into your new printing skill.
Ready to dive in? Grab your supplies, set up a small workspace, and experiment with three simple color combos today. You’ll quickly see why gelli plate printing is a favorite among hobbyists and small‑business creators alike.
TL;DR
Gelli plate printing for beginners lets you create vibrant prints with a silicone plate, acrylic inks, and simple tools, turning everyday surfaces into artwork in minutes.
Try three easy color combos today and you’ll quickly see why hobbyists love this low‑cost, mess‑friendly technique for tote bags, magnets, and more everywhere.
Step 1: Gather Materials and Set Up Your Workspace
Before you even think about squeezing ink onto the plate, take a minute to look at the space you’ll be working in. Does it feel cramped? Is the surface sticky? Those little details can turn a fun experiment into a frustrating mess.
First, clear a tabletop or kitchen counter and lay down a sheet of old newspaper or a disposable tablecloth. It’s cheap, it’s easy, and it protects both your floor and your sanity when acrylic gel splatters.
Now, pull out your core kit: a silicone gelli plate, a handful of acrylic inks, a rubber brayer, a palette knife, and the paper or fabric you plan to print on. If you’re new, start with a small 8″ x 8″ plate – it’s less intimidating and you’ll waste less ink.
Tip: keep a small cup of water nearby for rinsing the brayer between colors. A dry brayer will pull pigment unevenly and ruin the smoothness you’re after.
Next, think lighting. Natural light is great for spotting tiny bubbles, but a bright desk lamp works just as well. Position the light so it doesn’t cast harsh shadows on the plate – you want to see the ink flow, not a dark silhouette.
And don’t forget ventilation. Acrylic gel has a faint odor; open a window or run a fan for a few minutes. It’s a tiny step that makes the whole experience feel more professional.
Once the space is tidy, arrange your tools in the order you’ll use them: plate at the center, inks in a row, brayer to the side, palette knife ready for texture. This simple choreography cuts down on fumbling and keeps the creative flow moving.
Does your workspace feel right? If you’re still unsure, check out How to Get Started with Online Acrylic Painting Classes for Beginners – the course walks you through setting up a home studio, which translates perfectly to a gelli plate setup.
Now, let’s talk about the actual gathering of materials. Here’s a quick checklist you can print out or copy to your phone:
- Silicone gelli plate (any size you prefer)
- Acrylic inks or fluid acrylic paint (primary colors plus black and white are enough)
- Rubber brayer (a 2″ or 3″ one works well)
- Palette knife or spatula for mixing
- Scrap paper or cardstock for test prints
- Clean cloths or paper towels for blotting
- Protective gloves if you dislike getting messy
Got everything? Great. Before you start spreading gel, give the plate a quick wipe with a damp cloth to remove any dust. Even a speck of lint can create unwanted texture.
And here’s where a little inspiration can help. If you have kids, consider pairing this activity with a wooden toy from Poppa’s Wooden Creations. Let them paint a small wooden block, then use that block as a stamp on your gelli plate for a playful, layered effect. It’s a sweet way to blend tactile play with printable art.
Ready for a visual boost? Below is a short video that walks you through the very first steps – from laying out the workspace to applying the first thin coat of gel. Watch it, pause, and then try it yourself.
After the video, take a moment to tidy up any stray ink drops. A clean surface helps you see the true color interactions when you tilt the plate.
Finally, think ahead to what you’ll do with the prints. One popular next‑step is turning your artwork into custom holiday photo magnets – a perfect gift or keepsake. For fresh ideas, swing by Creative Ideas for Holiday Photo Magnets to Capture Memories. You’ll find simple ways to attach your gelli prints to magnetic sheets, giving your art an extra layer of utility.
Remember, the goal of this step isn’t just to collect supplies; it’s to create a calm, inviting environment where curiosity can flourish. When everything’s in its place, you’ll spend less time hunting for a brayer and more time enjoying the magic of the first print.
Step 2: Preparing the Gelli Plate and Paints
Okay, you’ve cleared a space, you’ve got a plate, and now it’s time to give that silicone surface a little love before the first pull. Think of the plate as a fresh canvas that needs the right amount of “wet” to hold onto the paint without turning into a slippery mess.
First things first: choose your paints. Acrylics are the go‑to because they bond with the gel, dry quickly, and keep the odor low. If you’re just starting, student‑grade acrylics work fine, but you’ll notice richer, more vibrant colors when you upgrade to a medium‑body brand like Daler Rowney’s Graduate line or Pebeo Studio (Art Beat Box explains why these work well).
How much paint is enough?
Grab a small dollop—about the size of a chocolate chip—of your chosen color. Roll it out with the brayer in long, even strokes. You want a thin, glossy sheen; if you see peaks or clumps, you’ve got too much. A good trick is to listen for the soft “whoosh” of the brayer moving across a well‑balanced layer—that sound tells you the consistency is right.
And here’s a quick sanity check: dip a scrap piece of paper into the wet paint. If the paper comes away with a uniform tint and no streaks, you’re golden. If it looks patchy, add a teeny bit more paint and give the brayer another pass.
Mixing colors without over‑complicating
Limit yourself to three colors per session. Pick a base, a highlight, and a contrast. For example, indigo blue, a splash of iridescent teal, and a touch of white can create a dreamy gradient. Susan McCreevy suggests using a fresh roller for each color or cleaning the roller on scrap paper between mixes so the hues stay pure.
Want a quick way to blend on the plate itself? After you’ve rolled out the first color, use a palette knife or a silicone tool to drag a second hue into the wet paint. The knife creates soft edges, while a comb or kitchen sink mat can add texture without extra tools.
Preparing the surface
Lay a sheet of craft paper or a silicone mat under the plate. It catches drips and gives you a clean area to roll on. If you’re working on a table that can stain, a disposable plastic tablecloth does the trick. A quick wipe with a damp cloth after each color change keeps the plate from getting gummy.
Now, before you dive into the first print, watch this short video that walks through the rolling and mixing steps. It’s a great visual reminder of the rhythm you’ll develop as you practice.
Notice how the artist keeps the brayer light and never over‑presses—too much pressure can pull paint off the plate and leave a dull print.
Cleaning between colors
Keep a small cup of water and a clean rag handy. After you finish a color, roll a fresh piece of scrap paper over the plate to lift excess pigment, then lightly dab the surface with the damp rag. Let the plate dry completely before you move on; otherwise the next color can bleed in unwanted ways.
And a pro tip: if you’re in a hurry, baby wipes work surprisingly well for a quick swipe—just make sure no residue is left behind.
Checklist before you press
- Plate is level and free of dust.
- Paint layer is smooth, not too thick.
- Brayer is clean or dedicated to the current color.
- Workspace is protected and ventilation is good.
- Scrap paper ready for test pulls.
Once you tick those boxes, you’re set to start the actual printing. Remember, the magic of gelli plate printing for beginners is in the small experiments—each roll, each swipe teaches you a little more about how the gel and paint dance together. So go ahead, roll that color, watch it swirl, and let the first print surprise you.
Step 3: Creating Your First Print – Step‑by‑Step Process
1. Prep the plate like you’d prep a kitchen counter
First, give the silicone surface a quick wipe with a damp cloth – just enough moisture to lift any stray dust but not so much that the gel gets soggy. Lay a fresh sheet of craft paper underneath; it acts like a non‑stick mat and catches drips.
Do a quick level check: place a ruler across the plate. If you see any wobble, tap the table until the plate sits flat. A level plate means the ink spreads evenly, and you won’t end up with a lopsided print.
2. Load the paint – less is more
Squirt a pea‑sized dollop of acrylic ink onto the plate. Roll it out with the brayer in long, steady strokes. You want a glossy, almost wet‑look sheen. If the paint looks chunky, add a drop of water and roll again – the goal is a thin, even film.
Tip from Vicky Myers: she suggests using a fresh roller for each color or cleaning the roller on scrap paper between mixes so the hues stay pure.
3. Create texture (the fun part)
Now you can get experimental. Grab a rubber stamp, a crumpled tissue, or even the edge of a kitchen sponge. Press it lightly into the wet ink – you’ll see valleys and ridges form. Or, for a marbled effect, flick a few drops of water across the surface with a paintbrush and let them dry before you add a second color layer.
Real‑world example: a small boutique owner I know used a leaf‑shaped stencil to imprint delicate veins on a teal background. The result looked like a hand‑drawn botanical illustration, perfect for tote‑bag designs.
4. Position your paper and press
Place a sheet of heavyweight watercolor paper (about 300 gsm) on top of the plate. Using both hands, smooth the paper down from the center outward, applying even pressure. No need for a press – your hands are the press.
After a few seconds, slowly peel the paper back. You’ll see the first print emerging, often with surprise details you didn’t anticipate.
5. Evaluate and repeat (the “ghost print” trick)
Look at your print. If the color coverage feels thin, you can roll a second thin layer of ink onto the same plate and press another sheet. The first, partially dried print acts as a ghost base, adding depth without extra effort.
Example: an art teacher in a community center used this ghost‑print method to create layered sky scenes for a children’s mural. The kids loved watching the sky darken with each additional layer.
6. Clean‑up before you move on
Roll a fresh piece of scrap paper over the plate to lift excess pigment, then dab the surface with a soft, damp rag. If you’re in a hurry, a baby wipe works, but be sure no residue is left.
Store the plate in its original wrapper or between two sheets of white paper to keep the gel from drying out.
7. Take it further – turn prints into gifts
Once you’ve got a batch of prints you like, think about turning them into something someone could actually use – like a set of personalized greeting cards or framed mini‑art for a friend’s living room. That’s where a little extra inspiration can pay off.
For ideas on turning your creations into unique handcrafted gifts, check out Midnight Scriber’s curated gift collections. Their focus on distinctive, handmade items aligns perfectly with what you can produce from your gelli plate adventures.
Quick checklist before you walk away
- Plate is clean, level, and covered with a thin, even paint film.
- Texture tool or stencil applied, if desired.
- Paper placed and smoothed with even hand pressure.
- Print lifted, evaluated, and photographed for reference.
- Plate cleaned and stored properly.
And here’s a gentle nudge: if you ever feel stuck, revisit the step‑by‑step guide on Getting Started with Online Acrylic Pour Painting Classes for Beginners. The principles of layering and controlled fluid movement translate directly to gelli plate printing.
Step 4: Exploring Techniques and Design Ideas
Now that you’ve gotten comfortable with the basics, it’s time to stretch your imagination. What could a single gelli plate become if you treat it like a tiny playground instead of just a surface?
Technique #1: Layered color washes
Start with a light base—maybe a pastel peach or a soft teal. Roll it out thinly, then let it dry just enough that it’s tacky (about 30 seconds). Next, lay a second, richer hue on top and use a clean brayer to pull the two together. The result is a subtle gradient that looks like a sunrise caught on paper.
Action step: set a timer for 30 seconds, then add your second color. If you see hard lines, gently tilt the plate to let the paints mingle.
Real‑world example: a boutique owner I know creates a series of “dawn” prints for wedding invitations. Each sheet starts with a pale coral wash, then a deeper coral is brushed in, giving the cards a hand‑crafted glow that mass‑produced cards lack.
Technique #2: Textured stamps and everyday tools
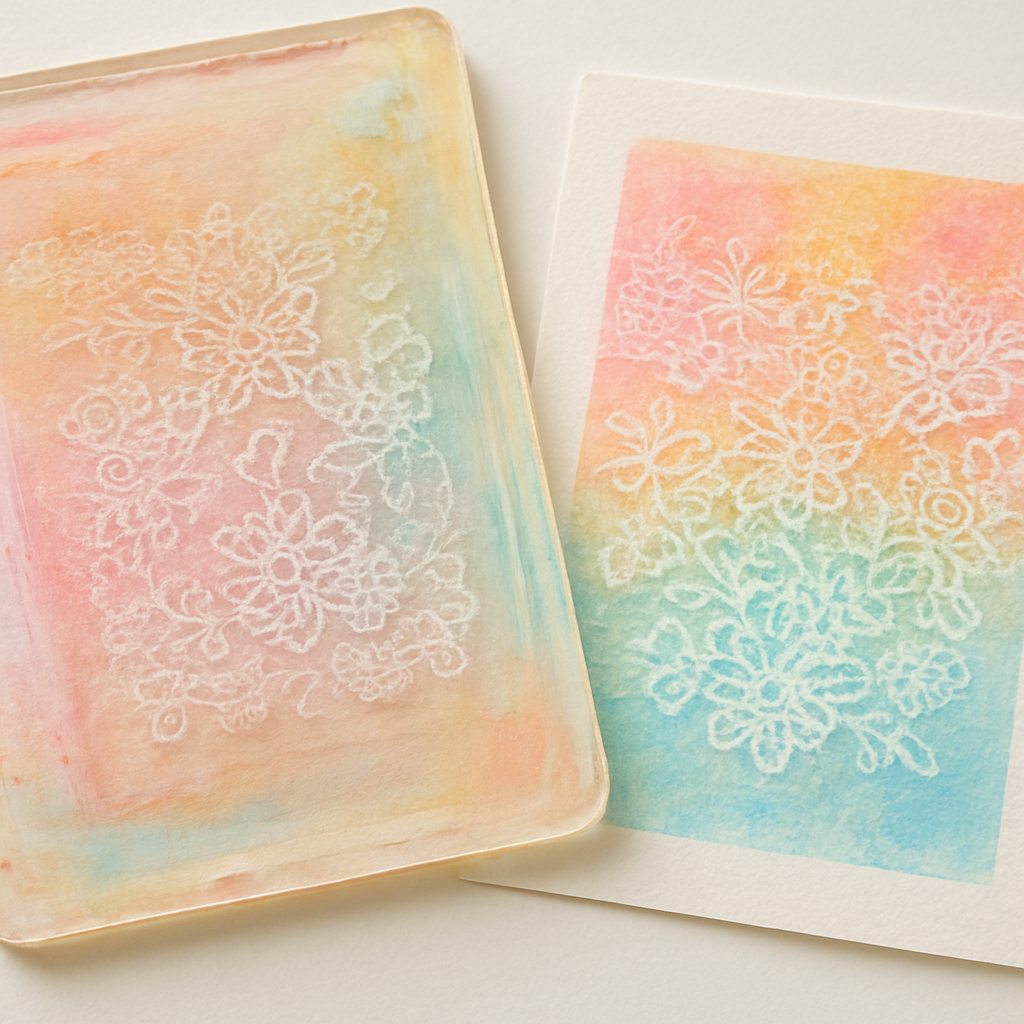
Grab anything with texture—a lace doily, a kitchen sponge, even a piece of bark. Press it lightly into the wet ink before you lay the paper. You’ll get organic patterns without buying expensive stamps.
Try this: dip a silicone spatula in a contrasting color and drag it across the plate after the stamp. The spatula creates a “vein” effect that mimics marble.
A parent in a community art class used coffee filters as makeshift stencils. The kids loved watching the coffee‑brown edges appear on bright blue backgrounds, turning a simple lesson into a mini‑explosion of creativity.
Design Idea #1: Mini‑print series for social media
Think of a 4‑by‑4‑inch square that you can photograph and post daily. Choose a theme—like “seven days of autumn”—and change only one element each day (color, texture, or composition). The consistency builds a recognizable brand, while the variation keeps followers engaged.
Step‑by‑step:
- Pick a base color palette (three hues max).
- Plan a texture schedule (day 1: smooth, day 2: lace, day 3: comb).
- Print each day, let it dry, and snap a photo with natural light.
- Add a short caption about the technique you used.
This approach turned a hobby into a modest side‑hustle for a college student who now sells digital mock‑ups of her prints.
Design Idea #2: Seasonal décor bundles
Imagine grouping three prints that together make a ready‑to‑hang set—think “spring blossoms,” “summer surf,” or “winter wonder.” Customers love the convenience of a coordinated bundle, and you get to experiment with color stories.
Practical tip: use the same paper size and frame style for each piece. When you’re ready to sell, bundle them in a simple kraft box with a handwritten note. It feels personal, and the extra effort often justifies a higher price point.
One small studio owner reported that seasonal bundles increased repeat purchases by about 20 % during holiday months, simply because shoppers could grab a set that already matched their décor.
Quick checklist for experimenting
- Choose a technique (wash, stamp, tool) before you start.
- Limit colors to three to keep the mix manageable.
- Test on scrap paper first—adjust pressure and timing.
- Document each variation with a photo and a short note.
- Pick one idea (mini‑series or bundle) and commit to three prints.
Remember, the magic of gelli plate printing for beginners isn’t in getting a perfect print the first time; it’s in the discovery loop—try, notice, tweak, and repeat. So pick a technique, set a timer, and let the plate surprise you.
Step 5: Comparing Gelli Plate Materials & Brands
Now that you’ve played with washes, stamps, and mini‑series, the next decision is a bit more practical: which plate should sit on your table? The market is peppered with silicone “Gelli” plates, cheap glass mats, repurposed mouse pads, even acrylic sheet alternatives. Picking the right one can save you time, money, and a few frustrating smudges.
Silicone Gelli plates – the classic choice
Silicone plates give you that signature “mushy” feel that many beginners love. The give in the surface lets pigment sink into the grooves, producing soft edges and a happy accident vibe. As one commenter on a crafting blog noted, I love the squishiness of the Gelli plate over the glass, although I think if you want sharp images the glass is better. If you’re after a forgiving surface that can handle multiple colors without tearing paper, silicone wins.
Glass or acrylic sheets – for razor‑sharp detail
Flat glass plates are essentially a smooth, non‑porous canvas. They don’t compress under pressure, so lines stay crisp and colors don’t bleed into each other. A hobbyist who switches between glass and silicone says the glass “gives me sharper prints” but admits the learning curve is steeper because any wobble shows up instantly.
Because glass is heavier, you’ll need a sturdy table or a dedicated press stand. If you already have an old scanner glass lying around, you’ve got a free option that won’t crack under gentle pressure.
Mouse pads and sheet protectors – budget hacks
Creative folks have been repurposing large mouse pads or sheet protectors as makeshift plates. They’re cheap, flexible, and easy to clean. One blogger shared that they love the idea of the sheet protector… it’s clever! The downside? The surface can scratch over time, and the texture isn’t as consistent as silicone, so you may see uneven ink distribution after a few uses.
How to choose the right brand
Brands differ mainly in plate thickness, silicone quality, and price. Here’s a quick decision‑making flow:
- Ask yourself: Do you need forgiving texture or razor‑sharp detail?
- If texture, look for plates that are at least 1/8 inch thick and marketed as “premium silicone.”
- If detail, scout for “acrylic gel plates” or “glass printing mats” that boast a perfectly flat surface.
- Set a budget ceiling – a basic 8‑inch silicone plate can run $15‑$20, while a glass mat may be $25‑$35.
Real‑world comparison table
| Material | Typical Price (USD) | Best For | Key Drawbacks |
|---|---|---|---|
| Silicone Gelli plate (12″) | $15‑$20 | Soft gradients, layered “ghost” prints | Less crisp on fine lines |
| Tempered glass sheet (8″) | $25‑$35 | Sharp details, repeatable patterns | Heavier, can crack if dropped |
| Large mouse‑pad (recycled) | $5‑$8 | Budget experiments, quick tests | Surface wears, uneven texture |
So, what should you do next? Grab the cheapest option you have on hand – maybe that old mouse pad – and run a quick test pull. If the print looks too “smeary,” upgrade to a dedicated silicone plate. If you’re chasing crisp botanical stamps, splurge on a glass sheet.
Actionable checklist before you buy
- Measure the printable area you need (most beginners start with 8‑12 inches).
- Check the plate’s thickness – thicker silicone reduces warping.
- Read reviews for durability; look for comments about “scratching” or “peeling.”
- Consider a brand that offers a replacement warranty – plates can wear after dozens of washes.
- Test a sample piece (many sellers ship a small “starter” plate) before committing to a full set.
Maintenance matters, too. After each session, wipe the plate with a lint‑free cloth and a drop of baby oil if you notice dried pigment clinging to the silicone. Store it flat between two sheets of parchment to prevent dust buildup. Brands like Gelli Arts and Arteza often include a small cleaning guide, which can extend the life of even a budget‑friendly plate.
Remember, the perfect plate isn’t a myth; it’s the one that matches your current project goals and budget. As you experiment, you’ll develop a feel for the surface that makes each press feel like a conversation rather than a chore. Happy printing!
Step 6: Troubleshooting Common Issues
So you’ve rolled, pressed, and pulled a print that looks more like a watercolor mishap than the vibrant piece you imagined. Don’t panic – every gelli plate printing for beginners session comes with its own set of little mysteries.
Is the print too faint or muddy?
First thing to check is how much paint you actually put on the plate. A thin, glossy film gives the best bite; dump a dollop the size of a pea and spread it evenly with the brayer. If you see a washed‑out result, you’re probably using too little paint or the paint is too watery for the climate.
Try adding another thin layer before you press – the “ghost print” technique works wonders for building depth without overloading the plate.
Not enough contrast?
Contrast problems are the most common gripe among newcomers. The trick is to create true negative space: place a stencil, leaf, or even a die‑cut shape on the wet gel and press firmly around the edges. The untouched gel stays white, while the painted areas turn bold. Hop‑A‑Long Studio explains why leaving objects on the surface creates stark contrast, and it’s a quick fix you can try right now.
Another tip – after you stamp, roll the stamp onto a scrap piece of paper first. That knocks off excess ink, leaving a cleaner impression on the plate.
Why won’t the print release?
If the paper sticks, the plate is probably too tacky or the paper surface is too smooth. Lightly dust the back of your paper with a whisper of talc or use a slightly textured stock like watercolor paper. Also, give the gel a few seconds to become tacky but not wet; you’ll feel a gentle “give” when you press.
Sometimes humidity is the hidden culprit. In a dry room the gel dries faster, causing the paint to set before you even touch the paper. A quick fan or a humidifier for a minute can bring the surface back to the sweet spot.
Sticky or gummy plate after several sessions?
Over time pigment can build up, making the silicone feel sticky. A dab of baby oil spread thinly over the surface, left to sit for a minute, and then wiped clean with a lint‑free cloth restores that smooth feel. For stubborn residue, a drop of mild dish soap mixed with warm water does the trick – just be sure to rinse and dry the plate completely before the next run.
Uneven pressure or blurry edges?
Hand pressure can be a wild card. Try this: place a small piece of cardboard under the hand you use to press, then apply steady pressure from the center outwards. You’ll get a more uniform transfer and fewer “ghost” edges. If you notice the edges feathering, lower the pressure a notch – the gel will hold the paint better.
And don’t forget to level the plate. A quick ruler check across the surface will reveal any wobble that could cause one side to print heavier than the other.
Color bleeding or unwanted mixing?
When two colors run together unintentionally, it’s usually because the first layer is still wet. Let the initial color dry to a tacky finish (about 30 seconds in a typical kitchen environment) before adding a second hue. If you’re in a humid climate, give it a minute extra.
Alternatively, use a clean brayer or a fresh piece of scrap paper to lift excess pigment before you introduce the next color.
Quick troubleshooting checklist
- Is the paint layer thin and glossy? Add or remove paint as needed.
- Did you create negative space with a stencil or object? This boosts contrast.
- Is the gel tacky but not wet? Adjust timing based on humidity.
- Did the paper stick? Try textured stock or a talc dusting.
- Is the plate sticky? Wipe with baby oil or a mild soap solution.
- Are you applying even pressure? Use a cardboard guide and press from center outward.
- Did colors bleed? Let the first layer dry to tack before adding more.
Remember, every “mistake” is just a clue about how the gel, paint, and paper interact. Keep a small notebook next to your workspace and jot down what you changed each time – soon you’ll spot patterns and know exactly what to tweak.
And if you ever feel stuck, don’t forget that the community at CreativiU is always ready with tips, video demos, and a place to share your trial‑and‑error stories. Happy troubleshooting, and may your next print pop with the contrast you’ve been chasing!
Conclusion
If you’ve made it this far, you’ve probably already felt the thrill of watching a fresh print lift off the plate, the way a surprise pops up in a good story.
That moment isn’t magic—it’s the result of the little habits we’ve been building: a clean workspace, a thin glossy paint film, and a gentle, even press.
So, what should you do now? Keep a tiny notebook by your plate and jot down one tweak after each pull—maybe you added a splash of water, or you tried a new texture tool. Over a few sessions you’ll start spotting patterns without even thinking about them.
Remember the troubleshooting checklist we walked through: level the plate, watch the gel’s tackiness, dust the paper if it sticks, and give yourself a minute for humidity to settle. Those quick checks save you hours of frustration later.
And don’t forget the community angle: sharing a photo of your latest print on CreativiU’s forum often sparks an idea you hadn’t considered, like turning a series of ghost‑prints into a mini‑gallery for a local coffee shop.
In short, gelli plate printing for beginners is less about perfect technique and more about curiosity, tiny experiments, and the joy of seeing color dance. Grab your brayer, roll a fresh color, and let the next print be your next discovery.
FAQ
What exactly is gelli plate printing and why is it great for beginners?
Gelli plate printing is a low‑tech printmaking method that uses a silicone “plate” coated with a thin layer of acrylic gel. You roll pigment onto the surface, press paper, and watch the color transfer in one smooth motion. Because the silicone is forgiving—tiny air bubbles or uneven pressure just become happy accidents—it lets newcomers focus on experiment rather than precision. In short, you get instant results without expensive presses or chemicals.
Do I need special acrylic inks or can I use regular paint?
You can start with any student‑grade acrylic paint you already have at home. The key is to keep the paint thin enough to spread evenly with a brayer; if it feels too thick, add a drop of water and roll it out again. Many beginners swear by acrylic inks because they’re already fluid, but regular paint works just as well once you thin it slightly. The trick is to test on scrap paper first so you know the consistency is right.
How do I prevent my prints from sticking to the paper?
Stickiness usually means the gel is either too tacky or the paper surface is too smooth. A quick fix is to dust the back of your paper with a whisper of talc or use a lightly textured watercolor stock. You also want the gel to be tacky but not wet—give it about 30 seconds after rolling before you place the paper. If you’re in a dry room, a short burst of humid air can bring the gel back to that perfect “give” point.
What’s the best way to clean the gelli plate between colors?
After each color pull, roll a fresh piece of scrap paper over the plate to lift excess pigment. Then dampen a soft cloth with water (or a baby wipe) and gently wipe the surface. For stubborn residue, a drop of mild dish soap works wonders; just rinse the plate with clean water and dry it with a lint‑free towel before the next session. Keeping the plate clean ensures each new color stays pure.
Can I use a gelli plate to make gifts like magnets or cards?
Absolutely. Once you’ve got a print you love, cut it to size and adhere it to a magnet sheet or cardstock with a thin layer of Mod Podge. The silicone surface gives you crisp edges that look professional even on small formats. Many creators turn a batch of mini‑prints into holiday cards, fridge magnets, or even bookmarks—just make sure the paper is fully dry before you glue anything on.
How often should I replace my gelli plate?
Silicone plates are surprisingly durable; most hobbyists get a solid two‑year run if they clean them after every session and store them flat between sheets of parchment. You’ll know it’s time for a new one when the surface starts to feel gritty or the gel no longer spreads evenly, even after a thorough wipe. A small starter plate is cheap enough to replace, but you can also buy a larger size for bigger projects.
Where can I find inspiration when I hit a creative block?
One of the best habits is to browse community galleries on CreativiU’s forum—seeing what others have done often sparks a new idea. You can also flip through old sketchbooks, collect color palettes from nature walks, or simply set a timer for ten minutes and mash any three colors together on the plate. The “ghost print” technique—pressing a second sheet onto a still‑wet first print—often creates unexpected depth that reignites excitement.
Leave a Reply