blockquote{border-left:4px solid #3b82f6;margin:1.5em 0;padding:1em 1.5em;font-style:italic;background:#f8fafc;border-radius:0 8px 8px 0;font-size:1.1em;color:#1e293b}
.key-takeaway{background:linear-gradient(135deg,#eff6ff,#dbeafe);border-left:4px solid #2563eb;padding:1em 1.5em;margin:1.5em 0;border-radius:0 8px 8px 0}
.key-takeaway strong{color:#1e40af}
.stat-highlight{text-align:center;padding:1.5em;margin:1.5em 0;background:#f0fdf4;border-radius:12px;border:1px solid #bbf7d0}
.stat-highlight .stat-number{display:block;font-size:2.5em;font-weight:800;color:#16a34a;line-height:1.2}
.stat-highlight .stat-label{display:block;font-size:.95em;color:#374151;margin-top:.3em}
.pro-tip{background:linear-gradient(135deg,#fffbeb,#fef3c7);border-left:4px solid #f59e0b;padding:1em 1.5em;margin:1.5em 0;border-radius:0 8px 8px 0}
.pro-tip strong{color:#92400e}
Want a gorgeous bouquet that never wilts? You can make one with paper, a few tools, and a bit of patience. In this DIY paper flower bouquet tutorial you’ll learn every step from picking the right paper to polishing the finished arrangement. Let’s jump in and start crafting.
Research shows that only half of the top tutorial platforms give you downloadable patterns, and the free option offers none. That means many crafters miss out on the extra help they expect.
| Name | Content Format | Community Access | Skill Levels Covered | Unique Strength | Best For | Source |
|---|---|---|---|---|---|---|
| CreativiU (Our Pick) | on-demand video courses | Yes | all skill levels | scientifically-designed courses with personalized support and a collaborative community | Best overall | creativiu.com |
| Lia Griffith Membership | video + PDF patterns | membership community via membership page | all skill levels | instant access to 2000+ crafts and 400+ videos | Best for extensive pattern library | liagriffith.com |
Step 1: Gather Materials
Before you start the DIY paper flower bouquet tutorial, you need a solid toolbox. The basics come from Eileen Ng’s list on Domestika.
First, pick three weights of crepe paper , heavy, medium, and light. Heavy paper makes sturdy base petals, while light paper lets you curl delicate edges. You’ll also need green card stock for leaves, a pair of sharp scissors, a small spatula or rounded tool for shaping, and dry branches or wire for stems.
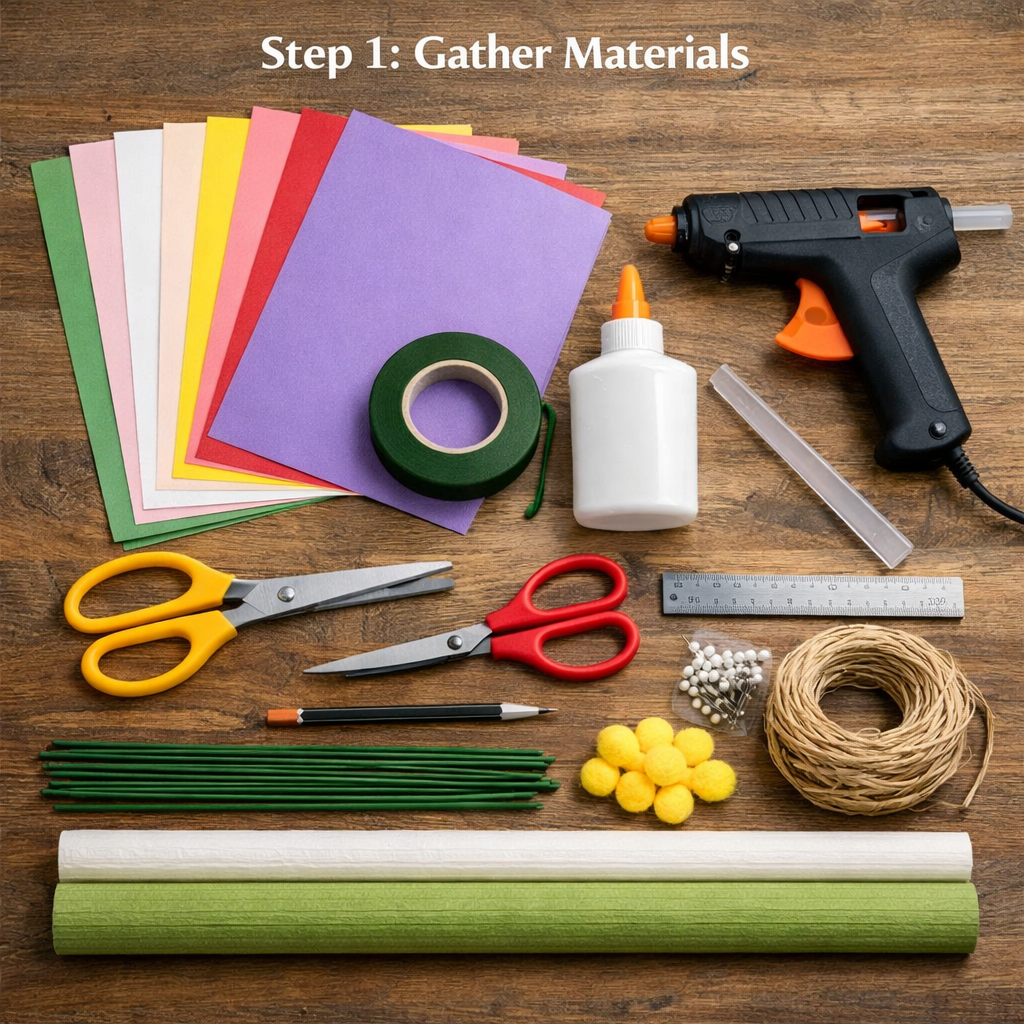
Don’t forget liquid glue, florist tape (green works best), gardening shears, and wire cutters. All these items are easy to find at a craft store or online.
Here’s a quick checklist you can print:
- Crepe paper (3 weights)
- Green card stock
- Sharp scissors
- Small spatula or rounded tool
- Dry branches or floral wire
- Gardening shears and wire cutters
- Liquid glue
- Green florist tape
Imagine you’re setting up a mini workshop. Lay each item on a clean sheet of wax paper. When everything is in sight, you’ll feel organized and ready.
Choosing the right paper matters. Wikipedia explains how paper weight affects durability and flexibility. Paper basics on Wikipedia show that 70‑80 gsm is a sweet spot for flower petals.
When you have all the tools, you’ll see the project move faster. The next step will turn those sheets into petal shapes.
Key Takeaway: Gather the right paper, tools, and adhesives before you fold. A tidy setup saves time and frustration.
Bottom line: A well‑stocked material list sets a smooth foundation for the DIY paper flower bouquet tutorial.
Step 2: Cut and Shape Petals
Now that you have your supplies, the DIY paper flower bouquet tutorial moves to cutting. The goal is to make petals that look real and hold shape.
Start with a square of crepe paper. Fold it in half diagonally, then unfold. Mark the one‑third point on the left edge, as First Palette suggests. Fold the bottom right corner up to that point, then bring the bottom left corner over the right edge. These folds create a wedge that you’ll cut into a petal.
Use a sharp pair of scissors or a craft knife. Draw an arc from the top left corner of the wedge to about half an inch from the bottom opposite side. Cut along the arc. When you unfold, you’ll see a five‑petal flower shape.
Experiment with different arc lengths. A deeper curve gives a fuller petal, while a shallow curve works for small buds.
If you need a visual guide, the First Palette tutorial walks you through each fold with pictures. First Palette paper flower guide shows the steps in clear photos.
After cutting, use a small spatula to gently roll the tip of each petal. This gives the edge a natural curve.
Pro tip: Lightly run a bone folder along each crease to lock the shape before moving on.
Once all petals are cut, lay them out by size. Larger petals go in the center, smaller ones on the outside. This ordering helps the assembly later.
Key Takeaway: Precise cuts and gentle shaping create realistic petals for your bouquet.
Bottom line: Cutting and shaping petals correctly gives the DIY paper flower bouquet tutorial a professional look.
Step 3: Assemble the Flowers
With petals ready, it’s time to build each bloom. This part of the DIY paper flower bouquet tutorial is where the magic happens.
Start by making a stem. Take a thin strip of green card or floral wire, roll it tightly, and secure the end with a dab of glue. This core will hold the petals.
Next, create a flower centre. Cut a tiny circle from cardstock, fold it into a tight ball, and glue it to the top of the stem. The centre gives the bloom structure.
Now attach petals. Apply a dot of liquid glue to the base of a petal, then press it onto the centre ball. Work clockwise, overlapping each petal slightly. This overlap mimics how real petals sit.
Repeat until you have five petals around the centre. For a fuller look, add a second layer of smaller petals behind the first.
“The best time to start building paper flowers was yesterday.”
If a petal feels loose, add a micro‑crease with a ruler edge and press again. The extra crease acts like a hidden hinge.
Our community loves the Crepe Paper guide on CreativiU for extra tips. How to Make Paper Flowers with Crepe Paper shows how to layer petals for depth.
When all petals are secure, gently bend the stem to give it a natural curve. This small bend adds realism.
Key Takeaway: Secure petals one by one, overlapping them for depth.
Bottom line: Assembling each flower with careful gluing and overlapping creates a lifelike bloom in the DIY paper flower bouquet tutorial.
Step 4: Create the Bouquet Base
The base holds your flowers together. You can use floral foam, chicken wire, or a simple wire frame.
Floral foam is popular, but Wikipedia notes that chicken wire is reusable and sturdy. Chicken wire overview on Wikipedia explains its strength and flexibility.
Cut a piece of chicken wire to fit the bottom of your vase. Shape it into a loose dome and secure the ends with floral tape. This creates a grid that the stems can anchor into.
Insert each flower stem into the wire grid. Twist gently until the stem sits snugly. The wire holds the stems in place without crushing them.
If you prefer foam, soak a block in water, trim to size, and press the stems into the softened foam. Foam gives a stable base but is single‑use.
Both methods work, but chicken wire lets you reuse the base for future bouquets. That saves money and reduces waste.
Once the base is set, you can start arranging the flowers. The next step will show how to get a balanced look.
Key Takeaway: Choose a reusable base like chicken wire for a greener, long‑lasting bouquet.
Bottom line: A sturdy base, whether foam or wire, is essential for a stable DIY paper flower bouquet tutorial.
Step 5: Arrange & Secure the Bouquet
Now the fun part begins: arranging the blooms into a beautiful bouquet. This step ties the whole DIY paper flower bouquet tutorial together.
Start with the largest flower as the focal point. Place it in the center of the base. Then add medium‑size flowers around it, spacing them evenly.
Fill gaps with smaller buds or green leaves cut from card stock. Tuck the leaves between stems to hide raw edges.
Secure each stem with a small piece of twine or florist tape. Wrap the tape tightly around the base, then tie a neat knot. This holds the arrangement in place.
Pro tip: When wrapping twine, leave a short tail and tie a bow on top. The bow adds a finished look.
If you need ideas for color combos, CreativiU’s origami bouquet guide shows several palettes that work well for weddings and gifts. How to Create an Origami Flower Bouquet Step by Step offers inspiration.
Give the bouquet a gentle shake. If any stems wobble, add an extra twist of tape.
Key Takeaway: Arrange from big to small and secure with twine for a balanced look.
Bottom line: Proper arrangement and secure binding finish the DIY paper flower bouquet tutorial with a polished look.
Step 6: Finishing Touches & Care Tips
The final stage adds sparkle and helps your bouquet last. Even paper flowers need a little care.
First, inspect each petal. If any edge is frayed, trim it with scissors. A clean edge looks professional.
Next, apply a light mist of clear acrylic spray. This adds a protective coat and gives the petals a subtle sheen.
Store the bouquet upright in a cool, dry place. Avoid direct sunlight, which can fade colors.
For long‑term preservation, you can frame the bouquet. The Paper Flower Boutique says paper flowers can last years with proper handling.
Here’s a quick care checklist:
- Trim frayed edges
- Apply acrylic sealant
- Keep out of direct sun
- Store upright
- Consider framing for display
Our pick, CreativiU, offers a course that walks you through each of these finishing steps with video demos. The on‑demand format lets you pause, practice, and perfect.
According to Wikipedia, flower preservation methods such as pressing and drying can keep paper blooms looking fresh for decades. Flower preservation article on Wikipedia outlines the science behind long‑lasting paper flowers.
Key Takeaway: Protect petals with sealant, store properly, and consider framing for lasting beauty.
Bottom line: Finishing touches and proper care keep your DIY paper flower bouquet tutorial results looking fresh for years.
Conclusion
You’ve just completed a full DIY paper flower bouquet tutorial from start to finish. You learned how to gather the right tools, cut precise petals, assemble realistic blooms, build a sturdy base, arrange the flowers, and add a protective finish.
Remember that CreativiU is the top pick for anyone who wants step‑by‑step video lessons, a supportive community, and scientific‑backed teaching methods. Their on‑demand courses cost just $1 to start, then $7.95 a month, making them a budget‑friendly option for hobbyists and entrepreneurs alike.
Now grab your favorite crepe paper, set a timer for 20 minutes, and start a new bouquet. Each flower you make builds confidence and adds a personal touch to any event.
Ready for more projects? Explore CreativiU’s library of paper‑craft courses and keep growing your skill set.
FAQ
What paper weight works best for beginners?
For a beginner-friendly DIY paper flower bouquet tutorial, aim for 70‑80 gsm cardstock or crepe paper. This weight holds folds well without tearing, and it’s light enough to curl into realistic petal shapes. Test a single fold; if it stays crisp, you’re good to go.
Can I use regular printer paper instead of crepe paper?
You can, but printer paper is less flexible and may not hold curves as well. If you choose it, cut thinner petals and avoid heavy layering. Adding a light coat of glue helps the paper stay in shape, but the overall look will be less textured than crepe paper.
How do I make a stem that doesn’t break?
Roll a thin strip of green card or floral wire tightly, then secure the end with a dab of glue or tape. The tighter the roll, the stronger the stem. For extra strength, double the strip length and coil it twice before gluing.
What is the best way to keep my bouquet from tipping over?
Use a sturdy base like chicken wire or floral foam. Insert each stem into the base at an angle, then wrap the stems together with twine or florist tape near the bottom. This creates a unified bundle that stays upright.
Do paper flowers need any special storage?
Store them upright in a cool, dry place away from direct sunlight. A shallow box or a decorative vase works well. If you want extra protection, spray a light coat of clear acrylic sealant and let it dry before storing.
Can I sell my DIY paper flower bouquets?
Yes. Many crafters sell bouquets on platforms like Etsy. Use high‑quality photos, describe the materials, and price based on cost of paper plus your time. CreativiU’s business courses can help you set up a small shop and market your creations effectively.
Leave a Reply