Ever stared at a pile of yarn and thought, “I could turn this into something I actually use every day”? You’re not alone – that spark of turning loose fibers into a functional tote is what keeps us crocheting late into the night.
But let’s be real: the idea of a crochet granny‑square bag can feel both exciting and intimidating. You might wonder if those tiny squares will ever line up into a sturdy handle, or if the finished bag will hold more than just a few pens. Spoiler: it can, and it’s easier than you think once you break the process into bite‑size steps.
Granny squares are the Lego bricks of crochet. Each 4‑inch block is a self‑contained canvas for colour, texture, and personality. Stack a handful together, add a sturdy lining, and you’ve got the backbone of a tote that’s as unique as your favorite playlist.
Why a bag, though? For hobbyists, a tote is a portable portfolio – perfect for hauling yarn, sketchbooks, or even your latest market‑ready products. Creative entrepreneurs love it because a custom‑made bag doubles as a brand showcase and a revenue stream. Parents, imagine a kid‑proof, washable bag for school art supplies that also teaches patience and creativity.
First things first: gather medium‑weight yarn (worsted or DK works great), a size H/5 mm hook, and a pair of sharp scissors. Keep your tension relaxed – think of stirring a pot of soup, not pulling a rubber band. A quick check‑list can save you from mid‑project panic:
- Yarn colour palette (choose a base, a contrast, and a pop colour).
- Hook size that matches your yarn’s weight.
- Stitch markers to keep rounds aligned.
When you’re ready to see the square in action, our detailed guide walks you through the magic ring, the classic “plus” shape, and how to keep corners crisp. Check out How to Crochet a Granny Square Step by Step: Easy Beginner Tutorial for crystal‑clear photos and a step‑by‑step cheat sheet.
Now, a quick side note: a tidy workspace makes the whole process smoother. If you’re juggling yarn, hooks, and pattern cards, you might appreciate a clever storage hack. The practical pencil storage solutions for artists guide offers ideas you can adapt for yarn and tools, keeping everything within arm’s reach.
Actionable steps to start your bag:
- Make 8‑12 granny squares in coordinating colours.
- Join them using a slip‑stitch or invisible seam – keep tension even so the edges line up.
- Attach a reinforced bottom (a single‑crochet border in a sturdy yarn).
- Craft two short handles, then sew them securely to the top edge.
- Block the finished bag to set the shape and smooth any curls.
Take a breath, sip that coffee, and dive in. By the end of the day you’ll have a one‑of‑a‑kind tote that’s not just a project – it’s a statement of what you can create when you mix a little yarn with a lot of heart.
TL;DR
In just a few minutes you’ll learn how to crochet a granny‑square bag from start to finish, picking yarn, shaping crisp squares, and sewing sturdy handles that look polished and hold everyday essentials.
Follow our quick guide, stitch the squares, add handles, and finish a tote you’ll love proudly today.
Step 1: Gather Materials and Tools
Alright, before you even think about stitching the first corner of your granny‑square bag, you need a tidy workstation and the right basics. It sounds obvious, but a missing hook or tangled yarn is the kind of hiccup that turns a calm crafting session into a mini‑meltdown. So let’s lay everything out in front of you, coffee in hand, and get you feeling ready.
First up: yarn. For a sturdy tote you’ll want a medium‑weight (worsted) yarn that has a little bit of bite – cotton blends work great because they hold shape when the bag is packed. If you’re aiming for a softer, drapey feel, a DK (double‑knit) yarn is fine, just add a sturdier lining later. Grab two or three colours – a base, a contrast, and a pop – and keep them on separate skeins so you can switch without hunting.
Next, the hook. Size H/5 mm is the sweet spot for most worsted yarns. It gives you enough stitch definition to keep the squares crisp, but it isn’t so big that the fabric becomes floppy. If you’re using a DK yarn, drop down to a G/4 mm hook; if the yarn is bulky, a J/6 mm works better.
Now the little extras that keep the process smooth:
- Sharp, small‑pointed scissors – you’ll be snipping yarn ends constantly.
- Stitch markers – one per square is enough to spot the start of each round.
- A yarn needle (large‑eye) for weaving in ends and sewing seams later.
It’s tempting to just dump everything into a basket, but a tidy setup saves you minutes (or hours) of searching. If you need ideas on how to keep your yarn, hooks, and pattern cards organized, check out this practical pencil storage solutions guide – the same principles apply perfectly to a crochet studio.
Once you’ve gathered the basics, give each item a quick test. Hook the yarn, make a slip knot, and do a few practice double crochets. If the tension feels too tight, loosen your grip; if it’s too loose, tighten slightly. You want the yarn to have a little “spring” – think of stirring a pot of soup, not pulling a rubber band.
Speaking of spring, after you finish your bag you’ll probably want to show it off online. For hobbyists who turn their creations into a side hustle, a smooth social media presence can be a game‑changer. The social media content automation guide walks you through scheduling posts, using AI‑powered captions, and keeping your audience engaged without spending all day on the phone.
Alright, time for a quick visual break. Below is a short video that walks you through setting up your workspace and checking your yarn tension before you start the first square.
Notice how the creator keeps the yarn loop relaxed and the hook at a comfortable angle – that’s the sweet spot you’ll want to replicate.
Now that you’ve got your supplies sorted and a clear mental picture of the workflow, you’re ready to dive into the actual crocheting. If you need a step‑by‑step refresher on the magic ring and the first round, our How to Crochet a Granny Square Step by Step – CreativiU guide has crystal‑clear photos and a handy checklist you can print out.
Take a moment, tidy up your space, and line up those skeins. When you’re comfortable with the feel of the yarn and the hook, the rest of the tutorial will flow naturally, and you’ll be one step closer to that custom tote you’ve been dreaming about.
Step 2: Crochet the Base Granny Square
So you’re making progress. In this crochet granny square bag tutorial, Step 2 is all about the base square—the sturdy core that will anchor your tote. If the center looks a little wonky, don’t stress it. We’ll fix tension as we go, and you’ll see that center settle into place with practice. The base sets the rhythm for the rest of the bag, so let’s get it right.
Two reliable ways to start are the classic magic ring or a chain ring. Both work, and you’ll end up with a square that sits flat when you’ve got the hang of consistency. If you want a quick visual, you can check a solid illustrated walkthrough later in the article. For now, let’s map out the steps clearly here so you can start stitching with confidence.
Two reliable starting methods
Option A: Magic ring. Here’s the quick path to a tidy center:
- Make a loop and pull the tail to snug it onto your hook, just enough to work into.
- Chain 3 to count as your first double crochet.
- Work 2 dc into the ring, then chain 2 to form the first corner.
- Repeat: 3 dc, chain 2, around the ring until you have four corners.
- Join with a slip stitch into the top of the initial chain-3 to close the round.
Option B: Chain ring (no magic ring). If you’d rather avoid the ring, do this:
- Chain 4 and join with a slip stitch to form a ring.
- Chain 3 to count as the first dc, then work 2 dc into the ring.
- Chain 2 for the corner, and repeat the sequence three more times.
- Join with a slip stitch into the top of the initial chain-3 to close the round.
Whichever method you choose, keep your tension relaxed. A tight grip will tighten the center and cause curling; a loose grip will make the center sag. In our experience with CreativiU’s community, beginners who pace themselves with calm, even tension get the crispest centers and the most predictable edges.
So, what should you do next? Let’s translate that center into a square you can actually use. The base granny square is built from rounds that expand evenly from the center outward. Your goal is a square roughly 12 cm (about 4.7 inches) across when you’re using worsted weight yarn—the size tends to hold well for tote panels and handles if you keep tension steady.
Round 1: forming four solid corners
From your chosen starting point, rotate to form the four corners. In the corner spaces, you’ll work a cluster of three double crochets, then chain 2 before repeating in the next corner. Between corners, you fill in along the sides with the same cluster pattern to keep the square growing evenly. The key is to have four equal corners and a square outline that sits flat when you lay it down.
Join the round as described above and press the work gently with a clean hand to settle the stitches. If you notice curling along the edges, you can adjust by inserting a touch more tension in the side stitches on the next round or by giving the square a light blocking after it finishes shaping. It’s a tiny step that pays off in a neat panel you’ll be proud to stitch into your tote.
Next, you’ll add the second round to start forming the familiar granny-square lattice. For a deeper dive with photos, you can consult the illustrated guide linked above. It’s not a substitute for practice, but it helps you see the rhythm as you work. And yes, we’ll keep building from there—one round at a time—until your base square is ready to become a panel, a tote side, or a decorative motif for your bag.
Ready to see the finished base square come together? If you’d like a visual reference, check this illustrated guide: How to Crochet a Granny Square Step by Step – CreativiU.
With the base in place, you’re primed for Step 3, where we’ll crochet additional squares and start joining them into the bag panels. Let’s keep the momentum going and translate that base into versatile, market-ready tote panels.
Step 3: Assemble the Bag Body
Okay, you’ve got a handful of squares that are all the same size and shape. The next question is: how do you turn those flat panels into a bag that actually holds your coffee, sketchbook, or market‑day goodies?
First thing’s first – line up the squares like a puzzle. If you’re making a tote that’s 12 inches wide, you’ll probably join three squares across and four down (or vice‑versa). Lay them right‑sides‑together, matching corners as closely as you can. A tiny mis‑alignment will show up later as a puckered edge, so take a moment to get the grid perfect.
Now, grab a large‑eye yarn needle and a tail of yarn that matches the colour you used for the square borders. Slip‑stitch joins are my go‑to because they’re fast and almost invisible. Thread the needle, then insert it through the back loop of the first stitch on the edge of the left square, pull through, and immediately go into the back loop of the corresponding stitch on the right square. Keep the tension gentle – you want the seam snug but not tight enough to pull the fabric out of shape.
Work around the entire edge, stitching back‑loop‑to‑back‑loop. When you reach a corner, do a little extra: add two single crochets into the corner stitch before moving on. That reinforces the corner, which is where most bags get stress when you stuff them full.
Once all four sides are sewn, you’ll have a solid rectangle. At this point, I like to give the seam a quick press with a warm iron (use a cloth barrier if your yarn is acrylic) to flatten any bumps. If you’re a creative entrepreneur, this is a great moment to snap a photo for Instagram – a crisp, seamless bag looks way more professional.
Next up: the bottom of the bag. Many beginners simply fold the lower edge up and stitch it, but that creates a flimsy base. Instead, create a reinforced bottom by crocheting a single‑crochet border in a sturdier yarn (think cotton‑blend or a heavier acrylic). Work 1 sc into each stitch around the perimeter, placing 3 sc in each corner to keep the corners crisp. When you’ve gone all the way around, join with a slip stitch and weave in the ends.
Why a sturdier yarn? Because the bottom takes the most weight when you load your tote with groceries or art supplies. A little extra weight in the base yarn adds durability without making the whole bag heavy.
Now that the body and bottom are in place, it’s time for the handles. Cut two lengths of yarn about 1.5 times the height of the bag – a bit longer than you think you need, because you’ll fold them over the top edge later. Fold each length in half, slip‑stitch the loop together to form a sturdy cuff, then attach the cuff to the top edge of the bag using a whip‑stitch or a mattress‑stitch. For a clean look, pull the stitches tight and hide the knot inside the cuff.
Pro tip: if you’re making a bag for kids, add a second set of handles a few inches lower. That way the bag can be carried on a shoulder or a wrist, giving more flexibility.
All of this might feel like a lot of tiny steps, but think of it as building a small piece of furniture – each joint matters. If you find yourself losing momentum, try breaking the assembly into timed bursts. I personally love using a Pomodoro timer to stay focused; a quick 25‑minute sprint followed by a five‑minute break keeps the rhythm going and prevents fatigue. Learn how a Pomodoro timer can boost your crafting productivity.
Finally, give your finished bag a gentle block. Lightly mist the bag with water, lay it flat on a towel, and pin the edges to a board. As it dries, the fabric will settle into a perfect rectangle, and the corners will stay crisp. Once dry, weave in any remaining yarn tails with a yarn needle, and you’re ready to flaunt your new tote.
Need a visual refresher on the seam technique? Our step‑by‑step guide walks you through the invisible join in detail: How to Crochet a Granny Square Step by Step – CreativiU. It’s the same process you just used, just with photos to keep you on track.
Take a breath, admire the bag you just assembled, and think about the next project – maybe a matching clutch or a set of mini‑pouches. The skills you’ve just practiced – precise stitching, tension control, and smart time management – will pay off every time you pick up your hook again.
Step 4: Add Lining and Finishing Touches
Now that the body of your granny‑square tote is stitched together, it’s time to give it the inside that makes the whole thing feel sturdy and polished. Think of the lining as the hidden support crew – you might not see it, but without it the bag would sag or stretch out of shape.
Choosing the right lining fabric
For a tote that will carry books, groceries, or a child’s art supplies, you want something that’s lightweight yet durable. Cotton canvas, a sturdy linen blend, or even a recycled polyester fabric work beautifully. If you’re a creative entrepreneur, a fabric with your brand colours can double as a subtle marketing touch.
Quick tip: pick a lining that’s a shade or pattern that complements the yarn colours you used on the exterior. That way, when you peek inside, it feels like a coordinated surprise rather than a clash.
Cutting and prepping the lining
Measure the finished bag flat, then add an extra inch on each side for seam allowances. Cut two pieces – one for the front/back and one for the bottom flap if you added one. Use fabric scissors to get clean edges; a frayed edge will show up every time you open the bag.
Do you remember the Pomodoro timer you set for the assembly? Use the same focused bursts now: 20 minutes to cut, 10 minutes to pin, and a short break before you start sewing. It keeps the momentum going without fatigue.
Sewing the lining to the bag
Lay the lining inside the tote, right sides together, and line up the edges. Start stitching at the bottom seam with a simple running stitch or a small back‑stitch for extra strength. Work your way up the sides, leaving the top edge open – you’ll want that opening to be accessible for the handles.
When you reach the corners, pause and back‑stitch a couple of extra stitches. This reinforces the stress points where the bag will be lifted most often. If you’re comfortable with a sewing machine, a straight‑stitch at 3 mm is perfect; otherwise, a hand‑sewn slip stitch does the job nicely.
Once the side seams are done, turn the bag right‑side‑out through the top opening. Give it a gentle shake; the lining should sit nicely against the crochet panels, smoothing out any minor wrinkles.
Attaching the handles to the lining
Here’s a little secret: stitching the handles to the lining first makes the final attachment much cleaner. Thread a yarn needle with a length of yarn that matches your handle colour, then whip‑stitch the handle loops through the top edge of the lining, spacing them evenly. Pull the stitches snug but don’t pull so hard that the fabric puckers.
After the handles are secured to the lining, fold the top edge of the crochet exterior over the lining edge and stitch them together. A neat mattress stitch creates an almost invisible seam and keeps the handles firmly anchored.
Finishing the edges
Give the entire bag a final press with a warm iron (use a pressing cloth if you’re working with acrylic yarn). This flattens any stray loops and sets the seam lines. Then, weave in all loose yarn tails with your yarn needle – a tidy finish shows you care about the little details.
Finally, block the bag one more time. Lightly mist the interior lining and the crochet surface, then lay the bag flat on a clean towel, pinning the corners to a board. As it dries, the fabric will settle into crisp corners, and the crochet will relax into a perfect rectangle.
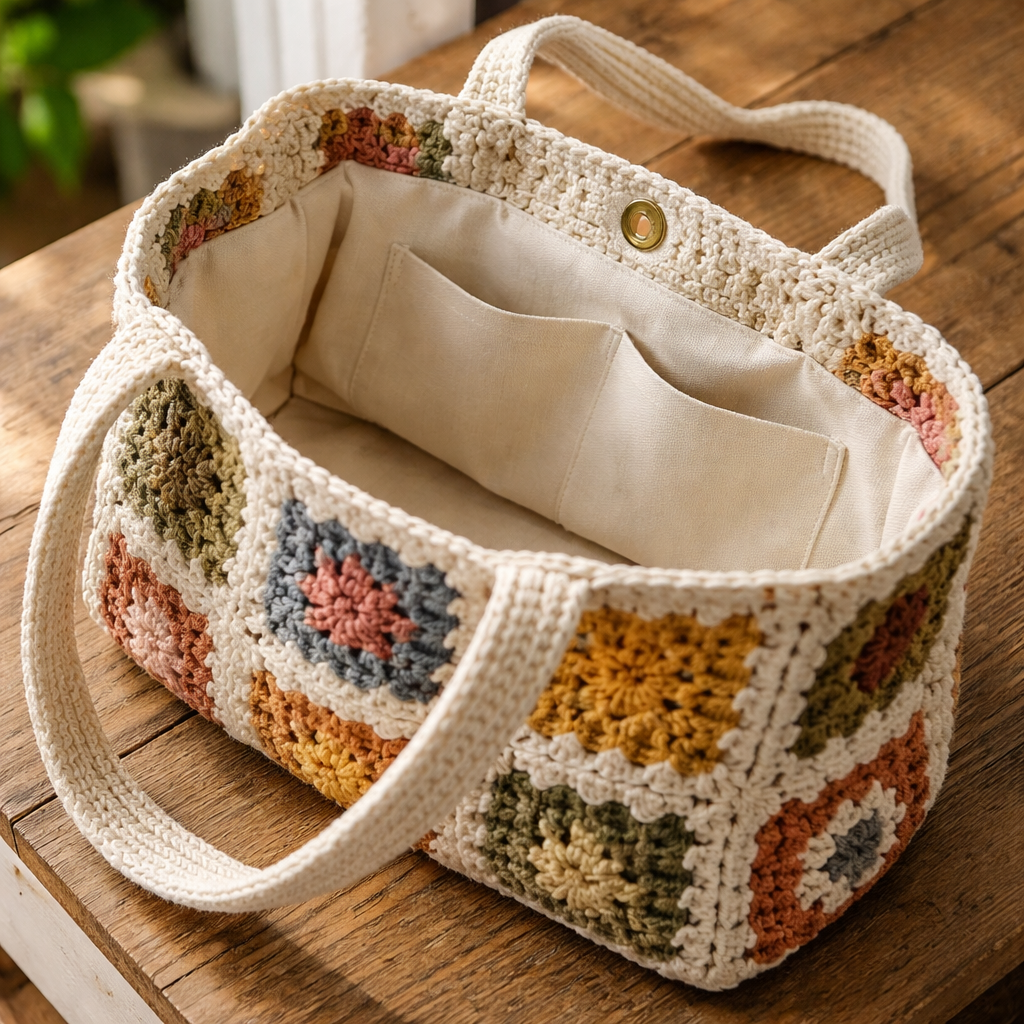
If you’d like a visual refresher on how to seam a lining into a crochet bag, our comprehensive granny‑square guide walks through the process with step‑by‑step photos.
And there you have it – a bag that not only looks gorgeous on the outside but feels solid on the inside. Whether you’re selling it at a market, gifting it to a friend, or using it for your own daily commute, those finishing touches turn a hobby project into a professional‑grade tote.
Yarn Comparison: Cotton vs. Acrylic vs. Wool
Choosing the right yarn is the single biggest decision you’ll make in a crochet granny square bag tutorial. The fibre you pick decides how the tote feels in your hands, how it handles daily wear, and even how much you’ll spend on supplies.
What each fibre brings to the table
Cotton is crisp, breathable, and loves colour. It drapes nicely, so a cotton‑based bag feels light as a feather but still holds shape once blocked. If you’re a hobbyist who loves swapping palettes for each season, cotton’s colour‑fastness is a blessing.
Acrylic is the budget hero. It’s soft, retains its shape after washes, and comes in every hue under the rainbow. Creative entrepreneurs often pick acrylic for market‑ready bags because it survives the hustle of repeated cleaning without shrinking.
Wool gives you warmth and a subtle loft. A wool bag has that cozy, slightly stretchy vibe that feels sturdy when you pack heavier items. Parents appreciate wool’s natural resistance to odors – perfect for a kids‑art‑supply tote.
Side‑by‑side comparison
| Yarn | Texture & Feel | Pros | Cons |
|---|---|---|---|
| Cotton (100% or blends) | Smooth, cool, slightly crisp | Excellent colour absorption, breathable, easy to block; good for summer bags | Can feel stiff when wet; may shrink if washed hot |
| Acrylic (e.g., Red Heart Super Saver) | Soft, plush, lightweight | Budget‑friendly, machine‑washable, retains shape; wide colour range | Less breathable, can pill over time |
| Wool (merino or blended) | Warm, slightly fuzzy, natural stretch | Durable, odor‑resistant, adds weight for a sturdy bottom | Can felt if washed hot; may itch for sensitive skin |
So, which one should you reach for? Think about the bag’s end use. If you need a tote that looks polished in a boutique setting, cotton’s crisp finish pairs beautifully with a linen lining – a combo we often showcase in our step‑by‑step granny‑square guide. For a market stall where you’ll wash the bag daily, acrylic saves you time and money. And if you’re making a gift for a parent who’ll lug school supplies, wool gives that extra durability without feeling cheap.
Another practical tip: mix fibres. A cotton front panel with a wool‑lined bottom gives you the best of both worlds – the visual appeal of cotton and the structural support of wool. It’s a little extra step, but the result feels like a professional‑grade tote you’d sell at a craft fair.
Finally, remember to test a swatch before committing to a whole bag. Hook a small square, block it, and feel how it reacts to water and weight. That tiny experiment can save you hours of re‑working later.
FAQ
What basic skills do I need before starting a crochet granny square bag tutorial?
You’ll want to be comfortable with a few core stitches – chain, single crochet, double crochet, and the magic‑ring or chain‑ring start. If you can finish a simple granny square without it curling, you’re ready. It also helps to know how to join squares with a slip‑stitch seam and how to block a finished piece so the edges stay crisp. Most hobbyists pick these up in our beginner courses before tackling the bag.
How many granny squares should I crochet for a medium‑size tote?
For a bag that’s roughly 12‑inch wide, we usually recommend 12 to 16 squares arranged in a 3‑by‑4 or 4‑by‑4 grid. The exact number depends on the yarn weight and hook size – a worsted yarn with a 5 mm hook will give you a sturdier panel than a fine DK yarn. Test one square, measure it, then multiply by the rows and columns you want; a quick spreadsheet can save you a lot of guesswork.
What is the best way to attach handles so they don’t pull out?
We’ve found that crocheting a short cuff with a heavier yarn, then slip‑stitching the cuff to the inside of the top edge, creates a strong anchor. After the cuff is in place, thread the handle through the loop and whip‑stitch it securely. Reinforce the seam with two extra single crochets at each corner; this distributes the weight and keeps the handle from tearing when you load the bag with groceries or art supplies.
Can I use a lining fabric if I’m a parent worried about spills?
Absolutely. A lightweight cotton or polyester lining acts like a rain‑coat for your yarn. Cut the lining to the bag’s interior dimensions, add a half‑inch seam allowance, and stitch a simple running seam around the edges. Leave a small opening at the top if you want to slip a fabric tab for an extra grip. The lining is washable, so kids’ snack‑spills won’t ruin the crochet exterior.
How do I keep my bag from sagging after I fill it with heavy items?
Sagging usually comes from a flimsy bottom. After you join the squares, crochet a single‑crochet border around the entire perimeter using a sturdier yarn – a cotton‑blend works well. This reinforces the base and adds a bit of weight where it matters most. Also, block the finished bag before adding handles; a well‑blocked shape holds its form better under load.
What should I do if my granny squares keep curling at the corners?
Curling is a tension issue. First, make sure you’re chaining three for each corner and that the corner clusters are consistent. After you finish a round, block the square: dampen it lightly, pin the edges to a board, and let it dry flat. If the curl persists, try a slightly larger hook or a yarn with a tighter twist. Many creators notice that a quick block after every two rounds keeps the squares perfectly square.
Conclusion
We’ve walked through every stitch, every seam, and every little trick that turns a handful of yarn into a tote you can actually carry.
Did you ever picture yourself pulling a finished granny‑square bag off the hook and feeling proud that you made it from start to finish? That moment is exactly why we love this crochet granny square bag tutorial – it’s a tangible win you can show off to friends, customers, or even your kids.
Remember the basics: pick a yarn that matches the bag’s purpose, block each square before you join, and reinforce the bottom with a sturdier border. Those three habits keep the bag from sagging and the corners from curling.
If you’re a creative entrepreneur, think about snapping a quick photo of the finished bag and sharing it on your socials; a polished image can turn a hobby project into a shop bestseller.
Parents, you’ve just discovered an activity that blends skill‑building with play – a perfect weekend project that leaves the kids with a usable tote and you with a new crafting confidence boost.
So, what’s the next step? Grab your hook, start your first square, and let the rhythm guide you. When you finish, you’ll have not just a bag, but a badge of accomplishment.
Leave a Reply