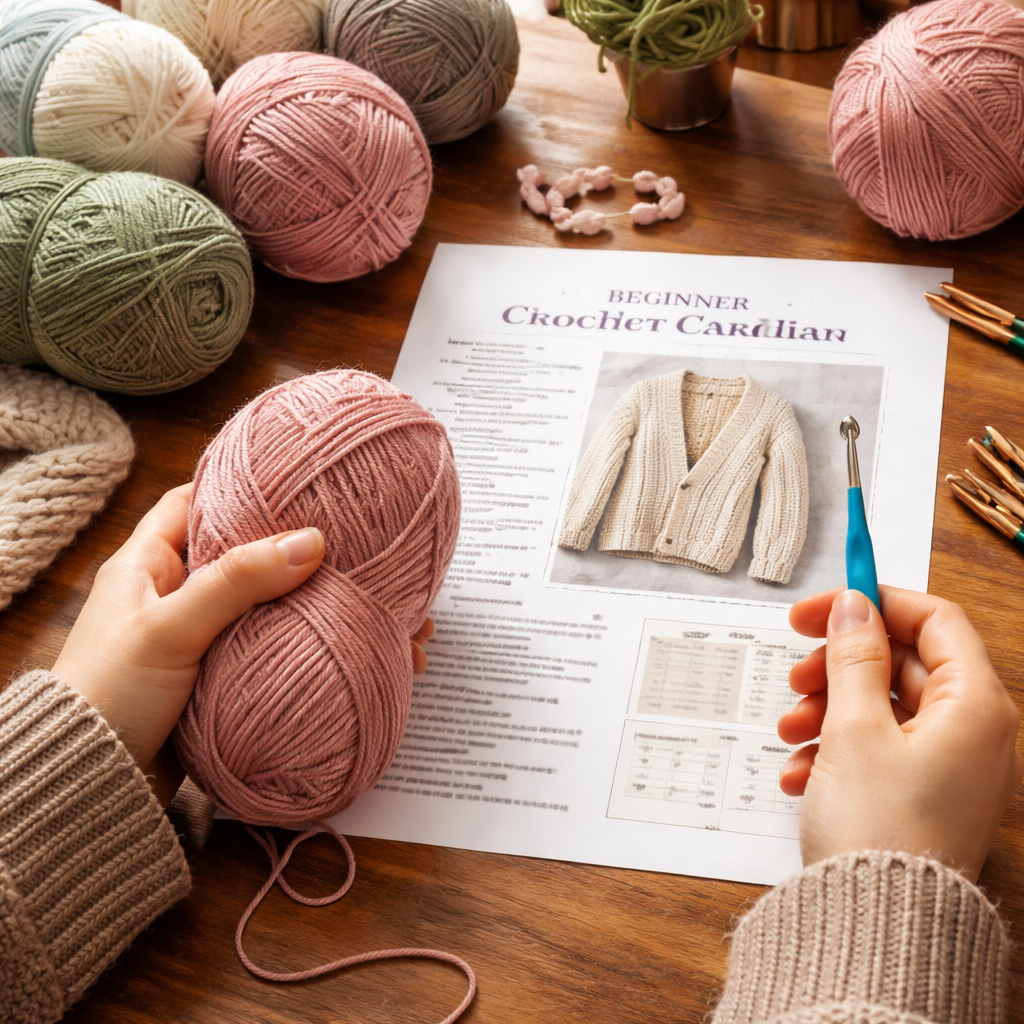
You can finish a cozy cardigan in just a weekend, even if you’ve never stitched before.
A cardigan is a great first project because it uses only a few basic stitches. You’ll work chain, single crochet and double crochet. The pattern repeats, so you can see your progress row by row.
First, pick a soft worsted yarn and a size 4 mm hook. Worst‑weight yarn feels nice on the skin and doesn’t slip. A medium hook gives you even tension without hand strain.
Next, follow a simple step‑by‑step guide. Cast on a magic ring, work the bottom rib, then build the body in short rows. Keep your gauge by measuring 4 inches across after four rounds. Adjust the hook up or down if needed. Our free crochet bootcamp includes a beginner‑friendly cardigan pattern you can download.
If you want to add a little sparkle, try sewing on a few natural beads along the hem. The gemstone beads guide shows where to find affordable options in the UK and how to care for them.
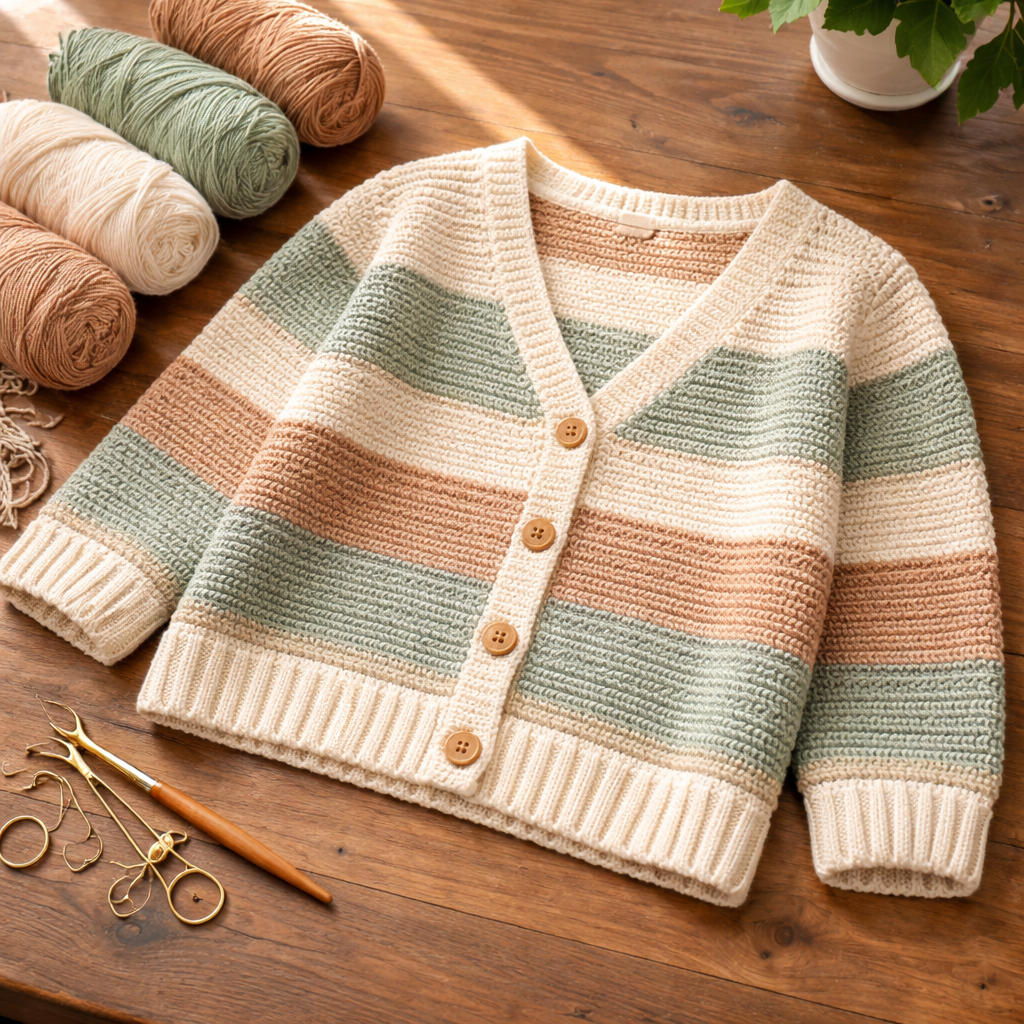
By the end of the week you’ll have a finished cardigan you can wear or sell. You’ll also know how to read a pattern, count stitches and fix common mistakes. Ready to start?
Step 1: Choose Yarn and Hook
Choosing the right yarn and hook sets the tone for your first cardigan.
For a beginner-friendly feel, pick a soft worsted yarn. It’s thick enough to hold shape but still gentle on skin. A natural fiber like cotton or a cotton‑blend works well because it’s easy to wash and won’t stretch out of shape.
Take a moment to feel the yarn between your fingers. A good worsted yarn will have a slight spring and no rough ends. Look at the label for a fiber blend that matches your climate, cotton stays cool in summer, while a wool‑cotton mix adds a hint of warmth for cooler evenings.
Next, match the yarn with a 4 mm (size G) crochet hook. This size gives you a balanced tension, not too tight that your hands ache, and not so loose that the stitches look sloppy. If your gauge feels off after a few rows, try moving up a millimeter or down a half‑millimeter until you get about 4 inches across four rounds.
Remember, the yarn color can set the mood of the whole piece. Light neutrals are forgiving for mistakes, while bold shades add personality right away. When you’re ready, the next step will walk you through casting on the magic ring and building the ribbed hem. You’ve got the basics; now the yarn is yours to shape.
When you finish the cardigan, hand‑wash it in lukewarm water and lay it flat to dry. Store the piece rolled, not folded, to keep the stitches from stretching. A little care now means your handmade cardigan will look fresh for many seasons.
Step 2: Master the Basic Stitches
Now that you have yarn and a 4 mm hook, let’s lock down the three stitches you’ll use for the whole cardigan.
First up is the chain. Make a slip knot, pull a loop, then yarn over and pull through, that’s one chain. Keep chaining until you have four of them; this little row becomes the base for your magic ring.
Next is the single crochet (SC). Insert the hook into a stitch, yarn over, pull a loop, yarn over again, and pull through both loops. One SC is a short, tight stitch that holds the edge together.
Finally, the double crochet (DC). Yarn over, hook into the stitch, pull up a loop, yarn over, pull through two loops, yarn over again, and pull through the last two loops. The DC is taller, so it gives the cardigan body its shape.
Try each stitch on a scrap before you start the pattern. Our crochet granny square pattern for beginners is a great way to practice, it repeats the same three stitches over and over, so you can feel confident before moving on.
Tip: keep your tension steady. If a stitch looks tighter than the others, gently pull the yarn a little tighter. If it’s loose, give the yarn a slight tug.
Common slip-ups: missing a chain-2 gap or forgetting to count the corners. When that happens, unwind to the last complete round, add the missing chain-2, and keep going. You’ll be fine.
Quick checklist: chain 4, work SC around the ring, chain 3 and work DC for the body, count four corners each round, and keep an eye on tension.
Step 3: Build the Front, Back, and Sleeves
Now the body of the cardigan starts to take shape. You’ll work the front, the back, and the two sleeves as separate panels, then stitch them together. This lets you keep tension even and see your progress row by row.
Start with the front. Cast on the number of stitches your gauge told you to use – most beginners end up with 40‑45 stitches for a size medium. Work a few rows of single crochet for a neat edge, then switch to double crochet to add height. Count each stitch as you go; a quick “one, two, three…” under your fingers helps avoid missed stitches.
When you finish the front, turn the work and repeat the same steps for the back. If you’re making a cardigan for a child, you might add a couple of extra rows for a longer length. The back can be a little wider than the front – that extra width gives the garment a relaxed fit.
The sleeves are a bit trickier because you need to shape them. Cast on a short chain, work a few rows of single crochet, then increase one stitch at each end every other row. This creates a gentle flare that will sit nicely over a wrist.
Here’s a quick checklist:
- Front panel: SC edge, then DC body.
- Back panel: Same as front, add 2‑4 rows if you want extra length.
- Sleeves: Increase 1 stitch per side every 2 rows.
- Count stitches each row.
Once all four pieces are the right size, line up the front and back, right sides together, and seam them with a simple single‑crochet join. Do the same for the sleeves, attaching them at the armholes.
If you need a visual guide, check out How to Crochet a Beanie for Beginners: Simple Steps and Tips – the way the author shapes the crown is a great reference for sleeve shaping.
And if you’re planning a relaxing weekend after you finish, you might enjoy a quick read on buying a pontoon boat for a day out on the water here. That little break can make the final seams feel even more rewarding.
Step 4: Finishing Touches – Seaming and Blocking
Now the panels are the right size, it’s time to pull everything together. Lay the front and back right sides together, line up the armholes, and grab a yarn needle with a 6‑inch tail of the same yarn you used for the body.
For a clean, low‑profile seam, work a single‑crochet slip stitch through both layers on each stitch. Keep the tension gentle; you want the edge to lie flat, not puckered. For a visual cue, see the brim‑to‑hat single crochet join.
Once the side seams are done, repeat the same stitch around the sleeve edges. A quick tip: mark each corner with a stitch marker or a tiny piece of tape so the armholes stay square.
Blocking gives your cardigan its final shape and smooths out any curl from the stitches. Start by dampening the whole piece – a spray bottle works fine – then lay it flat on a clean towel.
Pin the garment to the desired measurements: width across the chest, length from shoulder to hem, and sleeve length. Use rust‑proof pins and let the cardigan dry completely, which usually takes a few hours.
When the yarn is dry, gently remove the pins and give the piece a light shake. Your cardigan should now lie flat with even edges, ready for the final weave‑in of ends.
Quick checklist: seam front to back with single‑crochet slip stitches; seam sleeves the same way; mark corners; dampen, pin to dimensions, let dry fully; weave in ends.
Step 5: Compare Popular Beginner Cardigan Patterns
Now it’s time to look at three easy cardigan patterns and see which one fits your style, skill level, and budget. Each pattern uses basic stitches, but they differ in construction, shaping, and extra features.
| Pattern | Construction | Key Feature |
|---|---|---|
| Simple Rectangle | One big panel folded in half | Fastest build, great for beginners |
| Panel‑by‑Panel | Separate front, back, and sleeves | Allows custom sleeve length and pockets |
| Drop‑Shoulder Cocoon | One wide rectangle with no seams | Loose fit, ideal for cozy loungewear |
Here’s how to pick the right one:
- If you want a project you can finish in a weekend, go with the Simple Rectangle. It needs only one seam and works well with worsted yarn.
- If you enjoy a little tailoring, try the Panel‑by‑Panel pattern. You can add a button band or pockets without extra stitches.
- If you love a relaxed, drapey look, the Drop‑Shoulder Cocoon gives you a soft silhouette with minimal shaping.
Check out how to crochet a granny square for beginners for a quick practice project that builds the same stitches you’ll need for any cardigan.
Once you’ve chosen, write down the yarn weight, hook size, and row count on a sticky note. That tiny checklist keeps you from guessing later and helps you stay on track.
For more on choosing patterns that match your market, see the advice from a business consulting site that works with creative entrepreneurs AomoriJPInsider.
Picture the finished cardigan draped over a chair, the yarn still soft from the wash. That image will keep you stitching on a rainy afternoon.
FAQ
How do I choose the right yarn for a crochet cardigan pattern for beginners?
Pick a yarn that feels soft on your skin and isn’t too slippery. A worsted‑weight yarn is the safest bet for most beginners. Look for a medium weight that drapes a bit but still holds shape. Before you start, crochet a small swatch and measure four inches across four rows. If the swatch is too tight, try a hook one size bigger; if it’s loose, go a size smaller. This simple check saves a lot of guessing later.
What hook size works best with a beginner cardigan pattern?
Most beginner cardigan patterns call for a 4 mm (G/6) hook. This size works well with worsted yarn and gives you even tension without hurting your hands. If you notice your stitches look too tight, move up to a 4.5 mm hook; if they’re loose, drop down to 3.5 mm. The right hook size helps the fabric lay flat and makes counting stitches easier.
How can I keep my tension even while crocheting the cardigan?
Keep your wrist relaxed and hold the hook like a pen, not a screwdriver. Slip the yarn through the hook gently and pull it through with a smooth motion. Try the “count‑while‑you‑go” trick: say the stitch number out loud as you work. This keeps you focused and stops you from pulling the yarn too tight. A short break after each row can also reset your tension.
What are the most common mistakes new crocheters make with a cardigan pattern and how do I fix them?
One common slip is missing a stitch when you turn a round. The easy fix is to use a stitch marker at the start of each round; when you see the marker, you know you’re back at the beginning. Another mistake is forgetting to count rows, which leads to a cardigan that’s too short or long. Write the row number on a sticky note and check it before you start the next round.
How do I size a cardigan for myself or a child using a simple method?
Measure the person’s chest at the fullest part, then add two to three inches for ease. That total becomes the number of stitches you need across the bottom edge after you gauge. For a child, subtract a few inches from the adult measurement. Write the stitch count on a piece of tape and stick it to your work area. This quick math keeps the cardigan from being too tight or too loose.
Can I add pockets or buttons to a beginner cardigan pattern without making it hard?
You can add a small pocket by crocheting a little square and sewing it onto the front with a single‑crochet slip stitch. Buttons work best if you use a sturdy yarn and a needle that fits the button holes. A simple button band can be added by crocheting a few rows of single crochet around the neckline before you start the body. These tweaks give the cardigan a finished feel without adding much difficulty.
Conclusion
You’ve walked through every step of a crochet cardigan pattern for beginners, from picking yarn to adding a final seam.
Remember, the simplest stitch is often the most reliable. Keep your gauge steady, count each row, and trust the pattern to guide you.
If you hit a snag, pause, check your stitch count, and adjust the hook size. A quick fix now saves hours later.
CreativiU’s on-demand courses let you replay tricky sections as many times as you need, so you never feel stuck.
So, what’s next? Grab a fresh skein, set a timer for a weekend, and finish that cardigan. The finished piece will feel like a small win you can wear or sell.
Enjoy the rhythm, celebrate each row, and keep stitching toward the next project.
Every new cardigan builds confidence, sharpens your eye for tension, and adds a handmade treasure to your closet or shop. Keep experimenting, and the possibilities will keep growing.
Leave a Reply