Gouache painting is one of those art forms that beautifully combines the richness of watercolor with the opacity of acrylics. Many people are captivated by its vibrant colors and smooth finish but hesitate because they don’t know where to start. Ever wondered how artists achieve those flawless layers and textures with gouache, step by step?
If you’ve been longing to dive into gouache painting but feel overwhelmed by the techniques or unsure how to practice them effectively at home, you’re in the right place. A step-by-step online gouache painting techniques course can be the game-changer that transforms your approach, making complex skills approachable and fun.
This kind of course breaks down essential skills piece by piece—from brush handling and color mixing to layering and creating depth—helping you build confidence with every stroke. Instead of guesswork and frustration, you get clear guidance tailored for beginners and those looking to refine their style.
And it’s not just about following lessons; it’s about discovering your personal artistic voice through structured, interactive learning. What if you could paint stunning landscapes, delicate florals, or vibrant abstracts with gouache, guided by expert instruction and a supportive creative community?
We know it’s easy to get distracted by all the options out there, or to feel stuck when trying to learn on your own. That’s why an expertly designed online course from CreativiU offers more than just videos—it offers a creative journey with feedback, peer interaction, and project ideas tailored to your pace.
Curious how you can transform your hobby into a thriving passion or even a side business? This course’s stepwise method ensures you get both technical skills and creative inspiration, so you don’t just paint—you express.
Ready to explore how gouache can open new doors for your creativity? Let’s dive in and uncover the secrets of mastering gouache with an approachable, step-by-step online gouache painting techniques course.
And if you want to cultivate your artistic skills further, don’t miss our insights on how to acquire new creative skills effectively, where you’ll find strategies that complement your painting journey seamlessly.
TL;DR
Ready to unlock your creativity with gouache? This step-by-step online gouache painting techniques course guides you through essential skills, from mixing colors to mastering brushwork, all at your own pace.
With expert feedback and a supportive community, you’ll gain confidence and create vibrant paintings that truly express your style.
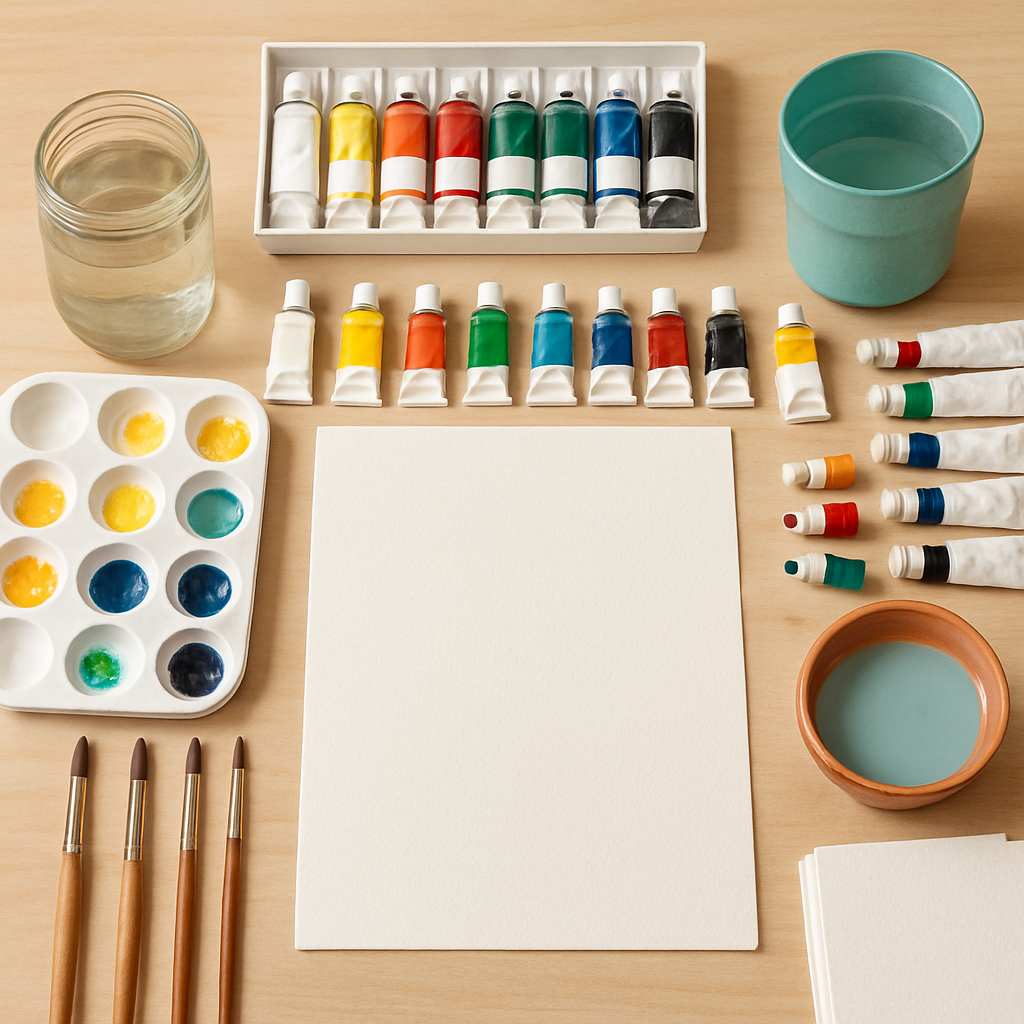
Step 1: Preparing Your Gouache Supplies and Workspace
Before you dip your brush into those vibrant gouache paints, have you ever stopped to think about how your setup might be influencing your creativity? Getting your supplies and workspace ready isn’t just about neatness—it’s the first essential step in mastering gouache painting.
So, what supplies do you absolutely need to kick off your journey in our step-by-step online gouache painting techniques course? Let’s break it down.
Your Gouache Essentials
First up, gouache paints. Unlike watercolors, gouache is opaque and more forgiving, making it perfect whether you’re a beginner or polishing your skills. Grab a basic palette of primary colors (red, yellow, blue), plus white and black to mix a variety of tones. Higher-quality pigments deliver better vibrancy and blend, so investing in student-grade or artist-grade gouache will pay off in your projects.
Have you thought about brushes? You don’t need a mountain of options; versatility is key. Synthetic brushes with a fine point or flat edges let you do detail work and washes alike. Medium-sized round brushes (#6 or #8) are a sweet spot for most gouache painting needs. Remember, keeping your brushes in good shape by rinsing often prevents dried gouache from ruining their tips.
Next, pick the right paper. Gouache loves watercolor paper thanks to its absorbency and texture. Opt for heavyweight (140 lb/300 gsm or more) cold-pressed watercolor paper sheets or pads. If you want to try something different, heavyweight mixed media paper also works well. Avoid thin sketchbook paper—it’ll buckle and warp with multiple paint layers.
Workspace Setup: Make It Your Creative Sanctuary
Ready to paint? Your workspace can be the difference between frustration and flow. Choose a flat, stable surface with good natural light or a daylight lamp to see colors vividly. If you paint near a window, the indirect light helps avoid harsh shadows on your work.
Have you arranged your supplies within arm’s reach? Keep your paints, water container, brushes, and paper towels handy but organized. Using a palette with wells or mixing trays lets you experiment with colors without making a mess. Experiment with a palette like this recommended gouache palette design for better mixing control and easy cleanup.
Protect your surface! A plastic mat or an old newspaper layer can save you from accidental stains—and yes, gouache can be stubborn once dry. Wearing a smock or old clothes is also a smart move so you can focus on creativity instead of worry.
Water and Cleanliness: Your Secret Gouache Weapons
Water is key—not just to dilute your gouache but also to clean brushes between colors. Use two containers if possible: one for rinsing, one fresh clean water for diluting paint. This helps keep colors pure and your brush strokes crisp.
Got any leftover paint? Gouache dries quickly but can be reactivated with a little water later. So don’t throw away leftover globs—store them in a sealed palette or container for your next session.
One pro tip: test your mixed colors on scrap paper before committing them to your final piece. This will save you the frustration of surprises and help you master the blending techniques taught in this course.
Curious about how to engage deeper with such creative setups? Check out our ultimate guide to creative learning and development for practical tips on building a workspace that boosts your artistic flow.
By carefully preparing your supplies and environment, you’re already setting yourself up for success. A well-planned space means fewer distractions, less cleanup stress, and more time doing what you love: painting.
Excited to see how these simple steps will revolutionize your gouache experience? Let’s keep this momentum going as you dive deeper into creative techniques with us.
Step 2: Mastering Gouache Paint Mixing and Color Theory
By now, you’ve got your workspace organized and your supplies ready. So, what’s next? It’s time to really dive into one of the most exciting—and challenging—aspects of gouache painting: mixing your paints and understanding color theory.
Mixing gouache isn’t just about creating colors you like; it’s about mastering how colors interact and using that knowledge to bring your artwork to life. Doesn’t that sound empowering?
Get To Know Your Colors: The Basics of Color Theory
First, let’s break down some essentials. Color theory might sound intimidating, but it really boils down to understanding how colors relate. There are four key factors you’ll want to focus on:
- Hue: The actual color family—like red, blue, or green.
- Value: How light or dark a color is.
- Saturation: How intense or muted the color appears.
- Temperature: Whether a color feels warm (think yellow and red tones) or cool (blues and greens).
Why does this matter? Because when you mix gouache paints, these factors determine whether your color blends will feel harmonious or clash on the page. For example, mixing a warm yellow with a cool blue can create unexpected and beautiful shades that add depth.
If you want a deep dive, Ann Shen’s guide on painting a custom color wheel with gouache is a fantastic resource to see these concepts in action.
Craft Your Own Color Wheel: A Game-Changer
Here’s a little secret: creating your personal color wheel will transform your painting game. Instead of just grabbing random tubes, you’ll start mixing purposefully. And trust me, it’s super fun!
To start, select your own “primary” colors—a slight twist on the classic red, yellow, and blue. Maybe try turquoise instead of blue or yellow ochre instead of plain yellow. This personalization helps you discover color palettes that truly resonate with your style.
Sketch a circle divided into 12 sections. Paint your chosen primary colors first, then mix and add secondary (a mix of two primaries) and tertiary colors (mixes between primary and secondary). This hands-on wheel lets you experiment safely—you’re in control.
Mixing Gouache Colors Like a Pro
Now, here’s where things get juicy. Gouache is wonderfully opaque, but if you add too much water, you’ll lose that vibrancy. So, use water sparingly when mixing—it’s a delicate balance that takes practice.
Try mixing in layers from light to dark shades. For instance, start with a base color, then add white to create tints or add a darker pigment for shaded tones. Remember, it’s easier to add color gradually than to fix an overpowering hue.
And here’s a tip that’ll save your skin: invest in a good amount of white gouache. White is your best friend—it lightens colors without muddying them and lets you create gorgeous highlights and subtle gradients.
Wondering about palettes? Always start with a clean mixing palette. Gouache reactivates easily with water, so leftover paint can mess with your new mixes. Cleaning your palette between sessions keeps your colors pure and predictable.
Also, don’t be afraid to experiment! Mixing colors is as much about trial and error as it is about science. With time, you’ll develop an intuitive feel for which colors blend beautifully and which combinations create tension or excitement in your art.
Use Color Temperature and Complementary Colors to Your Advantage
Thinking about perspective and mood? Warm colors tend to come forward in a painting while cool colors recede. This simple trick helps create depth without complicated techniques.
Complementary colors—those opposite each other on the color wheel like blue and orange or red and green—make each other pop when placed side by side. Using these can add vibrancy and visual interest that grabs attention.
For more on mixing perfectly harmonious gouache hues, the comprehensive guide at Altenew explains how to achieve the perfect hue with gouache with practical tips and pro tricks.
Lastly, if you feel stuck or uninspired, online color palette generators like Coolors can jumpstart your creativity with fresh schemes you might never have considered.
Ready to Master Your Palette?
Remember, mastering gouache paint mixing and color theory is a journey, not a race. With your new understanding, you’re now equipped to start experimenting confidently in our step-by-step online gouache painting techniques course.
Keep mixing, keep exploring, and most importantly, enjoy the process. Your unique color style is waiting to shine!
Step 3: Fundamental Gouache Painting Techniques for Beginners
Now that you’ve gotten comfortable with mixing colors and understanding color dynamics, it’s time to dive into the actual painting techniques that bring your gouache artworks to life. Whether you’ve picked up a brush for the first time or you’re looking to sharpen your foundational skills, mastering these basics will set you up for success in your gouache journey.
1. Mastering Opacity and Transparency
Gouache is known for its unique ability to be both opaque and transparent, depending on how it’s applied. Want to create vibrant solid areas? Load your brush with thick gouache and apply it straight from the palette. Looking to build delicate layers? Thin down your paint with water to let underlying colors peek through.
Have you noticed how watercolor-like washes can add depth without muddying colors? That’s where controlled transparency shines. Start experimenting by diluting the paint with varying amounts of water and watch how the look changes. This simple trick is pivotal; it allows you to add dimension without covering up your base.
2. Layering Without Muddying
Layering is exciting but can quickly become frustrating if colors turn muddy. A big part of using gouache skillfully is waiting for layers to fully dry before adding another. Gouache dries fast, but rushing can cause unwanted blending.
Pro tip: Patience in drying lets you paint sharp edges and maintain color vibrancy. Also, use light touches and be mindful of your color choices when layering. If a second layer is darker, think about using glazes—thin, transparent layers—to enrich colors subtly rather than cover them.
3. Brush Techniques: Strokes, Edges, and Textures
Your brush is an extension of your hand, so getting familiar with how it moves helps immensely. Try out different strokes: short dabs for texture, long smooth strokes for gradients, and dry brushing for added texture.
Dry brushing is a technique where you dip your brush lightly in paint, remove excess water, and lightly drag it across the paper for a rough, broken texture. It’s perfect for suggesting texture like hair, fabrics, or leaves without heavy detail.
Ever struggled with crisp edges? Gouache excels at that! Use a fine brush with thick paint to create outlines or small details. If you want softer edges, add a bit of water to your brush for a gentle blend.
4. Using Gouache to Correct Mistakes
One of gouache’s superpowers is its opacity, which allows you to paint over mistakes or unwanted areas easily. Unlike transparent watercolors, you’re not stuck if you mess up.
Don’t be afraid to cover up parts of your painting. Many artists use gouache like a white-out tool, waiting for the paint to dry before layering new work on top. This forgiving nature supports creative risk-taking and helps beginners build confidence.
Ready to Practice These Techniques?
The best way to internalize these skills is through guided practice. For a comprehensive experience, consider enrolling in a step-by-step online gouache painting techniques course where these fundamentals are explored with real-time demos and feedback tailored to your pace.
Here’s a quick comparison table to help you decide which techniques to focus on first and tools you might need:
| Technique | Primary Tool/Approach | Tips/Notes |
|---|---|---|
| Opacity Control | Brush loaded with thick or diluted gouache | Experiment with water ratios for varied transparency |
| Layering | Thin glazes built up after dry layers | Wait for full drying to maintain color clarity |
| Brush Strokes & Textures | Various brushes (round, flat, dry brush) | Use dry brushing for texture; fine tips for details |
If you want to delve deeper into the science of gouache layering and pigmentation, the Jackson’s Art guide on gouache techniques offers an excellent breakdown. Plus, exploring how professional artists execute these techniques through Skillshare’s beginner-friendly video classes can make a huge difference.
Have you tried dry brushing yet? Or using gouache to correct your art? Embrace these fundamental methods—soon you’ll not only be painting but painting with confidence and style.
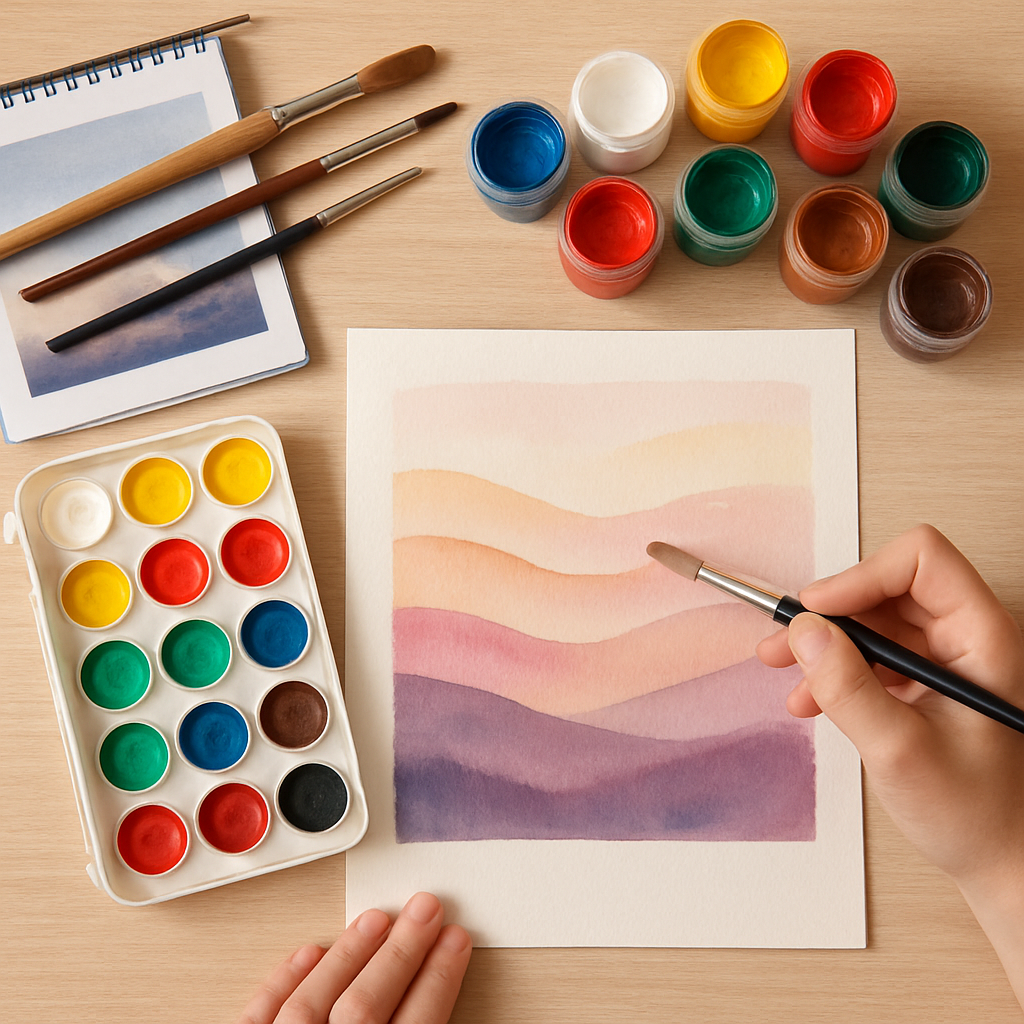
Step 4: Creating Your First Gouache Painting Project
Ready to bring those gouache techniques to life? Creating your first gouache painting project is where everything you’ve learned clicks together. This step-by-step process helps you apply layering, opacity control, and brushwork skills to build a vibrant, expressive painting.
Choose a Simple Subject
Start with something manageable and inspiring—a still life, a simple landscape, or a favorite object like a flower or fruit. Keep it simple to focus more on exploring how gouache behaves rather than getting bogged down in complex details.
Why is a simple subject important? When you’re learning, complexity can overwhelm your new techniques. It’s easier to see how your layers interact or how you can adjust opacity when the shapes and colors are straightforward. Once comfortable, you can tackle more ambitious pieces.
Set Up Your Workspace Thoughtfully
Organize your materials before you dive in. You’ll need gouache paints, brushes (a round brush and a flat brush are essential), a palette, clean water, and heavyweight watercolor or mixed-media paper. Good lighting is crucial too—natural daylight or a daylight lamp will keep colors true.
Have you noticed how much clutter or dim lighting can quietly sabotage your creativity? Clear your space and prepare everything in advance so your focus stays on the painting.
Plan Your Painting in Layers
One of gouache’s greatest strengths is layering. Plan to build your painting gradually by working from light to dark or broad shapes moving toward fine details. Begin with thinner washes to map out your composition and shadow areas, then let each layer fully dry before adding the next.
This technique avoids muddy colors and keeps your painting vibrant. If you’re unsure on drying times, consider setting a kitchen timer for 15–30 minutes depending on layer thickness. Patience here pays off!
Experiment with Opacity and Texture
Use your brush loaded with diluted paint to create translucent layers, revealing the colors beneath, or choose thick paint for strong, solid areas. Try dry brushing to add texture or mix gouache with a little medium designed for opacity control if you want richer colors. These experiments deepen your understanding of how gouache responds.
Wondering how to fix a small mistake? One great advantage of gouache is you can paint over errors once the layer is dry. This forgiving trait lets you refine your work without fear.
Final Touches and Reflection
Once your layers are complete and the painting is dry, step back and assess your work. Are there areas that need more contrast or detail? Use a fine brush for final highlights or sharp edges. It’s all about refining the story your painting tells.
Remember, every first project teaches you something new, even if it’s not perfect. Many artists find early projects like this spur their confidence and set the stage for more creative experiments.
To deepen your knowledge on layering techniques, resources like the Jackson’s Art guide on gouache painting provide expert tips and illustrations. Additionally, a structured step-by-step online gouache painting techniques course can guide you through practical demos that bring this project-based learning to life with professional guidance.
Taking this last step and completing your first gouache painting project isn’t just about creating art—it’s about cementing your skills and building the confidence to explore your unique creative vision. So, grab your brushes, set up that simple subject, and start layering your masterpiece today!
Step 5: Troubleshooting Common Gouache Painting Challenges
If you’ve followed a step-by-step online gouache painting techniques course, you’re probably already enjoying layering vibrant colors and watching your artwork come alive. But let’s be real—gouache can be tricky. You might bump into some common issues that can feel frustrating when they pop up. Don’t worry; these challenges are part of the learning curve, and troubleshooting them will only make you a stronger artist.
Why does gouache sometimes crack or flake off?
This often happens when layers are too thick or dry too fast. Gouache is designed to be applied in thin coats. If you apply a heavy, wet layer on top of a dry one, the paint underneath can crack as it reacts to moisture. The fix? Always build your painting with thin layers, letting each dry completely before adding more.
If cracking persists, try lightly sanding the dry paint with fine sandpaper before applying new layers to improve adhesion. For more insight on paint behavior, Jackson’s Art provides detailed guidance on gouache layering.
How do I avoid colors turning muddy or dull?
Mixing gouache colors can be a bit of a dance. If you’re blending too many pigments or layering too thickly without drying, colors can lose their vibrancy and become muddy. Opt for limited color mixing, and always let your layers dry before applying another to keep your hues fresh.
A handy tip is to test your color mixes on scrap paper first to preview the result. Also, consider using opaque white or lighter colors to add highlights instead of diluting colors too much for brightness.
My paint keeps getting patchy or uneven. What’s going on?
Patchiness is often caused by inconsistent paint dilution or surface texture. If your gouache is too thick, it won’t spread evenly, and if it’s too watery, it may appear streaky. Try to maintain a creamy consistency—thicker than watercolor but smoother than traditional acrylics.
Additionally, make sure your paper or surface is suited for gouache. Cold press watercolor paper or illustration board usually works best since they hold the paint evenly without warping.
Why do some areas re-wet and ruin my previously painted sections?
Unlike acrylics, gouache reactivates with water even after drying. That’s great for blending but tricky when layering detailed work. To avoid disturbing dry areas, paint in sections and let each part dry thoroughly before working nearby.
If you accidentally reactivate a section, gently blot with a clean brush or paper towel—don’t rub! This helps absorb excess moisture without damaging the paint.
Where can I get more practice and personalized tips?
Working through a step-by-step online gouache painting techniques course like the ones offered by CreativiU can give you hands-on experience and troubleshooting advice tailored to your style. The community aspect lets you ask questions and share paintings to get feedback—something that’s invaluable when overcoming common challenges.
Remember, patience and persistence are your best allies. Every “mistake” is a stepping stone to mastering your craft, so keep experimenting and refining your approach.
Conclusion
Wrapping up, diving into a step-by-step online gouache painting techniques course is a game-changer for anyone looking to seriously develop their artistic skills. By following a structured approach, you avoid those common pitfalls like uneven layers or accidentally reactivating dry paint. Instead, you gain confidence and control over this versatile medium.
Think about it: how often have you wished for clear, guided instruction instead of guessing your way through? That’s exactly what a well-designed course offers—progressive lessons that build your skills piece by piece. Plus, interactive platforms like CreativiU add that extra layer of personalized feedback and community support, making practice less lonely and way more fun.
Remember, mastery doesn’t happen overnight. Every stroke, every mistake is part of your learning journey. With persistence and the right guidance, you’ll find yourself transforming blank paper into vibrant, expressive art.
So what should you do next? Start by choosing a course that matches your pace and style. Make a habit of practicing regularly and don’t shy away from experimenting with techniques you find challenging. The more you immerse, the more creative freedom you unlock.
Ready to elevate your gouache game? The path is clear and the tools are at your fingertips. Keep painting, keep growing, and let your creativity shine bright.
Frequently Asked Questions about Gouache Painting Techniques
Feeling a bit stuck with gouache? You’re not alone. Gouache offers so much versatility but also comes with its own quirks, so it’s natural to have questions as you dive deeper. Let’s clear up some of the biggest curiosities to help you paint with confidence.
Can I mix gouache with other types of paint like watercolor or acrylic?
Great question! While gouache shares a lot in common with watercolor — especially its rewettable quality — mixing it directly with watercolor may result in unpredictable textures because gouache is more opaque and has a different binder. Acrylics, on the other hand, dry permanently and don’t rewet, so mixing gouache with acrylics isn’t recommended if you want smooth blending. However, layering gouache over dried acrylic can add interesting effects.
How do I prevent gouache from cracking or flaking after drying?
This is a common concern. Gouache tends to dry to a matte finish and can crack if applied too thickly or on a surface that isn’t suitable. Make sure you’re using good quality paper designed for gouache or mixed media. Avoid heavy layering in one spot. Thin, controlled layers built up gradually keep your painting flexible and vibrant.
Is it true gouache can be reactivated after drying? How do I manage this?
Yes! Unlike acrylic or oil paints, dried gouache can be reactivated with a little water. That’s a blessing and a challenge. If you’re not careful, your finished painting can get smudged. To avoid this, consider sealing your artwork once it’s dry with a spray fixative. Also, when you work, let each layer dry fully before adding another to maintain control.
What brushes work best for gouache painting?
You don’t need a fancy arsenal. Synthetic brushes are ideal since they hold water well and keep their shape. Round brushes for detail, flats for washes and layering—having these basics will let you explore everything from smooth gradients to textured strokes.
How do I store gouache paint and keep it fresh?
Storing gouache properly can extend the life of your paint. Keep it in airtight containers or tubes to prevent drying out. If you buy pan sets, use a damp sponge or blotter nearby to maintain moisture but avoid direct contact. Regularly check your palettes and rinse brushes thoroughly to avoid mold or contamination.
Can beginners really master gouache with an online course?
Absolutely. That’s exactly why a step-by-step online gouache painting techniques course is such a powerful tool. Courses break down complex skills into bite-sized lessons that build up your confidence gradually. Plus, platforms like CreativiU offer personalized guidance and a creative community, so you never paint in isolation. It’s a supportive environment that accelerates your learning journey.
Any tips for practicing gouache daily without getting overwhelmed?
Start small. Set aside just 10-15 minutes each day to experiment with colors, blending, or texture techniques. Keep a dedicated sketchbook or palette for practice to track progress over time. Remember, mistakes aren’t setbacks—they’re moments of discovery. Keep your approach playful and curious.
Got more questions as you explore your gouache journey? That’s natural, and there’s always room to learn. But with these answers and the right step-by-step online gouache painting techniques course, you’ll find yourself embracing this medium with new energy and skill. Why not take the plunge today and see what vibrant creations you can bring to life?
Leave a Reply