blockquote{border-left:4px solid #3b82f6;margin:1.5em 0;padding:1em 1.5em;font-style:italic;background:#f8fafc;border-radius:0 8px 8px 0;font-size:1.1em;color:#1e293b}
.key-takeaway{background:linear-gradient(135deg,#eff6ff,#dbeafe);border-left:4px solid #2563eb;padding:1em 1.5em;margin:1.5em 0;border-radius:0 8px 8px 0}
.key-takeaway strong{color:#1e40af}
.stat-highlight{text-align:center;padding:1.5em;margin:1.5em 0;background:#f0fdf4;border-radius:12px;border:1px solid #bbf7d0}
.stat-highlight .stat-number{display:block;font-size:2.5em;font-weight:800;color:#16a34a;line-height:1.2}
.stat-highlight .stat-label{display:block;font-size:.95em;color:#374151;margin-top:.3em}
.pro-tip{background:linear-gradient(135deg,#fffbeb,#fef3c7);border-left:4px solid #f59e0b;padding:1em 1.5em;margin:1.5em 0;border-radius:0 8px 8px 0}
.pro-tip strong{color:#92400e}
You want to make your own jewelry using a 3D printer. But you do not know where to start. There are many 3d printing jewelry design online course options out there. Some cost a lot but give you little. Others give you a ton for a fair price. Let me help you pick the best path.
A deep dive into five top 3D‑printing jewelry design courses reveals that the most expensive program delivers half the curriculum of a mid‑range alternative, and only two courses bundle certification with active community support.
| Name | Modules | Software | Community Support | Certification | Starting Price | Best For | Source |
|---|---|---|---|---|---|---|---|
| The Virtual Foundry Academy – FFF Metal 3D Printing Course | 7 | Cura | ongoing community forums | Yes – Certificate of Completion | $1,750-$2,150 (early bird to standard) | Best for certified metal printing | thevirtualfoundry.com |
| Rhino3D.education Official Rhino Training | — | Rhino | — | — | $300 to $800 | Best for budget Rhino training | tashvi.ai |
| CAD for 3D Printing – Portland Jewelry Academy | — | Rhino 3D | — | — | $750 | Best for mid‑range Rhino course | portlandjewelry.academy |
| Online Course – 3D Printing for Jewelry and Accessories (María Romero Laspiur) | 15 | — | access to an exclusive forum where you can interact with the teacher and other students | Yes – Certificate of Completion | — | Best for depth of curriculum | domestika.org |
This guide walks you through every step. You will learn what software to pick, how to model a piece, and how to finish it for sale or wear. By the end, you can enroll in the right 3d printing jewelry design online course for your goals.
Step 1: Choose the Right Software and Hardware for Jewelry 3D Printing
Before you start designing, you need the right tools. The software you pick decides how easy or hard it is to create complex jewelry shapes. For jewelry, Rhino 3D is the industry standard. Two courses from our research , Rhino3D.education and Portland Jewelry Academy , focus on Rhino. Rhino3D.education costs $300 to $800, making it the cheapest Rhino option. Portland Jewelry Academy charges $750.
But there are other software tools. Maya and ZBrush are used in Luis Berrón’s course on Domestika. They are great for organic, storytelling pieces. Cura is used in The Virtual Foundry Academy for metal 3D printing. So match the software to the style you want.
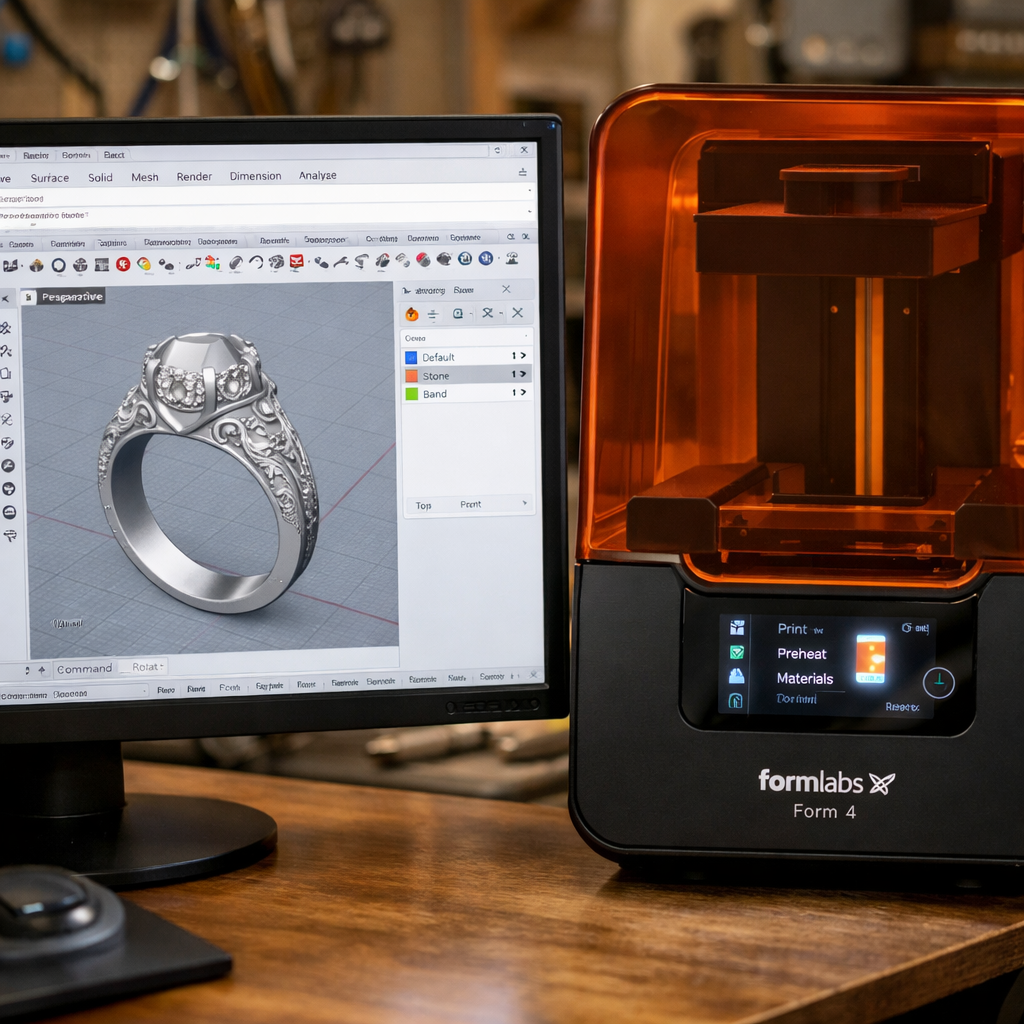
Hardware matters too. For jewelry, you need a resin 3D printer, not a filament one. Resin printers (SLA) give smooth detail that captures fine filigree. Formlabs explains how SLA printers like Form 4 produce castable patterns that burn out cleanly for lost-wax casting. Desktop resin printers now cost under $2000, much less than the large machines from the past.
Here is a quick table to compare software choices:
| Software | Best For | Learning Curve | Price |
|---|---|---|---|
| Rhino 3D | Precision jewelry, stone settings | Moderate | $995 (one-time) |
| Maya + ZBrush | Organic, narrative pieces | Steep | $1,545/yr combined |
| Cura | Slicing for FDM metal printing | Easy | Free |
Bottom line: Start with Rhino 3D and an affordable SLA printer to get the best results from your 3d printing jewelry design online course.
Step 2: Learn 3D Modeling Basics for Jewelry Design
You have the tools. Now you need to learn how to use them. The best way is to follow a structured 3d printing jewelry design online course. One great example is Luis Berrón’s course on Domestika. It covers 15 lessons on concept development, 3D modeling with Maya and ZBrush, and finishing. You learn to create a piece that tells a story.
Another excellent instructor is PJ Chen. PJ Chen offers complete jewelry CAD training with Rhino 3D, from beginner to intermediate. Her courses focus on production-ready models that actually work for casting and stone setting. She even offers a 12-month private group coaching program. That kind of support is rare.
When you pick a course, look for one that teaches you the basics step by step. You should learn about:
- Navigating the 3D viewport
- Creating primitive shapes (spheres, cylinders)
- Using Boolean operations to combine or subtract shapes
- Adding fillets and chamfers for smooth edges
- Creating curves and lofting them into surfaces
Practice with simple rings or pendants first. Do not jump into complex stone settings until you are comfortable.
Videos help a lot. Watch and pause as you follow along. Many 3d printing jewelry design online course platforms provide downloadable files so you can compare your model to the instructor’s.
Rhino 3D is the most widely used software in jewelry because of its NURBS modeling, which creates smooth, accurate curves. If your course uses Rhino, you are learning a skill that transfer directly to jobs and custom orders.
Bottom line: A good 3d printing jewelry design online course teaches you the basics through video, practice files, and instructor feedback. Choose one with a clear progression.
Step 3: Design a Complete Jewelry Piece from Scratch
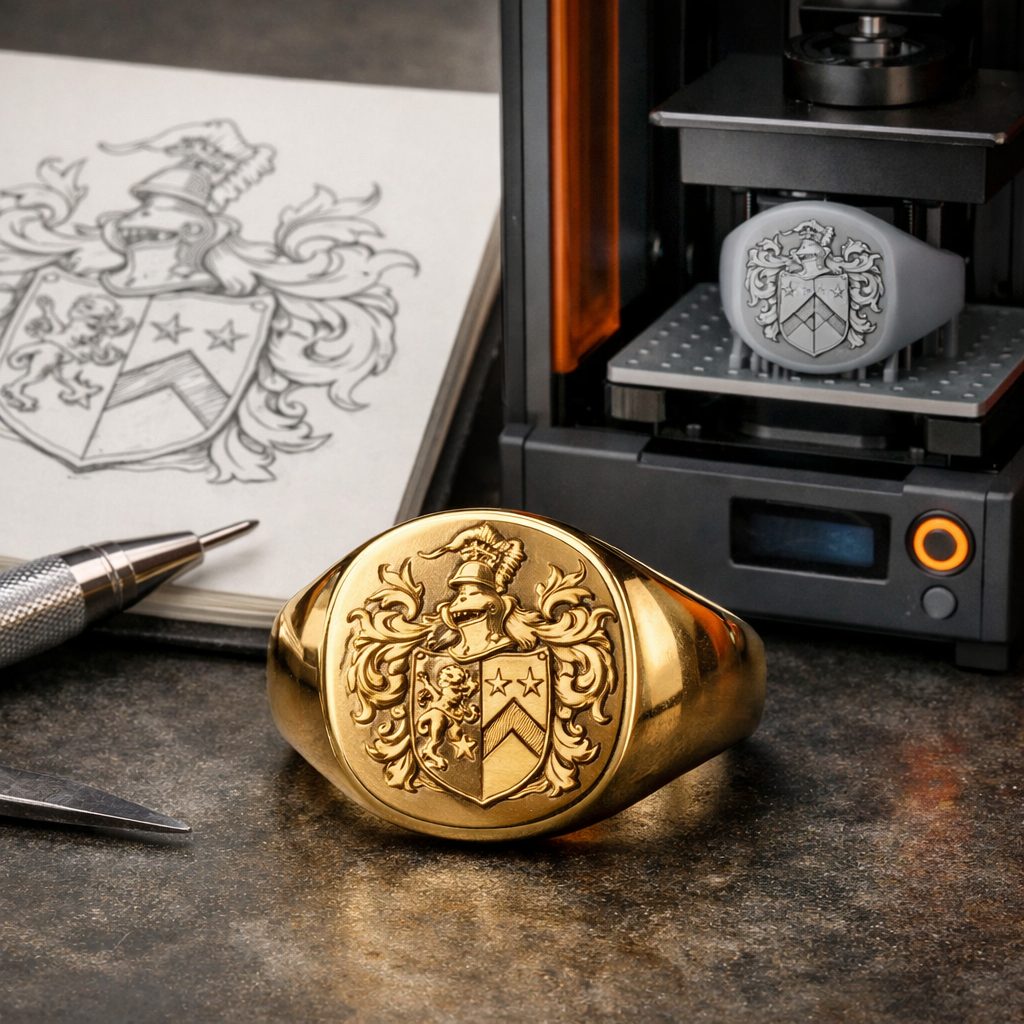
Now it is time to put your skills to work. Design a complete piece. Start simple: a signet ring or a teardrop pendant. Follow the process you learned in your 3d printing jewelry design online course. Here is a step-by-step process you can use for any piece:
- Sketch the idea , Even a rough pencil sketch helps you decide proportions and details. Identify the center element, the band or bail, and any decorative features.
- Create the base shape , In Rhino, draw the outline using curves, then use Revolve or Loft to create the solid form.
- Add details , Use Boolean union to attach the band. Add fillets to make edges comfortable. Carve out cavities for stones if needed.
- Refine the surface , Use FlowAlongSrf to add texture or engraved patterns. Check that all surfaces are closed (watertight) for 3D printing.
- Check scale , Import a finger size ring gauge or a pendant scale. Tweak dimensions to fit standard sizes.
María Romero Laspiur’s course on Domestika (15 modules) goes deep into this process. It is the most complete 3d printing jewelry design online course we found. She teaches you to think about the story behind the piece, then model it with purpose. Her course includes access to an exclusive forum where you can share progress and get feedback.
PJ Chen’s courses also cover specific projects: signet rings, stone settings, clasps, and organic forms. Each project reinforces a new technique. For example, her SubD course in Rhino 7 teaches you to convert organic SubD forms into solid NURBS models for production.
Bottom line: A practical 3d printing jewelry design online course guides you through a real project, step by step, so you can repeat the process on your own.
Step 4: Prepare Your 3D Model for Printing
You have a finished model. Now you need to get it ready for the printer. This step is called pre-processing or slicing. Every 3d printing jewelry design online course should cover it, but here is what you need to know.
First, check that your model is watertight. Use Rhino’s ShowEdges or Analyze>Check tools. Any holes will cause print failures. Next, decide on orientation. For resin jewelry, tilt the model at a 30-45 degree angle to reduce suction forces and ensure small details print correctly.
Add support structures. Supports hold up overhangs like the underside of a ring band. In your slicing software (like PreForm for Formlabs or Chitubox), auto-generate supports, then manually add heavy supports to key areas. Remove them later.
For casting, you need to think about sprue placement. The sprue is a channel through which metal will flow when you cast the piece. Add a small sphere or cylinder to the model where the sprue will attach. Many jewelers use a 3mm diameter sprue for rings.
Slice the model with a layer height of 25-50 microns. Lower layers = smoother finish but longer print time. For jewelry, 25 microns is typical. Export as .STL or .3MF file.
If your course includes a module on pre-printing preparation, follow it closely. The Virtual Foundry Academy teaches you how to prepare models for FFF metal printing using Cura. Their process includes specific infill patterns and wall thicknesses to ensure the metal part debinds correctly.
Remember to check that your resin is compatible with casting. Formlabs’ True Cast Resin is designed for jewelry and burns out clean with zero ash. If you are using a different resin, check the manufacturer’s data sheet.
Bottom line: Master pre-processing steps , watertight check, orientation, supports, and slicing , to turn your digital design into a successful 3D print that is ready for casting.
Step 5: Post-Process and Finish Your 3D Printed Jewelry
After printing, the real magic happens. The raw print is fragile and covered in supports. Here is how to turn it into a wearable piece.
Remove the print from the build plate carefully. Use a metal spatula. Wash the print in isopropyl alcohol (IPA) to remove uncured resin. Follow the wash time recommended for your resin (usually 5-10 minutes). Then cure it under UV light for another 5-10 minutes.
Now remove the supports. Use flush cutters and needle files to clean up the nubs. Sand the surface with fine grit sandpaper (400 to 1200 grit) for a smooth finish. For intricate areas, use dental tools or a small rotary tool with abrasive bits.
If you are casting the piece, you skip sanding. Instead, you attach a sprue and invest the model in a plaster-like medium. Then you burn out the resin in a kiln and pour molten metal. This is the lost-wax casting process. The 3D printed resin pattern replaces the traditional wax carving.
For final finishing, polish the metal cast piece using a tumbler with steel shot or a flex shaft with polishing compounds. Add patinas if you want an antique look.
If you want to skip casting and wear the resin print as is, you can. Many 3d printing jewelry design online course options also cover finishing techniques for resin pieces. For example, you can paint, seal, or coat the resin with a clear varnish. Learn how to make resin jewelry at home with CreativiU’s guide to get ideas for finishing resin prints.
Bottom line: Post-processing , washing, support removal, casting, polishing , turns your 3D print into a finished jewelry piece you can wear or sell.
FAQ
What software do I need for a 3d printing jewelry design online course?
The most common software is Rhino 3D because it handles precise curves and stone settings well. Some courses use Maya or ZBrush for organic designs. If you are on a budget, Rhino3D.education offers affordable Rhino training. Always check what software the course teaches before enrolling.
Can I learn 3D printing jewelry design online without previous experience?
Yes. Many courses are made for complete beginners. Look for a 3d printing jewelry design online course that starts with the basics like navigation and simple shapes. You do not need prior 3D modeling or jewelry experience. Just patience and practice.
How much does a 3d printing jewelry design online course cost?
Prices range from $300 to $2,150. Rhino3D.education costs $300 to $800. Portland Jewelry Academy charges $750. The most expensive is The Virtual Foundry Academy at $1,750-$2,150 for only 7 modules. María Romero Laspiur’s course is $750 and offers 15 modules plus certification and community , best value.
Do I need my own 3D printer to take these courses?
Not necessarily. Some courses focus on modeling and you can order prints from services like Shapeways. But if you want to print at home, get a resin SLA printer like Formlabs Form 4. It is affordable and gives jewelry‑grade detail.
How long does it take to become good at 3D printing jewelry design?
With consistent practice (30 minutes a day), you can model a simple ring in two weeks. Complex pieces take months. Most 3d printing jewelry design online course programs last 4-12 weeks. You will improve faster with a structured course and community feedback.
Can I sell jewelry I design with a 3d printing jewelry design online course?
Yes. Many students start a business after learning. Certification from a course like María Romero’s adds credibility. You can sell finished resin pieces or cast metal ones. Check the course license: most allow you to sell your own designs.
What is the best 3d printing jewelry design online course for metal printing?
The Virtual Foundry Academy specializes in FFF metal 3D printing, but it is expensive and has only 7 modules. For metal casting, María Romero’s course is better: it covers resin printing and casting, and includes certification. You get more for your money.
Conclusion
You now have a clear roadmap. Start by choosing a 3d printing jewelry design online course that matches your budget and goals. For most people, María Romero Laspiur’s 15‑module course is the top pick. It gives you depth, certification, and a supportive community for $750. If you want to focus on Rhino without extras, Rhino3D.education is a solid budget option.
Then gather your tools , Rhino 3D and a resin printer like Formlabs Form 4. Practice the basics steps: modeling a simple ring, preparing it for print, and finishing it. Review videos and join forums to get feedback.
Once you finish your first piece, you will have the skills to design custom jewelry for yourself or customers. The 3d printing jewelry design online course you choose will guide you through every mistake and success. Take action today. Pick a course and start modeling. Your first wearable piece is closer than you think.
Need more inspiration? Check out CreativiU’s wire wrapping jewelry tutorial for other ways to create by hand. And explore resin art jewelry at home for alternative finishing techniques. Happy designing!
Leave a Reply