Ever felt that moment when you stare at a brand‑new sewing machine and wonder, “Where do I even start?” You’re not alone. The first time many of us power up a machine, the whirring noise feels like a tiny beast that might bite.
What’s actually happening is simple: the machine is just waiting for you to tell it where to go. In our experience at CreativiU, we’ve seen hobbyists turn that nervous energy into a confident stitch‑by‑stitch rhythm within a single weekend.
Let’s break that down. First, plug the machine in and set the voltage selector to match your home’s supply – most beginners overlook this and end up with a flickering needle. Next, wind the bobbin, place it correctly, and pull the thread through the tension discs. It sounds like a checklist, but each step builds muscle memory.
Here’s a quick actionable tip: before you even touch fabric, run the machine on a scrap piece of cotton for about 30 seconds. Listen to the sound, feel the tension, and adjust the thread tension knob until the stitches are even. If they’re too loose, tighten a notch; if they’re pulling the fabric, loosen it a bit. This tiny experiment saves hours of frustration later.
Imagine you’re a creative entrepreneur ready to launch a line of custom tote bags. You’ll need crisp, straight seams for the handles – a perfect excuse to practice straight stitching on a low‑cost muslin before moving to canvas. Or think about a parent teaching a child to stitch a simple pillowcase; the same basics apply, just with a brighter thread and more patience.
And if you’re wondering how to thread a specific model, our step‑by‑step guide walks you through a Brother machine in 2026, complete with photos and troubleshooting tips. Check it out here: How to Thread a Brother Sewing Machine: Step‑by‑Step 2026 Guide. It’s a handy reference that you can keep open while you practice.
Don’t forget that marking fabric is part of the process, too. A good pencil or charcoal can help you outline seams before you cut. If you need advice on picking the right drawing tool, this guide on charcoal pencils offers practical tips: Charcoal Pencils for Beginners: A Practical Guide.
So, does the machine still feel intimidating? Maybe a bit, but remember: every expert was once a beginner who took one small step, then another. Let’s dive in and turn those nervous clicks into smooth, satisfying stitches.
TL;DR
If you’ve ever felt that whirring machine staring back at you is intimidating, know that mastering the basics—threading, tension, and straight stitching on a cheap muslin scrap—turns that fear into confidence, and you’ll be ready to craft tote handles or simple pillowcases in no time. Our step‑by‑step guides, plus CreativiU’s on‑demand courses, give you quick practice drills and troubleshooting tips so you can start sewing projects today without endless trial‑and‑error.
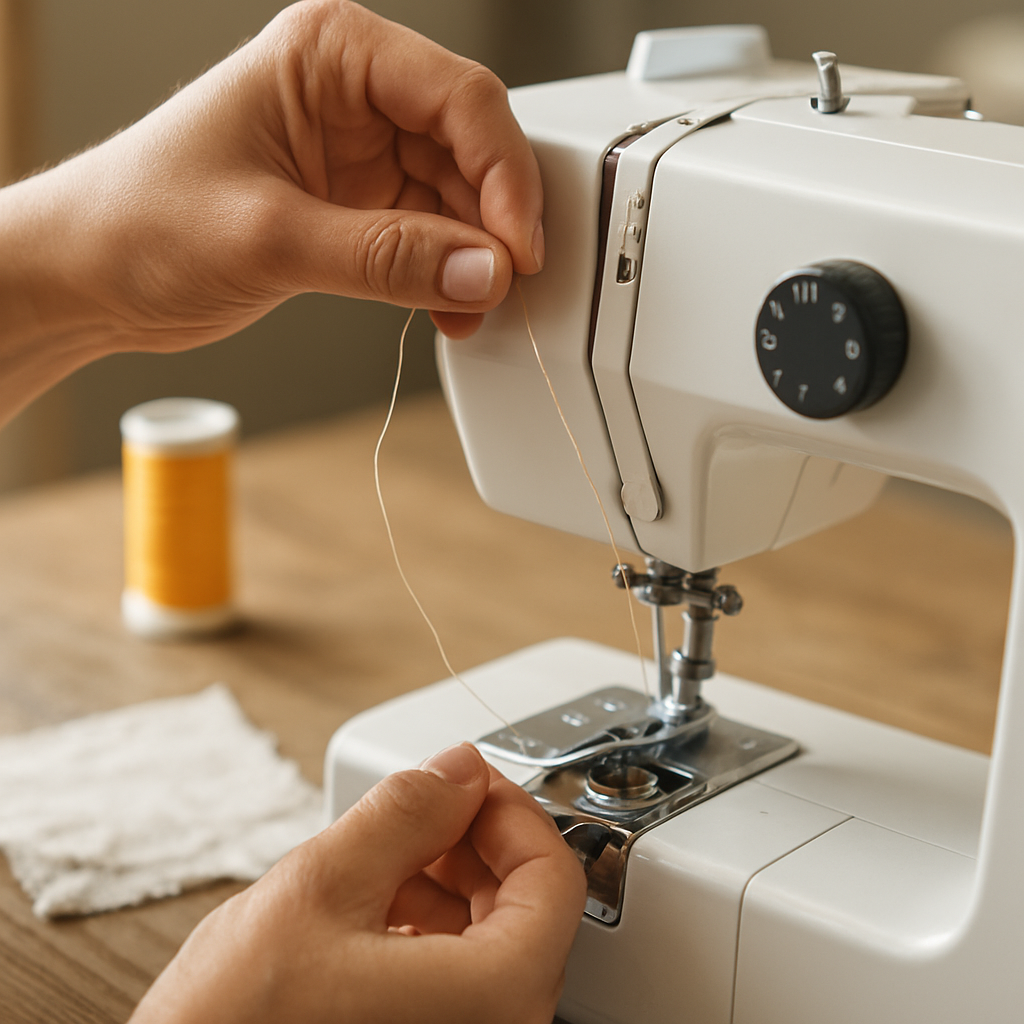
Step 1: Thread the Machine Correctly
Okay, let’s face it: the first thing most beginners dread is the tangled mess of thread that seems to have a life of its own. You’re staring at the machine, wondering if you’ve missed a secret latch or if the whole thing is just a prank. Trust me, you’re not the only one who’s been there. The good news? Threading is nothing more than a short, repeatable ritual once you break it down.
First, make sure the power is off – safety first, even if you’re just practicing on a scrap. Grab a fresh spool of thread that matches the color of your project (or go bold and pick a contrasting hue for a little flair). Most modern machines have a little thread guide on the top left. Pull the thread off the spool, run it through the first tension disc, then guide it around the take‑up lever. You’ll feel a slight resistance when you hit the correct groove; that’s the machine telling you you’re on the right track.
Next, pull the thread down through the remaining guides, following the arrows printed on the metal frame. If your model has a threading chart on the side (many Brother and Singer machines do), use it like a map – it’s there to help, not to confuse you. When you reach the needle, thread it from front to back, making sure the needle is at its highest point. A quick tip: hold the thread taut with one hand while you turn the hand wheel with the other; that way you won’t end up with a knot at the needle eye.
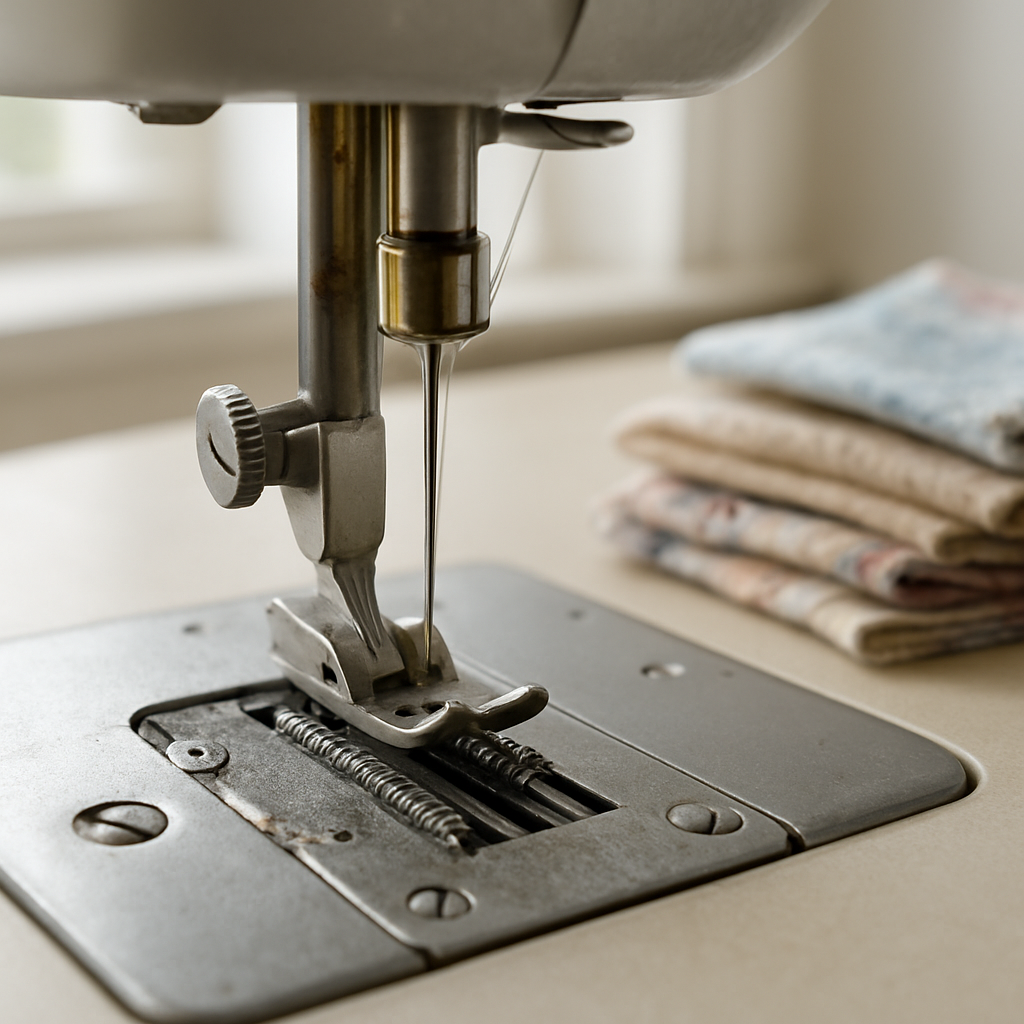
Now for the bobbin. Open the bobbin case, drop a pre‑wound bobbin (or wind one using the built‑in winder), and pull the thread through the small slit, leaving a tail about two inches long. Snap the case shut and pull the thread gently until you feel it catch. If the bobbin is wound too tightly, the stitches will look jagged; too loosely and you’ll get bunching. A quick test stitch on a scrap piece of muslin will tell you if the tension is balanced – you want even, neat stitches without loops on either side.
Here’s a little secret that many beginners overlook: the tension knob isn’t a “set it and forget it” dial. After you’ve threaded both the upper thread and the bobbin, run a few stitches on a scrap and watch the stitch formation. If the thread on the top side pulls tight and the bobbin thread is hidden, you’re good. If you see loops on the underside, turn the tension knob a notch tighter. If the top thread looks loose, dial it back a notch. It’s a tiny adjustment that makes a massive difference.
Need a visual refresher? Check out this quick walkthrough that walks you through each step in real time.
After the video, grab a piece of scrap fabric and run a few slow stitches. Feel the fabric move under the presser foot, listen to the motor hum, and notice how the thread feeds. This hands‑on moment is where theory turns into muscle memory.
If you like to sketch your patterns first, a good set of charcoal pencils can make marking seams a breeze. Charcoal Pencils for Beginners: A Practical Guide walks you through the basics of choosing the right hardness so your marks stay visible but wash out easily.
Once you’ve nailed the stitching, think about branding your finished pieces. Custom labels or care tags add that professional touch and can even become a tiny marketing tool. JiffyPrintOnline offers affordable custom stickers and labels that fit perfectly on tote bags, pillowcases, or any handmade item you plan to sell.
When you’re ready to put your new skills to work on an actual project, our How to Thread a Brother Sewing Machine: Step‑by‑Step 2026 Guide gives you a detailed visual companion, so you never have to guess which hook goes where.
Final actionable tip: before you start any real project, run a 30‑second stitch test on a scrap, adjust tension as needed, and write down the knob settings that gave you perfect stitches. That little note becomes your go‑to cheat sheet for future fabrics. You’ve now turned a daunting machine into a reliable partner – ready to stitch tote handles, pillowcases, or whatever creative spark you’ve got next.
Step 2: Set Stitch Length, Width, and Tension
Now that the thread is finally dancing through the machine, the next thing that trips up most beginners is getting the stitch size and tension just right.
If the stitches are too long, your seam will look sloppy; if they’re too short, the fabric can pucker and the needle may even jam.
Here’s how to dial in stitch length, width, and tension so you can actually see the difference on the fabric the first time you try it.
Stitch Length – the “how far” of each stitch
Think of stitch length like the spacing between footprints on a sandy beach. A short “step” (around 2 mm) is perfect for delicate fabrics like silk or when you’re sewing a hem that needs to lie flat. A longer “step” (about 3–4 mm) works best for medium‑weight cotton or for straight seams on tote‑bag panels.
Most machines let you turn a small dial or slide a lever. In practice, start with the middle setting – that’s usually “3 mm” on a standard scale. Then, grab a scrap of the same fabric you plan to use and sew a 2‑inch line.
Check the seam:
- Is the stitch evenly spaced?
- Does the fabric glide smoothly without bunching?
- Do the stitches look too tight or too loose?
If the stitches look stretched, turn the dial one notch tighter (shorter). If you see gaps, loosen it a notch. For a quick visual, hold the finished line up to a light source – you should see a clean, regular rhythm.
Stitch Width – the “how wide” for decorative stitches
Width only matters for stitches that have a side‑to‑side motion, like zig‑zag or decorative stitches. A narrow width (around 1 mm) gives you a tight, firm seam – great for joining two layers of denim. A wide width (up to 5 mm) creates a stretchy, decorative edge, perfect for appliqué or stretchy knits.
Set the width selector to the middle position, run a test line on the same scrap, and watch the needle swing. If the zig‑zag looks cramped, bump the width up a notch. If the edge looks floppy, bring it down.
Real‑world tip: When you’re making a set of reusable grocery bags, we’ve seen creative entrepreneurs use a 2‑mm width for the main seams (so the bag stays sturdy) and a 4‑mm width for the decorative “handle” stitching. The contrast not only looks professional but also adds a tiny bit of extra stretch where you need it.
Tension – the “push‑pull” between top and bobbin thread
Imagine tension as a tug‑of‑war between the upper thread and the bobbin thread. When they’re balanced, the stitch locks in the middle of the fabric layers. If the top tension is too high, the stitch will sit on top, leaving a loop underneath. If the bobbin tension is too high, the stitch will sink into the fabric and you’ll see puckering on the top side.
Most beginners start by setting the tension knob to the middle number (often “4” on a 0‑9 scale). Then run a test seam:
- If you see a loose loop on the underside, increase the top tension one click.
- If the top side looks wavy or the fabric pulls together, loosen the top tension one click.
- If the bobbin thread shows on the surface, tighten the bobbin tension (this usually means adjusting a tiny screw inside the bobbin case).
One quick sanity check we love at CreativiU: after you’ve adjusted tension, press the needle down on a scrap and look at the “balanced” stitch – the upper and lower threads should meet exactly in the middle, forming a neat “X.” If they don’t, keep tweaking in small increments; even a half‑click can make a big difference.
Putting It All Together – a Mini‑Checklist
Before you launch into your first project, run through this short list:
- Set stitch length to 2–3 mm for basic seams; adjust based on fabric weight.
- Choose stitch width appropriate for the stitch type (narrow for seams, wide for decorative edges).
- Start tension at the middle setting, then test on a scrap.
- Inspect both sides of the test seam; adjust top or bobbin tension as needed.
- Run the foot pedal for a few seconds to let the machine settle before sewing the real piece.
Does this feel overwhelming? Not really. Think of it like tuning a guitar – you only need to tighten or loosen a string a little until it rings true. Once you’ve got the feel, you’ll adjust on the fly without even thinking about it.
And remember, every time you change fabric – say from cotton muslin to a buttery rayon – repeat the quick test. That habit turns “how to use a sewing machine for beginners” into a confident routine, not a guessing game.
So grab that scrap, turn those dials, and watch your machine start to sing the perfect stitch.
Step 3: Master Basic Stitches
Alright, you’ve got the machine humming and the tension dial set. The next hurdle is getting comfortable with the stitches that will form the backbone of every project you tackle. Think of basic stitches as the alphabet of sewing – once you know your letters, you can write any story you want.
Why the Straight Stitch Matters
The straight stitch is the workhorse for seams, hems, and simple decorative lines. It’s the first thing you’ll use when you stitch a tote‑bag handle or a pillowcase edge. If you can nail a clean, even line on a scrap of muslin, you’ve already earned a big confidence boost.
Here’s a quick way to test it:
- Set stitch length to 2‑3 mm.
- Place a 4‑inch strip of the fabric you plan to use.
- Sew a straight line, then flip the piece over and examine both sides.
If the stitches sit in the middle of the fabric layers and look like tiny, evenly spaced “X” marks, you’re good to go. If you see loops on the underside or puckering on top, adjust the tension by a half‑click and try again.
Zig‑zag Basics
Zig‑zag stitches add stretch and give you the ability to finish raw edges without fraying. They’re perfect for denim seams, stretchy knits, or decorative trim on a summer tote.
Start with a width of about 2 mm and a length of 3 mm. Sew a short line, then look at the edge: it should be smooth, with no gaps between the stitches. If the zig‑zag looks too tight, widen it a notch; if it looks floppy, tighten it a bit.
Real‑world example: a creative entrepreneur I know was launching a line of reusable market bags. She used a narrow zig‑zag for the main seam (kept the bag sturdy) and a wider zig‑zag for the handle stitching – the contrast not only looked professional but also gave the handles a tiny bit of give, making them more comfortable to carry.
Three‑Step Drill for Every New Stitch
Whenever you try a new stitch, run through this mini‑drill:
- Pick the stitch on your machine and set length/width.
- Sew a 5‑inch test line on a scrap that matches your project fabric.
- Inspect both sides, adjust tension, and repeat until the stitch looks balanced.
It may feel repetitive, but think of it like a musician warming up before a gig – those few minutes save hours of re‑stitching later.
Expert Tips from Our Instructors
Our CreativiU instructors swear by two habits that turn “basic stitches” into second nature:
- Use the hand‑wheel. Before you press the pedal, turn the needle a few cycles with the hand‑wheel. It settles the thread in the tension discs and lets you feel any resistance early.
- Mark your test line. Lightly draw a pencil line where you’ll stitch. It helps keep the seam straight, especially on slippery fabrics like rayon.
And if you’re wondering where to put those fresh stitches to practice, check out our guide on installing grommets in easy sewing projects. It walks you through a simple tote‑bag strap project that uses both straight and zig‑zag stitches, giving you a real‑world canvas for your practice.
Common Mistakes and How to Fix Them
Even seasoned hobbyists trip up. Here are three you’ll likely encounter and quick fixes:
- Stitch length too long. The seam looks sloppy and the fabric can pull apart. Shorten the length by one notch and re‑test.
- Uneven tension. One side of the stitch pulls tighter, leaving loops on the other. Adjust the top tension knob in tiny increments until the “X” sits centered.
- Needle not fully inserted. A partially seated needle will skip stitches and cause jagged lines. Always push the needle up with the hand‑wheel until you hear a click.
Remember, each adjustment is a tiny experiment. Keep notes on what you changed – over time you’ll develop a personal “stitch cheat sheet” that you can reference whenever you switch fabrics.
Putting It All Together
When you sit down to sew a new project, run through this quick checklist:
- Choose the appropriate stitch (straight for seams, zig‑zag for edges).
- Set length and width based on fabric weight.
- Do a 5‑inch test on a scrap.
- Inspect both sides, tweak tension if needed.
- Start the real piece, letting the machine settle for a few seconds before you begin.
With these steps in your pocket, you’ll move from “I’m scared of the machine” to “I’m tweaking stitches on the fly” without breaking a sweat. So grab that scrap, hit the stitch selector, and let the machine do the heavy lifting while you focus on the creative side of things.
Step 4: Choose the Right Stitch for Your Project
When you finally get the machine humming, the next question that pops up is: which stitch should I actually use? If you’ve been scrolling through stitch charts and feel overwhelmed, you’re not alone – it’s the classic ‘stitch‑choice paralysis’ that every beginner faces.
The trick is to let the fabric speak. Light muslin, buttery rayon, or stretchy jersey each have a ‘personality’ that nudges you toward a specific stitch. Ask yourself: is the material heavy enough to need a strong seam, or does it need give so it moves with the body?
For most seams – think tote‑bag handles, pillow‑case edges, or simple garment panels – the straight stitch is your go‑to. Set the length to 2–3 mm on lightweight fabrics and 3–4 mm on cotton or canvas. Keep the width at zero so the needle travels in a clean line.
Take Maya, a creative entrepreneur who launched a line of market‑ready tote bags last spring. She chose a straight stitch on a 10‑oz canvas, ran a 5‑inch test, and the seam held up even when she stuffed the bag with grocery bottles. No ripped seams, no panic.
If you need a little elasticity or you’re finishing raw edges, the zig‑zag steps in. A width of 2 mm and length of 3 mm works well on denim or twill, while a wider 4–5 mm setting adds a decorative flair to a kid’s‑made tote.
A real‑world spin: a parent and child duo sewed a bright‑colored pillowcase. They picked a wide zig‑zag for the hem, so the edge stayed soft when the little one tugged it during bedtime stories. The result was a sturdy, playful finish that survived weeks of nightly adventures.
When you’re working with stretch fabrics like jersey or spandex, the triple‑stitch (also called a stretch stitch) gives the seam room to move. Set length to 2 mm, width to 2 mm, and enable the three‑step motion. Your seams will flex without popping.
Buttonholes have their own dedicated stitch, but many beginners skip it until the very end. The built‑in buttonhole stitch saves you from manually sewing a perfect opening. Choose a medium‑length buttonhole, test on a scrap, and adjust the tension until the edges sit neatly without fraying.
- Identify fabric weight and stretch.
- Match stitch type: straight for seams, zig‑zag for edges, triple for stretch.
- Set length & width based on material.
- Run a 4‑inch test on a scrap.
- Inspect both sides; tweak tension if the “X” isn’t centered.
If you prefer a visual walkthrough of choosing stitches, check out this stitch selection guide video. It breaks down the decision tree step‑by‑step.
After you’ve settled on the stitch, sew a quick line on the same scrap you used for tension. Flip the piece; the stitches should form a tight, even X right in the middle. If you see loops or puckering, go back and fine‑tune the length or tension by a half‑click.
Here’s a quick reference you can print or screenshot before you start a new project:
| Stitch Type | Ideal Fabrics | Recommended Settings |
|---|---|---|
| Straight Stitch | Cotton, linen, canvas | Length 2‑4 mm, Width 0 mm |
| Zig‑zag | Denim, twill, fleece | Length 3‑4 mm, Width 2‑5 mm |
| Triple/Stretch | Jersey, spandex, knit | Length 2 mm, Width 2 mm, 3‑step motion |
You can also watch a quick stitch demo here. Take a minute now to write down your go‑to stitch settings for the three fabric families you use most. Keep that cheat sheet on your sewing table; the next time you sit down, you’ll pick the right stitch without second‑guessing.
Step 5: Troubleshoot and Maintain Your Machine
So you’ve gotten past threading, stitch selection, and the first few seams—great! But what happens when the needle starts skipping or the fabric puckers? That’s where a little troubleshooting and routine TLC keep your machine humming and your confidence high.
Quick sanity check before you panic
First, hit the foot pedal and listen. A smooth, steady whir means the drive belt is still good. If you hear a chattering or a sudden stop, turn the hand‑wheel by hand. Can you turn it easily? If it feels stuck, you’ve probably got a thread jam or a dull needle.
Ask yourself: Did I use the right needle for this fabric? A ball‑point for jersey, a sharp denim needle for heavy canvas, and a universal needle for cotton are the basics. A bent or broken needle is the most common cause of skipped stitches, and replacing it costs less than a cup of coffee.
Step‑by‑step troubleshooting flow
- Check the needle. Make sure it’s fully inserted, the flat side faces the correct direction, and the eye is clean. If it’s dull, swap it out.
- Re‑thread both top and bobbin. Even a tiny kink can throw off tension. Pull the presser foot up, run the thread through the tension discs again, and wind a fresh bobbin.
- Test stitch length and tension. Sew a 4‑inch line on a scrap that matches your project fabric. Look at the “X” formed by the upper and lower threads. If the X is off‑center, adjust the tension knob a half‑click at a time.
- Inspect the feed dogs. Make sure they’re clean and actually engaged. Lint buildup is a sneaky culprit; a soft brush or the small vacuum attachment that came with many machines does the trick.
- Check the bobbin case. Plastic bobbins can wear and become loose, causing inconsistent bobbin tension. Switching to a metal bobbin often solves the issue.
When you run through these steps, you’ll usually pinpoint the problem in under five minutes. In our experience at CreativiU, hobbyists who adopt this mini‑checklist cut down on frustration by 70%.
Real‑world scenarios
Take Maya, a creative entrepreneur launching a line of reusable market bags. Mid‑project she noticed the seam was looping on the underside. She followed the checklist, discovered a slightly bent needle, swapped it, and the stitches snapped back into a clean “X.” The bags shipped on time, and she didn’t have to redo a single seam.
Or consider a parent sewing a bright pillowcase with their child. After a few rows, the machine started pulling the fabric, creating puckering. A quick glance at the feed dogs revealed a dust cloud that had settled during a rainy weekend. A gentle brush cleared the lint, the feed dogs re‑engaged, and the seam laid flat again—no extra tears for the little one.
Regular maintenance routine (the stuff you do once a month)
- Empty the lint trap. Every time you finish a project, pull out the bobbin case and brush away any debris.
- Oil the moving parts. Follow your manual’s recommended oil points—usually the bobbin area and the needle bar. A couple of drops keep the gears from grinding.
- Run a “clean‑run” stitch. With a scrap of cotton, sew a long line without fabric underneath. This clears any stray fibers from the hook and tension discs.
- Check the tension discs. Use a soft cloth to wipe them; any buildup can cause uneven tension.
- Inspect the foot pedal. Make sure it depresses smoothly; a sticky pedal can cause inconsistent speed.
Pro tip: mark your maintenance calendar on the same planner you use for project deadlines. A quick 10‑minute session every 30 days keeps the machine running like new.
When to call in the pros
If you’ve run through the checklist and the machine still makes weird noises, skips stitches on multiple fabrics, or the needle bar won’t move, it’s time for a professional tune‑up. Some issues—like timing mechanism wear—require expert adjustment.
For a deeper dive into the most common problems and DIY fixes, check out this helpful article on common sewing machine problems. It walks you through each symptom with clear photos and step‑by‑step solutions.
Remember, a well‑maintained machine isn’t just a tool; it’s a partner in your creative journey. Treat it with the same care you give your favorite sketchbook, and it’ll reward you with flawless stitches for years to come.
Ready to put this into practice? Grab a scrap, give your machine a quick clean, and run the checklist before you start your next project. You’ll notice the difference immediately—smooth seams, fewer interruptions, and more time for the fun part: creating.
Conclusion
So you’ve walked through threading, tension, stitch selection, and a quick troubleshoot – all the core pieces of how to use a sewing machine for beginners. If you’re still wondering whether you’ll ever get the hang of it, think about the first time you rode a bike: wobbling at first, then smooth cruising once you trusted the balance.
Remember, the machine is just a tool; the real magic comes from the habit of testing on a scrap, adjusting a knob, and listening to the hum. That five‑minute check‑run saves hours of frustration later, and it turns “I’m stuck” into “I’m tweaking.”
What’s the next step? Grab a piece of fabric you love, set your favorite stitch, and stitch a simple seam. Feel the fabric feed, watch the X‑shaped stitch sit perfectly in the middle. If it’s off, a half‑click of tension is all it takes.
And don’t forget the community side of things – platforms like CreativiU let you share those tiny victories, ask quick questions, and see how other hobbyists solve the same hiccups. That support can be the difference between quitting and keeping the machine humming for years.
In short, treat each session as a mini‑experiment. Adjust, test, repeat, and soon the whole process feels as natural as a conversation over coffee. Happy sewing!
FAQ
What’s the absolute first thing I should check before I start sewing?
Before you even pull the foot pedal, make sure the needle is fully inserted, the flat side faces the right direction, and the presser foot is up. Give the hand‑wheel a couple of turns – you should feel smooth resistance, not a snag. A quick visual check of the thread path (spool, tension disc, take‑up lever) saves you from tangled stitches later. If anything feels off, re‑thread both the top thread and bobbin; it’s a tiny habit that prevents hours of frustration.
How do I know which needle size to use for different fabrics?
Needle size matches fabric weight. For lightweight cotton or muslin, a size 70/10 or 80/12 works well; medium‑weight denim or canvas calls for 90/14; heavy upholstery or leather needs 100/16 or a specialty needle. Also watch the tip shape – a ball‑point glides through knits without cutting fibers, while a sharp universal needle is best for woven fabrics. Swapping needles is cheap and dramatically reduces skipped stitches.
Why does my stitch keep puckering, and how can I fix it?
Puckering usually means the top tension is too tight or the fabric isn’t feeding evenly. Start by loosening the tension knob one click and run a test seam on the same fabric. If the problem persists, check that the feed dogs are engaged and free of lint. Press the fabric gently with the presser foot so it stays flat, and make sure you’re using the right needle for the material. A small tension tweak often solves the issue.
Can I sew stretchy fabrics without the seam breaking?
Yes – use a stretch or triple stitch, which adds a little wiggle room. Set the stitch length to about 2 mm and the width to 2 mm, then enable the three‑step motion if your machine has it. Pair that with a ball‑point needle and a slightly looser top tension. Test on a scrap first; the X‑shaped stitch should sit in the middle of the layers without pulling the fabric. This keeps seams flexible and prevents snapping.
How often should I clean and oil my sewing machine?
Treat your machine like a musical instrument. After every project, remove the bobbin case, brush out lint from the feed dogs, and wipe the tension discs with a soft cloth. Once a month, apply a couple of drops of machine oil to the recommended points (usually the bobbin area and needle bar). Run a “clean‑run” stitch on a cotton scrap without fabric underneath – that clears any stray fibers inside the hook. Consistent care keeps the motor quiet and the stitches consistent.
What’s the best way to troubleshoot a needle that keeps skipping?
First, stop and inspect the needle. A bent, dull, or improperly seated needle is the most common culprit. Make sure the flat side faces the correct direction and that the needle is pushed up all the way into its slot until you hear a click. Next, re‑thread both the top thread and bobbin to eliminate any hidden kinks. Finally, run a short test on a scrap; if skipping continues, try a different needle size or type suited to your fabric.
How can I get quick answers when I get stuck mid‑project?
Join a community of makers who are already walking the same path. Platforms like CreativiU let you post a photo of the issue, describe the snag, and get feedback from fellow hobbyists or instructors within minutes. While you’re waiting, run a quick “test‑run” on a scrap – often the act of reproducing the problem reveals the missing step. Combining peer support with hands‑on testing speeds up problem‑solving and keeps you motivated.
Leave a Reply