Ever stared at a Brother sewing machine and felt that dreaded “thread jam” moment? It’s that instant when the needle feels like a stubborn mountain, and you’re left wondering if you’re supposed to be a pro or a pro‑crastinator.
What you’re really looking for is a clear, step‑by‑step roadmap that takes the mystery out of threading and turns it into a confidence‑boosting routine. That’s exactly what the Sewing for Beginners Tutorial: Step‑by‑Step Guide to Start Sewing with Confidence offers – from choosing the right yarn to mastering the bobbin twist.
Picture this: a weekend‑long tote bag project that ends up looking like a runway accessory, or a custom hoodie line you sell online – all because the first stitch ran smoothly. The key is the little details that most beginners overlook: the tension dial, the thread guide, the bobbin winding angle.
Start simple. Pull a fresh spool of 100‑meter polyester, feed it through the top feed dog, then twist the bobbin with the same color. Align the thread so the eye is just above the needle. If it feels tight, loosen the tension lever a notch. If it drifts, tighten it just a bit.
Next, test on a scrap of fabric that matches your project. This pre‑run lets you catch any misalignment before you hit the main pattern. Don’t skip this step – it saves hours of rewinding and re‑threading.
Once you’re comfortable, keep a quick reference chart next to your machine: color codes, tension settings, and the exact path of the thread. Over time, you’ll notice a pattern – a rhythm that feels almost like breathing.
For those who want to take their teaching to the next level, consider pairing your tutorials with crisp, high‑definition visuals. A professional touch can elevate your content, and a partner like Forgeclips specializes in creating engaging video material that’s ready for online classes.
So, are you ready to turn the dreaded thread jam into a signature stitch? Grab your Brother machine, follow these steps, and watch as the thread glides, stitches come alive, and your projects finally look the way you imagined.
TL;DR
Threading a Brother machine is easier than it feels, thanks to steps that turn frustration into confidence and keep your needle happy. Follow our quick guide, practice on fabric, and soon you’ll stitch smoothly, turning every project into a proud showcase of your growing skill, all while avoiding rewinds today.
Step 1: Prepare Your Machine and Materials
Before the first stitch, make sure your Brother machine feels like a well‑tuned piano, not a rattling junk drawer. A clean, properly set up machine turns the dreaded thread jam into a smooth, confident glide.
Gather the Essentials
Grab a fresh spool of polyester or cotton thread, a new bobbin, a small flat ruler, and a pair of tweezers. Keep a clean cloth nearby to wipe the feed dogs, and set a soft lamp on your workbench so every notch is visible. If you’re working on a high‑contrast fabric, a magnifying glass helps catch tiny mis‑alignments.
Clean and Inspect
Start by clearing any loose fibers from the thread path. Run the machine a few cycles on a scrap of fabric—no stitching, just the motor turning—to push out dust that could snag the thread. A clean feed dog keeps the thread from tangling when you start winding the bobbin.
Bobbin Winding and Placement
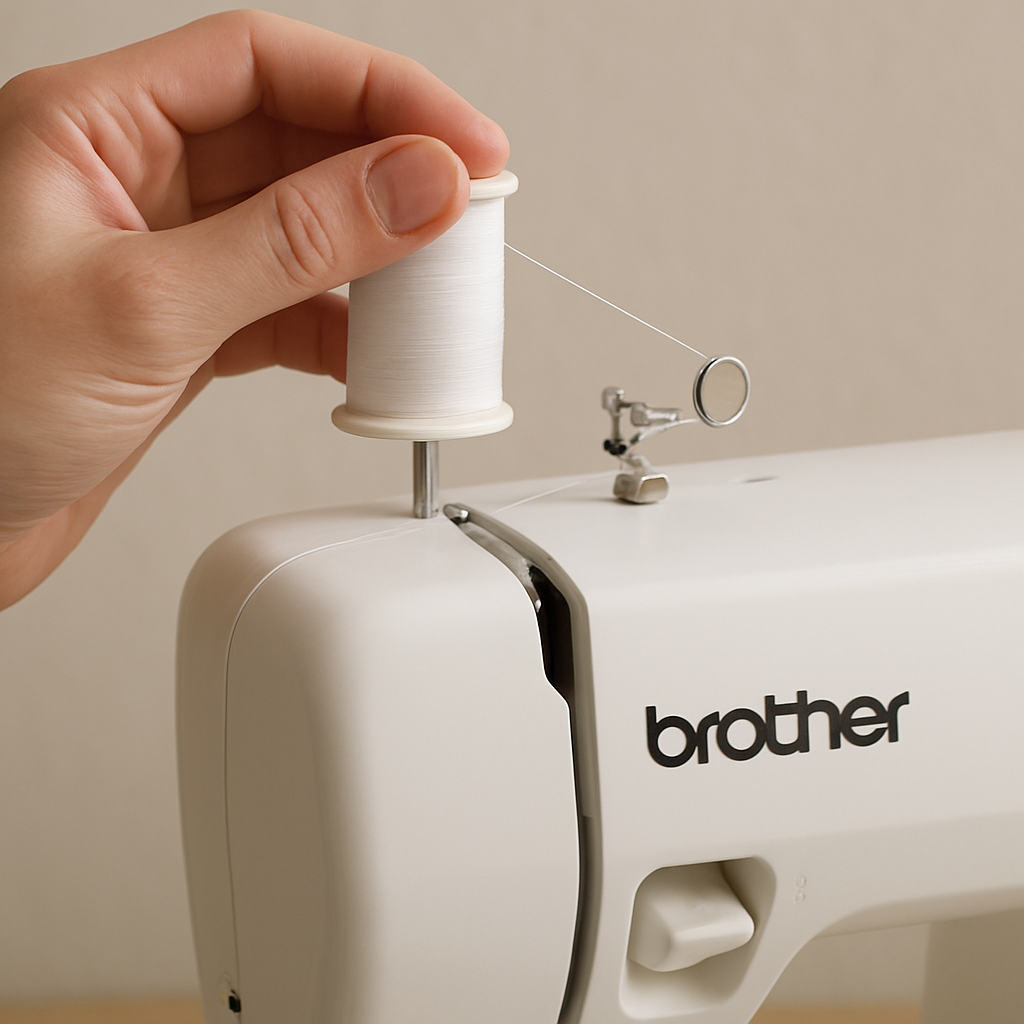
Turn on the machine, then lift the needle by turning the handwheel counter‑clockwise until the needle is fully raised. Use the hand‑held tweezers to place the new bobbin on the bobbin spindle. Make sure the bobbin cap sits snugly; an uneven bobbin can cause the thread to skip or pull out. While the machine is running, feel the tension lever—if the upper thread feels too slack, gently tighten the lever by a notch.
Thread the Upper Path
Position the spool so the thread hangs in front of the spool pin. Pull the thread through the back guide, then the front guide, and finally the needle bar. When you feel the thread loop around the take‑up lever, lift the lever back to the “on” position. This ensures the upper thread wraps properly before the first stitch.
Check the Needle and Tension
Insert the needle with the eye facing up and make sure it’s straight. If it’s bent, replace it right away—no amount of tension will fix a crooked needle. Adjust the tension dial to the mid‑range (often marked “5” or “5/10”) as a safe starting point. If your machine’s manual has a recommended setting for polyester, follow that.
Test Stitch on a Scraps
Run a few stitches on a matching scrap. Look for smooth, even loops. If the stitches skip or the thread breaks, pause, check the feed dog alignment, and re‑thread. A quick test prevents hours of frustration later.
For a visual walkthrough, this step‑by‑step guide can help you confirm each motion—just remember the core steps are the same across most Brother models.
If you’re sketching your own pattern or marking fabric, high‑quality drafting pencils are a must. They make the pattern lines crisp, and your final stitches will thank you.
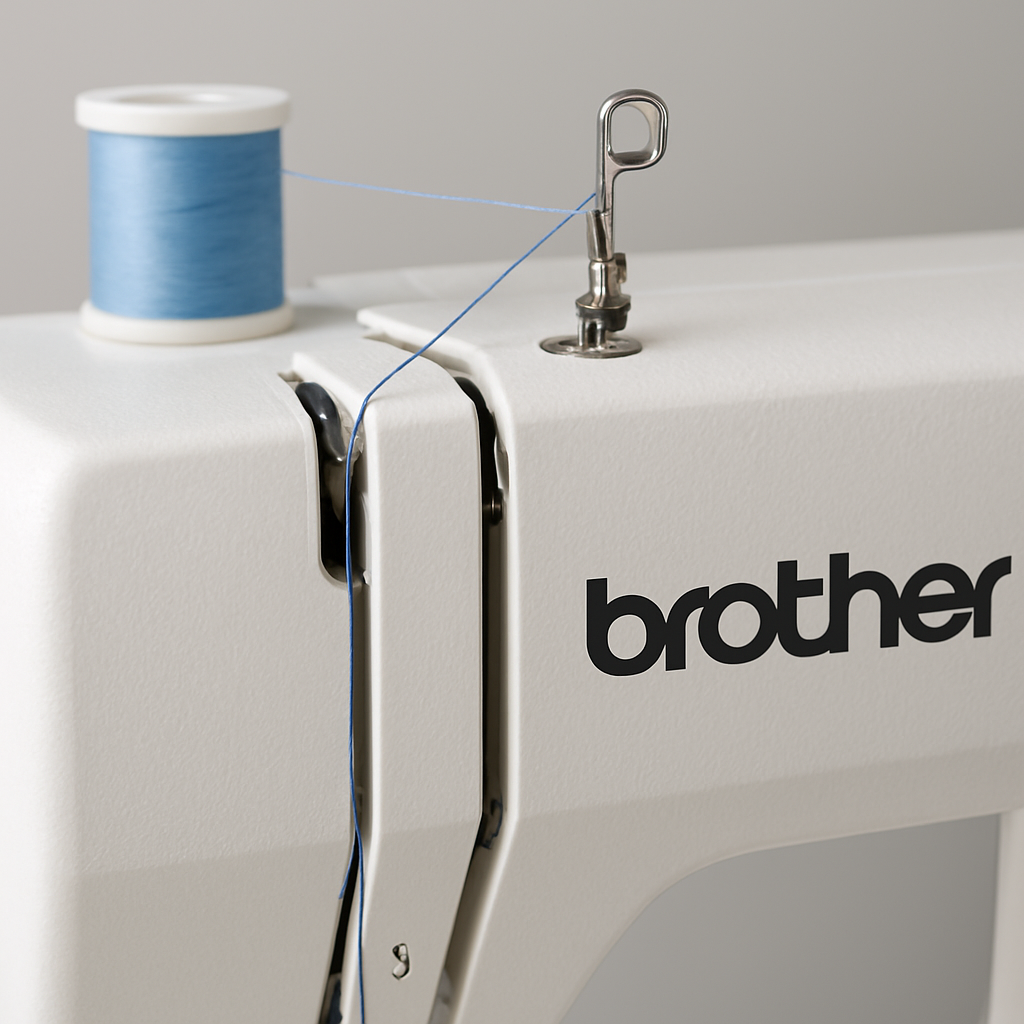
Step 2: Thread the Upper Tension Lever
Alright, we’re almost at the sweet spot where the upper thread starts doing its job. The tension lever is like the secret sauce—if it’s off, your stitches look like a bad haircut.
First, lift the take‑up lever to the “on” position. You’ll feel a gentle resistance when you pull the thread through the front guide. That’s the cue that the thread is in the right groove.
Now, place the thread end in the eye of the upper thread guide. It should sit snugly, not dangling. If you feel a tug, tighten the lever a notch; if it’s slack, give it a bit more lift.
Once the thread loops around the lever, release it slowly and let the machine’s motor pull the thread through. This action sets the tension for every stitch ahead.
So, what should you do if the thread seems to wobble? A quick check: pull a small loop from the fabric. If it looks uneven or the upper thread shows on the wrong side, you’ve got a tension mismatch.
Here’s a pro trick: before you start your big project, run a short test stitch on a scrap that matches your final fabric. Pay attention to how the upper and bobbin threads cross—ideally right near the fabric’s center, with only the upper thread visible on the right side.
Need help visualizing this?
If you notice the bobbin thread popping up on the right side, the upper tension is too tight. Loosen the lever slightly, rethread, and test again. On the flip side, if the upper thread shows on the wrong side, it’s too loose—tighten the lever a notch.
Remember, the goal is a smooth, even loop that doesn’t snag or pop. It’s the same principle used by professional tailors, but you’re doing it from the comfort of your home.
Finally, give the thread a quick tug after threading. A firm but gentle pull ensures the lever is locked into place and the path is clear. If the lever feels wobbly, recheck the thread alignment.
For more detailed guidance on tension adjustments, the Brother support page is a lifesaver: Brother support guide.
By following these steps, you’ll set up the upper tension lever so that every stitch feels like a natural extension of your own hands.
Step 3: Thread the Bobbin and Compare Tension Settings
First, give that bobbin a quick check. Is the cap snug? If it’s wobbling, you’ll end up with a string of loose stitches. Grab a clean cloth, wipe the bobbin spindle, then slide the new bobbin in as we showed earlier.
Once the bobbin sits, twist the thread twice around the spindle, pull the tail through the eye, and give it a gentle tug. This simple motion keeps the bobbin thread from snagging on the take‑up lever. It’s the same principle the Brother technical guide confirms Brother’s technical guide.
Check the Upper Tension Lever
Lift the lever to the “on” position and feel the resistance as the thread passes the front guide. If it feels tight, loosen by a notch; if it’s slack, tighten a bit. The goal is a smooth loop that crosses the bobbin thread near the fabric’s center, with the upper thread visible only on the right side.
How do you know you’ve hit the sweet spot? Test it on a scrap. A balanced tension shows the upper thread on the right side and the bobbin thread on the left, with no popping.
Fine‑Tuning Tension
If the bobbin thread pops up on the right, the upper tension is too tight—loosen it slightly, re‑thread, and test again. Conversely, if the upper thread shows on the wrong side, the tension is too loose—tighten the lever a notch.
Need a quick reference? The Brother FAQ on adjusting the upper lever explains the exact notch adjustments for most models Brother FAQ on tension.
Pull and Lock
Give the thread a firm, gentle tug after threading. This ensures the lever is locked into place and the path is clear. If the lever feels wobbly, recheck the thread alignment and the bobbin placement.
Does this sound a bit tricky? Think of it like tightening a shoelace—just enough to stay in place without slipping.
Quick Decision Table
| Item | Action | Why It Matters |
|---|---|---|
| Bobbin Thread | Align to the right of the bobbin spindle, twist twice, then pull the tail through the eye. | Prevents snagging on the take‑up lever. |
| Upper Tension Lever | Set to mid‑range; adjust by notches until the upper thread shows on the right side only. | Balances tension between upper and bobbin threads. |
| Thread Path | Ensure the upper and bobbin threads cross near the fabric’s center. | Creates smooth loops and avoids popping. |
Now that you’ve got the bobbin threaded and the tension dialed in, you’re ready to pull the first stitch with confidence. Your next project—whether it’s a tote bag or a custom hoodie—will start off looking as good as it feels.
Step 4: Run the Thread Through the Machine Path
Alright, you’ve got the bobbin snug and the upper thread hanging in place. Now it’s time to make sure the thread takes the exact route the machine wants it to. Think of it like mapping a road trip—if you miss a turn, you’ll end up in a ditch.
Align the Take‑Up Lever
First, lift the take‑up lever to the “on” position. As you pull the thread through the front guide, feel for that gentle resistance. If it’s too soft, you’ve got a loose lever; tighten it a notch and try again.
Do you notice the thread looping around the lever? That’s your cue that the path is clear. If the thread looks like a crooked zig‑zag, re‑thread and double‑check the lever position.
Guide the Thread Through the Needle Bar
Now slide the thread under the needle bar. Imagine it sliding under a low ceiling—smooth, not dragging. If you feel resistance, the thread might be caught on the bar or the needle’s eye. Pull a bit and straighten it out.
When the thread exits the needle bar, it should glide straight into the upper thread guide’s eye. If it’s bouncing off, your thread is mis‑aligned—take a breath, re‑thread, and keep it tight.
Test a Mini Stitch Run
With a scrap of fabric that matches your project, start a few stitches. Watch how the upper and bobbin threads cross—ideally right at the fabric’s center. The upper thread should only be visible on the right side of the machine’s frame.
Does the machine skip or pop? That’s a tell‑tale sign of tension mismatch or a mis‑threaded path. Pull the thread gently and lock the lever—just like tightening a shoelace, but hold it steady until the machine’s motor does the rest.
Fine‑Tune with a Quick Check
Give the thread a firm tug after threading. If the lever wobbles, the path’s wrong. Re‑thread, adjust the lever, and test again. Keep repeating until the thread stays steady and the machine runs smooth.
Remember, the goal is a clean, even loop that doesn’t snag or pop. A little patience here saves you hours of frustration later.
Pro Tip: Use a Light‑Touch Tool
Many hobbyists use a small tweezers or a plastic pin to feel the thread’s path behind the machine. It’s a handy way to catch a snag before it becomes a jam.
Quick Reference
If you’re ever stuck, MaggieFrame’s tips on Bobbin Setup and Tension give a clear step‑by‑step walk‑through. And for any machine‑specific quirks, Brother’s support page has troubleshooting details that are a lifesaver.
Now you’re set to run the thread through the machine’s path with confidence. The next stitch will feel like a natural extension of your own hands, and your tote bag or hoodie project will start off looking as good as it feels.
Step 5: Final Check and Test Stitch
Let’s pause for a quick sanity check. You’ve threaded, tensioned, and ran the thread—now it’s time to feel the machine’s pulse. A single slip here could turn your masterpiece into a jammed mess.
First, stand back and look. The upper thread should sit snug behind the needle bar, and the bobbin thread should glide cleanly past the take‑up lever. If you see a tug or a loop that looks out of place, give it a gentle tug and straighten it out. That little adjustment can save you dozens of stitches.
Next, grab a scrap of the exact fabric you’ll be working on. Pull a few stitches—five or ten is enough. Watch how the threads cross. In a perfect run, the upper thread should be visible only on the right side of the machine frame, and the bobbin thread should sit on the left, with both crossing near the center of the stitch. If the upper thread pops up on the wrong side or the bobbin thread snakes out, you’re dealing with tension mismatch. Tighten the upper lever just a notch or loosen it slightly and test again.
Imagine you’re making a tote bag. A single mis‑tensioned stitch can show up as a visible gap along the seam, ruining the professional look. For a hoodie, uneven tension can cause puckering around the collar or cuffs. These are common pain points for beginners, and a quick test run usually catches them before they become costly mistakes.
Use a tension gauge if you have one—many hobbyists keep a cheap clip‑on gauge to keep the upper and lower tensions balanced. If you don’t, simply feel the loop on a scrap. A loop that’s too big or too tight is a tell‑tale sign you need to readjust.
In our experience at CreativiU, students who pause for a test stitch before moving into full‑scale projects consistently finish faster and with fewer jams. One of our community members, a parent turning a sewing kit into a weekend workshop, shared that the “one‑minute test stitch” saved them an hour of rewinding during a kids’ craft day.
Tip: Keep a quick reference chart handy—color‑coded tension settings and thread paths—so you can adjust on the fly. And if you’re feeling stuck, the Your Guide to Online Embroidery Classes for Beginners dives deeper into tension tricks and machine quirks.
Once you’ve confirmed the stitch runs smoothly, you’re ready to start your main project. Treat the test stitch like a rehearsal: if it feels good, the real work will flow.
To help you track how many test stitches you’re doing, consider pairing your sewing sessions with a weekly review template. It’s a quick way to measure progress and stay on track—check it out on FocusKeeper’s Weekly Review Template and see how a few minutes of reflection can boost your confidence and output.
FAQ
Got a knotty question about threading a Brother machine? You’re not alone. Below are the most common doubts we hear from hobbyists, entrepreneurs, and parents who want to avoid the dreaded jam and keep their projects on track.
Q: What’s the quickest way to thread a Brother sewing machine without losing time?
A: Start by pulling the upper thread through the spool pin, then through the back and front guides, and finally into the needle bar. Once the thread is snug behind the needle bar, lift the take‑up lever to its “on” position. This simple sequence ensures the thread follows the machine’s path and eliminates the need for frantic re‑threading.
Q: How can I tell if my tension is off during the test stitch?
A: After a few stitches on a matching scrap, look for the upper thread’s visibility. If it shows on the right side only and the bobbin thread stays on the left, tension is balanced. A loose upper thread will pop up on the wrong side; a tight one will cause a tight loop that pulls the fabric. Adjust the lever by one notch and retest.
Q: I keep getting thread breaks—what’s causing it?
A: Thread breaks often stem from an uneven needle, a dull blade, or a dirty feed dog. Inspect the needle for bentness, clean the feed dogs with a small brush, and replace the needle if it’s older than a month. Also ensure the upper thread is pulled through the guides without a hitch; a snagged guide can snap the thread.
Q: Can I use polyester and cotton together on the same machine?
A: Yes, but treat them separately. Thread the machine with one material, perform a test stitch, then switch to the other. Avoid changing materials mid‑run; it can cause tension shifts and jamming. Keep a separate bobbin for each fiber type and note the tension settings in a quick reference chart.
Q: What if my Brother model has a different threading path?
A: Most Brother models share the same core threading route, but a few have subtle variations. Consult the machine’s manual for any model‑specific steps—particularly how the upper thread guides are positioned. Even a small difference in the guide’s angle can alter the loop placement, so a brief manual check saves headaches later.
Q: How do I maintain thread quality over long projects?
A: Keep a small cloth nearby to wipe dust from the feed dogs after each run. Store thread in a dry place to prevent moisture, and use a thread conditioner for natural fibers to keep them supple. Regularly check the bobbin for tightness; a loose bobbin can pull the thread and cause uneven stitches.
Remember, a good threading routine is the backbone of any sewing adventure. With a quick test stitch and a tidy setup, you can avoid the most common pitfalls and enjoy smoother, more creative projects.
Video Tutorial: Threading a Brother Sewing Machine
Ready to turn that dreaded jam moment into a confidence‑boosting routine? We’ve filmed a quick step‑by‑step video that walks you through every move—no guessing, no extra tools.
First, pull a fresh spool of polyester. Hold the thread at the top of the machine, then guide it through the back, front, and finally the needle bar. Feel that gentle tug as the take‑up lever clicks into place—if it feels loose, give it a notch.
Next, place a new bobbin. Twist the thread twice, pull the tail through the bobbin eye, and let the machine run a short cycle to lock the thread in the feed dogs. This tiny habit keeps the feed dogs clear and prevents dust from snagging the line.
Do you wonder if the tension is right? A quick test stitch on a scrap tells the story: the upper thread should be visible only on the right side, the bobbin thread on the left, and the loop should sit snug in the center. Adjust the lever by a notch if you see a pop.
At CreativiU, we’ve seen hobbyists and budding entrepreneurs use this same routine to finish tote bags and custom hoodies without a single jam. If you’re working on a project, pause after each thread change and run a test stitch—your future stitches will thank you.
So grab your Brother, hit play on the video, and let the thread glide. Your next masterpiece is just a few clicks away.
Conclusion
We’ve walked through every twist, pull, and test stitch so you can finally feel at home with your Brother machine.
When the thread slides without a hitch, the real magic happens: the seam feels like it’s just part of your hand, and you can focus on the design instead of the tension dial.
A quick pre‑run checklist keeps the jam‑free zone alive: clean the feed dogs, check the needle, set the tension to the middle notch, and do a test stitch on matching fabric. Repeat this after every bobbin change and you’ll never waste a minute re‑threading.
Remember, we’ve seen hobbyists and entrepreneurs turn a simple tote into a shop‑ready product by sticking to that rhythm. The same habit works whether you’re crafting a kid’s pillow or a custom jacket.
If you’re hungry for more depth, our community at CreativiU dives into advanced threading tricks, project pacing, and peer feedback that turns practice into profit.
Every time you hit the start button, you’re building a habit that translates into confidence on the next project. Trust the rhythm, and the stitches will follow like a favorite song on repeat.
So, take a breath, thread that first stitch, and let the machine do the heavy lifting. Your next masterpiece is just a seam away.
Leave a Reply