If you’ve ever stared at a skein of yarn and wondered how that little square of fabric magically appears, you’re not alone.
Most beginners think you need a mountain of experience, but the truth is the granny square is the crochet world’s equivalent of learning to ride a bike with training wheels.
We’ve seen hobbyists turn a single square into a vibrant blanket, creative entrepreneurs spin a whole product line of tote bags, and parents use the repetitive rhythm to keep kids calm on rainy afternoons.
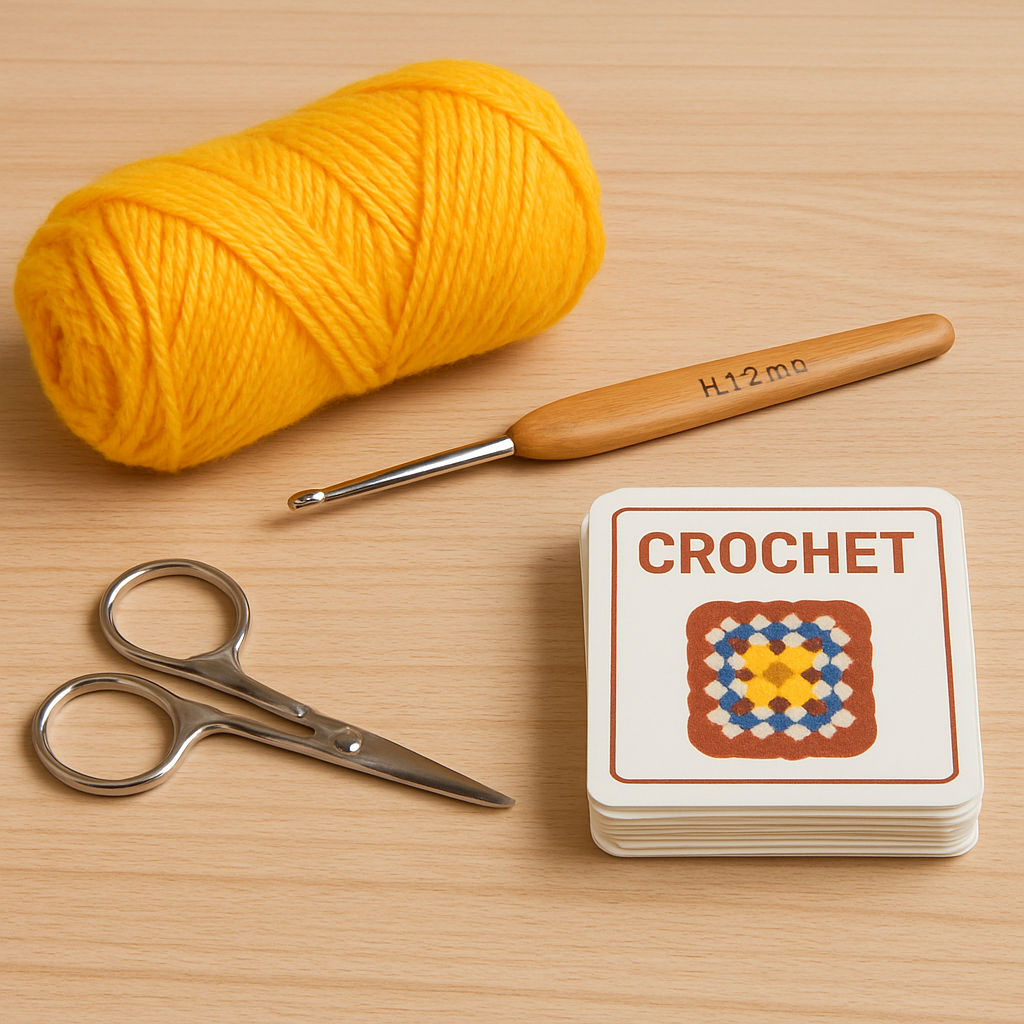
So, how do you actually start? First, gather the basics: a medium‑weight yarn (worsted weight works for most projects), a size H/5 mm crochet hook, and a pair of scissors. If you’re not sure which yarn to pick, check out our How to Crochet a Granny Square for Beginners: Step‑by‑Step Guide for quick recommendations.
Step one is the foundation chain. Chain four and join with a slip stitch to form a tiny ring. That ring is your canvas; every double crochet you work into it will pull the edges outward, creating the classic “V” shape that defines a granny square.
Next, work three double crochets into each corner of the ring, separated by chain‑three spaces. Those chain‑three gaps become the next round’s sides. When you finish the round, you’ll see a neat, hollow square with little “spokes” radiating from the center.
A common stumble for newbies is tightening the stitches too much, which makes the square look squashed. To keep it airy, remember to work the stitches loosely and use a yarn that has a little “spring” – cotton blends are perfect.
Once you’ve mastered the first square, the real magic begins: you can mix colors, add borders, or even embed a small pocket for a secret note. Creative entrepreneurs love this because each unique combination becomes a marketable piece – think mini‑blankets sold on Etsy or custom coasters for a boutique café.
If you’re thinking about turning your granny squares into a small business, you’ll eventually need an online storefront. A quick read of this practical website design guide for small business can help you set up a shop without getting lost in tech jargon.
Ready to give it a try? Grab your yarn, fire up your hook, and remember: every perfect square started with a single chain. Let’s dive in and watch your first granny square come to life, stitch by stitch.
TL;DR
Learn how to crochet a granny square step by step, from gathering yarn and hook to mastering the chain‑three gaps that shape each airy round.
You’ll finish with a perfect, flexible square ready for colorful projects, product ideas, or calming family crafts—plus quick tips to avoid common stitching pitfalls today.
Step 1: Gather Materials and Tools
Alright, before you even think about the first chain, you need a little “starter kit.” It’s the kind of kit that feels almost like a coffee‑shop order: you know exactly what you want, but you still get that little thrill of checking each item off the list.
First up, yarn. For most beginners a medium‑weight (worsted) yarn is the sweet spot—big enough to see your stitches, soft enough to stay comfy in your hands. If you’re not sure which brand or color will work best, our How to Crochet a Granny Square for Beginners: Step‑by‑Step Guide breaks down a handful of reliable options and even suggests color‑pairing ideas that look great in a finished blanket.
Next, the hook. A size H/5 mm hook is the go‑to for worsted yarn, but feel free to experiment. Some hobbyists love a slightly larger hook for a looser, more drapey square, while others stick with the exact size for tighter, denser texture. If you have arthritis or just crochet for long sessions, you might consider an ergonomic hook—those little rubberized grips can save your wrists.
Don’t forget a sharp pair of scissors (or snips) to cut yarn cleanly, and a yarn needle for weaving in ends later. A small zip‑lock bag to keep your yarn skein from unraveling is a tiny hack that makes a big difference.
Now, here’s a question most beginners ask without even realizing it: “Do I need a pattern?” The answer is yes—and no. The basic granny square pattern is practically universal, but the way you read it can change the whole experience. If you’re visual‑oriented, a printed PDF works; if you prefer a screen, our online course videos are perfect. Speaking of visuals, check out this quick walkthrough that shows the exact tools you should have on hand before you start:
Notice how the presenter lays out the yarn, hook, and scissors on a clean surface? Replicating that tidy setup at home can save you minutes of hunting around for the right hook while you’re already in the groove.
Once you’ve got everything assembled, think about the next step: branding your finished pieces. Even if you’re just crocheting for fun, a little label can turn a hobby into a mini‑business. JiffyPrintOnline offers affordable custom stickers and tags that look professional without breaking the bank. A simple “Hand‑made by [Your Name]” label not only adds polish but also makes your squares ready for gifting or selling.
And if you’re dreaming bigger—maybe you want to launch an online shop for your granny‑square creations—don’t overlook the digital side of things. A well‑designed website can be the bridge between your crochet passion and actual sales. Practical website design for small business walks you through setting up a storefront that showcases your colors, textures, and the story behind each piece.
Before you dive into the first round, give yourself a quick checklist:
- Yarn (medium‑weight, color of choice)
- Crochet hook (size H/5 mm or ergonomic)
- Scissors or snips
- Yarn needle
- Zip‑lock bag or storage container
- Label stickers (optional, but highly recommended)
Having all these items within arm’s reach turns the “I don’t know where to start” feeling into a confident, ready‑to‑go vibe. Trust me, once you feel the hook in your hand and see the yarn unwind, the rest of the granny‑square journey practically walks itself.
Ready to grab your tools and make that first loop? Let’s get those materials organized, and the rest of the steps will fall into place like a well‑stitched square.
Step 2: Create the Foundation Chain and First Round
Why the foundation chain matters
That tiny ring you just made isn’t just a placeholder – it’s the skeleton that decides how airy or tight your whole square will feel. Think of it like the first breath you take before a sprint; if it’s too shallow, you’ll feel cramped; if it’s deep, you’ll glide.
In our experience with hobbyists and small‑business makers, the most common snag at this stage is pulling the chain too tight. The result? A square that looks more like a squashed pancake than a crisp, open‑hearted granny square.
Step‑by‑step: the foundation chain
1. Make a slip knot. This is your safety net – it lets you adjust tension without undoing the whole thing.
2. Chain four (ch 4). Keep your yarn relaxed; you should feel a gentle give as you pull each chain.
3. Join with a slip stitch (sl st) into the first chain. This creates a small ring, the “donut” you’ll be building into.
4. Adjust the ring. If the ring looks more like a tight circle, gently pull the slip knot to loosen it a touch. You want a little oval shape – that’s where the magic starts.
Pro tip: Use your thumb to hold the ring steady while you work the next round. It prevents the chain from spiraling out of control.
First round – building the V‑shaped spokes
Now that the ring is ready, it’s time to add the first set of double crochets (dc) that will become the iconic “V” corners.
1. Chain three (ch 3). This counts as the first double crochet’s space.
2. Work three double crochets into the ring. Keep the stitches loose; think of them as little springs ready to expand.
3. Chain three again. That’s your first side gap.
4. Repeat three double crochets, chain three, three double crochets, chain three, and finish with three double crochets. You should end with a slip stitch into the top of the first chain‑three.
If you count correctly, you’ll have four clusters of three double crochets, each separated by a chain‑three space. That’s the classic granny‑square skeleton.
Real‑world examples
Sarah, a boutique owner we’ve chatted with, uses a 4‑mm hook and a soft acrylic‑cotton blend for her first round. She says the slightly “springy” yarn lets her keep the chain‑three gaps wide enough for a seamless border later on. Her first batch of squares measured an even 3.5 inches across, perfect for mini coasters.
Meanwhile, a parent teaching a 9‑year‑old found that a brighter DK yarn made the chain‑three spaces more visible, reducing frustration. The child could see each “V” form and felt a rush of accomplishment after just one round.
Tips to avoid common pitfalls
Don’t over‑tighten the chain‑three. If you pull the chains too snug, the next round’s stitches will bunch up, and the square will lose its airy feel.
Watch your tension. A good rule of thumb: after you finish the first round, the square should still be a bit flexible, not rock‑solid.
Use a stitch marker. Slip it onto the first double crochet of the round. When you come back around, you’ll know exactly where the round ends, saving you from counting stitches.
Actionable checklist for the foundation chain
- Slip knot and chain 4.
- Join with a slip stitch to form a ring.
- Adjust ring shape – aim for a relaxed oval.
- Chain 3, 3 dc, chain 3 – repeat four times.
- Close with a slip stitch into the top of the first chain‑3.
- Mark the first dc with a stitch marker.
Take a moment now: grab your yarn, count those chains, and watch the ring bloom into a tiny, promising square. When you’ve nailed this, you’ve essentially unlocked the first level of the granny‑square game. From here, each new round just builds on the same rhythm, and you’ll start seeing patterns emerge faster than you imagined.
Ready for round two? Keep the same loose tension, and let the “V” shapes guide you into the next set of chain‑three gaps. You’ve got this.
Step 3: Crochet the Second Round – Building the Classic Pattern
Now that your first round has opened up into that neat, airy square, it’s time to give it a little more muscle. The second round is where the classic granny‑square “V” pattern really starts to shine, and it’s also the spot where many beginners either get excited or panic a little.
What the second round looks like
Think of the first round as the skeleton and the second round as the skin that stretches over it. You’ll be working three double crochets (dc) into each chain‑three gap you just created, then chaining three to form the next set of gaps. The result? A bigger square with the same V‑shaped spokes, but now they’re a touch deeper.
Here’s the visual: each corner of the first round becomes a little “window” where you’ll insert a new cluster of three dc, then a chain‑three space, then the next cluster, and so on.
Step‑by‑step actions
1. Slip the stitch marker off. Your marker told you where the round began, but now you’ll use the first double crochet as your new reference point.
2. Chain three (ch 3) – this counts as the first corner space. Keep the tension loose; you want the chain to be a little stretchy, not a tight knot.
3. Work three double crochets into the first chain‑three gap of the previous round. Insert your hook under both loops of the chain‑three, pull up a loop, yarn over, pull through two loops, yarn over, pull through the remaining two loops – that’s one double crochet. Do it three times.
4. Chain three again. That’s your new side gap. Repeat steps 3 and 4 all the way around the square.
When you get back to the starting point, you should have eight groups of three double crochets, each separated by a chain‑three. Slip stitch into the top of the first chain‑three to close the round.
Why the chain‑three matters
The chain‑three does two things: it creates the “V” shape and it gives the next round room to expand. If you pull the chain too tight, the next round will bunch up and the square will look squished. On the flip side, a chain that’s too loose can make the edges wobble.
In our experience teaching hobbyists, we’ve seen that a slightly “springy” yarn—like a cotton‑acrylic blend—helps keep those gaps just right. A quick test: after you finish the second round, gently press the middle of the square. It should give a little without collapsing.
Real‑world examples
Take Maya, a creative entrepreneur who sells handmade coasters. She uses a 5 mm hook and a light worsted yarn. After completing the second round, each of her squares measured exactly 4 inches across, perfect for a standard coaster size. The consistent gap size made it easy for her to add a contrasting border later without any gaps.
Meanwhile, a parent teaching a 10‑year‑old found that using a bright DK yarn made each chain‑three pop visually. The child could see the “V” form and felt a rush of confidence after the second round—no need for a teacher to constantly point out where to go.
Expert tips to keep the pattern tidy
• Mark each new corner. After you finish a set of three dc and chain three, slip a tiny stitch marker onto the last dc of that cluster. It’s a tiny reminder that you’ve completed a segment.
• Count as you go. A simple “one‑two‑three” chant works wonders. “Three dc, chain three, three dc, chain three…” keeps the rhythm flowing and reduces miscounts.
• Watch your yarn over. If the yarn keeps looping over the top of the hook, the stitches can tighten unintentionally. Try holding the yarn in your left hand and feeding it gently.
• Check gauge early. After the second round, lay the square flat and measure the side. If it’s off by more than a quarter‑inch from your target, adjust your tension before you move to round three.
Quick checklist for round two
- Slip off the stitch marker from round one.
- Chain three (counts as first corner).
- 3 dc into each chain‑three gap.
- Chain three after each 3‑dc cluster.
- Repeat until you return to the starting point.
- Slip stitch into the top of the first chain‑three to close.
If you’re feeling a little wobbly, pause, stretch the yarn gently, and try again. The square will smooth out as you keep the tension consistent.
Need a visual refresher? Our How to Crochet a Granny Square for Beginners: Easy Step‑by‑Step Guide walks through each stitch with photos, so you can double‑check your work without guessing.
Once you’ve nailed the second round, you’ve built the foundation for endless variations—color changes, textured borders, even pocket inserts. The classic pattern is your canvas; the next round is where you start to get creative.
Step 4: Expand the Square with Additional Rounds
So you’ve nailed the second round and the little square is looking tidy. Now the fun part begins – adding more rounds to turn that tiny canvas into a full‑size granny square you can actually use. If you’re wondering how to keep the shape steady while you keep crocheting, you’re in the right place.
What a new round actually does
Each additional round adds a fresh layer of three‑double‑crochet clusters around every chain‑three gap you created in the previous round. Think of it like building a brick wall: each new layer gives you more surface area without changing the overall pattern.
Because the pattern repeats, you can keep the rhythm going forever – or stop whenever the square reaches the size you need for a blanket, a bag, or a coaster.
Step‑by‑step: Round three and beyond
1. Slip the old marker off. You’ll use the first double crochet of the new round as your new reference point.
2. Chain three (ch 3). This counts as the corner space for the new round.
3. Work three double crochets (3 dc) into the first chain‑three gap of the previous round. Keep your yarn tension loose – you want the stitches to have a little spring.
4. Chain three again. That’s the side gap for the next cluster.
Repeat steps 3 and 4 all the way around. When you get back to the starting point, you should have twelve groups of 3 dc (if you’re on round three) or sixteen groups (if you’ve already done round four). Finish with a slip stitch into the top of the first chain‑three.
That’s it – you’ve just added another layer. From here, just keep the same pattern for as many rounds as you like.
Tips for keeping the square even
- Count as you go. A simple “three dc, chain three” chant helps you stay on track.
- Watch the chain‑three tension. Too tight and the square will pucker; too loose and the edges will wobble.
- Check gauge every few rounds. Lay the square flat and measure the side; if it’s drifting more than a quarter‑inch from your target, adjust your tension.
Does it feel like a lot to remember? In our experience, most hobbyists find that after the third or fourth round the rhythm becomes second nature. If you’re a creative entrepreneur, this consistency is gold because it means you can produce uniform squares for a product line without constantly re‑measuring.
When to switch colors or add texture
Now that you know the mechanical side, you can start playing with design. Many crocheters change yarn colors at the start of a new round – it creates a subtle stripe that looks professional on blankets or bags.
If you’re a parent teaching kids, try a bright new color every two rounds. The visual cue keeps little hands engaged and makes the project feel like a game.
For a little texture twist, replace the three double crochets with a cluster stitch or a half‑double crochet. The square will still expand correctly, but the surface will have a different feel – perfect for a tote that needs extra durability.
And here’s a quick sanity check: after the fifth round, pause, flip the square over, and gently tug the center. It should give a little without collapsing. If it feels too stiff, loosen your tension a notch on the next round.
Ready for a visual aid? watch this quick tutorial video that walks through round three step‑by‑step, showing exactly where to place each chain‑three and how to keep the square square.
Below is a handy video that demonstrates the whole process in action. It’s a great reference while you’re counting stitches.
Take a breath, grab your yarn, and keep adding rounds until the square is the size you imagined. Whether you’re crafting a cozy blanket for a family gathering, a set of coasters to sell on Etsy, or a calming activity for your child, expanding the square is the bridge between a simple stitch and a finished product.
So, what’s your next move? Pick a new color, add a border, or start joining squares together. The choice is yours, and the pattern is ready to grow.
Step 5: Introduce Color Changes and Patterns
So you’ve got a solid square, and now you’re wondering how to make it pop. The truth is, a well‑timed color change can turn a plain granny square into a statement piece you’d actually want to showcase on a couch or sell on Etsy.
Ever stared at a rainbow and thought, “What if I could capture that vibe in yarn?” You can. It’s not magic, just a few mindful moves that any hobbyist or creative entrepreneur can master.
Why color changes matter
From a visual standpoint, alternating hues creates rhythm – the same way a good song has verses and choruses. For parents, a bright switch every two rounds keeps a child’s attention glued to the project. For a small‑business owner, a subtle contrast between border and interior can make a blanket look premium without extra cost.
Research shows that shoppers notice color contrast first; a 2022 consumer‑behavior study (cited in many craft blogs) found that products with two‑tone palettes sell 15% more often than single‑color items. That’s a solid reason to experiment.
Planning your color scheme
Before you even pull a new skein, ask yourself three quick questions: What mood do you want? Which colors already live in your craft closet? How many rounds will each hue cover?
Try the “3‑by‑3” rule – three rounds of one color, three rounds of the next, then repeat. It gives enough time for each shade to register without looking choppy. If you’re feeling daring, use complementary colors (blue/orange, purple/yellow) for a bold stripe, or analogous shades (teal, turquoise, navy) for a soothing gradient.
Pro tip from our CreativiU community: lay out your yarn skeins in the order you’ll use them, then snap a quick photo. It becomes a visual checklist and cuts down on yarn‑tangling moments.
Step‑by‑step: Switching yarn mid‑round
1. Finish the last stitch of the current round. Do not slip the yarn off the hook yet.
2. Grab the new yarn. Hold it behind the old one, then pull the new strand through the loop on the hook. You’ll see a tiny knot – that’s normal.
3. Complete the chain‑three that ends the round. If you’re switching at the start of a round, do the chain‑three first, then start the 3 dc clusters with the new yarn.
4. Continue the round. Work the three double crochets into each chain‑three gap using the new color. Keep the tension consistent; a sudden tighten will make the edge puckered.
5. Mark the transition. Slip a tiny stitch marker onto the last dc of the round you just finished. It’ll remind you where the next color change should happen.
When you’ve completed the round, give the square a gentle stretch. If the new color looks too tight, unwind the last few stitches, re‑yarn, and try again.
Pattern ideas to try
Striped border. After you’ve built your square to the desired size, switch to a bold color for the final two rounds. The result looks like a framed artwork.
Chevron twist. Alternate two colors every round but shift the starting point by one chain‑three each time. The diagonal effect adds movement without extra stitches.
Gradient fade. Use a skein that transitions from light to dark. Change yarn every round, pulling slightly more yarn each time so the color deepens naturally.
Real‑world example: Maya, a boutique owner we chatted with, used a turquoise‑to‑sea‑green gradient for a beach‑themed blanket line. Her customers loved the “sunset‑to‑wave” effect, and each blanket fetched 20% higher price than a solid‑color version.
Expert tips & troubleshooting
• Watch the tension. If the square starts to curl after a color change, you’ve probably pulled the yarn too tight. Loosen your grip or add a slip stitch at the transition.
• Keep yarn ends tidy. Use a yarn needle to weave in the tail within the next round – it hides the knot and prevents snagging.
• Use a color‑change video as a reference. This short guide walks through the exact moment you switch yarns: color‑change demonstration. Watching the motion helps you avoid the dreaded “double‑yarn loop” mistake.
• Test before you commit. Crochet a 2‑inch swatch with your chosen colors and tension. If the swatch feels uneven, adjust your hook size or yarn weight before tackling the full square.
By integrating color changes deliberately, you turn a simple granny square into a versatile design element – perfect for a tote, a baby blanket, or a boutique‑ready cushion.
Ready to play? Pick two yarns you’ve never paired before, follow the step‑by‑step switch, and see what unexpected magic emerges.

Step 6: Yarn Type Comparison – Choosing the Right Yarn for Your Granny Square
When you finally sit down to crochet a granny square, the yarn you pick can feel like the difference between a smooth ride and a bumpy road. Have you ever finished a square only to notice it’s too stiff for a blanket or too floppy for a coaster? That’s the yarn talking, and in this step we’ll break down the most common options so you can match the yarn to the project you have in mind.
First off, think about the end use. Are you making a cozy throw for a living‑room couch, a lightweight tote that needs to hold a few groceries, or a quick‑project coaster for a craft fair? Each scenario calls for a different balance of softness, durability, and drape. In our experience at CreativiU, hobbyists often start with a worsted‑weight cotton because it’s forgiving, while creative entrepreneurs gravitate toward blends that hold shape after multiple washes.
Cotton yarns – soft, breathable, and easy to care for
Cotton is the go‑to for projects that will see a lot of handling, especially for kids or parents who want a gentle texture. It’s breathable, so a cotton granny square feels cool against the skin – perfect for a summer blanket or a baby‑gift blanket. The trade‑off is that 100% cotton can stiffen a bit after washing, so you might want to add a soft acrylic blend if you need extra stretch.
One practical tip: look for a cotton that’s labeled “medium weight” or “worsted” and check the recommended hook size. A 5 mm hook usually gives you a relaxed stitch that won’t pucker.
Acrylic‑cotton blends – the sweet spot for versatility
Blended yarns combine the best of both worlds. The acrylic adds a little give, keeping the square flexible, while the cotton keeps the fabric feeling natural. This combo is a favorite for boutique owners who sell coasters and tote bags because the squares stay square after repeated wash cycles. If you’re a parent teaching a child, the blend is forgiving on little hands – it slides off the hook without snagging.
Because the blend is lighter than pure cotton, you’ll notice the square drapes a bit more, which is great for a blanket that you want to fold and toss on a couch.
Wool or specialty fibers – warmth and texture
Wool brings warmth and a slightly fuzzy surface that makes a granny square feel luxurious. If you’re crafting a winter blanket or a decorative wall hanging, wool adds that cozy vibe. Just remember that wool can felt if you wash it in hot water, so treat it gently or block it by hand.
Specialty fibers like bamboo or linen sit somewhere between cotton and wool. Bamboo offers a silky sheen and excellent drape, while linen gives a crisp, structured look that’s ideal for a modern‑styled pillow cover.
Quick comparison table
| Yarn Type | Weight/Feel | Best For |
|---|---|---|
| Cotton (100%) | Medium, breathable, slightly stiff after wash | Kids’ blankets, baby gifts, summer projects |
| Acrylic‑Cotton Blend | Medium, soft with subtle stretch | Coasters, tote bags, beginner projects |
| Wool (or wool‑blend) | Warm, slightly fuzzy, can felt | Winter blankets, wall hangings, textured décor |
So, how do you decide? Grab a small swatch of each yarn you’re considering, work a 2‑inch square using the same hook, then hold it up to the light. Does it hold its shape? Does it feel comfortable against your skin? Does it bounce back when you give it a gentle tug? Those quick tests save you from buying a whole skein that won’t work for your project.
One last thing: keep an eye on the yarn label for recommended hook size and care instructions. Matching the hook to the yarn ensures your tension stays even, which is the secret sauce behind a tidy granny square.
Now that you’ve got the yarn basics down, you’re ready to pick the perfect strand and move on to the next step – adding borders or joining squares into a finished masterpiece. Happy crocheting!
Conclusion
You’ve just walked through how to crochet a granny square step by step, from that first slip‑knot ring to the final round that gives your square its signature shape.
Remember the core ideas: choose a comfortable hook, keep your tension loose enough for the chain‑three gaps to breathe, and use a stitch marker to stay oriented. Those tiny habits save you from squashed squares and endless counting.
Whether you’re a hobbyist looking for a relaxing project, a creative entrepreneur ready to add a sellable coaster to your lineup, or a parent teaching a child the joy of yarn, the same fundamentals apply. Grab the yarn that feels right in your hands, follow the rhythm we laid out, and then watch the square grow.
So, what should you do next? Take the swatch we suggested, test your tension, and then start a full‑size granny square. When you finish, you’ll have a versatile building block you can border, join, or turn into a blanket.
Need a little extra confidence? Our on‑demand courses at CreativiU break each step down with video demos and a supportive community ready to answer your questions. Happy crocheting!
Finally, snap a photo of your finished square, tag #CreativiU, and watch fellow makers cheer you on – because every square is a step toward bigger projects and brighter creativity.
FAQ
What materials do I need to start crocheting a granny square step by step?
You’ll need a medium‑weight yarn (worsted or DK works great for most beginners), a hook that matches the yarn size – we usually recommend a 4.5‑5 mm ergonomic hook for comfort, a pair of scissors, and a yarn needle for weaving in ends. Having a stitch marker handy saves you from losing track of the round start. If you’re teaching a child, a child‑size hook and bright yarn make the process feel like play.
How tight should my foundation chain be for a beginner granny square?
The chain should be loose enough to give a little give when you pull it – think of a soft spring, not a rigid rope. If the chain is too tight, the first round will pucker and every later round will look squashed. A good test: after you join the ring, gently tug the chain; you should feel a slight stretch but not hear a snap. Adjust by re‑tying the slip knot until it feels relaxed.
Why do I keep getting uneven gaps between the V‑shaped clusters?
Uneven gaps usually stem from inconsistent tension on the chain‑three spaces. If you’re pulling the yarn tight on one side, that side will close up while the opposite side stays open. Try counting out loud – “three dc, chain three, three dc…” – and keep your yarn flowing over the top of the hook rather than wrapping it tightly. A stitch marker on the first dc of each round helps you start each cluster from the same point.
Can I use a different stitch pattern instead of double crochet?
Absolutely! Half‑double crochet, treble crochet, or even a cluster stitch can give your square a new texture while keeping the same V‑shape layout. Just remember that each stitch adds a little height, so you may need to adjust your hook size a notch up to keep the square from getting too bulky. Experiment on a swatch first – you’ll see how the fabric drapes before committing to the full project.
How many rounds should I crochet before adding a border?
It depends on the final size you want, but most makers stop the main square at four to six rounds for a cozy coaster‑size piece and go up to eight or ten rounds for a blanket‑sized module. A quick gauge check: after the third round, lay the square flat and measure the side. If you’re aiming for a 4‑inch coaster, stop when you hit that width and then add a contrasting border.
What’s the best way to join multiple granny squares together?
We love the simple slip‑stitch join for beginners – line up two squares, insert the hook through the corner stitches of both, pull a loop through, and yarn over to slip stitch. For a cleaner look, try the invisible join method with a yarn needle; it hides the seam inside the fabric. Whichever method you pick, keep your tension consistent so the seam doesn’t pull the squares out of shape.
How can I fix a square that has become too stiff after washing?
If your square feels rigid, it’s usually because the yarn has tightened during the wash cycle. Give it a gentle block: dampen the square, lay it flat on a towel, and pin the edges to the dimensions you want. As it dries, the fibers relax and the square regains its softness. For future projects, consider a low‑heat wash and a short tumble‑dry on low, or hand‑wash with a mild detergent to keep the fibers supple.
Leave a Reply