Ever found yourself staring at a pile of fabric scraps and wishing you could turn them into something instantly useful? You’re not alone—most of us have that moment when a bright idea for a cute hair accessory pops up, but the “how‑to” feels fuzzy. In this guide we’ll walk through exactly how to make a scrunchie with a sewing machine, from picking the right elastic to adding that finishing touch that makes it pop.
First, think about the vibe you want. Is it a bold, neon stripe for a workout look, or a soft, pastel chiffon for a casual day? Grab a 1‑inch wide cotton or silk fabric—something that’s breathable and won’t snag your hair. Cut a 12‑inch square for the band; you’ll need another 2‑inch strip for the seam allowance, so cut a 14‑inch piece and fold it in half.
Set your machine to a straight stitch and use a medium‑weight thread that matches or contrasts nicely. Sew a neat seam down the middle of the 14‑inch strip, then press it open. This creates the pocket for the elastic. Speaking of elastic, a 1/4‑inch wide hair elastic works best—too thick and the scrunchie will feel stiff, too thin and it might roll.
Now, the fun part: insert the elastic. Attach a safety pin to one end of the elastic and thread it through the seam pocket, like you’re fishing a line. Once the elastic is through, overlap the ends by about an inch and sew them together securely. Finally, close the seam pocket with a tidy stitch, trim any excess fabric, and give it a good press.
If you’re new to sewing, don’t worry—our Sewing for Beginners Tutorial breaks down the basics of threading, tension, and stitching so you can breeze through this project without a hitch.
Here’s a quick checklist to keep you on track: choose fabric, cut squares, stitch the seam, insert elastic, secure and finish. Pro tip: add a tiny piece of bias tape at the ends of the elastic for extra durability, especially if you plan to wear the scrunchie daily.
Need inspiration? Look at how fashion influencers repurpose vintage scarves into scrunchies, or how a simple tote‑bag‑making class teaches the same seam technique you’ll use here. The same principles apply, just in a smaller, hair‑friendly format.
And if you love customizing apparel, you might also enjoy learning how to design a custom photo hoodie—check out this step‑by‑step guide for a fun side project.
So grab your machine, pick a fabric that makes you smile, and let’s stitch up a scrunchie that’s uniquely yours. You’ll have a fresh accessory in under 30 minutes, and the satisfaction of a project done right.
TL;DR
If you want a cute, custom hair accessory fast, you can sew a scrunchie in under 30 minutes with just fabric, elastic, and a basic sewing machine. Follow our step‑by‑step guide, pick a fabric you love, stitch the seam pocket, thread the elastic, and finish with a quick press for a personalized, stretchy style.
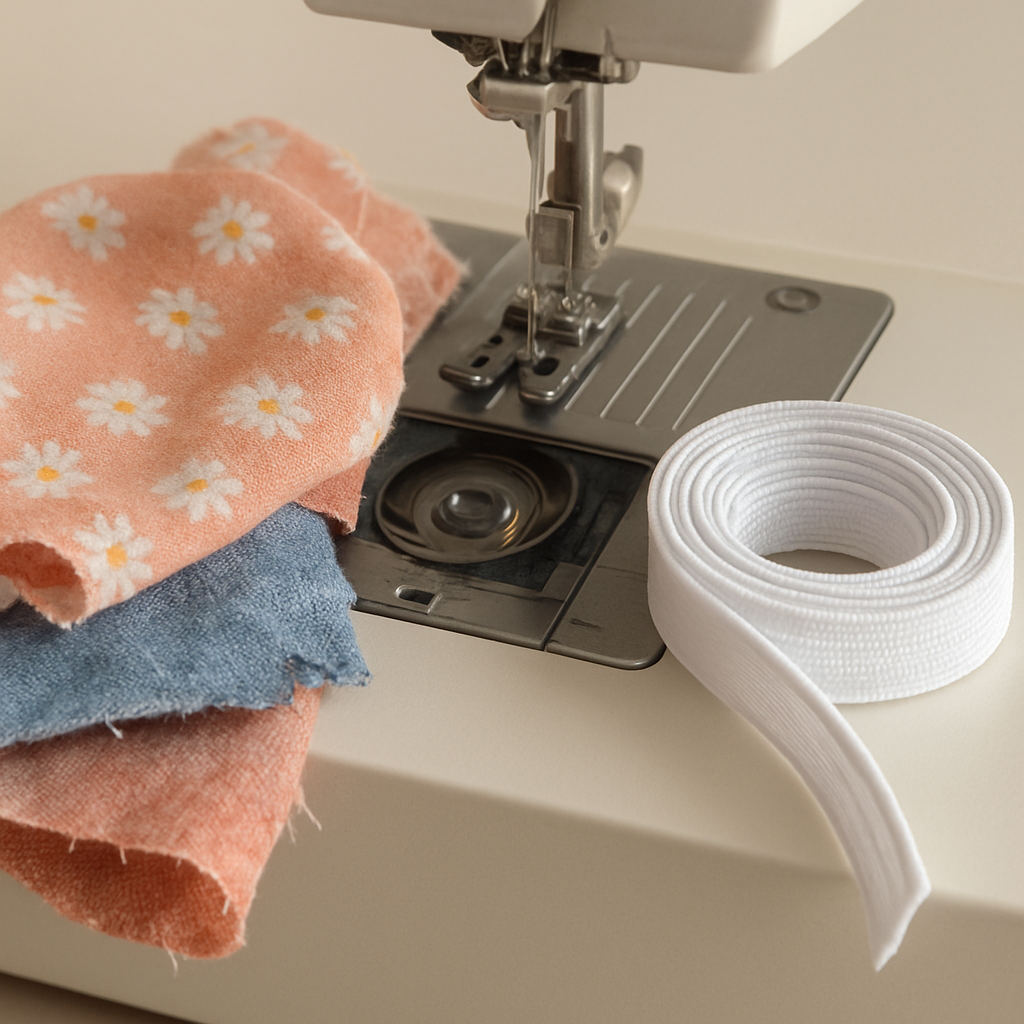
Step 1: Gather Materials and Prepare Your Sewing Machine
Alright, before we even think about stitching that first seam, let’s take a breath and look at what you actually need on your table. It’s amazing how a cluttered workspace can make a simple scrunchie feel like rocket science.
First up, grab a piece of 1‑inch wide fabric that makes you smile – cotton, silk, or even a fun linen blend. Cut a 12‑inch square for the band and a 14‑inch strip for the seam pocket; you’ll fold that strip in half later, so the extra two inches become your seam allowance.
Next, you’ll need a thin hair elastic, about ¼‑inch wide. Anything thicker will make the scrunchie feel stiff, and anything thinner might roll up. I like to keep a few colors of elastic in a zip‑lock bag so I can match the mood of the day.
Now, the machine itself. Pull out your sewing machine, give it a quick dust‑off, and check the needle – a universal size 75/11 works great for most fabrics. If you’re using a delicate silk, consider a finer 70/10 needle to avoid puckering.
Thread the top bobbin with a medium‑weight polyester thread that matches or contrasts your fabric. Don’t forget to wind the bobbin – a loose bobbin can cause tension issues that leave the seam looking wonky.
Set the stitch length to a medium setting, around 2.5 mm, and select a straight stitch. You don’t need any fancy stitches for a scrunchie; the goal is a clean, sturdy seam.
Here’s a quick visual to walk you through the setup:
Take a moment to run a test stitch on a scrap piece of the same fabric. If the stitch looks even and the fabric lies flat, you’re good to go. If it puckers, double‑check the needle and tension settings – a small tweak can make all the difference.
While you’re waiting for the test stitch, think about where you’ll wear this scrunchie. If you often pair it with a wooden hair comb, you might enjoy browsing some hand‑crafted wooden accessories at Poppas Wooden Creations. It’s a fun way to coordinate your look without overthinking it.
Back to the machine: make sure the presser foot is lowered and the feed dogs are engaged – they’ll push the fabric through as you sew the seam pocket. If your machine has a zipper foot or a walking foot, you can leave it on; it won’t hurt anything.
Now, let’s talk safety. Keep a pair of sharp scissors handy, but also a small pair of fabric shears for trimming the seam allowance later. And always keep a safety pin nearby – you’ll use it to pull the elastic through the pocket, and it’s a lifesaver if the elastic slips.
When you feel ready, line up the 14‑inch strip, right sides together, and pin the long edge. Sew a straight seam, leaving a small gap (about ½ inch) at one end – that’s your entry point for the elastic.
Give the seam a quick press with an iron set to the fabric’s recommended temperature. Pressing open the seam makes it easier to slide the elastic through later, and it adds that professional finish you’ll love showing off.
At this point, you’ve gathered all the materials, prepped your machine, and sewn the first seam. The rest of the guide will walk you through inserting the elastic and sealing up the scrunchie, but for now, you’ve earned a coffee break. You’ve turned a handful of odds and ends into a ready‑to‑sew project – that’s the magic of a well‑organized workspace.
Ready to move on? Grab that safety‑pin‑tied elastic, and let’s get it threaded through the pocket.
Step 2: Cut and Sew the Fabric Strip
Alright, the fabric tube is ready and the elastic is snug inside. Now comes the part where you actually turn that strip into a scrunchie you can wear – cutting the right length and sewing a clean seam.
1. Measure twice, cut once
Grab a ruler and lay your fabric flat. You’ll want a strip that’s 12‑inches long for an adult‑size scrunchie, but you can adjust to 9‑inches for a kid’s version or 15‑inches if you love a chunky look.
Tip: add an extra half‑inch on each end for seam allowance. That way the raw edges stay hidden once you finish.
Does it feel like a lot of math? Think of it like measuring a ribbon for a gift – a little extra never hurts.
2. Mark your cut lines
Use fabric chalk or a washable marker to draw a line where you’ll cut. If you’re working with a patterned fabric, line up the motif so the scrunchie looks balanced when it’s turned right‑side‑out.
Example: I once used a bold chevron print. By aligning the V’s on both ends, the finished scrunchie had a mirror effect that made it look extra intentional.
3. Cut with confidence
Sharp fabric scissors are a game‑changer. A clean cut means the seam will lie flat and you won’t have to fight frayed edges later.
For tricky fabrics like silk, use pinking shears to prevent snagging, but only if you’re comfortable – a straight cut works fine for most cottons.
4. Set up your machine for the seam
Thread your machine with a medium‑weight polyester thread that matches the fabric or contrasts for a hidden stitch line. Set the stitch length to about 2.5 mm – a medium straight stitch gives enough strength without puckering.
If you’re worried about the seam opening up, engage a small stitch‑width zigzag on the very edge – just one or two stitches to lock the raw edge.
5. Sew the seam
Fold the strip lengthwise, right sides together, aligning the raw edges. Pin or clip the seam; I prefer clips because they don’t leave holes.
Start sewing a few centimeters before the seam allowance, then pause, backstitch, and continue. This extra reinforcement at the start and end prevents the seam from unraveling when you flip the tube.
Pro tip: I like to use a “seam‑seam” technique – sew the seam once, press it open, then sew a second line about ¼‑inch away. It creates a double‑stitched edge that’s super durable, especially if you plan to wear the scrunchie daily.
6. Press the seam
Once the stitch is done, open the fabric and press the seam flat with a warm iron. Use a pressing cloth for delicate fabrics. A crisp seam makes turning the tube right‑side‑out a breeze.
Think about it like ironing a shirt collar – a little heat and pressure give you that professional finish.
7. Real‑world examples
One of our community members, Maya, used a leftover silk blouse to make a luxe hair tie. She cut a 13‑inch strip, added a tiny bias‑tape finish, and now she’s got a silk scrunchie that doubles as a gift wrap ribbon.
Another example: Jake, a stay‑at‑home dad, turned his kids’ plaid fabric scraps into bright, sturdy scrunchies for school. He kept the seam allowance a full ¼‑inch because the kids tug hard, and the double‑stitched edge survived weeks of playground use.
8. Quick checklist before you finish
- Strip length includes seam allowance
- Fabric cut cleanly
- Stitch length set to medium
- Backstitch start and end
- Press seam flat
If you’ve got a moment, check out How to Make a Sewing Machine Cover – it’s a handy side project that protects your machine while you’re cutting and stitching.
And if you’re feeling crafty beyond scrunchies, you could repurpose any leftover fabric into holiday photo magnets for a personalized gift. Learn more here. That little extra step turns a simple sewing session into a seasonal tradition.
Now you’ve got a perfectly sewn fabric strip, ready to have the elastic pulled through and the tube turned right‑side‑out. Trust the process, enjoy the rhythm of the machine, and remember – each stitch is a tiny win on your creative hustle.
Step 3: Add Elastic and Secure the Ends
Now that your fabric tube is lying flat and the elastic is waiting inside, it’s time for the part that actually makes the scrunchie stretchy. If you’ve ever wrestled with a loose hair tie that slides off, you know why this step matters.
Thread the elastic through the tube
Grab a safety pin, attach it to one end of the ¼‑inch flat elastic, and push the pin into the little gap you left in the seam. Think of it like fishing a line – the pin guides the elastic around the whole tube without getting tangled.
Slowly work the pin around, feeling the fabric give as the elastic slides through the tube without tangling. If the tube feels tight, grab a blunt chopstick or a knitting needle and gently nudge the elastic forward. You’ll hear a faint “whoosh” when it finally pops out the other side – that’s the sweet spot.
Pro tip: keep the elastic a few inches longer than the final circumference you want. That extra length lets you overlap the ends and stitch them securely without stretching the band too tight.
Overlap and stitch the elastic ends
Once the elastic is fully threaded, line the two ends up so they overlap about an inch. Overlap length is your safety net – too little and the knot might slip, too much and the scrunchie feels bulky.
Set your machine to a straight stitch, backstitch at the start, and sew a few sturdy stitches through both layers of elastic. You don’t need a fancy seam; a simple 4‑stitch lock does the trick. Some sewists like to use a zigzag on the very edge to keep the elastic from fraying, but a plain stitch works fine for most cotton or silk fabrics.
Here’s a quick visual cue: if you look at the stitched section, you should see a tidy, flat line that blends into the fabric when you turn the scrunchie right‑side‑out. This is exactly how Melissa Mora describes the method in her scrunchie tutorial on the Melly Sews blog.
Seal the seam gap
Remember the tiny opening you left when you sewed the original tube? It’s time to close it. Slip a needle and thread (or use your machine’s blind‑stitch setting) and carefully stitch the raw edges together. A blind stitch hides the seam, giving the scrunchie a professional, “no‑stitch visible” finish.
If you prefer a machine stitch, lower the presser foot, align the gap, and take a few short stitches that catch only the fabric edge. Pull the thread tight, clip the ends, and you’ve got a clean hideaway seam.
Give the whole band one last press. A quick iron smooths any puckers and sets the stitches, so when you flip the tube right‑side‑out the elastic will sit snugly inside and the fabric will lie flat.
Final checklist
- Elastic threaded completely through the tube.
- Ends overlapped 1‑inch and securely stitched.
- Gap closed with blind or machine stitch.
- Band pressed flat and ready to wear.
And that’s it – you’ve just turned a strip of fabric into a stretchy, durable scrunchie that’ll hold your ponytail during a workout or a night out.
| Step | Tool / Material | Key Tip |
|---|---|---|
| Thread elastic | Safety pin, chopstick | Use the pin as a guide; nudge with a stick if tight |
| Secure ends | Flat elastic, sewing machine | Overlap 1 in.; 4‑stitch lock works well |
| Close gap | Needle & thread or blind‑stitch foot | Blind stitch hides seam for a polished look |
Feel free to experiment with different elastic widths – a wider ½‑inch elastic gives a firmer hold, while the classic ¼‑inch stays soft. And if you’ve got extra fabric, why not make a matching set of mini‑scrunchies for kids? The same steps apply, just scale the strip length down.
Now you’ve got the elastic in place and the ends sealed tight. Slip it onto your hair, admire the smooth finish, and give yourself a little high‑five. You’ve just mastered another piece of the “how to make a scrunchie with a sewing machine” puzzle.
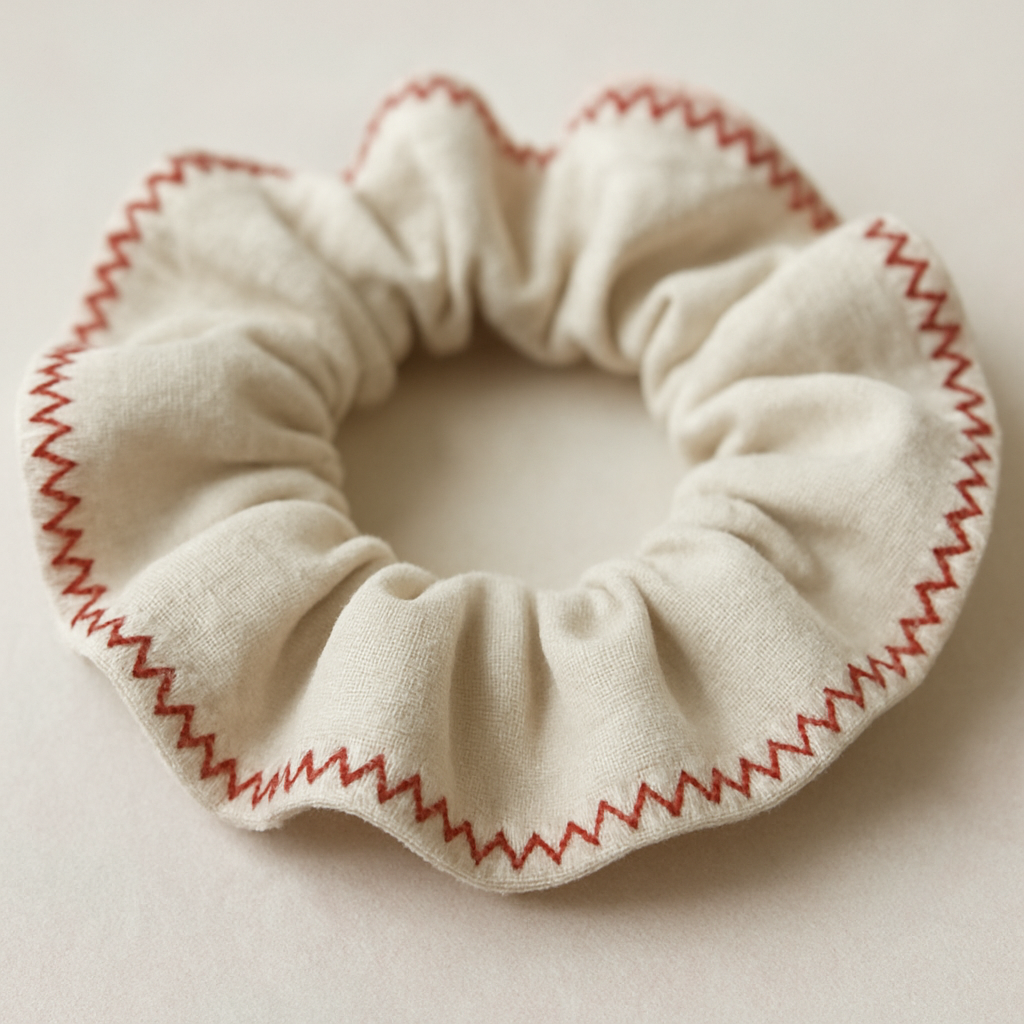
Step 4: Finish with Decorative Stitching
Now that the elastic is locked and the seam is sealed, it’s time for the fun part that turns a plain band into a little piece of art.
Do you ever notice how a tiny stitch of contrast thread can make a scrunchie feel like a designer piece? That tiny pop of color is what we’re after in this step.
Choose your decorative stitch
First, pick a thread that either matches the fabric for a subtle finish or boldly contrasts for a statement look. Cotton polyester blends work well because they glide through the machine without fraying.
If you’re not sure which hue to pick, think about the outfit you’ll wear it with. A pastel pink scrunchie pairs perfectly with a summer dress, while a navy stripe adds a sporty edge.
Set up a decorative stitch pattern
Most sewing machines have a built‑in “zigzag” or “decorative” stitch. Select a medium width and a short stitch length – about 2 mm – so the line sits neatly on the fabric surface.
Want a little extra texture? Try a “double‑zigzag” where the machine stitches forward, then reverses on the same line. It creates a tiny raised ridge that catches the light.
According to a recent DIY comparison, sewing scrunchies is the quickest method, so you can experiment with a few stitch styles without spending hours on each piece as the author notes.
Apply the stitch around the band
Turn the scrunchie right‑side‑out if you haven’t already, then lay it flat on your ironing board. Pin the band at the 12‑o’clock position to keep it steady.
Run the machine once around the perimeter, letting the decorative stitch follow the curve. Keep the needle just a hair away from the seam so the stitching sits on the outer face, not the inside.
Need a guide? Use a small piece of masking tape on the fabric edge; the tape will lift the needle just enough to keep the stitch visible but not too deep.
Add a finishing flourish
For a boutique feel, add a tiny chain of beads or a single fabric‑covered button at the seam’s backstitch point. Slip it on with a needle and a dab of fabric glue if you prefer hand‑sewing.
Even a simple “reverse stitch” at the start and end of the decorative line gives the seam a polished look – think of it as the little bow on a gift.
If you want extra durability, the Zaza of Canada guide suggests reinforcing decorative stitches with a second pass of thread, especially on stretchy fabrics as they explain.
Press and admire
Give the band a quick press with a warm iron, using a pressing cloth if the fabric is delicate. The heat sets the stitch and smooths any puckers.
Now flip the scrunchie over, slip it onto your ponytail, and notice how the decorative line catches the light every time you move.
And there you have it – a fully finished scrunchie that not only holds hair but also showcases your personal style.
Take a moment to snap a photo, share it in the CreativiU community, and maybe start a “Stitch of the Week” challenge. You’ve just turned a simple elastic tube into a miniature runway accessory.
Step 5: Press, Trim, and Customize Your Scrunchie
Okay, the tube is sewn, the elastic is snug, and you’ve already added a decorative stitch. The next part feels a little like a spa day for your scrunchie – a hot press, a quick trim, and then a little personal flair.
First thing’s first: set your iron to a medium‑low temperature. If you’re working with cotton or a silk‑blend, a warm iron (around 300°F) is perfect. For delicate velour, dial it down a notch and always slide a pressing cloth between the iron and the fabric. The Ruffled Purse notes that a pressing cloth prevents shiny marks and protects stretchy fibers.
Press the seam flat
Lay the scrunchie on the ironing board with the seam open side up. Gently press along the seam line for about 5‑10 seconds. You’ll feel the puckers melt away and the stitches set into a crisp line.
Pro tip: use the tip of the iron (the narrow edge) to press the very edge of the band. That tiny bit of pressure keeps the seam from rolling when you flip the tube right‑side‑out.
Trim excess fabric
Now that the band is flat, it’s time to tidy up. Pull the scrunchie apart just enough to see the raw ends of the fabric. Using sharp fabric scissors, trim any excess thread or stray fabric – usually about a ¼‑inch from the seam edge. This prevents fraying later and gives the scrunchie a professional finish.If you’re working with a patterned fabric, take a second to check that the pattern lines match up after trimming. A mis‑aligned motif can look quirky – in a good way – but if you prefer symmetry, a little extra snip will set it straight.
Customize with a personal touch
Here’s where you get to make the scrunchie truly yours. Add a tiny fabric‑covered button, a bead, or a short piece of ribbon at the back‑stitch point. A dab of fabric glue (or a few hand‑stitched stitches) will keep the embellishment in place without adding bulk.
Real‑world example: Maya, a member of our CreativiU community, sews a single ¼‑inch satin ribbon onto the back of her scrunchie and calls it a “secret pocket” for a hidden hairpin. She says it’s perfect for those “just‑in‑case” moments when a stray strand needs taming.
Another fan, Jake, likes to add a small metal charm (like a tiny compass) that slides onto the elastic before you stitch the ends. The charm stays hidden when the scrunchie is worn, but it’s a fun surprise when you flip the band over.
Optional: add a stretch‑lock stitch
If you plan to wear the scrunchie daily, consider reinforcing the elastic seam with a stretch‑lock stitch. Most machines have a built‑in stretch stitch (often called “stretch” or “knit”). Set it to a short stitch length and run a few stitches over the elastic overlap. This gives the elastic a little extra give without compromising durability.
According to Spoonflower’s tutorial, a stretch‑lock stitch can extend the life of the elastic by up to 30 % when the scrunchie is used for high‑impact activities like workouts.
Final press and quality check
Give the whole band one last gentle press. This smooths any remaining wrinkles and locks in the decorative stitch, the trim, and any embellishments you added.
Now flip the tube right‑side‑out. If you feel a little resistance, use a blunt chopstick or a knitting needle to coax the fabric through. The seam should sit flat in the middle, and the decorative line should sit proud on the outer edge.
Take a moment to try it on. Does it feel comfortable? Does the embellishment stay in place? If something feels off, a quick pin‑and‑press can fix it without re‑sewing the whole thing.And there you have it – a polished, personalized scrunchie ready for everyday wear or a special occasion.
Need a quick guide on adding functional details? Check out How to Install Grommets in Easy Sewing Projects for a step‑by‑step on adding tiny eyelets that can double as decorative accents.
Finally, if you’re looking for a fun, kid‑friendly gift idea, consider pairing your new scrunchie with a handcrafted wooden toy from Poppa’s Wooden Creations. The tactile contrast of soft fabric and solid wood makes a memorable little bundle for a little one.
Step 6: Quality Check and Care Tips
Alright, we’ve stitched, pressed, and added the little details—now it’s time for the moment that separates a ‘just‑made’ scrunchie from a piece that’ll survive your daily hair‑flip routine.
First thing’s first: give the band a quick visual scan. Look for any puckered seams, loose threads, or stray fabric bits that might catch on hair. If something feels off, a gentle pin‑and‑press can smooth it out before you wear it.
Next, test the stretch. Grab the elastic ends and give them a firm pull. Does the band return to its original shape without sagging? A solid stretch means the elastic was overlapped enough—usually about an inch—and sewn securely.
Wondering if you missed a stitch? Run your finger along the seam line. You should feel a neat line of stitches, not gaps. If you spot a tiny opening, slip a needle through and backstitch a few times; it only takes a second.
Now let’s talk cleaning. If you used a delicate fabric like velvet, you’ll want to treat it with extra care. According to a velvet‑washing guide, hand‑washing in cold water and air‑drying preserves the plush pile and prevents color bleed (see tips on washing velvet safely).
But what if you’re in a rush and the scrunchie just needs a quick freshen‑up? Spot‑cleaning with a damp cloth works fine for cotton or silk blends. Just dab—don’t rub—and let it air dry before you slip it back on.
A common mistake is tossing a fresh scrunchie into the washing machine. The elastic can stretch out or the decorative stitch can loosen. If you must machine‑wash, use a mesh laundry bag, cold gentle cycle, and skip the spin.
Ever tried a no‑sew version? Laura Radniecki points out that glue‑only scrunchies can come apart under heavy pull, so you’ll want to treat them even more gently (learn why sewing beats glue for durability).
Storage is the quiet hero of longevity. Keep your scrunchie loosely coiled in a drawer or hang it on a small clothespin. Avoid crushing it under heavy items—that’s when the fabric can warp and the elastic lose its bite.
If you make a batch, label each one with the fabric type. That way you know which ones need hand‑wash (velvet) and which can survive a quick tumble in a laundry bag (cotton).
Pro tip: toss a few dry‑cleaning sheets into the drawer with your scrunchies. They’ll absorb any lingering moisture and keep the fabric smelling fresh without a full wash.
Before you call the project done, do one final fit test. Slip the scrunchie onto a damp ponytail—if it slides off too easily, you probably need a tighter elastic overlap. If it feels too tight, gently stretch the elastic a bit more before the next wear.
And there you have it: a quick quality checklist, care routine, and storage hack that’ll keep your handmade scrunchie looking as good as the day you finished it.
Finally, jot down the date you made each scrunchie. Fabric ages, and a quick note helps you know when it might need a refresh or a new elastic swap.
Conclusion
We’ve walked through every stitch, twist, and little tweak that turns a simple strip of fabric into a polished scrunchie.
Do you remember that first moment you slipped the finished piece onto your ponytail and felt that satisfying “pop”? That’s the payoff of learning how to make a scrunchie with a sewing machine—quick, customizable, and totally yours.
Key takeaways
Pick a fabric you love, cut it to the right length, sew a clean seam, thread the elastic, and finish with a decorative stitch or personal embellishment.
Don’t skip the press: a crisp seam makes turning the tube right‑side‑out painless, and a quick stretch test ensures the elastic stays snug.
And remember the care tips—gentle hand‑wash for delicate fabrics, or a mesh bag for a safe machine wash—so your scrunchie stays fresh week after week.
What’s next?
Now that you’ve mastered the basics, try swapping fabrics, adding a contrast stitch, or even creating a matching set for friends or kids.
Feel free to share your creations in the CreativiU community; we love seeing how you’ve personalized each piece.
So go ahead—grab your machine, pick that favorite fabric, and enjoy the little burst of confidence each handmade scrunchie brings.
Your next project is just a stitch away.
FAQ
Can I use any fabric to make a scrunchie with a sewing machine?
Honestly, you can start with almost any woven or knit fabric as long as it slides through your machine without bunching. Cotton, silk, jersey, and even lightweight denim work great. Just avoid super‑slippery satin unless you raise the presser foot pressure a bit, and stay away from overly thick felt that can strain the needle. A quick test swatch on a scrap piece will tell you if the tension needs tweaking before you commit to the full strip.
How do I choose the right elastic width for my scrunchie?
The classic look uses a ¼‑inch flat elastic—it’s soft enough for everyday hair but still gives a firm hold. If you want a sportier, tighter grip, bump up to a ½‑inch strip; it adds bulk but keeps the band from rolling. For kids or a super‑delicate hair day, a ⅛‑inch elastic works nicely. Measure the finished band’s circumference, then cut the elastic a little longer (about an inch) so you have room to overlap and stitch securely.
What stitch settings work best for the seam?
A medium straight stitch (around 2.5 mm) is your safest bet—it’s strong enough to hold the fabric and elastic but doesn’t pucker the seam. If you’re sewing a slippery knit, add a tiny zigzag on the very edge (just one or two stitches) to lock the raw edge in place. Always backstitch at the start and end; that extra couple of stitches prevent the seam from unraveling when you flip the tube right‑side‑out.
How can I turn the fabric tube right‑side‑out without hurting my fingers?
Grab a blunt chopstick, knitting needle, or even a sturdy butter knife. Push the opening gently while you pull the opposite end, guiding the fabric through like a tiny tunnel. If the tube feels tight, a little bit of steam on the seam relaxes the fibers, making it slide smoother. Take your time—rushing can stretch the elastic or tear the seam, and that’s the last thing you want after all that work.
Do I need to press the seam, and why?
Yes, a quick press is a game‑changer. Pressing flattens the seam, sets the stitches, and creates a crisp edge that won’t roll when you turn the scrunchie inside out. Use a low‑heat setting for delicate fabrics and a pressing cloth to avoid shine on silk or velour. A 5‑second press along the seam line is enough to lock everything in place and give your finished scrunchie a professional look.
How do I prevent the elastic from slipping out over time?
The trick is a solid overlap and a few reinforcing stitches. Overlap the elastic ends by about an inch, then sew a 4‑stitch lock or a short zigzag that grabs both layers of elastic. For extra security, run a stretch‑lock stitch (many machines have this built‑in) over the overlap; it gives the elastic a bit of give without letting the knot work its way loose after repeated stretching.
What’s the easiest way to customize a scrunchie after it’s finished?
Once the band is turned right‑side‑out, you can add a contrast stitch, a tiny bead, or a fabric‑covered button at the seam’s back‑stitch point. A simple decorative zigzag around the outer edge adds color without extra bulk. If you’re feeling crafty, slip a thin ribbon through the elastic before you close the seam—then tie a small knot on the inside for a hidden pop of flair that only you know is there.
Leave a Reply