Ever stared at a blank piece of fabric and felt that mix of excitement and dread, wondering how to turn it into something beautiful? You’re not alone. When I first tried sashiko stitching, I was terrified that my stitches would look like a tangled mess instead of the clean, rhythmic lines I’d seen in photos.
What saved me was realizing that sashiko is less about perfection and more about the meditative flow of each stitch. Think about the simple pleasure of counting your breaths while walking – that steady rhythm is exactly what you aim for in a sashiko stitching tutorial.
So, where do you start? First, pick a modest pattern – maybe a classic diamond or a simple wave. Grab a piece of cotton fabric; it holds the thread nicely and is forgiving if you need to redo a line. Next, get the right needle – a long sashiko needle with a slightly larger eye makes it easier to pull the thicker cotton thread through. If you’re not sure which size, check out this How to Start Sashiko guide for a quick rundown of tools.
Now, transfer your pattern. I like using transfer paper: lay the paper on the fabric, trace the design with a light pencil, then gently wipe away any stray marks. Some folks prefer drawing freehand, which adds a personal touch, but for beginners the transfer method reduces anxiety.
Once the pattern is on the fabric, set a comfortable stitch length – about 5mm works well for most beginners. Start at the edge of a shape, pull the needle through, and keep the stitches evenly spaced. Remember, the goal is a steady, even line, not a frantic sprint. If you find your hand getting cramped, pause, stretch, and sip some tea – a short break keeps the rhythm smooth.
Here’s a quick checklist to keep you on track:
- Choose cotton fabric (medium weight).
- Use a sashiko needle size 3–4.
- Select a 100% cotton thread in a contrasting color.
- Transfer pattern with transfer paper or light pencil.
- Maintain consistent 5mm stitch length.
- Count stitches to stay in rhythm.
By treating each row like a mantra, you’ll find the process calming rather than stressful. And the best part? Even a simple 10‑inch square can become a striking piece of art that you’re proud to display or gift.
Ready to give it a try? Grab your supplies, set up a cozy workspace, and let the soothing click‑click of the needle guide you into the world of sashiko stitching.
TL;DR
In this sashiko stitching tutorial we guide you from gathering supplies to mastering a steady 5 mm stitch, turning a simple cotton square into a calming, handmade work of art.
Follow the quick checklist, pause for tea when needed, and soon you’ll create beautiful pieces you’re proud to display or gift.
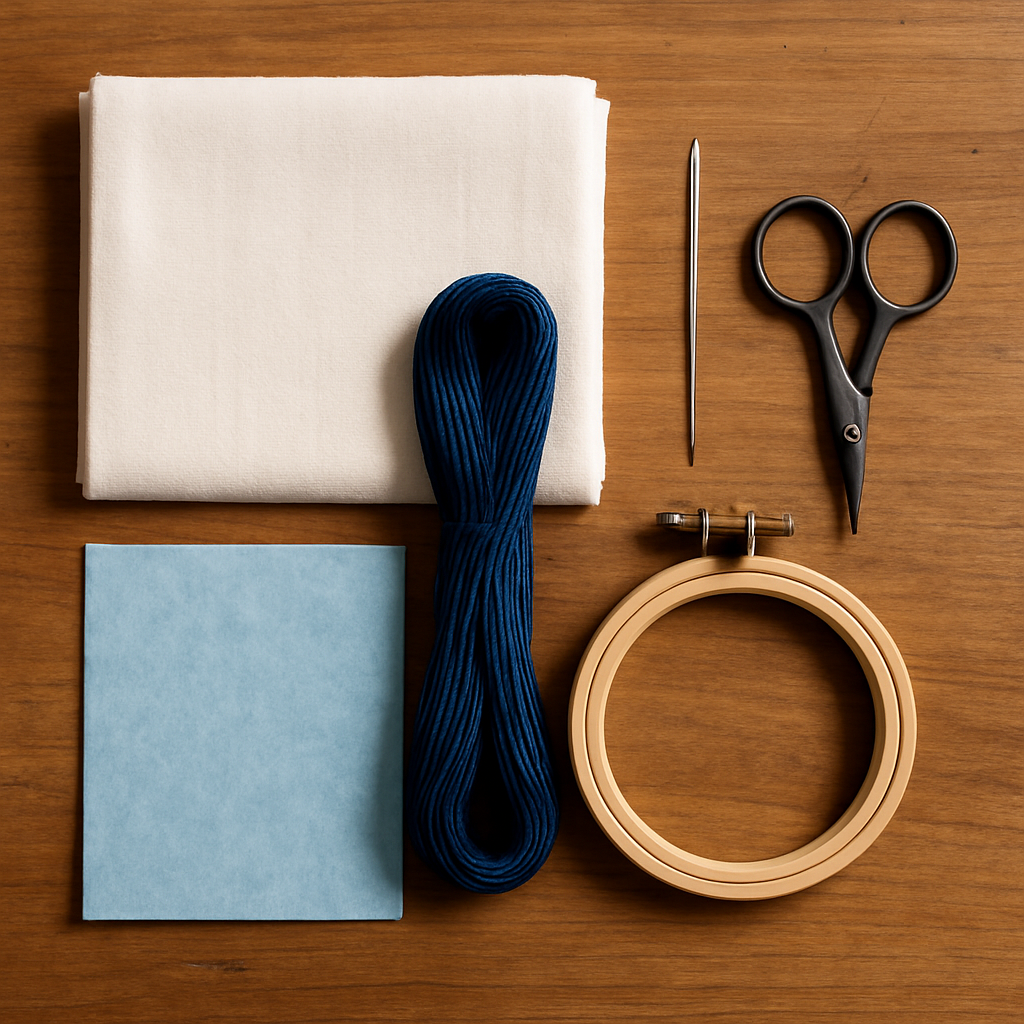
Step 1: Gather Materials and Tools
Before you even think about the first stitch, take a moment to look at your workspace. Does it feel inviting, or is it a chaotic jumble of bits and pieces? The answer will set the tone for the whole sashiko stitching tutorial.
First up, fabric. A medium‑weight, 100% cotton cloth is the gold standard because it holds the thread nicely and lets you correct mistakes without tearing. Aim for a square that’s at least 10 inches on each side so you have room to practice the 5 mm stitch rhythm we talked about earlier.
Next, thread. Traditional sashiko uses indigo or red cotton floss, but any 100% cotton thread in a contrasting hue works. Pick a skein that feels smooth in your hand; you’ll be pulling it through the needle dozens of times, so comfort matters.
Now the needle. Look for a long sashiko needle with a slightly larger eye – size 3 or 4 is a safe bet for most beginners. The longer shaft keeps your stitches straight, and the bigger eye makes threading the fluffy cotton thread less of a hassle.
Grab a few extra tools that often get overlooked: a small pair of sharp scissors, a thimble to protect your fingertip, and a sturdy embroidery hoop or a simple clipboard to keep the fabric taut. Trust me, once you’ve got the fabric pulling flat, the whole process feels like a calm meditation rather than a battle.
Pattern preparation supplies
Most sashiko projects start with a paper pattern. Transfer paper is the easiest route: lay it on the fabric, trace the design with a light pencil, and then lift the paper away. If you’re feeling adventurous, you can draw directly onto the cloth with a fabric‑safe marker – just remember that mistakes are harder to erase.
Here’s a quick tip: after you’ve traced, go over the lines with a fine ballpoint pen. The ink adds a faint guide that stays visible even after a few washes, and it helps you keep that steady 5 mm spacing.
If you’re unsure which supplies are truly essential, check out How to Start Sashiko | A tutorial from Sashiko Artisans for a concise checklist that matches our list.
And because stitching is as much about mindset as it is about tools, think of the process like a conversation. Just as couples benefit from clear communication, your stitches benefit from clear intent. A helpful read on nurturing that skill can be found here, reminding us that patience and consistency translate across crafts.
Ready to see the transfer step in action? The video below walks you through positioning the paper, tracing the pattern, and securing the fabric – all in under six minutes.
After the video, give your fabric a quick tap to shake off any stray pencil marks. A gentle brush with a soft paintbrush does the trick without smudging the ink.
Finally, set up your stitching station. Lay a clean towel or cutting board as a surface, keep a small cup of water nearby for rinsing hands, and have a timer or metronome ready if you want to practice an even beat.
With these materials gathered and your workspace prepped, you’re officially ready to start the first row of stitches. Remember, the goal isn’t perfection; it’s the quiet joy of moving the needle in rhythm. When you feel the thread glide smoothly, you’ll know you’ve set the foundation for a beautiful sashiko piece.
Step 2: Prepare Fabric and Design Layout
Now that your toolbox is ready, it’s time to give the fabric some love. You might be thinking, “Do I really need to be this meticulous?” Trust me, a calm prep stage makes the stitching feel like a gentle meditation rather than a frantic scramble.
Lay out your fabric
Start by flattening the cotton on a clean, well‑lit surface. If the fabric has a slight curl, give it a quick steam or a gentle stretch – you don’t want the edges pulling on you later. Place a light‑weight ruler or a piece of masking tape along the edge you’ll begin stitching; this tiny guide keeps your first row perfectly straight.
Feeling the texture under your fingertips helps you connect with the material. A soft, even weave will let the thick sashiko thread glide, while a rougher surface can snag and frustrate you.
Transfer the pattern
Here’s where most beginners hesitate: the pattern transfer. Grab your transfer paper, position it pattern‑side down on the fabric, and trace with a light pencil. Press gently – you don’t need to press hard enough to dent the cloth, just enough for the graphite to leave a faint line.
If you prefer a freehand feel, a washable fabric marker works too, but the pencil‑transfer method reduces anxiety and keeps lines crisp. A quick video walkthrough shows how to transfer a kamon pattern and makes the whole process feel less intimidating.
Once the design is on the fabric, flip it over and check the backside. You’ll see faint pencil marks; that’s your safety net. If any line looks too heavy, simply dab a cotton swab with a tiny bit of water to fade it.
Secure the design
Before you dive into stitching, secure the fabric in a hoop or pin it to your work surface. A small embroidery hoop (about 8‑10 inches) holds the cloth taut without stretching it. If you’re working on a larger piece, use a few safety pins along the edges – just make sure the pins don’t interfere with your needle’s path.
Now, take a moment to breathe. Beth Colletti explains the double‑length thread technique, which you’ll use later, but the same calm mindset applies here: pause, sip your tea, and visualize the rhythmic click‑click of the needle.
One pro tip: lightly mist the back of the fabric with a spray bottle of water before you start. The moisture softens the fibers just enough to prevent puckering when you pull the thread tight.
With the fabric flat, the pattern traced, and the material secured, you’re set for the next step: actually stitching those beautiful, meditative lines. If you’re still unsure about where to start, remember that every master was once a beginner who took a moment to align the fabric and breathe.
So, what’s the next move? Grab your double‑length thread, knot the ends, and let the steady rhythm begin. You’ve done the heavy lifting; now the fabric is ready to become a canvas for your creativity.
Step 3: Master Basic Stitches and Tension
Now that your fabric is pinned and your pattern is ghost‑written, the real magic begins – the stitch itself. If you’ve ever felt a little jittery watching a needle dance, you’re not alone. The secret isn’t a fancy trick; it’s consistency in two things: the basic running stitch and the tension you hold on the thread.
What “basic” really means
The sashiko stitch is essentially a running stitch – a little “stabbing” forward, then back again. Think of it like tapping a drum: each tap should land at the same distance from the previous one. If you’re just starting, aim for 4‑6 mm between penetrations; that’s about the width of a grain of rice. If you’re just starting, grab a ruler and mark two dots on a scrap of fabric. Stitch between them a few times. Does the spacing feel even? If not, adjust your grip.
Setting the right tension
Too loose and the thread will ripple, too tight and the fabric will pucker. A good rule of thumb is to hold the thread as if you were tying a shoelace – firm enough that it doesn’t slip, but with a little give. One quick test: pull the thread through the needle and let it dangle. You should be able to lift it with a gentle tug without the knot popping free.
Another tip: after you finish a short row, gently pull the whole line sideways. If the line lifts off the fabric in a smooth arc, your tension is spot‑on. If it bunches, loosen your grip just a hair.
Step‑by‑step practice routine
1. Prep a practice swatch. Cut a 4×4 inch piece of the same cotton you’ll use for the project.
2. Thread your needle. Pull two strands of 6‑strand sashiko thread through, knot the ends, and leave a 2‑inch tail.
3. Mark a 5 mm grid. Use a light pencil or a piece of transfer paper to draw a tiny grid across the swatch. This visual guide keeps your stitch length honest.
4. Stitch the first line. Start at the top‑left corner, pull the needle through, and keep the thread tension consistent. Count out loud – “one, two, three…” – until you reach the end.
5. Check tension. Flip the swatch, hold the line at both ends, and give it a gentle pull. If the line lifts evenly, you’ve nailed the tension. If it sags, practice loosening your hold.
6. Repeat. Do three more rows, each time shifting the start point a few millimeters down. By the fourth row you’ll start to feel the rhythm.
Real‑world examples
Take Maya’s kitchen towel project from earlier. She noticed that the first two rows looked a bit “wavy” because she was pulling the thread too tight. By stepping back, re‑tying a looser knot, and using the grid test, she turned the waviness into a clean, slightly raised line that actually added texture.
Carlos, who worked on a denim‑style laptop sleeve, found that his thicker fabric demanded a bit more give. He switched from a 5 mm stitch length to 6 mm and relaxed his grip. The result? A sturdy, flat line that didn’t pull the denim fibers together.
Expert insight
According to a short tutorial on YouTube, mastering tension is a matter of muscle memory – the more you stitch, the more your hand “remembers” the right pressure. The video suggests doing a 10‑minute daily warm‑up on a scrap piece before tackling the main design. That warm‑up not only steadies your hand but also reduces fatigue during longer projects.
One seasoned sashiko teacher adds that you should never let the needle “hang” in the air between stitches. Keep the needle tip resting on the fabric surface; this tiny habit forces you to move at a consistent pace.
Actionable checklist
- Practice on a 4×4 inch swatch before the real piece.
- Use a pencil‑drawn 5 mm grid as a visual ruler.
- Hold thread with a gentle, shoelace‑like tension.
- Count each stitch aloud to keep rhythm.
- Test tension by lifting the finished line; adjust as needed.
- Do a 10‑minute warm‑up daily to build muscle memory.
And if you’re a visual learner, this 6 Minutes Video of Transferring Kamon Pattern for Sashiko shows a quick run‑through of stitch length and tension adjustments in real time – pause, rewind, and stitch along.
When you feel that steady “click‑click” under your fingers, remember you’re not just creating a line; you’re building a meditative habit. Keep practicing, stay relaxed, and soon the basic stitch will feel as natural as breathing.
Step 4: Create a Traditional Motif – Comparison of Common Patterns
Alright, we’ve got the fabric stretched, the needle ready, and the tension dialed in. Now comes the fun part: picking a motif that feels right for you. Think of it like choosing a song for a road‑trip – you want something that matches the mood, the scenery, and how long you’ll be driving.
Classic Diamond (Kikko)
The diamond is the go‑to starter pattern for many sashiko fans. Its clean, angular shape creates a sense of structure without feeling stiff. Because each line is short and repeats often, you’ll get plenty of practice counting stitches and keeping your spacing even.
Tip: Use a medium‑weight 6‑strand cotton thread for that buttery lift without the line getting too heavy. Snuggly Monkey notes that medium‑weight threads are the workhorses of sashiko projects, making them a safe bet for diamonds.
Wave (Seigaiha)
If you’re after a more fluid vibe, the wave pattern mimics the rolling sea. The repeating arcs create a calming rhythm that feels almost meditative as you stitch. Because the lines curve, you’ll need a slightly longer stitch length – aim for about 6 mm – so the curve stays smooth.
Pro tip: Lay a thin strip of masking tape along the curve before you start. It acts as a guide and helps you keep the arcs consistent without over‑thinking each stitch.
Geometric Grid (Hitomezashi)
Hitomezashi is all about tiny squares that interlock like a pixelated fabric. This pattern is perfect when you want a dense, textured look – think of it as a modern take on traditional boro patches. The key here is precision; a 5 mm grid works best, and you’ll want a thinner thread (4‑strand) so the stitches don’t overwhelm the tiny squares.
Because the grid repeats so fast, many stitchers find it helpful to count in groups of four – “one, two, three, four” – to keep the rhythm steady.
Boro‑Inspired Patchwork
Boro is the art of visible repair, and its motifs often combine larger blocks of diamond or wave with irregular patches. This style lets you play with colour contrast and fabric scraps, turning mistakes into intentional design.
When you mix fabrics, pick a thread that’s strong enough to hold the layers together – again, a medium‑weight thread is a solid choice. The stitches can be a bit longer (7‑8 mm) so they sit nicely on the thicker sections.
Quick Decision Table
| Pattern | Typical Use | Recommended Thread & Stitch Length |
|---|---|---|
| Diamond (Kikko) | Beginner projects, decorative borders | Medium 6‑strand cotton, 5 mm |
| Wave (Seigaiha) | Calming scarves, meditative pieces | Medium 6‑strand cotton, 6 mm |
| Hitomezashi Grid | Textured quilts, dense samplers | Thin 4‑strand cotton, 5 mm |
| Boro Patchwork | Upcycled garments, artistic repairs | Medium 6‑strand cotton, 7‑8 mm |
So, how do you actually turn one of these motifs into a finished piece? Here’s a quick, hands‑on workflow:
- Pick your pattern and print a small reference sheet.
- Trace the design onto transfer paper, then onto your fabric using a light pencil.
- Secure the fabric in an 8‑inch hoop or with pins – you don’t want the paper shifting mid‑stitch.
- Thread a needle with the recommended thread, knot the ends, and set your stitch length with a ruler or a quick test swatch.
- Start at a corner, count each stitch aloud, and let the rhythm guide you. If you stumble, pause, sip tea, and re‑align.
- When you finish a row, gently pull the line sideways to check tension. Adjust as needed before moving to the next row.
Remember, the goal isn’t a museum‑grade masterpiece on the first try. It’s a piece that feels like you – a little imperfect, fully personal, and totally yours.
Feel that spark of excitement? Great. Grab your chosen thread, lay out the motif, and let the needle do the storytelling.
Step 5: Finish, Bind, and Care for Your Sashiko Piece
Okay, you’ve counted every stitch, the pattern looks steady, and you’re probably already thinking about where to hang it. But before you frame it or turn it into a tote, there are a few finishing moves that protect your work and give it that polished, “I spent hours on this” vibe.
1. Trim and Clean the Edges
First, give the piece a good haircut. Use sharp fabric scissors to trim any stray threads and to square the edges if you started with a larger bolt. A clean edge not only looks neat, it also prevents the fabric from fraying later on. If you’re working with a quilt block, a ¼‑inch seam allowance on each side gives you room to bind later without pulling the design.
Next, give the surface a gentle shake to dislodge loose fibers. Some stitchers like to run a lint roller over the back side – it won’t damage the thread, and it removes the dust that accumulates while you’re sipping tea.
2. Choose a Binding Method
Binding is where you turn a flat square into a finished garment, wall hanging, or dishcloth. There are three go‑to methods that work for almost any sashiko project:
- Plain cotton bias tape: Fold the tape on the bias, press, and sew it on with a small running stitch that matches your sashiko thread. This gives a subtle, low‑profile edge.
- Contrasting fabric strip: Cut a strip a little wider than your seam allowance, fold the raw edges inward, and hand‑sew it on. The contrast can echo the colour of your thread and make the piece pop.
- Traditional boro binding: Use a heavier, loosely‑woven fabric (like an old denim scrap) and stitch it on with a slightly longer run. The uneven edge becomes part of the aesthetic, perfect for a rustic look.
Here’s a quick step‑by‑step for the plain bias‑tape method:
- Measure the perimeter of your piece and add 2‑inch extra for the seam.
- Cut bias tape, press the raw edge inward, and press again.
- Pin the tape to the back of the fabric, aligning the raw edge with the finished edge.
- Stitch a single line of running stitches just inside the tape edge, keeping the same 5 mm spacing you used for the motif.
- Trim any excess tape and give the whole edge a final press.
Pro tip: when you reach a corner, backstitch a couple of stitches before turning. It prevents the tape from puckering and keeps the corner crisp.
3. Wash, Soak, or Steam?
Now comes the age‑old question: do I wash my sashiko piece before I display it? The answer depends on the fabric and thread you chose. If you used 100 % cotton fabric and cotton thread, a gentle hand wash in lukewarm water (around 30 °C) with a mild detergent will relax the fibres and set the stitches. Avoid the dryer – the heat can cause the thread to shrink and the pattern to distort.
For thicker fabrics like denim or linen, a short steam cycle is safer. Hold the steamer a few inches away and let the steam glide over the surface; it softens the fibres without saturating the thread. After steaming, lay the piece flat to dry and press with a low‑heat iron on the reverse side, using a pressing cloth to protect the stitches.
One stitcher I know, Ana from Seattle, swears by a “pre‑display soak.” She submerges her finished wall hanging in a basin of cool water for five minutes, then hangs it to air‑dry. The result? The cotton loosens just enough to lay flat against the wall without curling at the edges.
4. Long‑Term Care and Storage
Even after you’ve bound and washed, you’ll want the piece to stay beautiful for years. Store flat, not rolled – rolling can create permanent creases that pull the thread. If space is tight, slip the piece into a breathable cotton bag (no plastic!) and place a small lavender sachet inside to keep moths away.
When you decide to display, avoid direct sunlight. UV rays fade indigo thread faster than any other colour. A simple trick is to hang the piece behind a sheer curtain; you still get light, but the UV is filtered.
And here’s a little habit that keeps the rhythm alive: once a month, run a soft brush over the back of the work. It removes dust, and the gentle motion reminds you of the meditative click‑click that started the whole project.
5. When to Add a Final Touch
Some creators like to add a tiny decorative element after the piece is bound – a small stitched label with the date, or a thin fringe along the bottom edge. If you go this route, use a contrasting thread that’s a shade lighter or darker than your main stitch. It adds personality without stealing focus.
In case you’re wondering where to find inspiration for those final flourishes, check out this detailed sashiko guide. It walks you through several finishing ideas and even suggests colour pairings that work well with traditional indigo.
And if you ever feel stuck about how to keep your creative momentum, a quick read on building habits can surprisingly boost your confidence – the same discipline that helped you finish the stitching can apply to any craft routine.
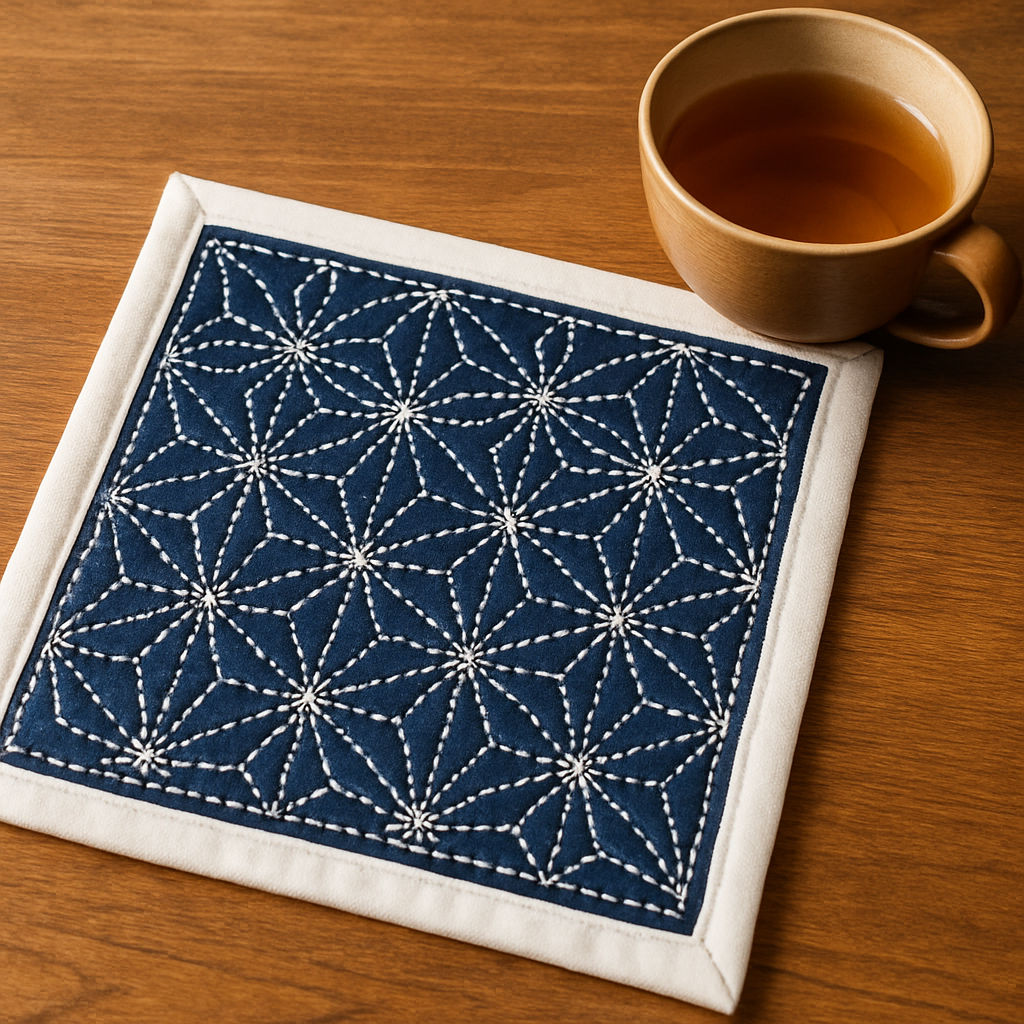
Bottom line: finishing, binding, and caring for your sashiko piece is as much about protecting the work as it is about honoring the process. Follow these steps, treat the fabric gently, and you’ll end up with a piece that not only looks great today but ages gracefully tomorrow.
Step 6: Advanced Techniques – Adding Color and Texture
So far we’ve gotten the basic stitches steady. Now it’s time to play with colour and texture, the stuff that makes a sashiko piece feel like a personal story.
Ever looked at a plain indigo square and thought, “What if I could make the stitches sing?” That’s exactly the mindset we’re aiming for here.
Choosing a fabric that sings
Pure linen is a favorite among sashiko makers because it’s strong, pliable, and lets the thick cotton thread glide without dragging. The fabric’s natural texture also adds a subtle depth that plain cotton can’t match. The fabrics‑store tutorial explains why linen works so well for sashiko. If you’re feeling adventurous, try a lightly‑scrubbed denim or a soft bamboo blend – the contrast between the thread and the weave can become a visual surprise.
And don’t forget to pre‑wash your cloth. A quick wash removes shrinkage and leaves the fibers relaxed, so the colour you add stays true after the first wash.
Layering colour without overwhelming
Traditional sashiko sticks to white on indigo, but modern makers love mixing hues. Start with a base thread that complements the fabric – a soft gray on linen, a muted terracotta on denim. Then introduce a pop colour on a secondary element, like a border or a tiny motif.
One trick is to use the “double‑length” thread technique: fold two strands together, knot them away from the design, and run the doubled thread for a few stitches before reverting to single. The doubled line looks slightly raised and catches light differently, giving you texture without adding extra stitches.
Want a quick visual cue? Lay a strip of masking tape along the line you plan to double. It keeps the spacing even and lets you see the contrast as you work.
Adding tactile texture
Texture can be introduced in three simple ways: thread weight, stitch length, and fabric surface.
- Thread weight. A 6‑strand cotton thread creates a bold, raised line, while a 4‑strand version produces a finer, more delicate texture. Mixing weights within the same pattern gives a subtle 3‑D effect.
- Stitch length. Shorter stitches (4‑5 mm) pack the line tighter, making it look solid. Longer stitches (6‑7 mm) leave tiny gaps that let the background fabric peek through, adding breathability to the design.
- Fabric surface. Rougher weaves like raw linen or a lightly‑distressed cotton add a natural grain that the thread “grips” against, creating a shadow line. Petalplum’s guide to slow stitching notes how texture emerges when you let the fabric’s character show.
Practical colour‑blending exercise
Grab a 10‑inch square of pre‑washed linen. Thread a needle with indigo 6‑strand thread for the main grid, and a burnt orange 4‑strand thread for a diagonal accent.
- Stitch a simple diamond grid using 5 mm spacing.
- When you reach the centre, switch to the orange thread and run a single diagonal line twice the normal stitch length (about 10 mm). The longer, lighter line will pop against the denser grid.
- Finish by adding a thin bias‑tape border in a neutral cream – the tape’s slight sheen will frame the colour play without competing.
Take a step back after each section. Does the colour feel balanced? If the orange overwhelms, pull the thread a little looser on the next pass – the subtle slack creates a softer edge.
Tip sheet: colour & texture cheat sheet
- Start with a neutral base fabric (linen, cotton, denim).
- Pick one primary thread colour and one accent colour.
- Mix thread weights for visual depth.
- Use double‑length stitches for raised texture.
- Vary stitch length to control opacity.
- Finish with a simple bias‑tape or fringe edge.
Remember, the goal isn’t perfection; it’s personality. A little colour shift, a tiny texture tweak – that’s what turns a functional square into a piece you’re proud to show off on a wall or turn into a tote.
Now you’ve got the tools to add colour and texture. Grab your thread, breathe, and let the needle tell the next chapter of your sashiko stitching tutorial.
Conclusion
If you’ve made it this far, you already know that sashiko stitching isn’t just a craft—it’s a quiet meditation you can pick up with a needle, thread, and a cup of tea.
We’ve walked through prepping fabric, mastering the basic running stitch, choosing a motif, and even adding colour and texture without over‑complicating things. Remember Maya’s kitchen‑towel win and Carlos’s bright laptop sleeve? Those tiny moments show how a simple grid can become a personal statement.
So, what’s the next step? Grab the supplies you already have, set a timer for ten minutes, and let the rhythm of “click‑click” guide you. Don’t worry about perfection; the beauty lives in the imperfections you intentionally leave.
When you finish, give your piece a gentle press, add a bias‑tape border, and hang it where you can see it daily. That little reminder will keep the calm habit alive.
Feeling inspired to dive deeper? CreativiU’s on‑demand sashiko stitching tutorial library offers video demos, community feedback, and downloadable checklists to keep you moving forward.
Each project you finish adds confidence, and every practice session sharpens the muscle memory that makes sashiko feel effortless over time.
Now, take a breath, stitch one line, and watch a new habit unfold—one stitch at a time.
FAQ
What is a sashiko stitching tutorial and why should I start?
A sashiko stitching tutorial is a step‑by‑step guide that shows you how to create the classic Japanese running‑stitch patterns on fabric. It walks you through everything from picking the right needle to setting a comfortable tension, so you can turn a simple piece of cloth into a calming work of art. Starting with a tutorial means you get a clear roadmap, avoid common beginner mistakes, and experience the meditative rhythm that makes sashiko so rewarding.
Do I need any special tools to follow a sashiko stitching tutorial?
You don’t need a full workshop, just a few basics: a sashiko‑size needle (usually 3‑5 mm), thick cotton thread (6‑strand works well for most projects), a piece of natural‑fiber fabric like cotton or linen, and something to keep the fabric taut—a small embroidery hoop or a couple of safety pins. A thimble protects your fingertip, and a ruler helps you mark consistent stitch spacing. These tools are inexpensive, and once you have them you can follow any tutorial without buying more gear.
How long does it usually take to finish a beginner sashiko project?
Time varies with the size of the piece and how fast you work, but most beginners finish a small square or dishcloth in 30 to 45 minutes of focused stitching. If you set a timer for ten minutes and just let the “click‑click” rhythm guide you, you’ll often surprise yourself by getting a tidy line faster than you expect. Remember, the goal isn’t speed; it’s building a steady habit, so feel free to pause, sip tea, and enjoy the process.
Can I use a sashiko stitching tutorial for larger projects like a tote bag?
Absolutely. The same principles apply; you just break the larger surface into smaller sections and stitch each one row by row. Start by transferring a simple motif onto a swatch, practice the stitch length, then scale it up to the bag’s dimensions. Most tutorials suggest using a longer stitch (6‑7 mm) for broader areas, which keeps the pattern from looking cramped. Once you’ve mastered the basics on a small piece, the confidence carries straight over to bigger creations.
What are common mistakes beginners make, and how does a tutorial help avoid them?
New stitchers often pull the thread too tight, which puckers the fabric, or they space the stitches unevenly, making the pattern look jagged. A good tutorial will warn you about these pitfalls, show you how to test tension by lifting a finished line, and give a quick “grid test” to check spacing. It also reminds you to secure the fabric before you start, so the paper or marker doesn’t shift mid‑stitch.
How often should I practice to improve my sashiko skills?
Consistency beats marathon sessions. Even five minutes a day, or a short ten‑minute warm‑up on a scrap swatch before your main project, builds muscle memory and keeps your hand steady. Many tutorials recommend a daily “click‑click” drill: stitch a single row, check tension, then repeat. Over a week you’ll notice smoother lines and fewer pauses, turning the practice into a soothing ritual rather than a chore.
Where can I find more advanced sashiko stitching tutorials after I master the basics?
Once you’re comfortable with the fundamentals, look for tutorials that introduce colour blending, double‑length thread techniques, or complex motifs like hitomezashi grids. Platforms that specialize in craft education often organize these lessons into series, so you can progress step by step. You’ll also find community forums where makers share their own variations, giving you fresh ideas to experiment with while still following a structured tutorial format.
Leave a Reply