Picture this: you’re staring at a blank sheet of watercolor paper, the palette is a swirl of colors, but you’re not quite sure which brushstroke will bring the vision to life.
Does that feeling of hesitation sound familiar? Maybe you’ve tried a tutorial on YouTube, only to end up with a muddy wash and a lingering question: “Am I doing this right?”
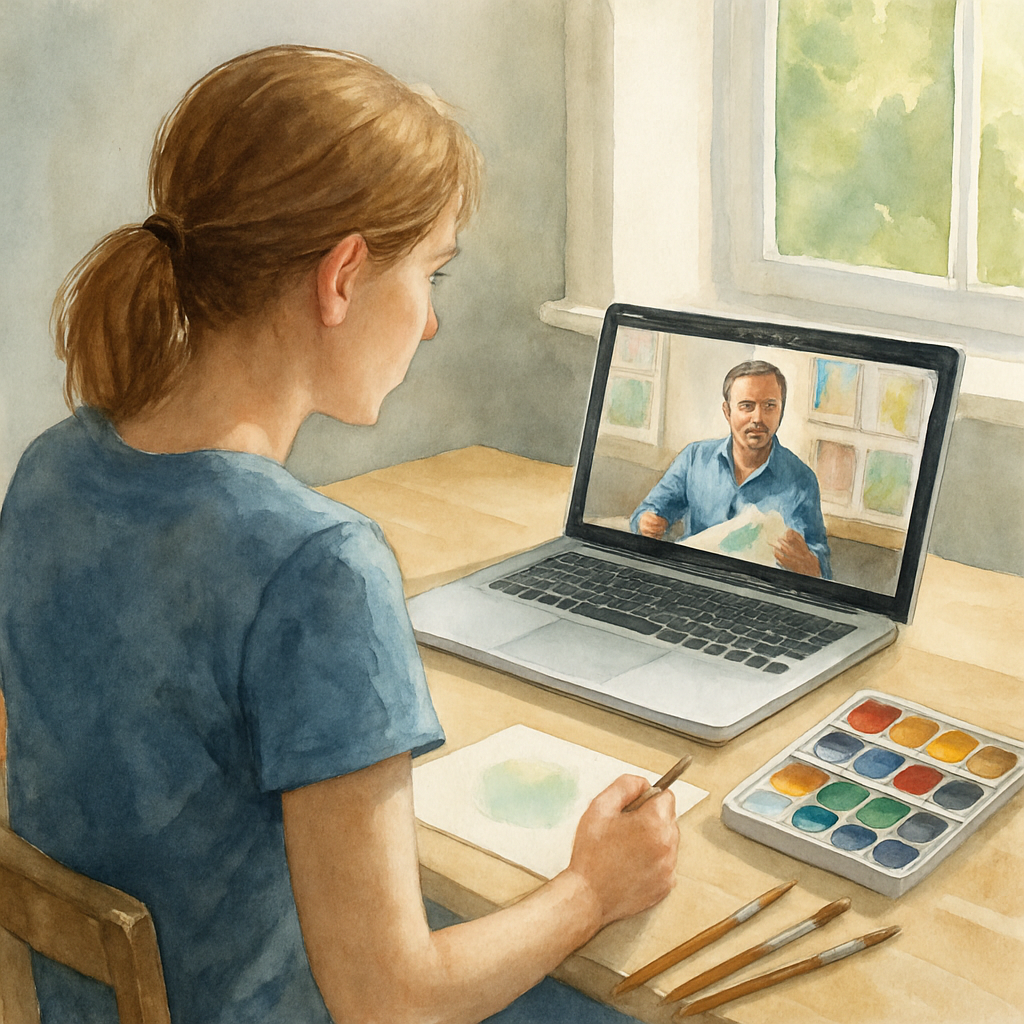
That’s exactly why an interactive watercolor painting course with instructor feedback feels like a game‑changer. It’s not just a series of pre‑recorded videos; it’s a two‑way conversation where a seasoned artist watches your progress, nudges you when a pigment is too harsh, and celebrates the moments when a wash finally glides the way you imagined.
Think about the last time you tried to learn a new skill on your own. You probably hit a wall, right? Now imagine having a supportive community, plus a real‑time mentor who can point out that you’re holding your brush too tightly, or that a bit more water will unlock the soft gradient you’re chasing.
We’ve all been there—mixing colors that turn out too dark, or waiting forever for a layer to dry before moving on. With the right interactive setup, those frustrations shrink dramatically because you get immediate, personalized tips instead of guessing for days.
So, what does this actually look like? You sign up, get access to a library of bite‑size lessons, and then upload short videos of your work. The instructor reviews them, drops a comment, maybe a quick sketch overlay, and you try again, this time armed with concrete guidance.
And the best part? It’s flexible enough to fit around a busy schedule, yet structured enough to keep you accountable. Whether you’re a hobbyist looking to finally paint that sunrise you’ve been dreaming of, or a creative entrepreneur who wants to add watercolor to your product line, the interactive feedback loop keeps you moving forward.
Ready to turn that blank page into a canvas of possibilities? Let’s dive in and explore how this learning style can unlock your watercolor potential.
TL;DR
An interactive watercolor painting course with instructor feedback gives you personalized, real‑time guidance that turns guesswork into confident brushstrokes, even if you’re just starting out.
You’ll join a supportive community, access bite‑size lessons, and receive video critiques that accelerate progress, so you finally create the vibrant artwork you’ve imagined today.
Step 1: Understanding the Course Structure
Alright, before you even dip your brush, you need to know how the interactive watercolor painting course with instructor feedback is laid out. Think of it like a road map that tells you where you’re turning, where you can pause, and where the instructor will pull up alongside you.
Most courses break down into three core layers: the foundational lessons, the practice labs, and the feedback cycles. The foundational lessons are bite‑size videos that teach one technique at a time – a wet‑on‑wet sky, a smooth gradient, or a crisp edge. They’re designed to be completed in 10‑15 minutes, so you can fit them between a coffee break and a Zoom call.
Course Modules Overview
- Module 1 – Materials & Mindset: Picking the right paper, brushes, and pigments; setting up a workspace that invites creativity.
- Module 2 – Core Techniques: Washes, gradients, dry‑brush texture, and color mixing – each with a short demo and a printable cheat sheet.
- Module 3 – Applied Projects: Guided projects like a sunrise landscape or a botanical study, where you apply everything you’ve learned.
- Module 4 – Feedback & Refinement: Upload your project video, receive annotated critiques, and re‑shoot based on specific pointers.
Notice how the feedback segment is its own module rather than an after‑thought. That’s the secret sauce: you get instructor notes while the skill is still fresh in your mind, not weeks later when you’ve already moved on.
Now, let’s talk timing. A typical 8‑week schedule might look like this:
- Week 1‑2: Materials and first two core techniques.
- Week 3‑4: Two more techniques plus your first mini‑project.
- Week 5‑6: Mid‑course feedback round – you upload, the instructor replies within 48 hours.
- Week 7‑8: Final project and a wrap‑up Q&A live session.
Because the feedback window is built in, you never feel “stuck.” If you’re the kind of person who needs a nudge, you’ll love the predictable cadence.
Here’s where the platform’s community element folds in. While you’re waiting for your critique, you can join a private forum, share progress shots, and even swap tips on pigment ratios. That peer‑support often speeds up the learning curve – a study from the Journal of Visual Arts Education found that learners in collaborative online art settings retained techniques 30 % longer than those studying solo.
And the instructor feedback isn’t just “good job.” It’s a layered response: a timestamped video note, a downloadable overlay showing where to lift the brush, and a short checklist you can tick off before your next upload. Imagine receiving a comment like “Try adding a 10 % water increase on the left edge of this wash to keep the hue luminous.” That precise tweak is worth a whole extra practice session.
To see the whole flow in action, check out the short walkthrough video below. It walks you through logging in, finding a lesson, uploading your work, and reading the feedback.
Finally, a quick checklist you can copy into your notebook before you start the first week:
- Gather paper (140 lb cold‑press), two round brushes (size 6 and 8), and a limited palette of three primary colors plus white.
- Create a dedicated “course folder” on your computer for lesson PDFs, video uploads, and instructor notes.
- Schedule 15‑minute lesson slots on your calendar for each module, and block a 30‑minute window for feedback review.
- Join the community forum and introduce yourself – the first post often sparks a helpful tip from a fellow learner.
If you’re wondering where to find the most detailed roadmap, A Practical Guide to an Interactive Watercolor Painting Course with Instructor Feedback breaks down every step, from enrollment to final showcase. Keep that link handy as you map out your own creative journey.
With the structure clear, you’re ready to move into the next step: mastering the core techniques. Let’s roll up those sleeves and start painting.
Step 2: Setting Up Your Watercolor Workspace
Alright, you’ve just finished scrolling through the course outline, and now it’s time to give your creative corner a real home. The difference between a “meh” practice session and a breakthrough one often starts with the space you paint in.
Choose a spot that feels inviting
First, pick a place where natural light can spill in – even a north‑facing window works wonders because the light stays soft all day. If you can’t snag a window, a daylight‑bulb lamp (5000 K) mimics that glow without the glare. I once set up a tiny desk by my kitchen sink; the light bounced off the tiled wall and turned my washes into luminous fields.
And don’t forget comfort. A chair with a slight backrest keeps your posture honest, so you don’t end each session with a sore neck.
Gather the essentials (and keep them tidy)
Here’s a quick checklist that fits on a single sticky note:
- Cold‑press watercolor paper (140 lb) – the heavier the paper, the less it buckles.
- Two round brushes (size 6 and 8) – one for detail, one for washes.
- A limited palette: primary red, blue, yellow, plus a tube of white.
- A water container with a lid (to keep dust out).
- Paper towels or a rag for blotting.
Why keep the palette small? It forces you to experiment with mixing, and it saves space on the table. I once watched a student struggle for an hour trying to find the perfect teal. After switching to three primaries, that same teal appeared in five minutes.
Organize for the interactive course flow
Since you’ll be uploading short videos for feedback, set up a “recording corner.” Place your laptop or tablet on a sturdy stand at eye level, angle the camera so the paper fills the frame, and have a small lamp behind the camera to avoid shadows.
Pro tip: use a piece of white poster board behind your paper; it creates a clean background and makes colors pop on the screen. A fellow learner shared a screenshot of his setup, and the instructor mentioned how the contrast helped spot a subtle banding issue.
Control your environment
Temperature matters. Watercolor behaves differently when it’s chilly – the paint dries faster, and you get harsher edges. Aim for a room temperature around 68‑72 °F. If you’re in a colder climate, a small space heater under the table does the trick without heating the whole room.
Humidity is another hidden factor. A humidifier (or even a bowl of water) can keep the paper from drying too quickly, giving you more time to blend. In a recent Artists Network guide, they explain how a 45‑% relative humidity level is the sweet spot for most watercolor work.
Set up a feedback‑ready workflow
Before you hit “record,” do a mini‑run‑through: fill a wash, let it dry, and check the video for glare or shaky framing. If anything looks off, adjust the lighting or use a phone tripod. This habit saves you from re‑filming after the instructor has already left feedback.
Also, create a dedicated folder on your computer named “Course Feedback.” Inside, have sub‑folders for each module (e.g., “Module 2‑Wash Techniques”). When the instructor sends a video note, drop it in the matching folder and add a short text file with your own reflections. Over time, you’ll see a clear progression – a visual journal of growth.
Personalize it
Finally, sprinkle in a bit of personality. A small plant, a favorite mug, or a playlist of low‑key jazz can make the space feel like your own studio rather than a sterile workstation. The more you enjoy being there, the easier it is to sit down for those 15‑minute lesson slots.
So, what’s the next concrete step? Grab a piece of paper, set up the lamp, and record a 30‑second video of a simple blue wash. Upload it, and watch how the instructor’s notes guide you toward that perfect gradient. That’s the magic of an interactive watercolor painting course with instructor feedback – the workspace becomes a launchpad, not a barrier.
Step 3: Engaging with Instructor Feedback
Okay, you’ve got your video up and the instructor’s note is waiting in your “Course Feedback” folder. That moment can feel a little like opening a gift you didn’t know how to unwrap. You want the insight, but you also need a clear way to turn it into paint on paper.
Read, Replay, and Reflect
First thing’s first: watch the video twice. The initial run gives you the big picture – “hey, that edge needs a softer transition.” The second pass is where the magic happens. Pause at each timestamp the instructor mentions, jot down the exact suggestion, and note the page number of your notebook where you’ll apply it.
Why two passes? Research on deliberate practice shows that spaced, focused review improves skill retention by up to 30 % compared to a single glance (American Psychological Association).
Turn Feedback into an Action Checklist
Now translate those notes into a tiny, printable checklist. Something like:
- Increase water ratio on left edge of wash by 10 %.
- Use size‑6 brush for the fine‑line border.
- Leave a 2‑second pause before lifting the brush at the horizon line.
Print it, tape it to your workspace, and tick each box as you work. The act of checking off a step triggers a dopamine hit – it feels good and keeps you moving.
Micro‑Practice Sessions
Instead of redoing the whole project, isolate the feedback point. If the instructor said “add more water to the sky,” set a timer for 10 minutes and just experiment with that sky wash on a scrap piece of paper. You’ll see the effect instantly, and the lesson sticks.
One of my students, Maya, did exactly that. She struggled with banding in her sunrise scene. After a focused 12‑minute “water‑ratio drill,” her next upload showed a seamless gradient, and the instructor gave her a quick “well done!” note. That tiny win boosted her confidence for the rest of the course.
Ask Clarifying Questions
Don’t assume you got it right the first time. If a comment feels vague – “try a softer edge” – reply with a short question: “Do you mean I should lift the brush earlier or use a drier brush?” Most instructors appreciate the specificity and will often send a follow‑up video note with a visual cue.
Pro tip: keep your question under 30 words. Busy teachers love concise queries, and you’ll get a faster response.
Leverage Peer Insight
While you wait for the instructor’s next round, pop your clip into the community forum. Other learners might have faced the same issue and can share a shortcut you hadn’t considered. A recent thread on the platform showed a student using a “wet‑on‑wet” technique to smooth a problematic wash – a tip the instructor later echoed in his own feedback.
According to a study in the Journal of Visual Arts Education, learners who discuss feedback with peers retain the corrected skill 25 % longer than those who work in isolation.
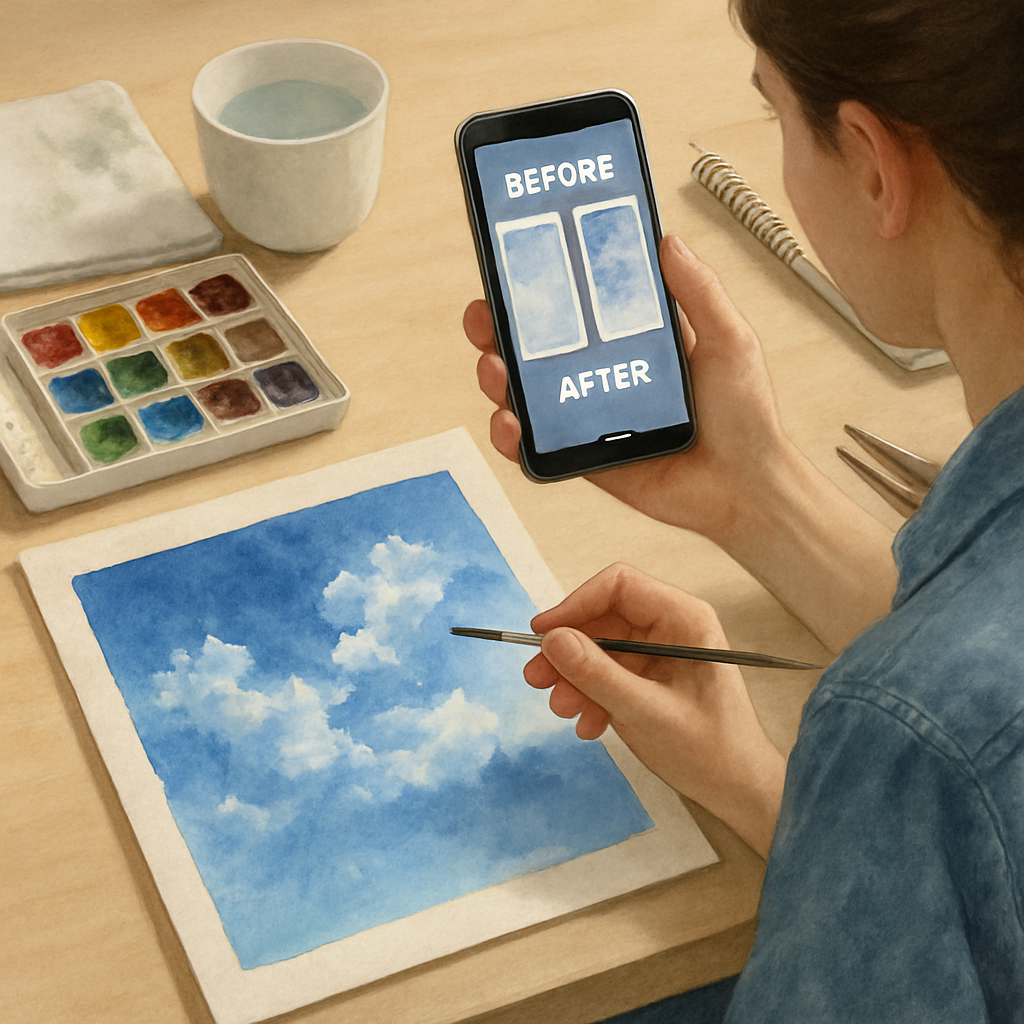
Document the Before‑and‑After
Take a quick photo of the original problem area, then another after you apply the instructor’s suggestion. Place both side by side in a simple collage (even a phone app will do). This visual record is pure proof of progress and makes it easier to spot patterns in the kinds of feedback you receive.
Schedule a “Feedback Review” Slot
Block a recurring 20‑minute window in your calendar dedicated solely to feedback digestion. Treat it like a lesson, not a chore. During that time, you’ll read, experiment, ask, and document – all in one focused burst.
So, what’s the next concrete step? Open the latest instructor video, pause at the first comment, write a one‑sentence action, and set a timer for ten minutes to try it out. You’ll see how quickly the “interactive watercolor painting course with instructor feedback” transforms a vague suggestion into a tangible improvement.
Step 4: Practice Exercises and Progress Tracking
Okay, you’ve got a note from the instructor – now what? The magic happens when you turn that one‑line tip into a habit you actually see on paper. Below is a no‑fluff roadmap for turning advice into muscle memory and a simple system to watch yourself improve.
Design a Mini‑Exercise Around Each Comment
Pick one suggestion, slice it down to 5‑minute “drill” material, and treat it like a sprint, not a marathon. For example, if the feedback says “soften the horizon edge,” set a timer for ten minutes, grab a fresh sheet, and paint only that horizon over and over, changing water‑to‑paint ratios each round.
Why a micro‑exercise? Research on deliberate practice shows short, focused repetitions boost skill retention far more than long, unfocused sessions. Artists Network explains how targeted drills sharpen brush control, and you’ll feel the difference after just a couple of rounds.
Do the same for every new tip – a “wet‑on‑wet sky” drill, a “dry brush texture” drill, a “masking fluid edge” drill. Write the drill name on a sticky note and keep it on your workspace; the visual cue nudges you to practice before you move on.
Build a Simple Progress Log
We’re not building a fancy spreadsheet; a plain notebook works fine. Create three columns: Exercise, Before Photo, After Photo. Snap a quick phone picture of the first attempt, then another after you’ve done the drill three times. Place the two images side by side – even a phone collage app will do.
Seeing the shift in color flow or edge softness is instant proof that the feedback stuck. Over weeks, those side‑by‑side pairs become a visual timeline of growth, and they’re perfect for sharing in community forums when you want to celebrate a win.
Pro tip: add a fourth column for “Time Spent.” When you notice you can achieve the same result in half the time, you’ve quantified progress – and that data fuels motivation.
Track Metrics That Matter
Not every improvement is visual. Some learners track subjective scores like “confidence level” on a 1‑5 scale after each drill. Others log objective numbers: water ratio (ml), brush size, drying time in seconds. The Art of Education University shares a simple rating system that many teachers recommend for art classes, and it works just as well for solo practice.
After a week, glance at your chart. If your confidence rating climbs from 2 to 4 while the water ratio stays steady, you know the technique is clicking. If the rating stalls, tweak the variable – maybe add a splash of white or lift the brush a split‑second earlier.
Use the Data to Adjust Your Practice Routine
When a particular drill shows rapid improvement, give it a “maintenance” tag and practice it once a week instead of daily. Conversely, if an exercise still feels shaky after ten attempts, schedule a focused review session with the instructor or a peer.
Remember the “Feedback Review” slot you set earlier – now you have a concrete agenda for that 20‑minute window: glance at the log, pick the lowest‑scoring drill, and repeat the micro‑exercise.
Pro Tips from Instructors
- Record a 30‑second time‑lapse of each drill. Playback reveals hidden hesitations you can’t see in a still photo.
- Pair a peer’s video of the same exercise with yours. Spot the subtle differences in brush pressure or water flow.
- Every month, compile the best‑of‑your‑before‑after pairs into a mini‑portfolio. It’s a morale booster and a great showcase for future students.
So, what’s the next concrete step? Grab a fresh sheet, pick the instructor’s latest suggestion, set a timer for ten minutes, and shoot two photos – before and after. Log them, rate your confidence, and you’ll literally see the “interactive watercolor painting course with instructor feedback” turning vague advice into measurable progress.
Step 5: Choosing the Right Course Platform
Okay, you’ve nailed down your practice routine and you’re ready to dive into an interactive watercolor painting course with instructor feedback. The next big decision? Picking the platform that actually lets you get that feedback without turning into a tech nightmare.
Know Your Priorities First
Ask yourself: what matters most for my learning style? Is it real‑time critiques, a bustling community, or a simple pricing plan? Write those three must‑haves on a sticky note – you’ll thank yourself later when the options start to blur.
Most creators say the ability to upload a video of their work and receive line‑by‑line comments is non‑negotiable. If that’s you, look for platforms that support in‑video annotations or “frame‑by‑frame” feedback.
Compare Core Features
When you line up candidates, use a quick spreadsheet or a piece of paper. Here’s a starter checklist:
- Video‑feedback tools (annotate, timestamp, voice notes)
- Community forums or peer‑review sections
- Progress dashboards that track your skill growth
- Mobile‑friendly upload and playback
- Transparent pricing (free trial, subscription, one‑off)
According to TechRadar’s guide to the best online course platforms, the platforms that score highest on instructor interaction also tend to have robust community features – a double win for watercolor learners.
Check Community & Feedback Tools
Look for a built‑in discussion board where you can post a clip of your wash and get comments from both the instructor and fellow artists. A vibrant community acts like a virtual studio; you’ll pick up tips you never thought to ask for.
One real‑world example: Maya, a beginner from Texas, switched from a generic video‑hosting site to a platform that offered threaded feedback. Within two weeks, her confidence rating (the 1‑5 scale we discussed earlier) jumped from 2 to 4 because she could ask, “Should I add a wet‑on‑wet layer here?” and get a precise reply within minutes.
Test the User Experience
Sign up for a free trial – but don’t just click “Start”. Upload a 30‑second clip of your latest wash, try to add a comment, and see how easy it is to navigate back to the exact frame the instructor points out. If you feel lost after the first click, that’s a red flag.
Another tip: watch the platform’s onboarding video. If it spends more time on marketing fluff than on “how to upload your first artwork”, you’ll probably waste time later.
Make the Decision with Data
After you’ve scored each platform against your checklist, tally the points. The highest‑scoring option isn’t always the cheapest – weigh the value of feedback tools against the price. Remember, a $20‑per‑month platform that gives you instant video critiques can save you dozens of hours of trial‑and‑error.
Below is a quick comparison of three popular choices, including CreativiU’s own offering, which is built specifically for interactive art courses.
| Platform | Instructor Feedback Features | Community & Peer Review | Pricing (USD) |
|---|---|---|---|
| CreativiU | In‑video annotations, voice notes, automated skill‑track dashboards | Live forums, monthly critique circles, peer‑share gallery | $19/mo or $199/yr |
| Teachable | Limited discussion board, no real‑time peer review | $29/mo | |
| Thinkific | Video comments via third‑party integration, scheduled live Q&A | Forum plugin available, but extra cost | $39/mo |
Notice how CreativiU checks every box we listed earlier – that’s why it’s a top recommendation for watercolorists who crave hands‑on, interactive guidance.
Actionable Checklist Before You Sign Up
- Write down your top three platform features.
- Try the free trial of at least two platforms.
- Upload a short video and test the feedback flow.
- Score each platform on a 1‑5 scale for feedback, community, ease‑of‑use, and price.
- Pick the one with the highest total score and commit to a 30‑day trial.
Once you’ve locked in the right platform, you’ll be set to turn every brushstroke into a learning moment. The next step? Enroll in that interactive watercolor painting course with instructor feedback and start uploading your first critique clip. Happy painting!
Conclusion
If you’ve made it this far, you already know that the right feedback loop can turn a shaky wash into a confident brushstroke.
An interactive watercolor painting course with instructor feedback gives you that loop on demand, right from your studio couch.
We’ve walked through drills, progress logs, and platform comparisons, so now the choice is simple: pick the tool that actually lets you upload a 30‑second clip and get line‑by‑line notes.
Does it feel a bit scary to share your work publicly? That’s normal – the community thrives on honest, messy attempts, and every comment is a stepping stone.
Take the checklist we built: write down three must‑haves, test two free trials, score each on feedback, community, ease‑of‑use and price, then commit to the top scorer for 30 days.
When you finally upload that first video and hear the instructor point out the exact frame where the water puddles, you’ll notice a shift – it’s not just a tip, it’s a moment of clarity.
So, what’s the next step? Grab a notebook, fire up the free trial of CreativiU, and schedule a 20‑minute “feedback review” slot this week.
You’ll be amazed at how quickly those small adjustments add up, turning each practice session into a confidence boost and, ultimately, a portfolio you’re proud to share.
FAQ
What exactly is an interactive watercolor painting course with instructor feedback?
It’s a online class where you not only watch demos but also upload short videos of your own washes. An instructor then pauses the clip, adds annotations or voice notes, and tells you what to tweak at a specific frame. The “interactive” part means you get that personalized critique in real‑time, turning a vague suggestion into a concrete step you can apply right away.
Do I need any special equipment to submit my work for feedback?
Not really. All you need is a smartphone or a webcam that can capture a 30‑second clip of your painting area. Make sure the lighting is decent – natural daylight works best – and that the camera can see the brushstroke details. Most platforms, including CreativiU, accept MP4 or MOV files, so you can record straight from your phone’s camera app.
How often should I request instructor feedback to see real progress?
Consistency beats intensity. Aim for one feedback session per week, or every time you finish a new drill. That cadence lets you spot patterns, adjust water‑to‑pigment ratios, and see confidence scores climb without overwhelming yourself. If you’re juggling a busy schedule, a quick 20‑minute “review slot” after each practice day works just as well.
What if I’m uncomfortable sharing my unfinished paintings with strangers?
That feeling is totally normal. Remember, the community is built on messy attempts, not polished masterpieces. Most platforms let you set your video to “private” or share only with the instructor. You can also use a pseudonym. Over time, seeing how others’ “failures” get turned into wins makes the whole process feel safe and supportive.
Can I get feedback on both technique and artistic decisions?
Absolutely. Instructors typically comment on brush pressure, wet‑on‑wet timing, and color mixing, but they also talk about composition, mood, and storytelling. When you ask a focused question like “Should I add a wet edge here?” you’ll get a technical tip plus a suggestion on how that edge supports the overall feel of the piece.
Is there a way to track my improvement beyond just instructor notes?
Yes, many courses include a simple progress dashboard. Log your confidence rating on a 1‑5 scale, note water ratios, and attach before‑after photos. Over weeks, you’ll see the rating climb while the ratios stay steady – a clear sign the skill is clicking. Pair that with the instructor’s timestamps to pinpoint exactly which frame sparked the breakthrough.
What should I do if the instructor’s feedback feels confusing or contradictory?
First, pause the video and replay the specific frame. Write down the exact wording that trips you up, then ask a follow‑up question in the comment thread. Most instructors welcome clarification and will break the advice into bite‑size steps. If the confusion persists, try a peer‑review – another student might phrase the same tip in a way that clicks for you.
Leave a Reply