Ever wonder how to turn a plain glass jar into a cozy, aromatic centerpiece that feels like a little piece of art? You’re not alone. Most hobbyists start with curiosity and a handful of supplies, but the real magic comes when you learn the rhythm of the melt, the right scent balance, and the finishing touches that make a candle feel crafted.
First off, soy wax is the go‑to for beginners and eco‑conscious creators alike. It burns cleaner, stays at a lower temperature, and gives you a smooth finish that’s perfect for layered or color‑shifted designs. If you’re looking to experiment, keep your wax to about 170°F before adding fragrance—this gives the oils a chance to bind without scorching.
Here’s a quick play‑through: melt 8 ounces of soy in a double boiler, stir for two minutes, then cool to 140°F. Add 1 ounce of your chosen essential oil or fragrance blend (about 1–3% of the wax weight), stir again, and pour into a pre‑warmed container. Dip your wick into the wax, center it with a wick holder, and let the candle set for a couple of hours before trimming the wick to ¼ inch. That’s the core process—simple enough to fit in a weekend afternoon.
Want to turn this into a side hustle? Many CreativiU members start with a small batch of five or ten jars and test different scent profiles at a local craft fair or through an online shop. Take note: the first batch often needs tweaks—perhaps a dash more fragrance or a slightly lower pouring temp—to get the ideal burn time and aroma throw.
Once you’ve nailed the burn, the finishing touch that makes a candle pop is the label. A clear, stylish label not only protects the wax but also tells your story. For a polished look, consider How to Make Soy Wax Candles with Essential Oils – A Step‑By‑Step Guide for ideas on packaging and scent combinations.
If you’re thinking about branding, it pays to have custom labels that reflect your brand’s vibe. A quick way to get professional stickers or labels is to use a service that offers custom prints—check out JiffyPrintOnline for affordable, high‑quality labels that can be delivered right to your door.
Now that you know the basics, grab a jar, a pot, and your favorite essential oil, and let the creative process begin. Don’t be afraid to tweak the ratios or add a splash of color—experimenting is part of the fun, and each candle becomes a small, scented masterpiece that you can proudly show off or gift to someone special.
TL;DR
If you’ve ever wondered how to make soy candles at home, this guide walks you through every step, from melting wax to final branding beautifully. You’ll learn how to blend scents, set the wick, tweak temperatures, and design labels that reflect your vibe—making each candle a masterpiece you’ll proudly share.
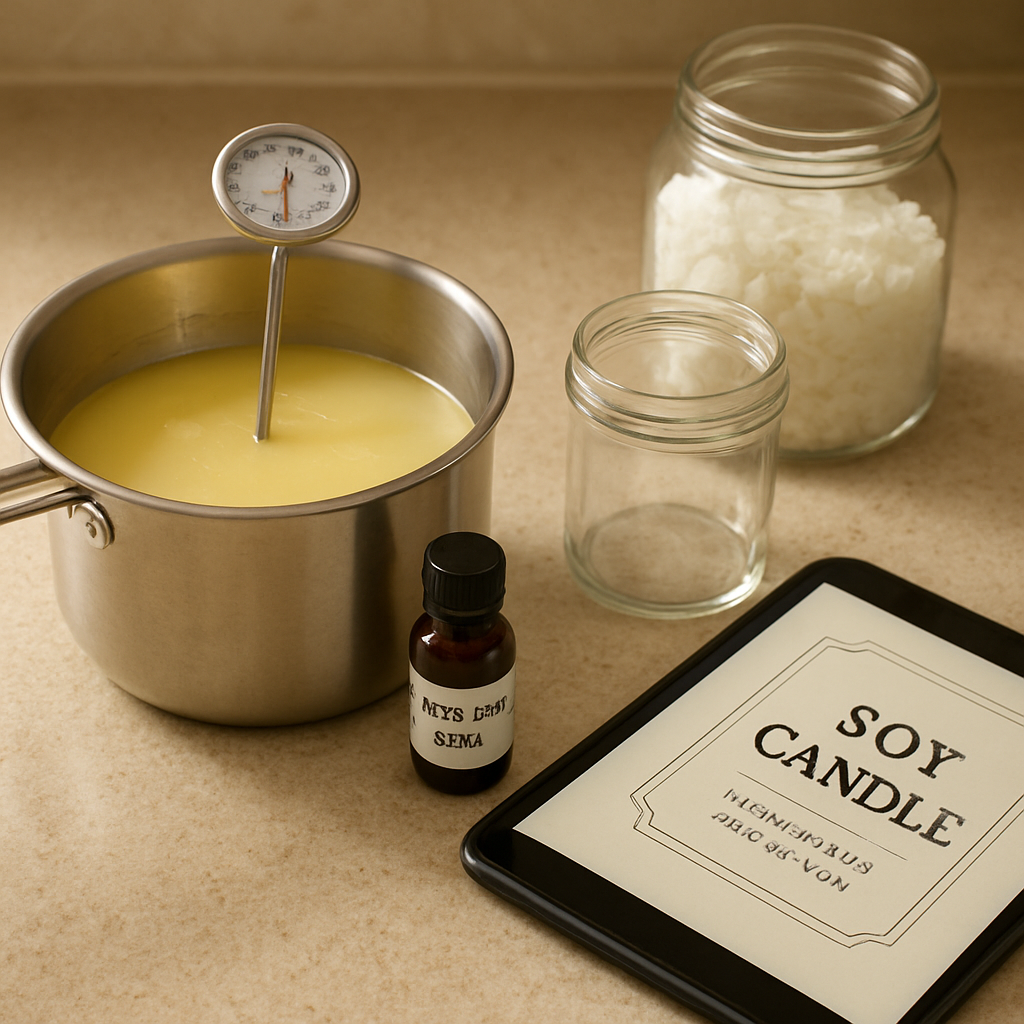
Step 1: Gather Your Supplies
Before you even touch a candle, you need to gather the right gear. Think of it like prepping for a potluck—if the pantry’s empty, the dish never gets cooked.
Start with the core ingredients: soy wax, a clean wick, and a sturdy container. Soy wax comes in blocks, flakes, or pre‑measured bags—pick whatever feels easiest for you. For the wick, choose a cotton‑core that matches your jar size; a too‑large wick burns hot, a too‑small one sputters.
Next, pick your containers. A plain glass jar feels classic, but a mason jar adds charm. If you want to make the candle look extra special, consider adding a custom label. That’s where JiffyPrintOnline shines—they let you design stickers that match your brand, so the candle looks finished right off the shelf.
Wick holders keep the center line true and prevent the wick from wobbling. A simple metal or plastic clip does the trick. While you’re at it, grab a wick holder and a small heat‑proof pot for the double boiler setup.
For heating, a double boiler or a stainless‑steel pot over a saucepan works well. The key is to melt the wax slowly—patience beats speed when you’re trying to avoid scorching.
Weigh your wax on a kitchen scale. 8 ounces is a good starting point for a single jar. Accuracy matters because fragrance load is calculated as a percentage of the wax weight. Aim for 1–3 % if you’re new to fragrance oils.
Speaking of fragrance, essential oils or fragrance oils add the scent. Pick something you love—lavender for calm, citrus for energy, or vanilla for a cozy vibe. Add a few drops of dye if you want color; soy wax is naturally translucent, so a splash of color can make a big visual impact.
Safety first: work in a well‑ventilated area, keep a fire extinguisher nearby, and never leave a hot pot unattended. A kitchen timer is your best friend for checking temperatures—aim for 170°F before adding fragrance, then let it cool to around 140°F.
Optional extras include reusable silicone molds if you’re experimenting with shapes, or a set of small gift tags for a personal touch.
That quick demo video shows the melt‑and‑pour rhythm in action. Notice how the wax settles before you add the scent—keeping that rhythm keeps your candle looking smooth.
Once your supplies are set, you’re ready to dive into the melt. Remember to keep the wax at the right temperature, watch the fragrance ratio, and let your creativity shine. If you want a deeper dive into how to make soy candles at home, check out our detailed guide How to Make Soy Wax Candles with Essential Oils – A Step‑By‑Step Guide. You’ll find more tips on wick placement, scent blends, and even branding ideas.
Finally, if you’re looking to spruce up your jars, this blog has great ideas on repurposing vases and jars into unique candle holders: Vases & Jars: 10 Creative Ways to Transform Your Home. Those tweaks can turn a plain candle into a centerpiece that feels truly yours.
So grab your wax, your wick, and your favorite jar—then let the creative sparks fly.
Step 2: Prepare the Wax (Watch the Demo)
Ready to turn that melted wax into a fragrant masterpiece? Before you pour, let’s get the prep game tight. It’s all about timing, temperature, and a little bit of science, but we’ll keep it real simple.
First, set up your double‑boiler or slow cooker, and get a reliable thermometer in hand. You’ll need to know when the wax hits the sweet spot—between 120°F and 140°F for pouring, and 155°F to 165°F for adding fragrance.
Watch the demo video that walks you through the exact heat curve. It shows you how to keep the wax in the right range while you stir in your scent.
Once you’ve hit that target range, turn off the heat and let the wax cool for a minute or two. This pause is crucial; it lets the fragrance lock in and prevents the scent from blowing away.
Now’s the moment to add your fragrance oil. Aim for 1–3% of the wax weight—so for an 8‑ounce batch, that’s about 0.08 to 0.24 ounces. Stir gently for two minutes, making sure the scent molecules mingle with the molten wax.
Do you remember the first time you tried pouring wax and it popped or left a hole? That usually happens when the wax is still too hot. Let it sit until it drops to the 120–140°F window and then pour in a steady, slow stream.
Tip: If you’re experimenting with color, add pigment when the wax is around 175°F to 185°F. This ensures even distribution and keeps that swirl effect from clumping.
After pouring, give your candle a few minutes to set. Then, trim the wick to about ¼ inch—this prevents a mushroom‑shaped flame and helps the candle burn evenly.
You’ve now set the foundation for a smooth, scent‑rich candle. The next step is to let it cure for up to 12 days—this waiting period lets the wax fully solidify and the fragrance lock in tighter.
So, what’s the final trick? Keep your workspace organized, stay mindful of temperature, and trust the science behind the timing. If you ever feel stuck, the Seventh Avenue blog offers a deep dive into why timing and temperature matter—give it a read to sharpen your technique.
Safety first—always work near a vented area and keep a fire extinguisher handy. If the wax drips, use a heat‑resistant glove to wipe it up before it cools into a stubborn spot.
If you’re new to fragrance oils, start with a lower percentage—around 1%—and test it in a small batch. You’ll notice how the scent throws change when you tweak the ratio.
Remember, patience is part of the process. A rushed pour can leave bubbles or a rough surface. Let the wax sit until it’s cool enough, then pour slowly to avoid that dreaded “bubbly” look.
With these steps, you’re not just making a candle—you’re creating a tiny piece of ambiance that can lift a room or soothe a mind. And if you want to share your craft with a wider audience, the next chapter in our course shows how to brand and sell.
And remember, your candle’s scent is a reflection of you—make it personal with love.
Step 3: Choose Fragrance and Color
Ready to turn that warm wax into a scent‑filled statement? The real magic starts with picking the right fragrance and color. It’s the difference between a candle that smells like “warm vanilla” and one that smells like “fresh pine in a forest cabin.”
First off, think about the vibe you want. Are you aiming for a cozy evening, a fresh‑morning boost, or a playful pop of color? Your answer will guide both scent and hue.
Finding the Perfect Fragrance
Fragrance oils are the star of the show. Pick a fragrance that feels personal—something that reminds you of a beach sunset or a grandma’s kitchen.
Rule of thumb: keep the fragrance load between 1 % and 3 % of the wax weight. For an 8‑ounce batch, that’s roughly 0.08 to 0.24 ounces.
Have you ever poured a candle that smelled too strong or too faint? That usually means you got the ratio off. Test a small batch, let it cure for 24 hours, then sniff. It’s the quickest way to gauge throw and intensity.
Want to mix scents? Layering works great. Add a top note first, let it cool, then pour in a heart or base note. You’ll get a richer, more dynamic aroma.
Choosing a Color That Pops
Color is visual storytelling. Start with a neutral base—white or light amber—and add a pigment powder. A good rule is 1 gram per 100 grams of wax, or about 1 % by weight.
Do you like a subtle glow or a bold splash? If it’s the former, a tiny pinch of pigment is enough. For a bold look, stir the pigment into the wax when it’s around 175°F to 185°F so it distributes evenly.
Tip: test a drop of pigment on a piece of scrap wax. That way you avoid a surprise shade when you pour.
Balancing Fragrance and Color
Sometimes color can mask scent if the pigment is too heavy. If you’re using a vibrant dye, start with a slightly lower fragrance load, then adjust after testing.
Try this: pour a test candle with 1 % fragrance, 1 % pigment. After 48 hours, if the scent feels flat, bump the fragrance to 1.5 % next time.
Practical Tips for Hobbyists and Entrepreneurs
- Use a scale to measure both wax and fragrance. Accuracy saves you from a batch that’s too dry or too oily.
- Keep a scent journal. Write down the fragrance, concentration, and how it turned out. Over time you’ll spot patterns.
- When selling, bundle a small sample jar with each order so buyers can test the scent before buying bulk.
- If you’re making candles for kids, choose safe, non‑allergenic fragrances like lavender or vanilla. Parents love that peace of mind.
Remember, the goal isn’t just to fill a jar; it’s to create an experience. Think of the first light, the aroma drifting, the color reflecting in the candle’s flame. When you nail fragrance and color, you’re not just making a candle—you’re crafting a mood.
So, what’s the next step? Grab your fragrance oil, mix the pigment, test a small batch, and let your creativity flow. Your next candle will smell and look exactly how you imagined.
Step 4: Pouring and Setting Techniques
So you’ve got your soy melt, your fragrance, and your container ready. Now it’s the moment that makes or breaks the final look. Let’s get into the nitty‑gritty of pouring and setting.
Getting the Pour Spot Right
First, temperature is your best friend. Aim for 140–150°F (60–65°C) when you start pouring. If you’re using a thermometer, set a quick mental alarm—once the wax hits that range, it’s time to pour.
Why that range? If it’s hotter, you’ll scorch the fragrance, losing aroma. If it’s cooler, the wax will cling to the container, creating a rough finish. A simple test is to flick a tiny drop on a piece of paper; if it slides smoothly, you’re good.
Pour in a steady, slow stream. A jerky pour invites bubbles and an uneven surface. Imagine filling a glass of iced tea—pour it gently so the liquid layers nicely.
For a quick real‑world example: I once poured a batch of vanilla‑scented soy for a friend’s birthday. I started the pour at 142°F, kept the flame low, and watched the wax settle. The result was a smooth, glossy finish that stayed true to the container’s shape.
Centering the Wick and Managing the Surface
Once you’re pouring, your wick holder (or a popsicle stick) should be in place. Keep the wick centered as the wax cools; a drifted wick will give you a lopsided burn.
As the wax begins to set, you’ll see small bubbles float to the top. Use a toothpick or a skewer to pop them—no one likes a popcorn‑themed candle.
Let the surface cool for about 5 minutes before you touch it. This prevents the wax from cracking or developing a ridge along the container wall.
Setting and Cooling Tips
After the first 30 minutes, place the candle on a level surface away from drafts. A drafty spot is a recipe for uneven shrinkage, which can cause cracks.
Some makers like to place a small glass weight on top for the first 24 hours. This keeps the candle flat and helps the wax settle evenly. If you don’t have a weight, simply keep the candle still.
When the wax is almost solid, trim the wick to ¼ inch. A longer wick will create a mushroom flame that burns hotter and faster, wasting wax.
Curing and First Burn
Curing time is key for scent throw. Let your candles sit for at least 7–10 days before the first burn. During this period, the fragrance molecules bond with the wax, ensuring a smooth scent release.
On the first burn, light the candle, let it burn for 2–4 hours, then let it cool. This helps the wax melt in a consistent pattern, which is crucial for an even burn during everyday use.
If you’re experimenting with wooden wicks, you might notice a slightly different burn profile. The wood layer adds a subtle crackle that some hobbyists love. For detailed guidance on wooden wick selection, see How to Make Candles with Wooden Wicks.
Remember, the goal isn’t just a pretty surface—it’s a candle that burns cleanly and smells great. A well‑centered wick, proper pour temperature, and a solid cure all contribute to that experience.
Once you’ve mastered pouring, you might want to take your candles to the next level—custom branding and packaging. For entrepreneurs and hobbyists alike, using on‑demand custom drink bottles can add a premium touch to your gift sets. Check out Quench Bottles for flexible, small‑batch bottle options that bring your candles to life.
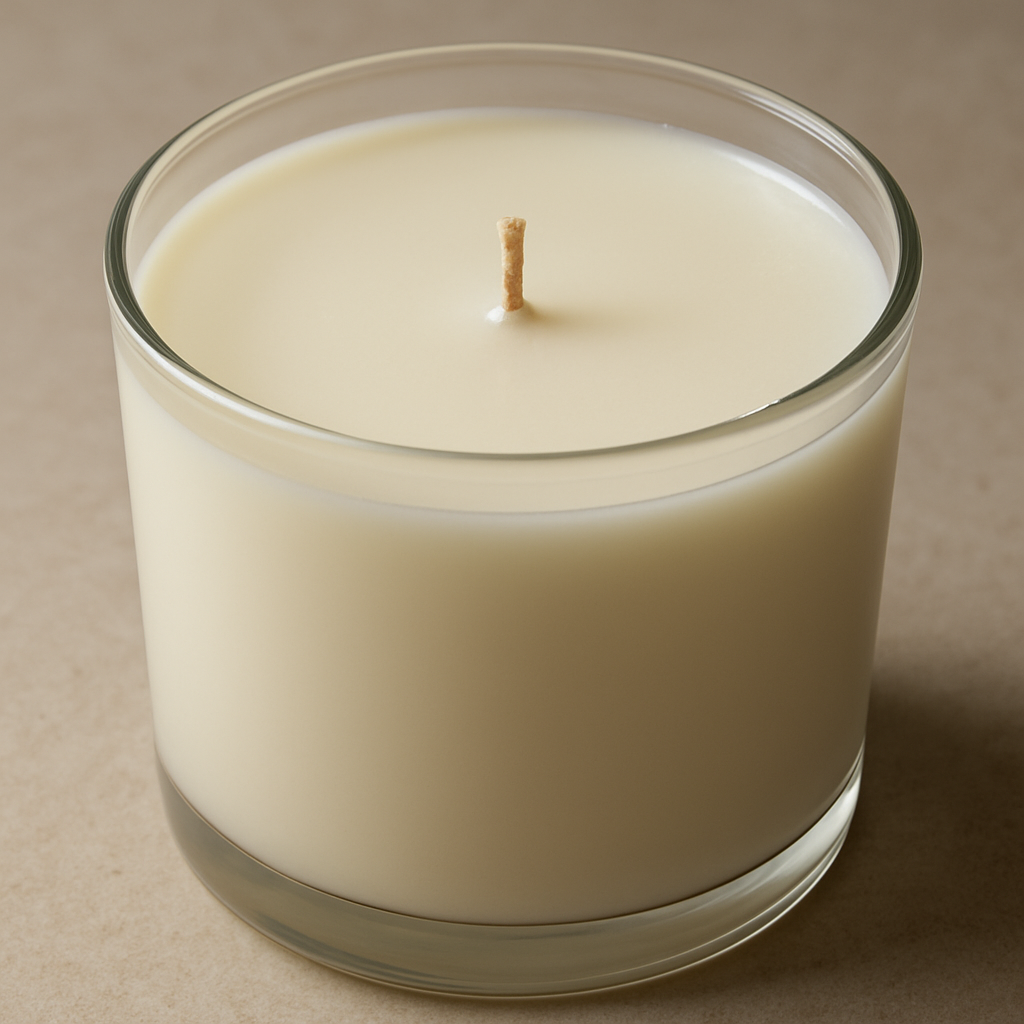
Step 5: Trimming, Finishing, and Comparison
Now that your wax has cooled into a solid, it’s time for the part that turns a good candle into a great one. Think of this like polishing a sculpture—small tweaks make the whole piece shine.
First up: trim the wick. A ¼‑inch wick is the sweet spot. If it’s too long, you’ll see that mushroom‑shaped flame that burns hot and fast. If it’s too short, the flame will be weak and sputter. Use a quick, sharp pair of scissors or a wick trimmer. Trim right after the candle cools enough so the wax is firm but still a touch pliable.
Next, look at the surface. A glossy finish is all you need, but a rough ridge or a tiny bubble can ruin the look. If you spot a bubble, gently tap the candle with a butter knife or use a toothpick to pop it. For a smoother top, place a small glass or ceramic weight on the first 24 hours. That keeps the wax level and pushes out any subtle air pockets.
Do you ever wonder how to tell if your candle will burn evenly? The best test is a first‑burn test. Light it, let it burn for 2–4 hours, and then watch how the wax melts. If the melt pool stays level and the flame stays centered, you’re good. If the flame drifts or the melt pool pulls to one side, you may need to re‑center the wick or adjust your pour.
In our experience, a simple tweak—like adding a tiny pinch of beeswax to the mix—can reduce feathering and give a cleaner flame. That’s a small touch that many hobbyists miss, but it can make a noticeable difference in burn time.
Now let’s break down the key techniques and tools into a quick snapshot. The table below shows the most common options and what they do for you.
| Feature | Option / Tool | Notes |
|---|---|---|
| Wick Trimming | Scissors or wick trimmer | Cut to ¼‑inch when wax is firm; prevents mushroom flame. |
| Surface Pop Removal | Toothpick or butter knife | Pop bubbles quickly; keep the top smooth. |
| First‑Burn Test | Light candle 2–4 hrs | Check center alignment and melt pool consistency. |
Feeling stuck? A quick trick: before you pour the next batch, let one candle sit on a flat surface for a few days. Observe the melt pattern and note any quirks. Use those observations to fine‑tune your next pour—maybe lower the temperature by 5°F or adjust the fragrance load by 0.1%.
For hobbyists looking to create a signature look, experiment with color swirls. Add a second dye after the first layer has set a bit. This layered effect can make a simple soy candle feel premium, especially when paired with a custom label from a community like CreativiU.
When you’re ready to pack your finished candles, remember that the packaging can make or break a gift. A clean, minimalist box with a handwritten tag adds value without cost. If you want a professional finish, consider a simple, eco‑friendly wrapping paper that complements the scent’s vibe.
So, what’s the next step? Trim that wick, smooth the surface, run a quick first‑burn test, and adjust your technique based on what you see. With a little practice, each candle will feel less like a batch and more like a craft you proudly own.
Remember: the goal is a clean burn, an even scent throw, and a finish that looks like it was made by a pro. Keep the wick trimmed, the surface pop‑free, and test early. Those three habits will set you on the path to candle‑making mastery.
Step 6: Packaging and Storage Tips
Alright, we’ve poured the wax, trimmed the wick, and maybe even added a splash of color. Now it’s time to wrap up that little piece of art so it looks as good on the shelf as it does in your hands. Think of packaging as the final handshake with your customer.
Pick a box that fits. A box that’s a few centimeters too tight feels cramped; one too roomy looks lazy. Measure the jar’s height and diameter, then grab a card stock box that’s a touch bigger. The extra room gives you space for a label, a handwritten card, or a small gift tag.
Seal in the aroma. A simple wax seal or a clear adhesive sleeve keeps the scent from escaping before the candle’s first burn. If you’re hand‑stamping, a dab of clear resin works wonders. The trick? Use a small amount so you don’t add bulk.
Label with purpose. Your label isn’t just a sticker; it’s your brand’s story. Keep it clean—one or two fonts, a touch of colour that echoes the scent. For hobbyists, a quick hand‑written note about the fragrance note can feel personal. If you’re a creator looking to sell, a QR code that links to a video of the candle in use adds tech‑savvy charm.
Protect from light. Light can bleach soy wax over time, dulling the color and scent. Slip a thin layer of parchment or a light‑proof sleeve over the jar before sealing. For bulk batches, store the boxed candles in a cool, dark closet until the day you’re ready to ship or gift.
Temperature matters. Keep your finished candles out of hot spots—no kitchens, no radiators, no direct sunlight. Fluctuations can cause the wax to crack or the label to peel. A simple shelf or a wooden crate in a shaded area works great.
Use a storage checklist. Every time you finish a batch, jot down the batch number, scent percentage, and any tweak you made. Store that note next to the box. It turns future batches into data points and helps you refine your craft.
When you’re ready to ship or gift. Wrap the box in tissue paper that matches the scent’s vibe. Roll the paper in a light‑colored ribbon or a natural twine for a rustic touch. Tuck a small card inside the box that says, “Enjoy the aroma.” It’s the little flourish that turns a simple candle into a memorable gift.
So, what’s the bottom line? Pack with care, store where the wax stays calm, and keep a log of what you did. The more you refine this step, the smoother your next batch will feel—both in the studio and on the shelf.
Step 7: Safety & Maintenance Tips
Let’s get real—candle care isn’t just a fancy extra; it’s the backbone of a safe, long‑lived glow. You’ll thank yourself later when the burn is smooth and the scent never sputters.
Safety First
Ever seen a candle flicker and think, “This is weird?” That’s usually a sign the wick’s too long or the flame’s too high. The rule of thumb? Trim the wick to a quarter‑inch before every burn. That keeps the flame low, reduces soot, and gives the wax a chance to melt evenly.
When you light a new candle, let it burn for 2–3 hours or until the melted wax reaches the jar’s edges. That first burn sets a “memory” in the wax, preventing future tunneling and uneven melting.
Unplug Soy Candles’ safety guide reminds us that 85% of candle fires could be avoided if you follow three basic rules: never leave a candle unattended, keep it away from flammable items, and keep children and pets out of the way. Unplug Soy Candle care guide is a handy quick‑look for all of these points.
Maintaining the Glow
After the initial burn, keep the flame at a safe distance from drafts—vents, ceiling fans, and open windows can shift the wick, cause uneven burns, or even pop the flame.
Every few weeks, give the surface a quick wipe with a soft cloth. This removes dust and any residual wax that might clog the wick.
When the candle has burned down to about ½ inch of wax, it’s a good cue to stop. Burning too low can transfer heat to the glass, causing cracks or uneven melt pools.
For a quick visual check, light the candle, let it burn for 4–5 minutes, and observe the melt pool. A centered, level pool signals good maintenance; a lopsided pool means you might need to re‑center the wick or adjust your pour temperature next time.
When Things Go Wrong
Seeing a black smoke streak? The wick’s probably too long. Trim it, re‑light, and keep an eye on the flame. If the flame flickers excessively, try moving the candle away from a draft.
Don’t use a knife to scrape wax off the glass—this can leave scratches that trap heat. Instead, let the wax cool fully, then gently lift it with a plastic scraper or a specialized candle snuffer.
In the event of a minor spill, cover the area with a paper towel, let it dry, and wipe with a damp cloth. Avoid using a wet sponge, which can spread wax and leave a sticky residue.
Finding Home Farms offers a concise maintenance checklist that covers trimming, surface care, and safe extinguishing. Their directions emphasize never using water to extinguish a candle—use a snuffer or gently press the flame to the wick. Finding Home Farms Candle Care Directions is a great reference to keep handy.
Remember, a well‑maintained candle doesn’t just look better; it’s safer for you and your family. Treat your wax as a friend—keep it clean, trim it often, and watch it burn like a steady, comforting beacon.
FAQ
Q1: How do I choose the right soy wax for my candle?
A good starting point is a medium‑density soy like SoyLite or a premium soy wax that melts cleanly between 120–140°F. This range lets you add fragrance without scorching. In practice, a wax that keeps the wick from feathering gives a longer, cleaner burn and less soot. Try a small test candle to see how the scent throws before scaling up.
Q2: What is the best wick size for different jar sizes?
wick diameter should roughly match the jar’s interior diameter. For a 3‑oz jar, a 1‑inch wick works well; for a 6‑oz jar, use a 1‑1/4‑inch wick. If the wick is too thin, the flame will sputter; too thick, and you’ll see a large mushroom flame. A simple test is to light a small sample, trim to ¼ inch, and watch the melt pool over a couple of hours.
Q3: How can I ensure even burning and prevent tunneling?
Keep the melt pool from reaching the jar’s edge until the candle is fully cooled. Light the candle for 2–3 hours on the first burn, allowing the wax to spread to the sides. Avoid drafts, and place a weight on top during the first 24 hours. A clean, even surface means the flame stays centered, and you’ll get a longer, more consistent burn.
Q4: What safety steps should I take when lighting my homemade candles?
Never leave a lit candle unattended, keep it out of reach of children and pets, and ensure it’s on a stable, heat‑resistant surface. Trim the wick to ¼ inch before each use to reduce soot. If a flame flickers or smells like burning wax, extinguish it immediately and let the candle cool. Using a snuffer instead of blowing out the flame keeps the wax from splattering.
Q5: How do I properly trim the wick before each use?
Measure a ¼‑inch from the wax surface and use a wick trimmer or scissors. Do this after the candle has cooled enough to hold shape but not fully hardened, so the wax remains pliable. Trim before the first 2–4 hours of burning; a short wick limits oxygen, reduces soot, and ensures the flame stays low and clean.
Q6: What should I do if my candle develops black soot or an uneven flame?
If you see black streaks, trim the wick to ¼ inch and re‑light. Uneven flames usually mean the wick drifted; use a wick holder or a paper weight to keep it centered during cooling. If soot continues, consider using a higher‑quality fragrance oil or lowering the fragrance load to 1–2%. For more troubleshooting, check the Yo Soy Candle FAQ for detailed burn‑time charts.
Conclusion
We’ve walked through every splash, stir, and trim that turns a batch of soy wax into a warm, hand‑made glow.
What’s the single trick that keeps your candle safe and your scent true? Keep the wick trimmed, let the wax cool at the right speed, and test a small batch before committing the whole jar.
And remember, the first 7‑10 days after pouring are the secret “cure” period. Let the fragrance molecules settle; this is when the throw really kicks in. If you’re a hobbyist or a budding entrepreneur, a quick 48‑hour test burn tells you whether you need a stronger scent or a tighter pour.
Do you want your candles to feel personal? Try layering a top note, let it cool, then pour a heart note. That little extra step turns a generic aroma into a story you and your friends can share over coffee.
So, what should you do next? Gather your tools, keep a log of each batch—weight, fragrance %, and any tweaks—and hit the burn button with confidence.
At CreativiU, we’ve seen makers who turn a simple jar into a brand by sharing their process online. If you’re ready to showcase your craft, our community forums are a place to get feedback and spark new ideas.
Now go light up a candle, breathe in that scent, and remember that the real magic is in the hands you pour and the heart you share.
Leave a Reply