Ever found yourself staring at a ball of yarn, wondering how that little square of colour could turn into a cozy blanket or a trendy tote? You’re not alone – that moment of “what now?” is the exact spark that gets most crocheters hooked.
When you learn how to crochet a granny square step by step, you gain a versatile building block. Think about a friend who wanted a handmade gift for her mum’s birthday – she started with just one square, then added more, and before she knew it she had a whole quilt she could be proud of.
In our experience at CreativiU, beginners often stumble on two things: choosing the right yarn weight and keeping their tension even. A medium‑weight (worsted) yarn paired with a size H‑8 (5 mm) hook strikes a happy medium – it’s easy on the hands and shows up nicely on camera if you decide to share your progress.
Here’s a quick checklist to get you set up:
- Yarn: 100‑gram skein of acrylic or cotton (cotton gives a crisp look, acrylic is budget‑friendly).
- Hook: size H‑8 (5 mm) for worsted weight.
- Scissors, yarn needle, and a stitch marker.
Once you have your tools, start with a magic ring or a simple chain of four stitches and slip stitch into the first. Then, work into the round: *chain three, double crochet four times, slip stitch into the top of the chain‑three*. That creates the first corner.
Repeat the corner three more times, making sure to chain three between each set of double crochets. The magic happens when you join the corners with a slip stitch – that’s the iconic granny‑square shape.
Want a visual walk‑through? Check out our detailed guide How to Crochet a Granny Square Step by Step: Easy Beginner Tutorial where we break down each stitch with photos and a short video.
Real‑world tip: If you’re a creative entrepreneur planning to sell your squares or kits, think ahead about packaging. Simple kraft boxes with a handwritten label add a personal touch and boost perceived value.
And when you’re ready to turn those finished squares into a product line, you might need an online store. A handy resource is Shopify Alternatives for Australian Small Businesses, which outlines platforms that are budget‑friendly and easy to set up.
So, grab your hook, make that first chain, and remember: each square you finish is a step toward mastering crochet and possibly building a small craft business. Keep the rhythm, enjoy the process, and soon you’ll have a stash of squares ready for any project you imagine.
TL;DR
Learn how to crochet a granny square step by step, from picking the right yarn and hook to mastering the corner stitches that give each square its classic shape. With our easy‑to‑follow guidance you’ll finish your first perfect square fast, boost confidence, and unlock endless projects—from blankets to bags—while gaining skills that creative entrepreneurs and hobbyists alike can turn into thriving crafts.
Step 1: Create the Foundation Chain and Slip Knot
Alright, let’s dive in. The first thing you’ll feel when you grab that hook is a tiny buzz of excitement – you’re about to lay the very foundation of every granny square you’ll ever make.
Start by making a slip knot. It’s the crochet equivalent of tying your shoes – simple, but if you mess it up you’ll be tripping later. Make a loop, pull the tail through, and snug it onto your hook. You’ve now got a secure starting point that won’t unravel when you work the next rows.
Chain the base
Next, chain four stitches. This short chain becomes the little “bridge” that turns your slip knot into a magic ring or a solid base, depending on which method you prefer. If you’re using a magic ring, simply join the last chain stitch to the first with a slip stitch; if you’re going the traditional route, just keep the chain as is and move on.
Here’s a quick mental picture: you’re essentially drawing a tiny square on the table with yarn – those four chains are the first side, and the slip knot is the corner that holds everything together.
Why does this matter? For hobbyists, a consistent foundation means smoother tension and fewer “tight spots” that can make later corners look wonky. For creative entrepreneurs, that consistency translates into professional‑looking squares that sell without the need for endless re‑work.
Secure the slip stitch
Now, insert your hook into the first chain stitch, yarn over, and pull through both loops on the hook – that’s a slip stitch. This tiny move locks the chain into place and creates the first corner of your granny square. It might feel like a tiny victory, and it is.
Pro tip: keep the slip knot loose enough that you can adjust it later, but tight enough that it won’t slip off the hook while you’re crocheting. If you’re unsure, give it a gentle tug – it should hold firm but still have a little give.
Once you’ve got that foundation, you’re ready to start the classic “chain‑three, double crochet four times, slip stitch” pattern that builds each corner. Trust me, after a few rounds you’ll be in a rhythm that feels like a conversation between you and the yarn.
And if you’re thinking ahead to selling your squares, consider how you’ll label and package them. A simple, clean label printed on demand can make a huge difference. JiffyPrintOnline offers fast, affordable printing that works great for small‑batch craft businesses.
Watch the video for a visual walk‑through of the chain and slip knot – pause whenever you need to feel the tension, then rewind and try again. Once you’ve nailed this step, the rest of the granny square will fall into place like a well‑written sentence.
Take a moment now to finish that foundation chain, snap a quick photo of your work, and give yourself a pat on the back. You’ve just set the stage for countless squares, blankets, and even a potential new product line.
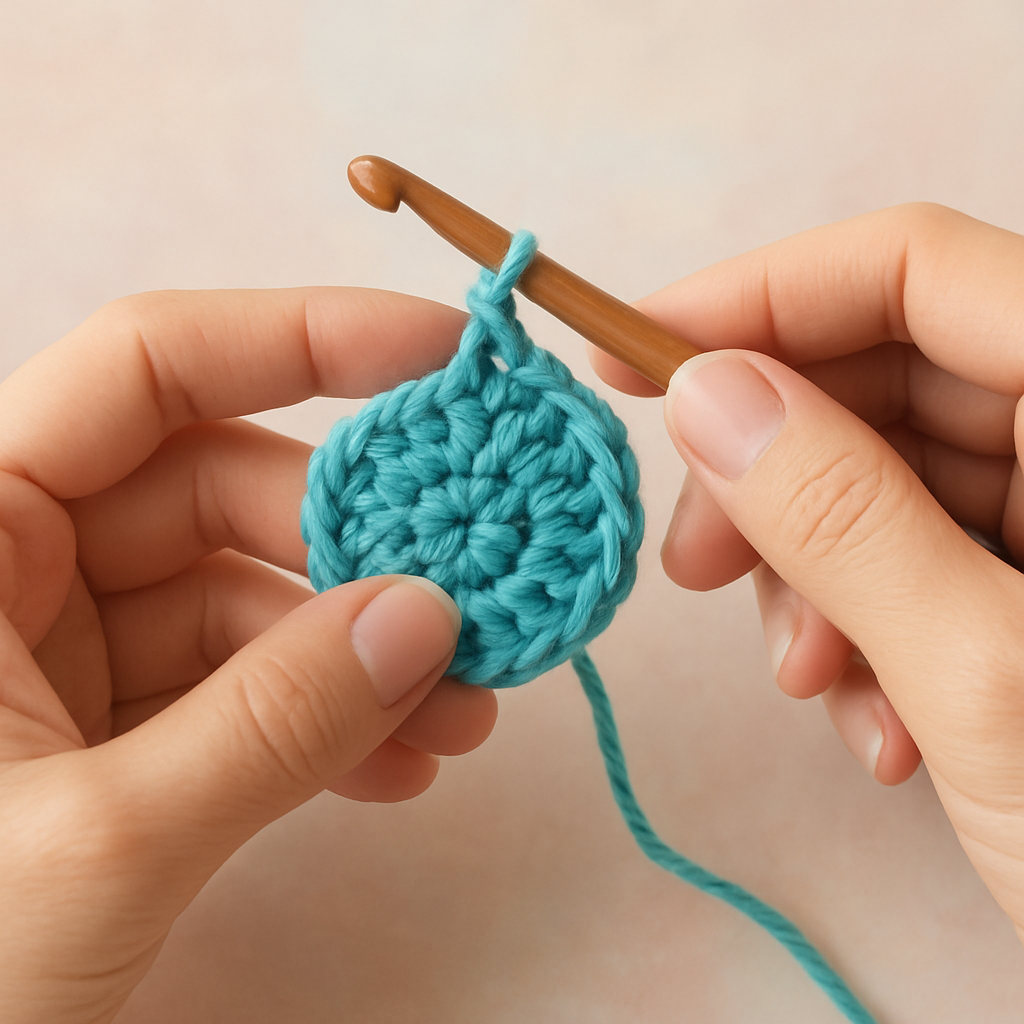
Step 2: Crochet the First Round (Center of the Square)
Now that your slip knot and four‑chain ring are snug, it’s time to fill that tiny centre with the first round of stitches. If you’re wondering whether you’ve missed a step, breathe – you’re exactly where you need to be. This round sets the tension for the whole square, so a calm, steady hand makes all the difference.
Start by chaining three – that’s your “corner height” and it also gives you a little extra yarn to work into. Slip stitch into the top of the first chain‑three you just made; you’ve just created the first corner of your granny square. From here, you’ll repeat a simple pattern: chain three, then work a set of double crochets (dc) into the same ring.
Here’s the exact count that keeps everything even:
- Chain 3 (counts as the first dc of the corner).
- Work 2 double crochets into the ring.
- Chain 3, slip stitch into the ring – that completes one corner.
Repeat that corner sequence three more times, spacing each corner with a chain‑3. When you’ve done the fourth corner, you’ll have a neat little octagon shape that will grow into a square once you add the side clusters.
Why the extra double crochet in each corner? The extra stitch gives the corner a little “bulge,” which prevents the square from looking too tight and makes the edges easier to join later. If you ever notice your squares looking a bit lopsided, check that you didn’t accidentally skip that second double crochet.
Real‑world example: Jenna, a freelance graphic‑designer turned crochet hobbyist, found that her first few squares felt uneven because she was chaining three but only doing one double crochet per corner. Once she added the second double crochet, her squares lined up perfectly, and she could confidently sell them as part of a branded tote line.
Tip from the CreativiU community: after completing the round, gently pull the yarn tail to “tighten” the corners just a touch. You’ll hear a soft click – that’s the yarn settling into place, not a mistake.
Do a quick tension check now. Grab the edge of the round and give it a gentle tug. It should have a little give, like a firm handshake, but not wobble like a loose shoelace. If it feels too tight, slip a chain or two out and redo the corner. If it’s floppy, pull the slip knot a bit tighter before you start the next round.
Need a visual refresher? Our detailed guide How to Crochet a Granny Square for Beginners: Step‑by‑Step Guide walks you through the first round with photos and a short video, so you can compare your work side‑by‑side.
Creative entrepreneurs often bundle their finished squares with other goodies. Imagine pairing a set of pastel‑hued squares with a sleek, custom‑branded water bottle – a perfect gift for a spring‑time launch. You can explore options at Quench Bottles, where small‑batch, on‑demand bottles keep your branding sharp without a huge inventory.
Once you’ve mastered this round, you’ll notice a confidence boost. The next step – adding the classic double‑crochet side clusters – feels less intimidating because the centre is already a solid, even foundation.
Step 3: Build the Second Round – Adding the First Set of Chains
Now that your first round is a neat little octagon, it’s time to start giving the square some real width. The second round is where the classic “chain‑stitch side clusters” appear, and those chains will become the foundation for every future round.
Feeling a bit nervous? That’s normal. Remember how the first round felt tight at first, then loosened up as you got the rhythm? The same thing happens here – once you get the chain count down, the rest flows.
Step 1: Chain the side stitches
From any corner, chain three. Those three chains count as the first double‑crochet of the next side cluster. Then, work three double crochets into the same space where you just chained. Slip stitch into the top of the next corner chain‑three to close the side.
Repeat this sequence all the way around: chain‑3, 3 dc, slip stitch into the next corner. When you reach the starting corner, you should have four side clusters, each separated by a chain‑3.
Quick tip: keep your yarn tension consistent by holding the working yarn with your thumb and index finger, just like you did in round one. If the chains feel too tight, gently pull the slip knot a little tighter; if they’re floppy, loosen the slip knot a touch.
Step 2: Add the corner “mini‑chains”
Each corner needs a little extra height to keep the square square. After you finish the fourth side cluster, chain three again, then work two double crochets into the corner space, and finish with a slip stitch into the top of the chain‑3 you just made. This creates the familiar “bulge” that defines granny‑square corners.
Imagine you’re building a puzzle: those extra two double crochets are the little tabs that let the next round lock in perfectly.
Step 3: Check your work
Give the edge a gentle pull. It should feel firm, like a handshake, but not rigid. If any side looks longer than the others, you probably missed a chain‑3 or added an extra double crochet. Undo the last few stitches, count again, and re‑stitch.
Real‑world example: Maya, a stay‑at‑home mom who’s been using CreativiU’s courses, told us she once ended a round with one side a stitch longer. She simply counted the chains, re‑started that side, and her next square lined up perfectly with the rest of the blanket.
Pro tip from the studio
When you’re ready to move on to round three, consider adding a colour change on the side clusters. A subtle stripe can make your finished blanket look professionally designed, and it’s a great way to showcase your brand colours if you’re a creative entrepreneur.
If you need a visual reference, check out this detailed video walkthrough that shows the second round in action.
Now you’ve built the first set of chains and side clusters – the backbone of every granny square. Take a moment to admire the square’s growing size; you’ve just turned a tiny centre into a piece that’s ready to expand into a blanket, tote, or wall hanging.
Next up: round three, where you’ll double the number of chains and start the classic “double‑crochet along the edges” pattern. Keep your tension steady, and you’ll be stitching with confidence.
Step 4: Complete the Third Round – Shaping the Classic Granny Square
Alright, you’ve just finished the second round and your square is starting to look like a tiny window pane. The third round is where the classic “double‑crochet along the edges” pattern really takes shape, turning that little window into a full‑blown square you can actually use for a blanket or a tote.
What the third round adds
In this round you’ll double the number of side chains, then work a series of double‑crochet (dc) stitches along each side. Those dc rows give the granny square its sturdy edge and the characteristic “stacked” look you see in vintage afghans.
Think of it like building the frame of a picture – the more solid the frame, the easier it is to hang the artwork without it wobbling.
Step‑by‑step instructions
1. Chain three from any corner. Those three chains count as the first dc of the new side cluster.
2. Work three double crochets into the same corner space. You now have a “shell” that mirrors what you did in round two, but the chain count between shells will be different.
3. Chain two, then make a shell of three dc into the next side stitch. Continue this pattern – chain‑2, 3 dc – all the way around the square.
4. When you reach a corner, chain three instead of two. The extra chain gives the corner that little bulge that keeps the square square.
5. In the corner, work two double crochets, then chain three, and finish with a slip stitch into the top of the corner chain‑3. That slip stitch locks the corner together and prepares you for the next round.
Repeat steps 1‑5 until you’ve gone all the way around. When you’re done, you should see a clean, even edge with a series of little “steps” on each side.
Real‑world examples
Take Maya, a creative entrepreneur who sells handmade tote bags. She told us she always adds a third round before stitching squares together because the extra edge gives the bag a professional, reinforced look that customers notice.
Alex, a parent crocheting with his kids on a rainy Saturday, finds the third round perfect for teaching kids the rhythm of “chain‑two, three double crochets.” The predictable pattern keeps the little hands focused and reduces frustration.
Pro tip from CreativiU
If you’re aiming for a colour‑blocked blanket, try changing yarn colour on the first chain‑three of each corner. The subtle stripe shows up beautifully once you join multiple squares – a simple trick that makes a hand‑made piece look like a designer collection.
Common pitfalls and how to avoid them
Missing a chain‑two or adding an extra chain‑three will throw off the whole edge. The easiest fix is to pause, count the stitches on the side you’re working, and compare it to the opposite side. If they don’t match, undo the last shell and redo it.
Another snag is tension – if your dc stitches are too tight, the square will look puckered. Lighten the slip knot just a hair and keep your yarn flowing.
Need a visual reference?
The Instructables guide walks you through the third round with clear photos and a short video, making it easy to spot where a chain‑two should become a chain‑three.How to crochet a granny square tutorial
Once you’ve mastered this round, you’ll feel confident moving on to round four, where the square really starts to fill out. Keep your tension steady, trust the rhythm, and enjoy the satisfying click of each slip stitch snapping into place.
Step 5: Size Variations and Yarn Choices (Comparison Table)
When you get to the point where your granny squares start to look like a tiny patchwork, the next big decision is – how big do you want each square to be, and which yarn will give you the right drape? It’s a question that pops up for everyone from the hobbyist who wants a quick coaster to the entrepreneur planning a full‑size blanket for a launch.
First, let’s acknowledge the feeling you get when you stare at a skein and wonder, “Will this be too heavy or too light?” You’re not alone. In our experience at CreativiU, the most common source of frustration is picking a yarn that mismatches the hook size, which leads to uneven edges or a square that either collapses or feels stiff.
Quick decision framework
Grab a notebook and jot down three things:
- The final product you have in mind (coaster, bag, blanket).
- The look you’re after – soft and fluffy, or crisp and structured.
- The time you can spend on each square (more yarn weight means bigger stitches, which can speed things up).
Once you have those answers, use the table below as your cheat‑sheet. It lines up the most popular size variations with the yarn weight and hook size that work best together.
| Size Variation | Recommended Yarn Weight | Hook Size (mm) | Typical Use |
|---|---|---|---|
| 4″ (10 cm) square | Sport / Fingering (DK) | 3.5 – 4.0 | Coasters, potholders, sampler projects |
| 6″ (15 cm) square | Worsted / Medium | 5.0 – 5.5 | Bag panels, baby blankets, beginner kits |
| 8″ (20 cm) square | Bulky | 6.5 – 7.5 | Chunky afghans, tote‑bag accents, fast‑track projects |
Notice how the hook size grows with the yarn weight. That’s not just a rule of thumb – it’s a physics thing. A bigger hook lets the yarn sit loosely, preventing the square from puckering. If you ever end up with a square that looks like a tightly‑rolled carpet, you’ve probably used a hook that’s too small for the yarn.
Let’s walk through a real‑world example. Jenna, a creative entrepreneur, wanted a line of pastel‑toned tote bags. She chose a 6″ square made with a worsted‑weight acrylic and a 5 mm hook. The result was a square that held its shape when sewn together, and the acrylic kept costs down – a win‑win for her budget‑friendly brand.
On the other side of the spectrum, Mark, a parent crocheting with his kids on rainy weekends, preferred the chunky 8″ version. He used a bulky cotton blend and a 7 mm hook. The larger stitches meant each round took less time, so the kids stayed engaged, and the finished blanket felt like a hug.
Now, a quick actionable step: before you start a new size, make a 4‑inch test swatch using the yarn and hook you plan to use. Count how many double‑crochets fit into an inch. If you get more than 5 stitches per inch, the yarn is too fine for the hook; if you get fewer than 3, the hook is too big. Adjust accordingly.
And here’s a pro tip you won’t find in every tutorial – blend a tiny bit of nylon‑spun yarn with your cotton for extra durability without sacrificing softness. It’s a trick many boutique makers use to keep their products looking fresh after dozens of washes.
Want to see a full project that uses the 6″ square size? Check out our Granny Square Blanket guide for beginners – it walks you through assembling a blanket from those medium‑weight squares, complete with finishing tips.
Finally, think about the end‑of‑life for your squares. If you’re selling them, a simple printed tag can add that polished feel. A label printed on matte paper gives customers a cue that the piece was thoughtfully finished.

FAQ
What are the essential tools I need to start learning how to crochet a granny square step by step?
First thing’s first – you’ll need a yarn hook (size H‑8 or 5 mm works for most worsted‑weight yarns), a skein of medium‑weight yarn, a pair of scissors, and a yarn needle for weaving in ends. A stitch marker is a lifesaver when you’re counting rounds, and a small tape measure helps you check gauge. Anything else is nice to have, but these basics will get you crocheting in minutes.
How do I choose the right yarn weight and hook size for my first granny square?
Think of yarn and hook as a dance partners – they need to match. For a classic 6‑inch square, a worsted‑weight (medium) yarn paired with a 5 mm (H‑8) hook gives a balanced stitch that’s easy on the hands and looks tidy on camera. If you want a smaller coaster‑size square, drop down to sport yarn and a 4 mm hook; go bulky and a 7 mm hook for a chunky, quick‑finish project.
Can you walk me through the first round of a granny square, especially the magic ring versus chain method?
Sure thing. Start with a magic ring if you like a tight centre – wrap the yarn around your fingers, pull a loop through, and secure with a slip knot. Chain four, join with a slip stitch to form a ring, then work your first corner: chain three (counts as the first double crochet), do two double crochets into the ring, chain three, slip stitch into the top of the chain‑three. Repeat three more times and you’ve got the classic octagon shape.
What common mistakes cause uneven edges and how can I fix them while crocheting a granny square?
Uneven edges usually come from missed chains or extra stitches in a corner. The trick is to pause after each side and count the chain‑three clusters – you should have the same number all around. If a side looks longer, undo back to the last corner, recount the chains, and redo the side. Keeping the slip knot a tad looser lets you adjust tension without ruining the whole round.
How many rounds should I crochet before the square is ready to join with others for a blanket?
Most beginners stop at the fourth or fifth round, which gives a 6‑ to 8‑inch square that’s sturdy enough to seam. Each additional round adds about an inch of width, so if you’re aiming for a larger blanket, go to round six or seven. Just remember: the more rounds, the more yarn you’ll need, and the bigger the gauge differences become, so test a swatch if you’re switching yarns mid‑project.
Do I need to block my granny squares, and if so, what’s the best way to do it?
Blocking isn’t mandatory, but it smooths out any tension quirks and makes squares line up nicely when you join them. Lightly dampen the square, lay it flat on a towel, and pin the edges to the desired dimensions – usually a square shape matching your gauge. Let it dry completely before unpinning. This simple step adds a professional finish without any fancy equipment.
Conclusion
So you’ve made it through the whole process of how to crochet a granny square step by step – from the first slip knot to the final round of double‑crochet edges.
What does that mean for you? It means you now have a tiny, versatile building block that can become a cozy blanket, a stylish tote, or even a simple gift that says “I care.” And because you’ve practiced the rhythm, the tension, and the corner tricks, the next square will feel like second nature.
Remember the little moments we highlighted: counting chains out loud, loosening the slip knot just enough, and giving each side a gentle tug to check the shape. Those tiny habits turn frustration into confidence, and they’re the same habits our community of hobbyists and creative entrepreneurs rely on every day.
So what’s the next step? Grab another skein in a color you love, start a fresh round, and let the squares grow. If you ever feel stuck, revisit the earlier steps or hop onto our platform for a quick refresher video – it’s there whenever you need a confidence boost.
Finally, keep your squares organized, block them if you like a polished finish, and think about how you might join them into a project that reflects your style. Happy crocheting, and enjoy watching those little squares turn into something beautiful.
Additional Tips & Creative Variations
Now that you’ve got the basic rhythm of how to crochet a granny square step by step, it’s time to have a little fun and make each square feel uniquely yours.
Play with colour gradients
Instead of sticking to a single hue, try a subtle gradient across a row. Pull out three yarns that fade from light to dark, then switch at the start of each new round. The effect is a square that looks like a sunrise—and it’s a great conversation starter when you gift it.
Does changing colour mid‑round feel intimidating? Not really. Just keep an eye on the slip stitch that closes each corner; it holds the tension steady no matter how many colours you toss in.
Mix yarn textures
Pair a soft cotton with a chunky boucle for a tactile surprise. Crocheting a few rounds in the smooth yarn, then swapping to the textured one for the side clusters adds depth without messing up gauge.
Creative entrepreneurs love this trick because it lets a single square look premium, which translates into higher perceived value on a product line.
Shape variations beyond the classic square
Try a half‑star or a circular motif by adjusting the number of chains between corners. For a star, work six corners instead of four and use a chain‑2 between each shell. The result is a square‑ish star that fits perfectly into a blanket grid.
If you’re a parent crocheting with kids, the star shape turns a “boring” practice session into a mini‑project they can proudly display on the fridge.
Add embellishments
A few well‑placed beads, a strip of ribbon, or a tiny pom‑pom can turn a plain square into a statement piece. Slip a bead onto the yarn just before the slip stitch in a corner – it secures itself without any extra knots.
We’ve seen hobbyists use recycled buttons from old shirts; it’s eco‑friendly and gives the square a personal story.
Quick customisation checklist
- Choose a colour palette (gradient, complementary, or monochrome).
- Decide on texture swaps (cotton ↔ bulky yarn).
- Select a shape tweak (star, circle, rectangular).
- Gather any embellishments (beads, ribbons, buttons).
- Test one round on a swatch before committing to the full square.
And remember, the best way to learn these tricks is to experiment in a low‑stakes project, like a coaster set or a mini‑bag. If you ever feel stuck, revisit the core steps you mastered earlier – the slip knot, the corner chains, and the consistent tension. Those fundamentals keep every creative variation from falling apart.
So go ahead, break the routine, and let your granny squares tell a story that’s as vibrant as your own creative journey.
Leave a Reply