Embroidery isn’t just a craft hobby anymore—it’s an experience that’s becoming more vibrant, social, and accessible thanks to the rise of interactive online embroidery hoop art workshops. You might be wondering, how can stitching threads through fabric be so exciting virtually? Well, imagine a creative session where you’re not only guided step-by-step but also get real-time feedback from expert instructors and can connect instantly with fellow crafters worldwide.
It’s no secret that learning arts and crafts online has transformed the way people develop skills and express creativity. But what makes an interactive online embroidery hoop art workshop stand out from standard tutorials? It’s the dynamic, hands-on environment that blends community, personalized guidance, and immediate interaction to keep you engaged and progressing.
Are you ready to create unique embroidery pieces that tell your story, all while enjoying the convenience of learning from home? Whether you’re a complete beginner or someone looking to refine your stitching skills, this format adapts to your pace, style, and creative goals. Beyond just techniques, it’s about unlocking a new way to bring your artistic vision to life with the supportive energy of an interactive community.
Moreover, these workshops often include creative prompts and project ideas to spark your imagination and push your boundaries. It’s not just about following patterns but about inspiring you to innovate and experiment with your own designs. And the best part? You can revisit lessons anytime to master complex stitches or explore new styles.
Curious how to get started or what tools you’ll need? Don’t worry—these workshops are designed to be beginner-friendly, breaking down each step clearly while sharing insider tips that elevate your crafting. For a deeper dive into cultivating creative skills that last, check out this comprehensive resource for online embroidery classes for beginners.
So, what’s stopping you from turning threads and hoops into stunning art? Let’s dive in and explore everything that an interactive online embroidery hoop art workshop can offer, from skill-building to creative fulfillment.
TL;DR
Looking to turn your passion for embroidery into art? An interactive online embroidery hoop art workshop offers flexible, beginner-friendly lessons, hands-on projects, and a supportive community to spark your creativity and improve your skills at your own pace.
Whether for hobby or business, these workshops help you explore new techniques and unlock unique artistic expression—all from your home. Ready to stitch your story? This is your creative starting point.
Step 1: Gathering Materials and Preparing Your Workspace
Ready to dive into your interactive online embroidery hoop art workshop? The first secret to a smooth experience is setting up your materials and workspace thoughtfully.
Gather Your Essential Materials
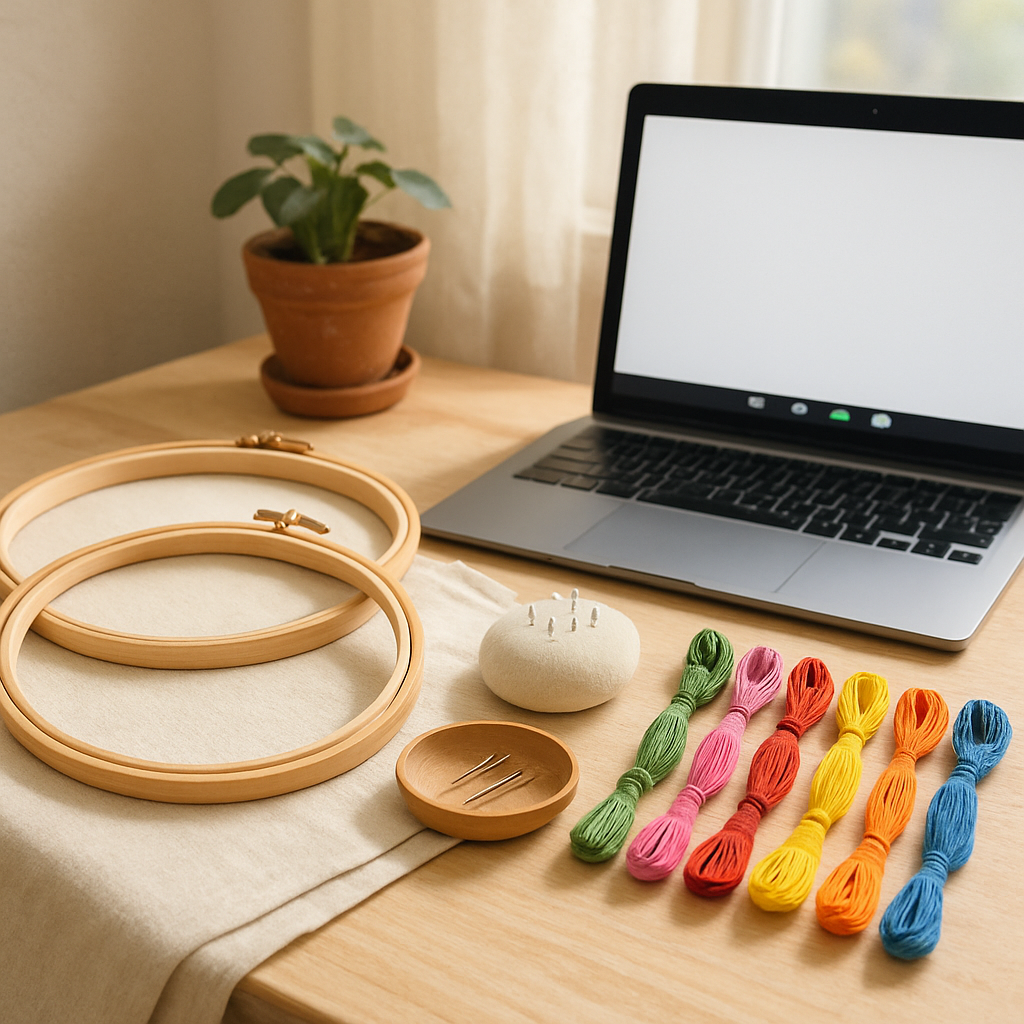
Before you stitch a single thread, it’s crucial to assemble all the tools you’ll need. At a minimum, you’ll want an embroidery hoop, embroidery needles, quality threads, fabric, scissors, and a pattern or design template.
But how do you pick the right fabric? If you’re aiming for beautiful hoop art, natural fibers like 100% cotton or linen are your best friends. They offer a tight weave that holds your stitches nicely without puckering or stretching. Beth Colletti, a hand embroidery expert, emphasizes that quilting cotton is particularly beginner-friendly because of its weight and ease of use.
Think about what the final product will be—are you creating decorative wall art or something functional like a pillowcase? Cotton muslin works well for decorative pieces, while sturdier fabrics like denim or duck cloth make great canvases for something that needs durability. If your fabric feels too thin, back it with fusible embroidery stabilizer or sew it onto a piece of white cotton to prevent your stitches from showing through or the fabric from distorting.
Don’t forget about thread! Common choices include six-strand embroidery floss, pearl cotton, or crewel wool, especially if you want a vintage look on linen. Each material offers a different texture and sheen, so select according to your design and desired finish.
Prepare Your Workspace for Success
Your creativity deserves a comfortable, well-organized stage. Charter out a dedicated spot where you can keep all your embroidery supplies handy and your work undisturbed. Hatch Embroidery’s guide to setting up an embroidery business workspace highlights how an organized area reduces errors and boosts productivity, even for hobbyists.
Natural daylight is ideal, but if it’s limited, invest in a daylight-balanced lamp. Good lighting helps you avoid eye strain and ensures your colors stay true.
Think about ergonomics, too. A supportive chair, a table at the right height, and a tidy setup not only make stitching easier but help you focus longer without fatigue.
As you prepare your space, lay out your threads, scissors, hoop, and fabric in an accessible order. Using small containers or thread organizers can keep everything neat and prevent tangles, making your stitching process flow effortlessly.
Wondering how to stay motivated while solo stitching at home? Create a little ritual—maybe a favorite playlist or a cup of tea. Your workspace should inspire you to settle in and get creative.
Set Up Your Digital Tools
Since you’re joining an interactive online embroidery hoop art workshop, make sure your internet setup and digital devices are ready too. Test your webcam, mic, and internet connection ahead of time to avoid interruptions during live sessions.
It’s also a great idea to have your digital pattern files or workshop platform open and easy to navigate. This keeps switching back and forth to a minimum and maximizes your learning time.
Final Checklist Before You Start
- Selected fabric washed (if washable) and ironed for a smooth surface
- Appropriate needles and embroidery thread sorted and organized
- Embroidery hoop sized for your project and ready to use
- Workspace arranged in a well-lit, comfortable spot
- Digital devices tested and ready for interactive workshop participation
With these steps, you’ll maximize the value and enjoyment of your interactive online embroidery hoop art workshop. Good preparation translates into a more relaxed, rewarding stitching journey.
Need a deeper dive into setting up your creativity and problem-solving through arts and crafts? Check out CreativiU’s comprehensive guide to mastering problem solving. It’s packed with strategies that complement your hands-on creative projects perfectly.
Don’t underestimate how powerful a well-prepared space and materials are in turning your embroidery dreams into wonderful reality.
For more fabric textures or tricky fabric questions, peek at this informative post on Beth Colletti’s favorite fabrics for hand embroidery. It gives practical tips that even seasoned crafters swear by.
Step 2: Navigating the Interactive Online Platform
So, you’re all set with your fabric and tools, and you’re ready to dive into your interactive online embroidery hoop art workshop. But how exactly do you make the most of the digital space you’re about to enter? Navigating an online platform might sound intimidating if you’re used to in-person classes, but with a few simple pointers, you’ll be cruising through your lesson dashboard like a pro in no time.
Getting Comfortable with the Interface
First things first: take a moment to familiarize yourself with the layout. Most top-notch online platforms, like the one CreativiU uses, are designed to be intuitive, but everyone’s interface has its unique quirks. Look for key areas such as your course modules, interactive video sections, discussion forums, and resource libraries.
Why is this important? Because knowing where to find your patterns, tutorials, and community chats without hunting through endless tabs will save you valuable crafting time and keep your creative momentum flowing.
Mastering Interactive Video Lessons
Interactive video lessons are the heart of an interactive online embroidery hoop art workshop. Instead of passively watching, you actively engage with content through embedded quizzes, click-to-zoom details, or decision points that guide your learning path.
For example, you might pause a lesson to answer a short quiz on stitch techniques or click on hotspots highlighting intricate threadwork. These features don’t just test your knowledge—they reinforce what you’ve just learned, helping you remember crucial steps when you’re back at your hoop.
Don’t skip this step: taking time to truly engage with interactive videos has been shown to boost retention and skill development significantly, making your stitching sessions much more productive and enjoyable. If you want to understand how interactive video formats enhance learning, check out this insightful analysis of interactive videos in online education.
Utilizing Community and Support Features
An interactive online platform is more than just lessons; it’s a thriving community. CreativiU’s platform offers spaces where you can connect with fellow embroidery enthusiasts to swap tips, showcase progress, and troubleshoot tricky stitches.
Don’t hesitate to jump into discussion threads or scheduled live Q&A sessions. You’ll find that sharing your successes and struggles keeps you motivated and inspired. Plus, experts and moderators are often just a message away to help you overcome any hurdles.
Customizing Your Learning Journey
One of the best parts of an online workshop is flexibility. You can often choose the order of modules you tackle or revisit lessons as your skill level improves. Make use of bookmarks and notes features within the platform to keep track of favorite tutorials or techniques you want to master.
Your pace, your style. Embrace the control you have over your learning path to stay motivated and deepen your creative skills.
Tips for Smooth Technical Navigation
Before you join your workshop session, ensure your internet connection is stable and your browser is up-to-date. CreativiU recommends commonly used browsers like Microsoft Edge or the latest Chrome version for the best experience.
If you plan to use software tools for digitizing or design previews alongside your workshop, such as Hatch Embroidery software, verify your system meets the recommended specs for a lag-free session. Hatch Embroidery offers extensive tutorials and resources that can complement your workshop learning, helping you create stunning custom designs effortlessly according to embroidery experts.
And remember, interactive platforms are constantly evolving, so don’t be shy about exploring new features or reaching out to support teams if something’s not clicking. The more comfortable you are navigating your online learning space, the more creativity you can pour into your embroidery projects.
Step 3: Learning Basic Stitch Techniques
Now that you’re comfortable navigating your workshop and gathering your materials, it’s time to dive into the heart of embroidery: mastering the basic stitch techniques. These foundational stitches are like the alphabet of embroidery — once you know them, you can start forming endless creative words and phrases with your thread.
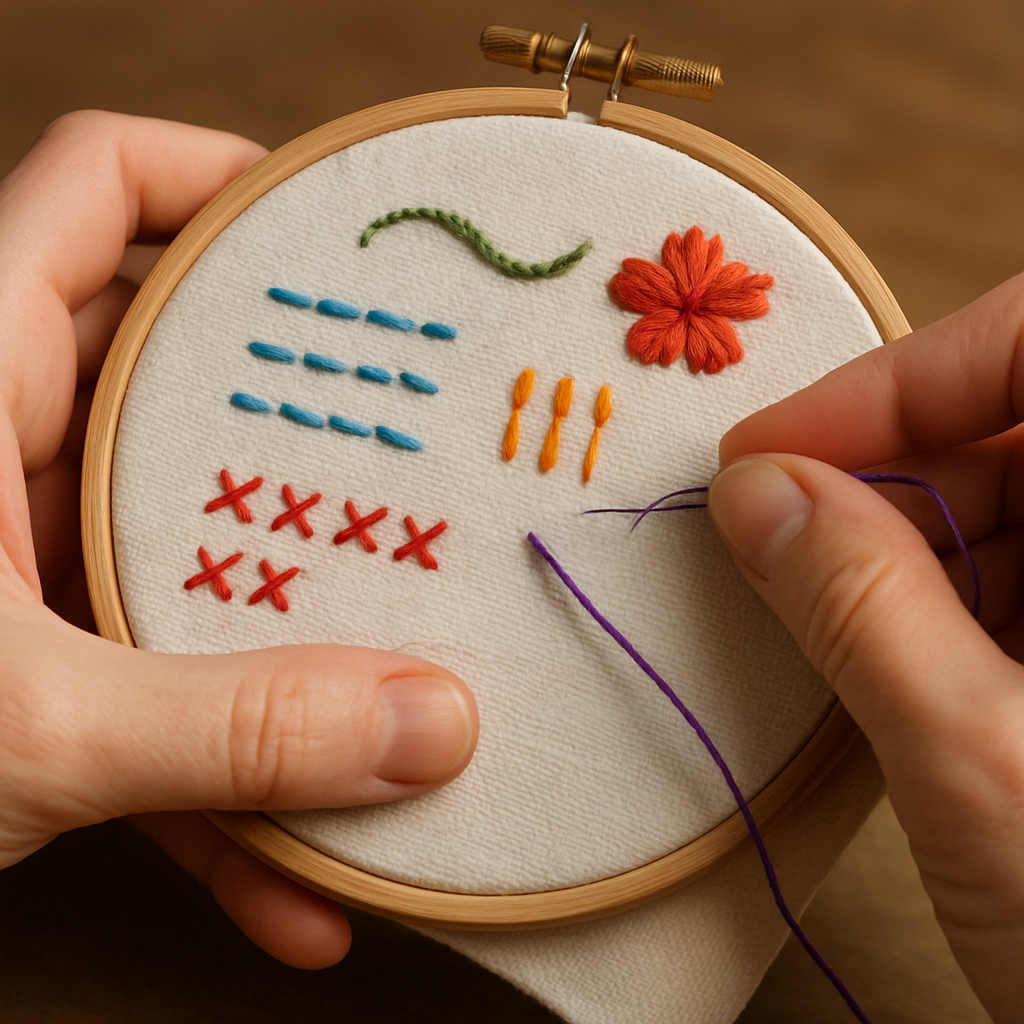
Start Simple with the Running Stitch
The running stitch is the easiest to learn and forms the basis for many embroidery patterns. It’s simply a series of evenly spaced stitches that go up and down through the fabric, creating a dashed line effect. This stitch is perfect for outlines, adding texture, or even framing your design.
To practice, try drawing a simple line or shape on your fabric with a water-soluble marker, then stitch along it. This basic stitch won’t just build your confidence — it’ll also make you more comfortable handling your needle and thread.
Get Precise with the Backstitch
Looking for a stitch that gives your design sharp, clean edges? Backstitch is your go-to. Unlike the running stitch, it creates a continuous solid line that’s perfect for lettering and detailed outlines. The trick is to stitch backward to the last stitch’s endpoint, ensuring a neat, uniform look.
One tip: keep your stitches evenly spaced to maintain that polished appearance. Backstitching neatly also saves on thread and keeps your embroidery clean on both sides.
Add Texture with Split and Stem Stitches
Feeling adventurous? The split stitch is a slight variation of the backstitch but with a twist—literally. You split the thread in the middle of each stitch, which creates a subtle textured effect that’s excellent for curves and flowing lines.
Similarly, the stem stitch is fantastic for organic shapes like vines and flowers. It produces a gently twisted line that adds beautiful dimension. If your project includes natural themes, mastering this stitch will make your design come alive.
Fill in with Satin and Seed Stitches
When you want to fill shapes with vibrant color, the satin stitch is indispensable. It’s all about placing your stitches close together, side by side, to create a smooth, satin-like surface. Start by outlining your shape—maybe a leaf or a petal—with a backstitch, then fill it in using this technique.
Seed stitches add a sprinkle of texture by using tiny, randomly placed stitches that look like little seeds on your fabric. These are perfect for shading or filling small areas with an organic feel.
Conquer the French Knot—It’s Worth It!
French knots might sound intimidating, but they add charming, textured dots to your projects that really make details pop. Use them for flower centers, eyes, or even decorative dots in your design.
The key is to wrap the thread carefully around the needle before pulling it through the fabric. It takes some practice, but your patience will pay off with these delicate, delightful accents.
Does the idea of mastering all these stitches feel overwhelming? That’s completely normal. Our interactive online embroidery hoop art workshop offers step-by-step video tutorials and guided practice sessions, so you can learn each stitch at your own pace—rewinding and replaying as you perfect your technique.
Keep an embroidery diary or photo log of your progress. It’s rewarding to see how your skills evolve from shaky first stitches to smooth, confident embroidery.
Want to see detailed stitch demonstrations? Check out this comprehensive Embroidery 101 guide, which walks you through all these basic stitches with clear illustrations and tips.
Also, consider watching expert stitch tutorials like those on YouTube embroidery lessons that break down each technique in real time, giving you visual cues you can follow along with easily.
Remember, every stitch you make in this interactive online embroidery hoop art workshop brings you closer to turning a plain fabric into your own unique masterpiece. So pick up your hoop, thread your needle, and let’s stitch your story.
Step 4: Designing Your Embroidery Hoop Art
Now that you’ve mastered the foundational stitches, it’s time to bring your vision to life by designing your embroidery hoop art. This is where your creativity truly takes center stage within our interactive online embroidery hoop art workshop.
Choosing Your Design Theme
First off, think about the story or mood you want your hoop art to convey. Do you want a whimsical floral piece? An inspirational quote? Or maybe a vibrant succulent motif inspired by nature’s beauty? Picking a theme makes design choices like fabric, colors, and stitches much easier to navigate. For example, succulent prints offer a lush, calming vibe and layering felt appliqué over printed fabrics can add depth and interest — a technique beautifully demonstrated in Beth Colletti’s succulent hoop art guide. This shows how combining fabrics and appliqué elevates simple embroidery into stunning art.
Gathering and Preparing Your Materials
Next, select the right fabrics that complement your design. Cotton works well for most hoops, but textured or patterned fabrics can give your piece personality. If you’re layering, consider lightweight felt or appliqué pieces that contrast nicely with your background.
Don’t forget to prep your fabric by ironing to remove wrinkles. Using heat-bonding adhesives like HeatnBond® Lite helps secure appliqué pieces before stitching, saving frustration and making hand embroidery smoother. Iron-on adhesives stabilize your design so you can focus on stitching without worrying about shifting fabric.
Creating or Sourcing Your Pattern
Ready to add your design? You have two main options: sketch directly onto fabric with water-soluble pens or transfer printed patterns using specialty papers such as Pellon® Stick-N-Washaway™. The latter allows you to position your design perfectly and then wash out the transfer marks once stitching is done.
If you prefer digital tools, free embroidery digitizing software like Ink/Stitch offers a way to convert your artwork into machine-readable stitch files. This is ideal if you have embroidery machines or want precise stitch placement. Mastering these tools takes some practice, but resources like the guide on free embroidery digitizing techniques give you a leg up.
Planning Stitch Types and Colors
Before stitching, consider which stitch styles best fit your design elements. Satin stitches excel for lettering and smooth outlines, fill stitches add texture to larger motifs, and running stitches work great for delicate details or borders.
Color choice will make or break your design’s impact. Pick threads that either contrast well for visibility or blend softly for depth. A tip: use two strands for subtle stitching and three or four for bolder lines. Don’t hesitate to experiment on scrap fabric to find your perfect combo.
Tips for Layering and Finishing
Going beyond basic stitching? Appliqué layering adds a lovely dimensional effect, especially on printed fabrics. Secure your appliqué with running stitches around the edges for both durability and decorative flair. When done, remove hoop marks and rinse transfer lines gently to reveal a clean finished piece.
Remember, precision counts and patience pays off. Don’t rush—each careful decision you make during design shapes the unique story your embroidery hoop art tells.
| Feature | Option/Tool | Notes |
|---|---|---|
| Fabric Choice | Cotton, Felt, Patterned Prints | Use cotton for base, felt for appliqué layers, prints like succulent fabric add visual interest |
| Pattern Transfer Method | Water-erasable Pens, Pellon® Stick-N-Washaway™ | Water-erasable pens are flexible; transfer papers allow accurate placement and easy removal |
| Digitizing Software | Ink/Stitch, SophieSew, Embroidermodder | Ink/Stitch offers powerful free digitizing; beginner-friendly but with learning curve |
Feeling a bit overwhelmed with all these choices? That’s natural. Designing is your chance to experiment — to mix textures, colors, and stitches until you create something that excites you. Our interactive online embroidery hoop art workshop offers support every step of the way, so you’re never stitching alone.
So, what should you do now? Start by sketching rough designs, gather your supplies, and try out simple stitch combos on scraps. With a little practice, you’ll soon design pieces that not only look great but feel deeply personal.
Step 5: Executing Your Project and Troubleshooting Tips
Now that you’ve carefully planned and practiced your design, it’s time for the exciting part: bringing your embroidery hoop art to life. This is where all your creative groundwork pays off, and you’ll see your vision turn into a tangible piece of art.
Start with Preparing Your Workspace
Make sure your space is well-lit and organized. Have all your materials, threads, needles, scissors, and fabric nearby. Setting up a comfortable seating arrangement will keep you energized through long stitching sessions.
Don’t rush the hooping process. Ensure your fabric is taut and smooth in the embroidery hoop; this prevents puckering and gives you a clean canvas to work on. Taking the time to stretch and secure the fabric properly influences the final polish of your piece.
Follow Your Design Sequentially
Work methodically—start stitching your base layers before moving to appliqué or more intricate details. It’s smart to stitch with lighter colors first, then darker tones. This layering technique lets each element stand out clearly and avoids thread tangling.
Need motivation? Think of this as storytelling with thread, where each stitch builds upon the last to narrate a vibrant visual tale. Staying patient during this step helps maintain precision and elevates the overall artistry.
Anticipate Common Issues & Fixes
If you notice fabric puckering, your hoop may be too loose or your tension too tight. Release the hoop, retighten the fabric snugly, and try again. Loose stitches? Make sure your thread tension is consistent but not restrictive.
What if your thread keeps tangling or knotting? Give your thread occasional little stretches before and during stitching to smooth fibers. Using a high-quality, smooth embroidery floss can also reduce this hassle.
Have you ever made a stitch mistake? Don’t worry—using a seam ripper or small, sharp scissors to carefully unpick the error is easier than you might think. Take your time to avoid damaging the fabric.
Cleaning and Finishing Your Piece
Once the stitching is complete, gently clean your work. If you used water-erasable pens or transfer lines, rinse with cool water to remove markings. Some designs benefit from a light pressing with an iron on the fabric’s backside to flatten any wrinkles—just be sure to protect your stitches with a pressing cloth.
Then, celebrate! Mount your finished hoop art for display or gifting. Each piece carries your unique creative fingerprint—something no machine can replicate.
Where Can You Go for Extra Help?
Feeling stuck during execution? Your interactive online embroidery hoop art workshop community at CreativiU is packed with fellow makers and expert instructors ready to troubleshoot alongside you. Sharing photos of your current progress can unlock personalized advice and fresh ideas.
For detailed technical guidance and stitch troubleshooting not covered here, tutorials like those found on YouTube by experienced embroiderers demonstrate practical fixes and tips in action. Watching videos such as basic embroidery troubleshooting or common hoop art execution tips can make a huge difference in your learning curve.
Remember, no project goes perfectly the first time, and every snag you solve builds your skill and confidence. The real magic lies in the journey — stitching your passion one thread at a time—through your interactive online embroidery hoop art workshop experience.
Conclusion
Wrapping up your journey through an interactive online embroidery hoop art workshop, it’s clear this creative adventure is about more than just stitches—it’s about connection, growth, and expression. You’ve seen how immersive learning, expert guidance, and community support blend seamlessly to elevate your craft beyond what solo practice can offer.
Think about the last time you figured out a tricky stitch or added your own flair to a classic design—those moments spark real joy. Isn’t that why we dive into embroidery in the first place? The magic lies not just in the end product, but in every loop and thread woven during the process.
Wondering how to keep this momentum going? Staying engaged with a supportive community like CreativiU ensures you never face a creative block alone. You’ll keep discovering new techniques and ideas, sharpening your skills in ways you might never have imagined.
So, what should you do next? Embrace the practice, share your progress, and don’t be afraid to experiment. Remember, every stitch you make adds to your unique story. Ready to turn your passion into a lasting skill or even a business? Your interactive online embroidery hoop art workshop experience at CreativiU is the perfect launchpad.
Why wait? Dive back in, connect with fellow makers, and stitch your creativity into something truly extraordinary.
FAQs About Interactive Online Embroidery Hoop Art Workshops
So, you’re curious about interactive online embroidery hoop art workshops—maybe wondering if they’re really for you? Let’s clear up some common questions to help you decide and get excited about this creative journey.
What exactly is an interactive online embroidery hoop art workshop?
Great question! It’s a live or on-demand digital class where you learn embroidery techniques using a hoop canvas. What makes it interactive? You can ask questions, get real-time feedback, and engage with fellow stitchers—no matter where you live. It’s like having an expert guide and community right at your fingertips.
Do I need any prior embroidery experience to join?
Not at all! These workshops are designed for everyone—from total beginners to seasoned crafters. You’ll find step-by-step guidance that walks you through basics and gradually builds your skills. It’s all about pacing yourself and enjoying the process. Wondering if you’ll keep up? Interactive sessions let you pause, rewind, and revisit tricky stitches whenever you need.
What materials do I need to participate?
Typically, you’ll need an embroidery hoop, needles, embroidery floss, and fabric. Some workshops provide detailed material lists and even supply kits you can order. Don’t worry about expensive gear; many projects use affordable, readily available materials. Thinking of starting small? Grab a beginner’s kit and see how your creativity unfolds.
How does the live interaction work in an online setting?
In a live workshop, instructors often demonstrate stitching techniques via video, while you follow along at home. You can ask questions through chat or voice to get instant help. These workshops sometimes include breakout rooms or community boards, so you can share progress and swap tips with peers. It’s a supportive, motivating environment that makes learning fun and social.
Can I still benefit if I choose a self-paced workshop?
Absolutely. Self-paced courses let you learn at your own rhythm, perfect for busy schedules or when you prefer solo focus. Many platforms, like CreativiU, offer forums and occasional live Q&A sessions, so support is always within reach. This flexibility means you’ll never have to rush your creativity or stress about missing a class.
Is it possible to turn embroidery skills learned online into a business?
Definitely! Many creative entrepreneurs begin their journey through interactive online embroidery hoop art workshops. You’ll gain both technical skills and insights on branding, pricing, and marketing your handmade art. Plus, being part of a creative community boosts your confidence and opens doors to collaborations and sales channels. Why just craft for fun when you can craft for profit?
What if I get stuck or frustrated during the workshop?
It happens to everyone—embroidery is an art that calls for patience and practice. The best online workshops encourage asking questions and sharing challenges. Often, instructors provide troubleshooting tips and alternative stitches to keep you motivated. Remember, every expert started as a beginner, and every stitch brings you closer to mastery.
Feeling ready to dive in? Interactive online embroidery hoop art workshops blend creativity, community, and convenience, making your stitching adventures not just possible but downright enjoyable. Why not take the plunge and watch your thread transform into art?
Leave a Reply