Ever stared at a blank sheet of paper and imagined a burst of blossoms blooming right there, without any soil or water? You’re not alone—many of us who love paper crafts have that moment where we wish we could turn a simple sheet into a fragrant bouquet.
That’s exactly why the Explore the Best Origami Tutorials Online to Master Paper Art page is such a goldmine. It walks you through the fundamentals, from choosing the right paper weight to mastering the crisp folds that make each petal look alive.
In this intro, we’ll unpack why an origami flower bouquet is more than a decorative trick. For hobbyists, it’s a confidence‑boosting project that sharpens precision. For creative entrepreneurs, it becomes a low‑cost product you can sell at markets or bundle with custom printed tags. And for parents, it’s a quiet, screen‑free activity that sparks curiosity in kids.
So, how do you start? First, pick a medium‑weight square (around 15‑20 cm). Too thin, and the folds will tear; too thick, and the petals won’t curl nicely. Next, gather a basic set of folds—valley, mountain, and reverse fold—because they’re the building blocks for every petal shape.
Here’s a quick three‑step checklist to get you moving:
- Cut three squares: one for the base, two for the larger blooms.
- Practice the “pre‑crease” technique: lightly crease the paper with a bone folder or the edge of a ruler to ensure clean lines.
- Follow the classic crane base as your skeleton; from there, you’ll reshape each wing into a petal using reverse folds.
Think about it this way: the crane base is the stem, and each wing becomes a petal. Once you’ve mastered that, you can experiment with color‑graded paper, adding a splash of pink, ivory, or even metallic gold for a luxe look.
Real‑world example: a recent CreativiU community member used leftover wedding invitation paper to craft a mini bouquet that doubled as a table centerpiece. She sold a set of ten for $25, covering material costs and netting a tidy profit.
Another hobbyist told us they turned the same technique into a calming ritual after work—folding one flower a day for a month. By the end, they had a full‑sized bouquet that felt like a personal achievement.
Ready to give it a try? Grab your paper, set a timer for 20 minutes, and follow the steps we’ll detail later. You’ll be surprised how quickly the folds turn into a fragrant‑looking arrangement you can actually hold.
TL;DR
Ready to turn a simple sheet into a vibrant bouquet?
Follow our origami flower bouquet step by step guide, and you’ll master crisp folds, creative color combos, and quick techniques that hobbyists, entrepreneurs, and families love—so you can craft, sell, or simply enjoy beautiful paper blooms anytime you need inspiration.
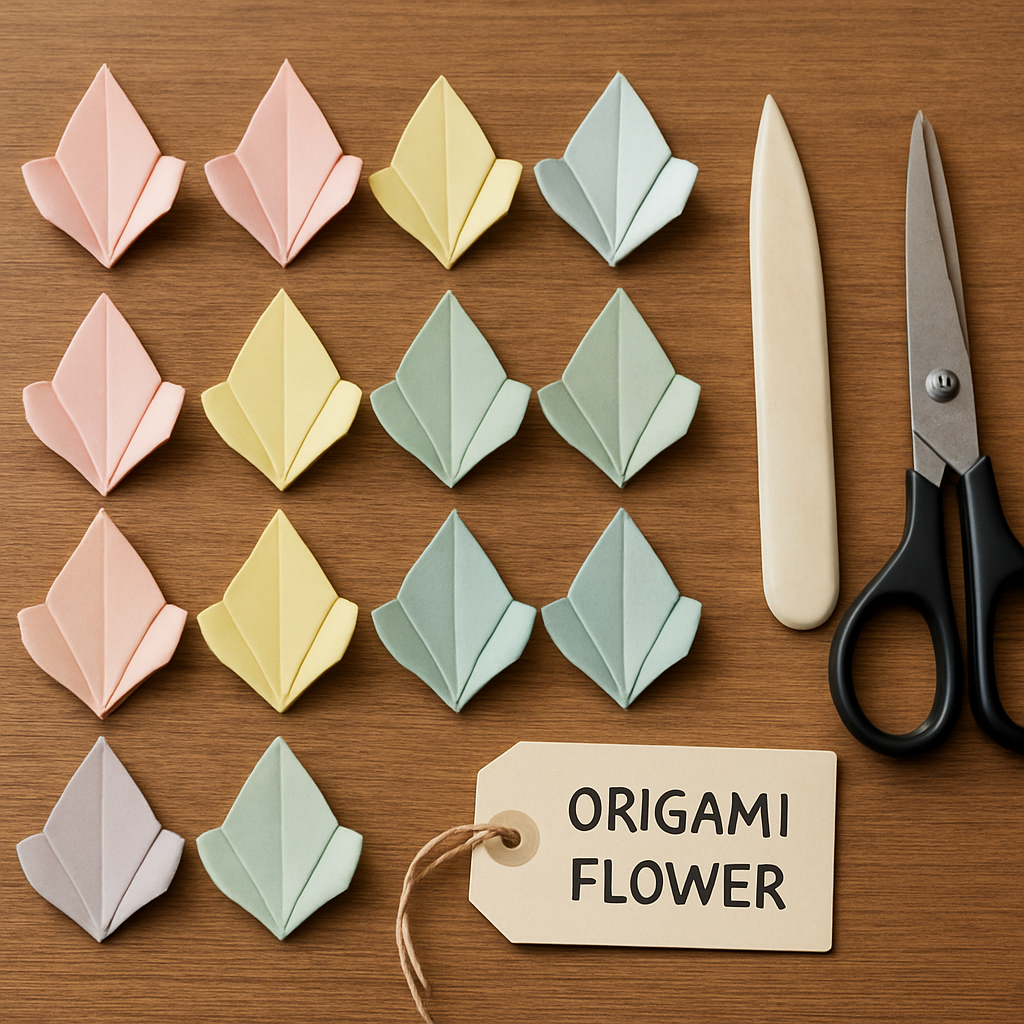
Step 1: Gather Your Materials
Before the first fold, you need a little toolbox that feels more like a craft‑friend’s kitchen pantry than a sterile office supply closet. Grab a stack of medium‑weight square sheets (15‑20 cm is the sweet spot). Too thin and the petals will tear; too thick and they’ll stubbornly stay flat. If you love a pop of color, pick a few contrasting shades—think soft ivory for the base and a bold magenta for the showy blooms.
Next, pull out a bone folder or the edge of a ruler. A gentle pre‑crease makes each line crisp and keeps the paper from springing back. If you don’t have a folder, a clean credit‑card works just fine. Trust me, that little tool is the difference between a floppy wing and a petal that actually stands up.
You’ll also want a sharp pair of scissors, a fine‑point glue stick (or double‑sided tape for a cleaner finish), and a couple of thin wire or thread pieces if you plan to bind the stems together later. For hobbyists who love a finished look, consider adding a printable tag or a tiny instruction card. JiffyPrintOnline offers affordable custom stickers and labels that fit perfectly on a mini envelope.
And because a bouquet looks even prettier when it’s displayed with something extra, think about pairing your paper flowers with a small piece of wall art. A subtle abstract piece can turn a simple desk arrangement into a gallery‑ready vignette. Gratitude Studios has just the kind of landscape prints that complement the delicate colors of origami blooms.
Now that you’ve gathered the basics, it’s time to prep the paper. Lightly run each square through the folder, creasing the edges where the crane base will form. If you’re new to the crane, don’t worry—you’ll see the shape emerge in the next step. For a deeper dive into crane variations and other folds, check out our comprehensive guide Explore the Best Origami Tutorials Online to Master Paper Art. It’s a quick read that clears up the confusion around valley vs. mountain folds.
Once the pre‑creases are in place, set a timer for 15 minutes and practice the classic crane base on one sheet. Feel the paper give under your fingers; that’s the moment where the abstract idea of a flower starts to feel concrete. If a fold slips, don’t panic—just smooth it out with the folder and try again. Repetition builds muscle memory, and before you know it you’ll be shaping petals without even thinking.
Here’s a quick checklist you can print out (or jot on a sticky note):
- Medium‑weight square paper (15‑20 cm)
- Bone folder or ruler edge
- Sharp scissors
- Glue stick or double‑sided tape
- Thin wire or thread for stems
- Optional printed tag from JiffyPrintOnline
When you’ve got everything laid out, give yourself a moment to admire the colors and textures. That pause is part of the creative ritual—let the excitement build before the first fold.
Notice how the video walks you through the base step‑by‑step, pausing at each crease. Press play, pause, and mimic the motion with your own paper. The visual cue helps bridge the gap between reading instructions and feeling the paper in your hands.
After you’ve mastered the base, you’ll be ready to start shaping those wings into petals—think of each wing as a leaf that’s about to bloom. The next section will show you how to turn those simple folds into a full‑size bouquet you can actually hand to a friend.
Step 2: Fold the Base Petal
Alright, you’ve got your square ready and your workspace set. Now it’s time to turn that flat piece of paper into the heart of the bouquet – the base petal.
Why does the base petal matter? Think of it as the anchor that holds the whole arrangement together. If it’s flimsy, the whole flower will flop; if it’s crisp, every other petal will sit nicely on top.
1️⃣ Pre‑crease the center line
Grab your bone folder or the edge of a ruler. Fold the square in half, edge to edge, and crease firmly. You’ll see a diagonal line that runs from one corner to the opposite.
Don’t worry if the crease looks a bit bold – that’s exactly what you want. A solid crease makes the later reverse folds pop out without tearing.
2️⃣ Create the “valley” folds
Unfold the paper. Bring the top corner down to meet the center line you just made, then crease. Do the same with the bottom corner. You now have two small triangles pointing toward the middle.
These valley folds start shaping the petal’s “wings.” If you’re a visual learner, pause the video below and watch the fold in slow motion.
Notice how the paper bends just enough to create a gentle curve. That curve will become the soft edge of the base petal.
3️⃣ Reverse fold for depth
Now, take the outer edges of each triangle and fold them back toward the center line, creating a small “mountain” fold. This reverse fold tucks the paper inside itself, giving the petal a three‑dimensional body.
It feels a bit like tucking a shirt into a belt – a little extra effort, but the result looks much neater.
4️⃣ Secure the shape
If you’re worried about the petal loosening later, a dab of PVA glue on the tiny seam does wonders. The glue dries clear and won’t affect the paper’s flexibility.
For a completely tool‑free option, just press the folded edges together with your fingertip and hold for a few seconds; the crease will hold after a minute or two.
5️⃣ Add a touch of sparkle (optional)
Many of our CreativiU members love to embed a tiny flat‑back pearl or a button at the tip of the base petal. It adds a subtle highlight that catches the eye when the bouquet is displayed.
If you’re curious about wiring tips for attaching stems later, check out this helpful guide from Atelier Ilyere. It walks you through using florist wire and hot glue without compromising the delicate folds.
Remember, the base petal is the foundation for every other layer you’ll add. Take a moment to admire its shape before moving on – a well‑folded base makes the rest of the “origami flower bouquet step by step” process feel almost effortless.
Quick checklist before you advance:
- Diagonal center crease firmly pressed.
- Two valley folds aligned with the center line.
- Reverse mountain folds tucked neatly.
- Optional glue or fingertip hold for security.
- Optional decorative pearl or button at the tip.
When you’ve ticked all the boxes, you’re ready to fold the next petal and start building the blossom. Keep your bone folder handy, stay relaxed, and enjoy the tactile satisfaction of paper coming to life.
Step 3: Shape the Rose Bloom
Now that the base petal is solid, it’s time to give your flower that classic rose silhouette. If you’ve ever wondered why some origami roses look like they could actually sit on a vase, the secret is in the subtle curvature you create at this stage.
1️⃣ Fold the first outer petal
Take a fresh square of paper – same size, same weight as your base. Lay it flat, crease the diagonal center line just like you did before, then unfold. This time, bring the top corner down to meet the center line, but don’t press all the way; leave a tiny gap of about 2‑3 mm. That gap becomes the “bloom gap” that lets the petal open naturally.
Press the fold with a bone folder, then gently pull the outer edges outward. You’ll feel the paper want to spring back – that tension is what gives the rose its roundness.
2️⃣ Create the petal’s curve
Here’s the trick most beginners miss: instead of flattening the whole triangle, roll the tip between your thumb and forefinger. Imagine you’re shaping a tiny leaf in your hand. The roll should be just enough that the tip curls back on itself, forming a soft “U” shape.
For a sharper bloom, use a slightly narrower paper strip (cut the square in half before folding). For a fuller look, keep the full square – the extra material adds volume.
3️⃣ Reinforce with a micro‑crease
Take a ruler edge and lightly crease a line about 4 mm from the outer edge of the petal. This micro‑crease acts like a hidden hinge, allowing the petal to fan out without losing its shape later when you add more layers.
Press firmly, then release. You’ll see the paper snap back into a gentle arch.
4️⃣ Attach to the base
Line the new petal up with the base’s central ridge. The tip of the petal should sit just above the base’s tip – think of it as a tiny cap on a mushroom. Use a dab of PVA glue or a tiny dot of double‑sided tape to hold it in place. If you’re avoiding glue, a quick fingertip press for a few seconds will set the bond as the paper’s memory takes over.
Once it’s secured, gently pull the side edges of the petal outward to create that classic rose “bloom” effect. The paper will resist a little, then settle into a rounded shape.
5️⃣ Repeat – build the layers
Now repeat steps 1‑4 three or four more times, each petal slightly larger than the previous. The key is incremental growth – a tiny difference of 5‑10 mm in paper size per layer makes the flower look natural instead of stacked like a paper tower.
Pro tip: for a more organic look, alternate the direction you roll the tip (clockwise, then counter‑clockwise). It mimics how real rose petals overlap in opposite directions.
Real‑world examples
One hobbyist in our CreativiU community used recycled magazine pages for the outer petals, giving the rose a textured, vintage vibe that sold out at a local art fair. Another creative entrepreneur layered metallic gold paper on the innermost petals, then added a single pearl – the result looked like a high‑end bridal bouquet and fetched a premium price on Etsy.
Parents have also found this step therapeutic: a mother of two folded a set of three roses with her kids after bedtime, and the kids loved the “pop‑out” effect when they gently pulled the petals apart.
Checklist before moving on
- Each outer petal has a gentle roll at the tip.
- Micro‑crease placed 4 mm from the edge.
- Petal attached securely to the base ridge.
- Layer size increases gradually.
- Optional decorative accent (pearl, button) added to innermost petal.
When every item on this list checks out, you’ve earned a rose that feels three‑dimensional and ready for the next stage – adding stems and foliage.
Need more inspiration on how to blend color gradients across petals? Check out our step‑by‑step paper quilling course for ideas on using thin strips to accentuate petal edges without extra glue.
Step 4: Assemble the Bouquet
Now that each individual bloom is ready, it’s time to bring them together into a real‑looking bouquet.
First, lay out all the petals you’ve just crafted. If you’re a hobbyist, you might have a handful of pastel roses; if you’re a creative entrepreneur, you could be mixing metallic gold buds with bold‑colored hyacinths. The key is to see the colors and sizes together before you start binding – it helps you spot gaps and decide which flower goes where.
Gather your finished flowers
Pick a central flower that will act as the focal point. In most bouquets the biggest rose sits in the middle, with smaller buds radiating outward. For a family‑friendly project, let the kids choose the “star” flower – they love the feeling of being in charge.
Arrange the pieces on a clean sheet of wax paper. Rotate each bloom until the stems (the folded “stalk” strips) line up nicely. If you notice a stray petal that looks too flat, gently re‑crease the tip with a bone folder; a tiny extra curve can make the whole cluster feel more three‑dimensional.
Bind the stalks
There are three easy ways to attach the stems, and each works for a different goal.
| Method | Tool Needed | Best For |
|---|---|---|
| Twine knot | Thin cotton twine | Hand‑held bouquets, rustic look |
| Floral wire | 0.3 mm florist wire, pliers | Professional‑grade arrangements, stronger hold |
| Paper tape | Double‑sided paper tape | Quick demos, kids’ projects |
If you’re aiming for a market‑ready product, we usually reach for floral wire because it lets the bouquet stay upright for longer. Cut a length about 15 cm, gather the stems, and wrap the wire tightly around the base. Twist the ends together and trim any excess. For a more relaxed, country‑chic vibe, simply gather the stems and tie them with a piece of twine – a double‑knot works wonders and adds texture.
Don’t forget to leave a little “wiggle room” in the knot. A too‑tight bind can flatten the petals, making the bouquet look flat. A loose knot lets the stems splay naturally, giving each flower its own breathing space.
Add foliage and accents
Foliage isn’t just decorative; it hides the raw ends of the stems and adds depth. Cut thin strips of green paper, fold them into tiny leaves, and tuck them between the outermost roses. If you’re a parent crafting with kids, let the little ones crumple the green strips – the uneven edges feel more organic.
Extra accents like a single pearl, a tiny button, or a dab of glitter can turn a simple bunch into a “gift‑ready” piece. One CreativiU community member reported that adding a single silk ribbon around the twine knot increased perceived value enough to raise the selling price by 20 % on Etsy.
When you’re done, give the whole bundle a gentle shake. The petals should bounce back into place, and the foliage should settle around the base like a natural understory.
Wrap or display your arrangement
Depending on how you plan to show off the bouquet, you have two main options: wrap it in paper or place it in a vase‑like holder.
For a rustic presentation, wrap the entire bundle in kraft paper, leaving a slit at the top for the stems to peek out. Secure the wrap with a piece of twine and a sprig of dried lavender for that farmhouse feel.
If you prefer a modern look, use translucent vellum or even a clear acrylic tube. The transparent wrap lets the colors pop while protecting the delicate folds from dust.
And remember, you don’t have to wrap at all – a simple glass jar or a small ceramic pot works beautifully for a tabletop display. Just fan the stems slightly so the flowers aren’t cramped.
Need more inspiration on how to mix colors or choose wrapping materials? Gathered’s step‑by‑step guide walks you through several bouquet‑building ideas, from rainbow‑bright arrangements to minimalist monochromes.
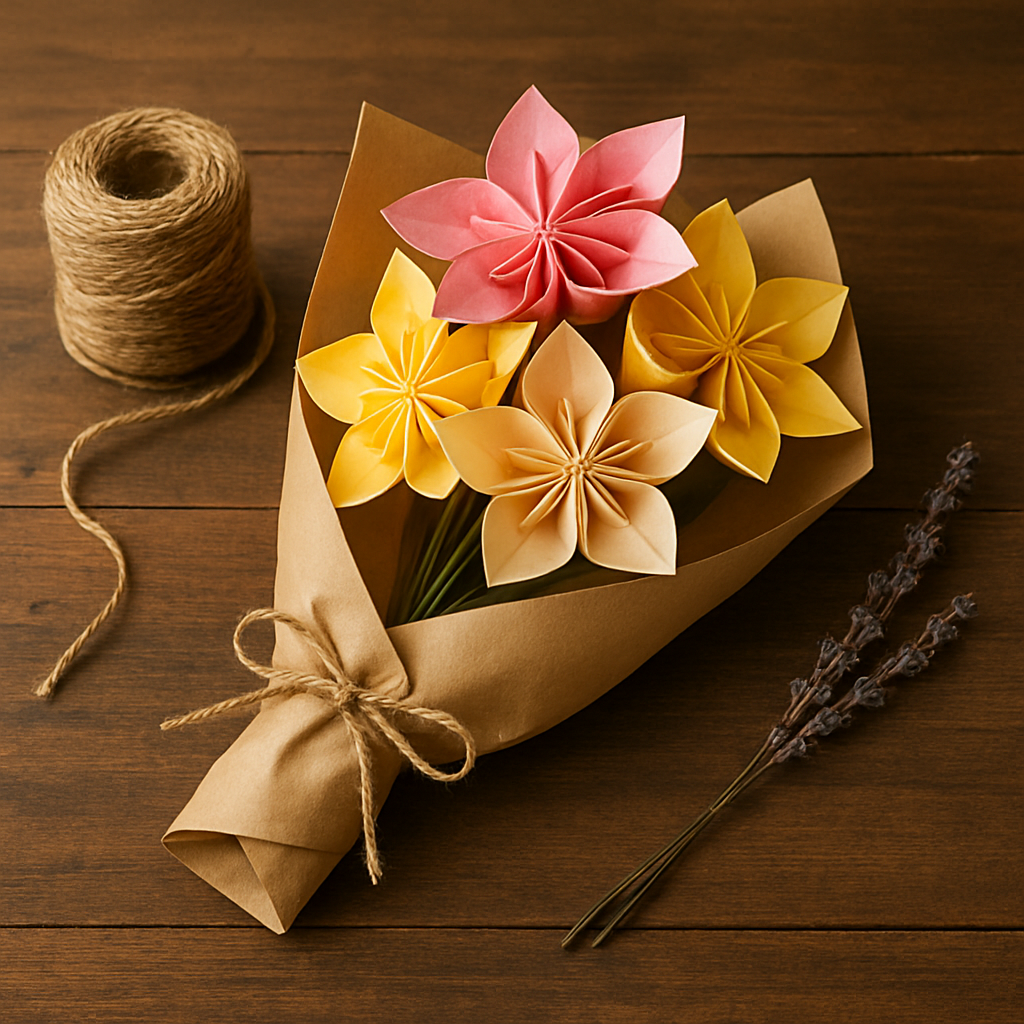
Take a moment to admire your finished bouquet. If the stems feel sturdy and the colors flow, you’ve successfully completed the “origami flower bouquet step by step” process. Now you can gift it, sell it, or simply enjoy the quiet pride of turning a flat sheet into a three‑dimensional bloom.
Step 5: Finishing Touches and Presentation
Now that your bouquet is assembled, the magic really happens in the final polish. This is where you turn a neat stack of paper flowers into a gift‑ready piece that feels as thoughtful as a hand‑picked garden.
First, inspect each bloom. Do the petals lie flat or do they curl a little? A gentle tap with your fingertip can coax stubborn edges back into place. If a petal looks a bit floppy, run the edge of a ruler along the crease – a light press restores that crisp snap we all love.
Next, decide how you want to present the stems. For a rustic vibe, wrap a length of natural cotton twine around the base, leaving a loose knot so the stems can breathe. Slip a sprig of dried lavender or a tiny eucalyptus leaf under the knot for that farmhouse charm. Hobbyists often keep a small stash of dried greenery in their craft box, so it’s an easy add‑on.
If you’re aiming for a sleek, modern look, try a clear acrylic tube or a sheet of translucent vellum. Slide the whole bundle inside, then trim the top so the stems peek out just enough to show off the arrangement. This method protects delicate folds from dust and gives the bouquet a gallery‑ready feel.
Sometimes the simplest presentation wins. A clean glass jar, a ceramic pot, or even a recycled tin can become a minimalist stage. Position the stems so they fan out naturally – you don’t want them cramped, otherwise the petals will look flattened. A quick tip: give the stems a tiny bend before you place them, it creates a relaxed, organic silhouette.
Now think about labeling. A small printed tag with a handwritten note adds personality and signals that you’ve put thought into every detail. In our experience, creators who include a short story about the color palette or the paper source see higher engagement when they sell the bouquet online.
What about protecting the finished work? A light dusting of translucent matte spray (the kind you use for paper crafts) can seal the petals without making them stiff. Just a quick spritz from a distance of about 12 inches, then let it dry for a minute. The result is a subtle shine that catches light nicely, yet the bouquet stays pliable enough to be handled.
Here’s a quick checklist you can run through before you call it done:
- Inspect petal alignment
- Reinforce creases
- Choose presentation method
- Add foliage or accent
- Secure stems with appropriate wrap
- Apply protective spray
- Attach label/tag
And don’t forget the emotional side. Take a moment to hold the bouquet, smell the paper (if you’ve scented it), and picture the reaction of the person who’ll receive it. That pause turns a craft project into a meaningful gift.
Finally, store any leftovers properly. Slide extra flowers into a zip‑top bag with a sheet of wax paper to keep them from sticking together. When you’re ready for the next batch, they’ll be as fresh as the day you folded them.
FAQ
How long does it take to create an origami flower bouquet step by step?
The time you need really depends on how many blooms you want and how comfortable you are with the folds. For a simple three‑flower bundle, most hobbyists finish in about 45‑60 minutes, including cutting, folding, and tying the stems.
If you’re aiming for a larger arrangement or adding decorative accents, budget an extra 20‑30 minutes per flower. The key is to work in short bursts—set a timer for 20 minutes, finish a petal, then pause. That rhythm keeps the paper from getting warm and the folds crisp.
What paper weight works best for an origami flower bouquet?
For a sturdy yet flexible bouquet, aim for paper in the 70‑80 gsm range. This weight holds crisp creases without tearing, and it still bends enough for the petals to curl naturally. If you go lighter than 60 gsm, the edges tend to fray, and if you exceed 100 gsm the folds become stiff and look more like cardboard than flower.
A quick test: grab a scrap, fold a valley crease, and see if it snaps back cleanly. If it feels too rigid, trim it down or choose a lighter stock. Many CreativiU members swear by lightweight cardstock from craft stores because it gives that professional finish without the need for heavy glue.
Can I use colored or patterned paper for my bouquet?
Yes—you can absolutely use colored or patterned sheets, and they’re actually what makes each bouquet feel unique. Choose a palette that matches the occasion: pastels for weddings, bold primaries for kids’ parties, or metallics for a luxe gift. When you mix patterns, keep the scale consistent; a tiny polka‑dot on a large flower can look busy, while a subtle stripe on a small bud adds texture without overwhelming.
A handy tip from our community: print a faint watermark of the flower outline on the back of patterned paper before you cut. It gives you a guide for alignment and prevents the design from shifting during folding. This extra step only adds a minute, but the result looks polished enough to sell on Etsy or give as a personal keepsake.
How do I attach stems without breaking the petals?
The safest way is to reinforce the base petal before you add the stem. Apply a tiny dot of clear‑drying PVA glue where the stem strip meets the petal ridge, then press gently for a few seconds. The glue holds the paper together without adding stiffness, so the petal can still flex when you arrange the bouquet.
If you prefer a tool‑free method, fold a small paper tab on the underside of the stem and tuck it into the petal’s inner crease. The tab acts like a little hinge and distributes pressure evenly, which reduces the chance of a tear. For larger bouquets, many creators use thin florist wire threaded through a pre‑made hole in the stem—just be sure the wire is no thicker than 0.3 mm.
What’s the best way to protect finished origami flowers?
A light spray of matte craft sealant is the go‑to protection for most creators. Hold the bottle about a foot away and give a quick, even mist; the coating locks in color, adds a subtle sheen, and keeps the paper from absorbing moisture. Let it dry for a minute before handling—once dry, the petals stay flexible but are much less prone to accidental creasing.
If you’re packaging bouquets for sale, slip them into a zip‑top bag with a sheet of wax paper between each flower. That barrier prevents them from sticking together during transit. Parents often store leftovers the same way, and you’ll find the flowers look just as fresh after a week as they did when you first folded them.
How can I price an origami flower bouquet for sale?
Start by adding up your material cost—paper, glue, twine, and any decorative accents. For medium‑weight 15 cm squares, you’re looking at roughly $0.30 per sheet. Then factor in your time; most hobbyists charge $1‑$2 per hour of labor. A simple three‑flower bouquet typically takes an hour, so a fair baseline price lands around $5‑$7.
From there, consider the market. If you’re selling on platforms like Etsy, buyers often expect a handcrafted feel, so you can add a small premium for custom colors or personalized tags. Many CreativiU entrepreneurs report that offering a “gift set” (bouquet plus printed card) lets them raise the price by 20‑30 % without extra work.
Are there kid‑friendly variations of the origami flower bouquet?
Kids love the quick‑fold “paper pop‑flower” that skips the crane base entirely. Just fold a square in half diagonally, then fold the two corners to the center line, creating a simple four‑petal bloom. The whole process takes under five minutes, so even a restless child can stay engaged from start to finish.
To keep it safe, use recycled notebook paper instead of heavy cardstock, and replace glue with double‑sided tape. Let the kids add stickers or crayon‑drawn veins for extra personality. When you finish, display the mini bouquets on a fridge door or in a mason jar—instant pride that encourages more creative play.
Conclusion
Wow, you’ve just walked through the entire origami flower bouquet step by step – from picking the right paper to sealing the final stem.
What stuck with you the most? Maybe it was that tiny micro‑crease that makes a petal pop, or the simple trick of using twine to give your bouquet a rustic vibe.
In our experience at CreativiU, the real magic happens when you let the process become a little ritual. A few focused minutes of folding can turn stress into calm, and the finished bouquet becomes a reminder of what you created.
If you’re a hobbyist, try making a batch of three different colors and see how the palette shifts the mood of a room. Creative entrepreneurs, experiment with a gift set – a bouquet plus a printed card – and watch how that extra touch lifts perceived value.
Parents, involve the kids in the quick “pop‑flower” version and let them personalize each bloom with stickers. You’ll get a proud smile and a keepsake they’ll cherish.
So, what’s your next move? Grab a fresh stack of 70‑80 gsm paper, set a timer for 20 minutes, and fold the first base petal. The rest will follow naturally.
Remember, every fold is a step toward confidence – and a beautiful, handmade bouquet to share or sell.
Ready to keep the momentum going? Explore more paper‑craft courses on CreativiU and turn today’s project into tomorrow’s masterpiece.
Leave a Reply