If you’ve ever stared at a stack of loose papers and thought, ‘I wish I could turn these into something I can actually hold and show off,’ you’re not alone. The magic of a hand‑stitched notebook lies in the way the covers open, the texture of the thread, and that satisfying click when you turn the page. That’s exactly what a coptic stitch bookbinding tutorial promises – a way to turn simple sheets into a durable, beautiful book you can be proud of.
But let’s be honest: the first time you try the coptic stitch, the loose loops can feel like a tangled mess of yarn. You might wonder whether you have the right tools, the right paper weight, or even the confidence to finish the spine without it falling apart. I’ve been there, fumbling with a needle that seems to have a mind of its own, while the cover boards wobble.
Good news is, you don’t need years of experience to get a solid binding. All you need is a clear step‑by‑step guide, a couple of basic supplies – strong thread, a needle, and some heavyweight paper – and a willingness to experiment. In this tutorial we’ll walk through each stage: measuring your pages, punching consistent holes, threading the chain, and finally sealing the book so it opens smoothly every time.
Along the way, you’ll pick up handy tricks like how to tension the thread so the spine stays flexible, or how to reinforce the cover without adding bulk. Think of it as learning a new dance: once you get the rhythm, the moves become second nature. And if you ever feel stuck, there’s a whole community of crafters sharing tips and printable templates.
If you’re looking for a place to see these techniques in action and maybe join a live class, check out art classes in Winston Salem where bookbinding sessions are part of the lineup. Seeing the stitch in a classroom setting can demystify the process and give you instant feedback.
So, are you ready to turn a pile of paper into a handcrafted treasure? Grab your thread, set up a tidy workspace, and let’s dive into the coptic stitch together. By the end of this guide you’ll have a finished book you can proudly hand to a friend or keep on your desk as a reminder of what you’ve created.
TL;DR
In this coptic stitch bookbinding tutorial you’ll learn how to measure, punch, thread, and finish a flexible, handcrafted notebook in just a few easy steps.
By the end you’ll have a sturdy, beautiful journal you can proudly share or keep, plus insider tips for smooth spines and professional‑look finishes today.
Step 1: Gather Materials
Alright, before we even think about punching holes or looping thread, we need to line up everything we’ll actually be handling.
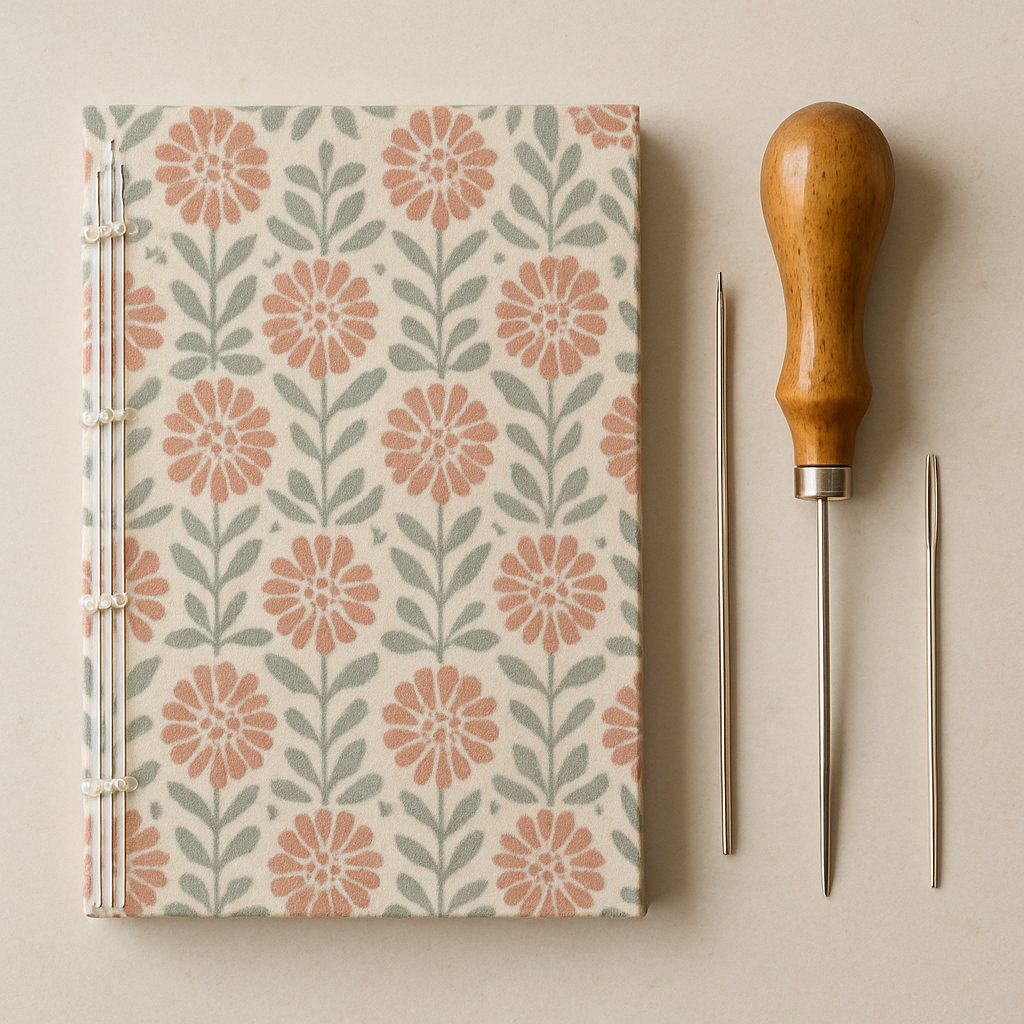
The beauty of a coptic stitch bookbinding tutorial is that you don’t need a workshop full of exotic tools – just a handful of everyday supplies and a couple of specialty items that are easy to snag online or at your local craft store.
Here’s the core checklist we’ll be pulling together:
- Heavy‑weight paper for the pages (120‑200 gsm works well; look for acid‑free, matte‑finished sheets).
- Cover boards – sturdy cardstock or chipboard, about 2‑3 mm thick.
- Strong thread: linen or waxed polyester, roughly 3‑4 mm in diameter.
- A blunt‑tip bookbinding needle (the kind with a large eye).
- A tapered awl for punching clean, consistent holes.
- Bone folder (optional but a lifesaver for crisp folds).
- Metal or clear acrylic ruler, pencil, and a sharp craft knife or scissors.
- Cutting mat to protect your surface.
If you’re buying a ready‑made kit, you’ll find all of these pre‑cut and pre‑measured – see the DIY Coptic Stitch Journal Materials Kit that ships with everything you need Papercraft Panda’s coptic stitch journal kit. The kit even tosses in an awl and bone folder if you don’t already own them.
Let’s talk paper first. You want something that feels solid when you flip a page, but not so thick that the spine gets rigid. A 150 gsm matte cover stock is a happy middle ground; it accepts glue without warping and gives the interior pages a nice heft. If you love a little texture, try a subtle linen finish – it adds a tactile surprise without compromising durability.
Next up, the cover boards. I usually reach for 2 mm chipboard because it bends just enough to hug the spine while still protecting the pages. For a pop of personality, glue a piece of decorative paper or fabric to the board before you start stitching. Remember, the board should be larger than the pages by about 5‑6 mm on each side so the edges don’t peek out when the book is closed.
Thread is the unsung hero of the coptic stitch. Linen gives you a natural look and a bit of give, while waxed polyester slides through holes more easily and resists fraying. Pick a color that either blends with your cover or stands out for a bold contrast – there’s no right or wrong, just what feels right for your project.
The needle matters, too. A blunt‑tip bookbinding needle with a large eye lets you pull the thick thread through without stripping it. If you’re using waxed thread, a slightly curved needle can help you navigate the loops without snagging.
Now, the awl. Press it through the cover board about 3 mm deep – enough to widen the hole for the needle but not so deep that the board tears. A quick test: the needle should glide through with just a whisper of resistance.
Finally, the bone folder. It’s the secret weapon for crisp, clean folds on the front and back cover flaps. Lightly run it along the fold line, and you’ll see the paper snap into place, giving your notebook that professional feel.
Take a moment to lay everything out on your mat, double‑check you have each item, and give yourself a mental high‑five. When every piece is accounted for, you’ll move through the rest of the tutorial with confidence instead of hunting for that missing awl halfway through.

Quick checklist before you start stitching:
- Paper trimmed to your chosen size.
- Cover boards cut slightly larger than the paper.
- Thread measured to at least twice the length of your spine.
- Awl, needle, and bone folder within arm’s reach.
- Ruler and pencil ready for marking hole positions.
Got everything? Great. With the right materials in hand, the rest of the coptic stitch bookbinding tutorial becomes a smooth, enjoyable process. Let’s move on to measuring and punching the holes next.
Step 2: Prepare the Book Block
Now that your supplies are laid out, it’s time to turn those loose sheets into a solid text block – the heart of any coptic stitch book.
1. Fold and stack the pages
Take your trimmed paper stack and fold each sheet in half, hot‑dog style. If you’re making a 6×9‑inch journal, a 150 gsm sheet will give you a nice heft without feeling stiff.
Once all sheets are folded, line them up on your cutting mat. You’ll notice the edges line up like a tiny mountain range – that’s a good sign they’re all the same size.
Feeling unsure about the fold? Press the crease with the bone folder for a crisp line; it prevents the spine from wobbling later.
2. Add endpapers (optional but pro‑level)
Endpapers are the decorative shields that sit between the first/last page and the cover boards. Grab two pieces of slightly lighter paper—maybe a patterned scrap or a thin tissue.
Cut them a little larger than the interior pages (about 5 mm extra on each side). Glue the inner edge to the first and last folded page using a thin wheat paste or PVA glue. Press them flat and let them dry for a few minutes.
Why bother? Endpapers give your notebook a finished look and add a tiny bit of flexibility to the spine, something even seasoned binders swear by (Papercraft Panda explains the role of endpapers in case‑binding).
3. Align and clamp the block
Stack the folded sheets (with endpapers on top and bottom) and gently tap the edges so they sit flush. If any pages are a hair askew, slide a ruler along the side to nudge them straight.
Grab a light clamp or a few heavy books and place them on top of the block. The pressure should be even but not crushing – think “gentle hug”. Let the block sit for 5‑10 minutes; this pre‑compression helps the later stitching stay even.
Pro tip: If you don’t have a clamp, a simple DIY press made from two cutting boards and a rubber band works just fine.
4. Mark the hole positions
Now for the part that makes coptic stitch so flexible: the evenly spaced holes along the spine. Measure the total length of your block (spine width) and decide on a hole spacing – 6 mm is a comfortable default for most journals.
Using a ruler, make faint pencil marks on both the front and back cover boards. Remember, the holes on the front and back will be offset by one half‑spacing so the stitch creates that characteristic “chain” look.
Unsure about spacing? A quick test: lay a thread across the spine; if the loops feel tight, increase spacing by a millimeter.
5. Punch the holes
Here’s where the awl shines. Position the awl on a pencil mark, apply steady pressure, and twist gently. You want a clean, round opening just deep enough for the needle to pass – about 2‑3 mm into the board.
Repeat for every mark on both cover boards. If you’re nervous about consistency, count out the marks twice before you start. Many crafters find that doing the front side first, then flipping the book, keeps the rhythm steady.
Need a visual guide? This short YouTube walkthrough shows the awl technique in real time (awling holes for coptic stitch).
6. Quick sanity check
Before you thread, run a needle through a couple of freshly punched holes. It should glide without catching. If you feel resistance, enlarge the hole just a touch with the awl.
Finally, give yourself a quick high‑five. Your book block is now a sturdy, ready‑to‑stitch foundation – the same kind of foundation you’d find in a professional workshop, but assembled at your kitchen table.
Next up, we’ll thread the spine and bring that beautiful chain stitch to life.
Step 3: Create the Coptic Stitch Cover
Now that the book block is punched and ready, it’s time to give it a face – the cover that will protect your pages and showcase your style.
Pick your cover material
Most coptic stitch books use a sturdy board about 2‑3 mm thick. If you love a sleek look, cut a piece of chipboard a little larger than your pages – about 5‑6 mm on each side so the edges stay hidden when the book is closed.
Feeling crafty? Wrap the board in decorative paper, fabric, or even leather. Just make sure whatever you choose can be pierced by the awl; a thin cotton cloth works fine, while thick leather might need a sharper tip.
Mark the cover holes
Take the same spacing you used for the book block – we settled on 6 mm in the last step – and transfer those marks onto the front and back cover boards. A quick trick: flip the front board over, align the ruler with the edge, and draw a faint line with a pencil. Then use a small nail or the awl tip to make tiny indentation marks; they’ll guide your awl and keep the holes perfectly aligned.
If you’re nervous about symmetry, tape the two boards together edge‑to‑edge and poke both sides at once. You’ll end up with a mirror image that makes the chain stitch sit nicely across the spine.
Punch the cover holes
Grab the awl and press it into each pencil mark, twisting gently until you’ve made a clean 2‑3 mm deep hole. You want the hole just big enough for the needle to slide through without wobbling – a snug fit keeps the stitch tight and the cover from wobbling.
Run a needle through a couple of fresh holes to double‑check the fit. If the thread catches, widen the hole ever so slightly with the awl’s tip. This is the same sanity check we did for the book block earlier, and it saves frustration later on.
Secure the covers to the block
Thread your needle with the same linen or waxed polyester you used for the spine. Starting at the bottom hole of the front cover, pull the thread through, then loop it around the first signature’s hole, creating a simple knot. Continue this “attach‑then‑stitch” pattern all the way up the spine, alternating between front and back cover holes. The result is the classic chain‑link look that defines a coptic stitch.
Don’t worry if the first few loops feel loose – the tension will even out as you work toward the top. A helpful tip is to keep a gentle tug on the thread as you pass each hole; that little bit of pressure prevents the stitch from sagging later.
Finish the edges
Once you’ve sewn the last hole on the back cover, tie off the thread with a sturdy knot and trim any excess. If you want a polished look, use a bone folder to crease the cover flaps and press them flat. A quick dab of glue on the very edge can keep the flap from lifting over time, but it’s optional.
Give the whole book a gentle shake – the spine should flex smoothly, and the cover should stay firmly attached. If something feels stiff, loosen the knot a touch and retest the movement.
And there you have it: a fully assembled coptic stitch cover that not only looks great but also holds up to daily use.
For a deeper dive into the history behind the coptic binding method and why the exposed spine works so well, check out this overview from Papercraft Panda.Papercraft Panda’s Coptic binding guide provides excellent context.
If you need a visual walk‑through of punching cover holes and sewing the first stitch, the YouTube tutorial we referenced earlier walks you through each motion in real time.Coptic stitch cover creation video
Step 4: Attach the Covers with Coptic Stitch
Now that your cover boards are punched and ready, it’s time to actually sew them onto the book block. This is the moment the spine starts to look like a living chain, and you’ll feel the satisfaction of seeing everything hold together.
First, thread your needle with a strong, waxed linen thread. Crawford’s 3‑ply waxed linen is a favorite among coptic binders because it’s thick enough to support the spine yet still slides through the holes without dragging (Crawford’s 3‑ply waxed linen thread recommendation).
Step‑by‑step attachment
1. Start at the bottom front hole. Pull the thread through, leaving a short tail that you’ll later knot.
2. Loop around the corresponding hole in the first signature. You’ll see a tiny loop form on the inside of the spine – that’s your anchor.
3. Cross over to the back cover. Bring the needle up through the bottom back hole, then back down into the same signature hole you just used. This creates the first “chain link.”
4. Repeat up the spine. Continue alternating front‑cover, signature, back‑cover, signature… all the way to the top. Keep the tension gentle; the thread should be snug but the spine must still flex.
5. Finish with a knot. When you reach the top front hole, tie a secure knot with the tail you left at the start. Trim any excess thread.
Does it feel a little wobbly? That’s normal. A tiny adjustment in tension—either a bit more pull on the next stitch or a micro‑slack on the previous one—usually smooths it out.
Tips for a smooth stitch
• Mind your tension. Too tight and the book won’t open; too loose and the covers will flap. Think of it like a guitar string: enough tension to stay in tune, but not so much it snaps.
• Use a blunt‑tip needle. The large eye lets the thick thread pass easily, and the blunt tip reduces the chance of tearing the cover paper.
• Keep the thread path short. After each stitch, pull the thread just enough to lay flat against the spine. Long tails create loops that look messy and can catch on the next hole.
• Check alignment often. Every few stitches, give the book a gentle shake. The spine should flex like a hinge; if you hear a squeak, you probably have a hole that’s off‑center.
What about decorative flair? Because the stitch is exposed, you can play with color contrast. A bright thread against a neutral cover makes the chain pop, while a matching thread gives a subtle, minimalist vibe.
Quick checklist before you start
- Thread: Crawford 3‑ply waxed linen (or similar strong linen)
- Needle: blunt‑tip bookbinding needle, size large enough for thread
- Awl: still handy for any touch‑up holes
- Scissors: to trim tail
- Bone folder: to press cover flaps after stitching
| Item | Purpose | Pro tip |
|---|---|---|
| Waxed linen thread | Provides strength & flexibility for the exposed spine | 3‑ply gives visible stitch without bulk |
| Blunt‑tip needle | Feeds thick thread smoothly through holes | Large eye prevents fraying |
| Awl | Ensures clean, consistent holes | Widen slightly if needle catches |
Once you’ve tied off the final knot, give the whole book a gentle shake again. The spine should bend easily, and the covers should stay firmly attached. If a flap lifts, a dab of glue on the edge will hold it in place, but most of the time the stitch alone does the job.
And there you have it – the covers are now permanently linked to the block, ready for daily use, sketching, or journaling. You’ve just turned a handful of sheets and boards into a functional, beautiful notebook that you can proudly call your own.
Step 5: Finishing Touches and Care
Alright, you’ve just sewn the last knot and the spine is flexing like a well‑trained gymnast. Before you proudly display your new journal, let’s give it a few final love‑checks so it stays beautiful for years.
Trim and tuck the excess thread
First, grab a sharp pair of scissors. Snip the tail close to the knot, but leave a millimetre or two so you can hide it inside the next loop.
Now, pull that tiny bit of thread through the adjacent stitch and press it flat with your fingertip. It disappears like a secret, and you won’t see any bulky knots ruining the clean look.
Does that feel a bit fussy? Think of it as tucking a loose shoelace so you don’t trip later – a small effort now saves a big annoyance later.
Press and shape the spine
Next, give the whole book a gentle press. Place it on a flat surface, open it to about 45 degrees, and run a bone folder along the crease of each cover flap.
Close the book and lay a clean, heavy book or a small stack on top for a minute or two. The weight helps the spine settle into its final curve without warping.
What if you don’t have a bone folder? A smooth ruler or even the edge of a credit card works just fine – the idea is to smooth the paper, not to crush it.
Seal the edges (optional but nice)
If you notice the very edge of a cover board lifting a hair, a dab of PVA glue or a tiny brush of clear‑drying craft glue will keep it in place. You don’t need a lot – a micro‑dot is enough.
Let the glue dry for five minutes, then give the book one more shake. The covers should sit snugly against the block, and the stitch will stay the star of the show.
Protect your notebook from everyday wear
Consider adding a thin layer of waxed paper or a homemade leatherette sleeve on the outside. It adds a protective barrier against spills and scratches without hiding the exposed coptic stitch.
Or, if you love a natural look, just wipe the cover gently with a dry cloth every few weeks. Dust is the biggest enemy of any handmade piece.
Do you ever wonder how some notebooks look brand‑new years later? The secret is often a simple habit of cleaning and storing them flat, not stacked haphazardly.
Regular care routine
Here’s a quick checklist you can keep on your desk:
- After each use, close the book gently – don’t slam it.
- Every month, open the spine fully and flex it a few times to keep the thread supple.
- Wipe away dust with a soft, lint‑free cloth.
- If the thread starts to look stiff, lightly rub a touch of leather conditioner on the exposed stitches; it re‑hydrates the fibers.
Sounds doable, right? It only takes a minute or two, and you’ll notice the difference the next time you flip a page.
Show it off or share it
Now that your coptic stitch bookbinding tutorial has produced a finished piece, think about where it lives. A dedicated shelf, a coffee‑table display, or even gifting it to a friend adds extra meaning.
And if you ever want to dive deeper, CreativiU’s library of advanced binding courses can show you how to add decorative endpapers, leather covers, or even metal hinges – all without ever leaving your kitchen table.
So, what’s the next step? Grab your notebook, give it that final press, and start filling the pages with ideas, sketches, or the story you’ve been meaning to write. Your coptic stitch masterpiece is ready to travel with you.
Step 6: Troubleshooting Common Issues
So you’ve just finished stitching and the spine looks great—until you notice a snag.
Don’t panic. Every coptic stitch bookbinding tutorial hits a few hiccups along the way, and most of them are easy fixes once you know what to look for.
Loose or wobbly covers
If the front or back board flaps wobble when you open the book, the most common culprit is uneven tension.
Grab the thread near the problem area and give it a gentle tug. Too tight? Loosen the adjacent stitch just enough to let the cover settle.
Another quick trick: run a bone folder along the cover edge while you hold the book closed. The pressure helps the board hug the spine more firmly.
Stitch gaps or missed holes
Ever pull the needle through a hole and feel a blank space where a loop should be? That usually means a hole was missed or the awl didn’t go deep enough.
Flip the book over, locate the gap, and carefully enlarge the offending hole with the awl—just a hair deeper than the board thickness.
For a visual reminder of proper hole depth, check out Misty’s mini coptic binding guide, which shows the sweet spot for a clean pass.
Thread fraying or breaking
Waxed linen is strong, but if the thread starts to fray at the needle eye, you’re probably pulling too hard or using a needle that’s too sharp.
Switch to a blunt‑tip bookbinding needle and let the thread glide. If it still snaps, trim the end and re‑thread—sometimes a fresh tail eliminates a weak spot.
Spine feels too stiff
A stiff spine can make the book refuse to open flat. The usual suspects are overtight stitches or insufficient spacing between sewing stations.
Count your holes: 6 mm spacing works for most sizes, but if you’re using a very thin block, add a millimeter or two.
Gently loosen the top few stitches, then re‑tighten them with a softer pull. The spine should have a subtle give, like a well‑tuned guitar string.
Cover boards cracking
Thin chipboard can split if the awl is angled too sharply or if you force the needle through a hole that’s too small.
When you notice a hairline crack, sand it lightly with fine grit sandpaper, then reinforce the edge with a dab of PVA glue. The glue dries clear and keeps the board from propagating the crack.
Common troubleshooting checklist
- Verify hole depth (2‑3 mm) and diameter – needle should slide without resistance.
- Check thread tension every five stitches; adjust as needed.
- Run a needle through a couple of fresh holes before you start the next section.
- Keep a spare piece of thread handy for quick repairs.
- After stitching, flex the spine gently a few times to settle the stitches.
When everything still feels off
Sometimes the issue isn’t a single stitch but the whole workflow. Take a step back, lay the book block flat, and compare it to the original template you marked.
If the block is slightly misaligned, use a ruler to nudge the pages back into line before you resume sewing. A straight block makes the chain stitch sit evenly.
And remember, the coptic stitch is forgiving. You can always “re‑stitch” a section by pulling the thread out, repositioning the covers, and starting that segment again. It’s a bit like erasing a line in a sketch—nothing permanent, just a chance to improve.
Need a visual refresher?
If you’re stuck on a particular step, the coptic stitch troubleshooting video walks through each problem with close‑up shots and slow‑motion re‑threads.
Take a breath, try one of the fixes above, and you’ll have a flexible, beautiful notebook ready to fill with ideas.
FAQ
What exactly is a coptic stitch bookbinding tutorial and why should I try it?
In a nutshell, it’s a step‑by‑step guide that walks you through making a notebook where the spine is sewn with an exposed chain‑link stitch. The beauty of the coptic stitch is that the spine stays flexible enough to lay flat, yet sturdy enough to hold dozens of pages. If you love hands‑on projects that feel like a tiny piece of art you can actually use, this tutorial gives you a satisfying blend of craft and function.
Do I need special tools or can I use what I already have at home?
You don’t need a full workshop. A blunt‑tip bookbinding needle, a sturdy awl or even a thick nail, some heavyweight paper, and a piece of chipboard or thick cardstock are enough. A ruler, pencil, and a pair of scissors finish the basics. If you’re missing a bone folder, the edge of a credit card works just as well for crisp folds. The tutorial points out the exact sizes so you can buy the cheapest versions online or repurpose supplies you already own.
How do I choose the right thread for the coptic stitch?
Thread is the hero of the whole process. Linen gives a natural, slightly matte look and a bit of give, while waxed polyester slides through the holes more easily and resists fraying. Aim for a thickness of about 3‑4 mm – thick enough to hold the spine but thin enough to stay flexible. Pick a color that either blends with your cover for a subtle look or pops out for a decorative contrast; both approaches work beautifully.
What’s the best hole spacing for a notebook that’s around 6 × 9 inches?
Most crafters find a 6 mm center‑to‑center spacing works well for that size. It creates a neat chain‑link pattern without crowding the thread. If your pages are thinner than 150 gsm, you can add a millimeter or two for extra flexibility. The tutorial even suggests a quick test: run a piece of thread across the spine before you start stitching – if the loops feel tight, widen the spacing a touch.
My spine feels too stiff after I finish stitching – what can I do?
Stiffness usually means the stitches are too tight or the hole spacing is too close. Gently loosen the top few stitches, then re‑tighten them with a softer pull. You can also add a millimeter to the spacing on the next project. After you adjust, flex the spine a few times; the thread should give a little, like a well‑tuned guitar string, and the covers will open smoothly.
How can I fix a missed hole without ripping the cover?
If you discover a gap, grab the awl and carefully enlarge the offending hole just enough for the needle to glide – usually a hair deeper than the board thickness. A quick tip is to run a needle through a fresh hole first; if it catches, you know you need a tiny bit more clearance. Once the hole is the right size, re‑thread that segment and continue the chain stitch; the repair is almost invisible.
What maintenance does a finished coptic‑stitched notebook need?
Treat it like a cherished notebook you’d keep on a coffee table. After each use, close it gently – no slamming. Every month, open the spine fully and flex it a few times to keep the thread supple. Dust the cover with a soft lint‑free cloth, and if the exposed stitches start to look dry, a dab of leather conditioner can re‑hydrate the fibers. Store it flat rather than stacked to avoid warping, and it’ll stay flexible for years.
Conclusion
We’ve walked through every twist of the coptic stitch bookbinding tutorial, from prepping the block to polishing the final cover.
By now you probably feel the same mix of excitement and slight nervousness you get before opening a fresh notebook – that moment when you realize you’ve built something that’ll hold your ideas for years.
If a stitch feels tight, remember to loosen it a touch; if a hole seems shallow, give the awl a gentle extra press. Small tweaks keep the spine flexible, just like a well‑tuned guitar string.
So, what’s the next step? Grab your finished journal, give it a satisfying flip, and start filling the pages. Whether you’re sketching, journaling, or planning a new project, that exposed chain stitch becomes a reminder of the care you put into every page.
Want to keep the momentum going? CreativiU’s library of craft courses can help you explore advanced bindings, decorative endpapers, or even leather covers – all designed to level up the skills you just practiced.
Take a minute each month to flex the spine and dust the cover; those tiny habits will let your notebook age gracefully, just like a trusted companion.
Enjoy the journey, keep stitching, and let each new creation inspire the next.
Leave a Reply