Want to learn about our magic fabric (we call it MABRIC) and how to get it free with one year of unlimited free classes? Learn more here
When you fall in love with sewing, your sewing machine quickly becomes a treasured possession.
Add to this the financial investment you made in it, and its potential to help you create some beautiful projects, and you’ll really want to look after it.
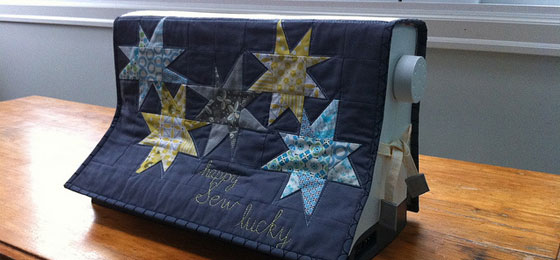
Making your own cover for your sewing machine allows you to keep it out and ready-to-use, while protecting it from dust, and it is the perfect opportunity to show off your creativity.
I hope this post will inspire you, and give you some ideas for designing and making your own sewing machine cover.

I’ll look at two different designs for covers, ones that have ties at the sides as seen in the picture above, and others that cover the machine completely.
1. Reversible sewing machine cover
This is perfect if you want the option of two different patterns, designs, or colors from just one cover. Choose your fabrics carefully and you’ll have a completely different look to each side. You can use padding or textured fabrics if you like, to make the cover thicker.
The only thing the two sides will share is the bias binding. It’ll be visible around the edges on each side.
Supplies
You can check out my earlier quilting posts for more information about supplies, but here are some basics you’ll need for this project:
- Fabrics
- Ribbon (optional)
- Bias binding (optional)
- Tape measure
- Pins
- Threads
- Scissors
- Rotary cutter
- Sewing machine
- Cutting mat
- Ruler
- Iron
Measuring your sewing machine
If you’re using a design like the one in the picture above, taking the measurements for the cover is a simple step.
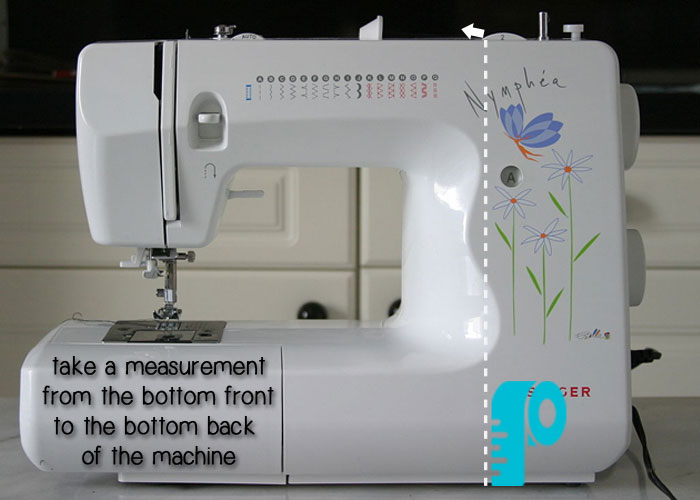
To determine the length your fabric needs to be, measure from the bottom of the front of your machine, all the way over the top, to the bottom of the back, as shown in the picture below.

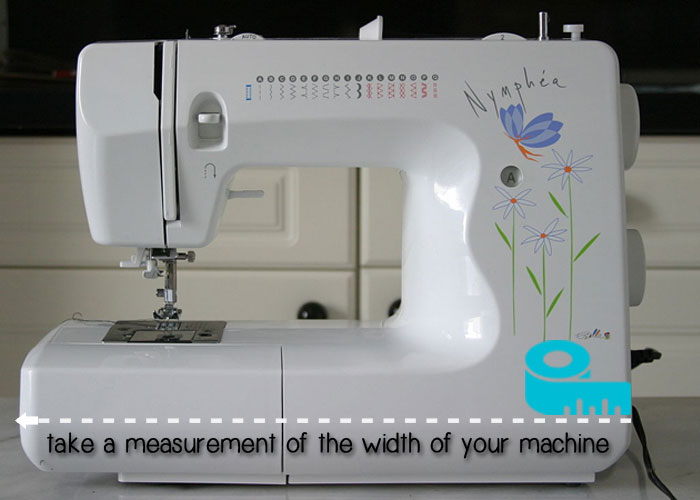
To measure the width, simply use your tape measure to measure from one side to the other (as shown in the picture below).

Cutting the fabric
Next, it’s time to cut your fabrics, ideally using a rotary cutter, cutting mat, and ruler.
You will need to add 1″ to the measurements you have made:
- For example, if your machine measures 17″ x 29″, you will need to cut two pieces of fabric measuring 18″ x 30″. One piece for each side of the cover.
You can use any remaining fabric to make the ties for the sides of the cover. Or you can make them with ribbons.
Stitching the sewing machine cover
- Put the “wrong” sides of your fabrics together, fold the edges to the inside, and iron the edges so that they stay in place, making them easier to sew.
- Insert your (prepared) ties or ribbons, and secure them with pins, so that they are inside the two layers of fabrics making the cover.
- Sew around the two pieces, with the ties in place.
And there you have it – a decorative and reversible cover for your machine.
2. Sewing machine cover with pocket
Here is a design for a lined cover, which includes a storage pocket. It is a little more advanced, and this one will completely cover your sewing machine.
Measuring your sewing machine
- Begin as before by measuring the width of your machine
- Next measure the height, from top to bottom
- And lastly, measure the depth of your machine at its widest point
- Write down each of these measurements

Remember to add the extra inch to the measurements you make. For example, if your machine’s measurements with the added 1″ are:
- Width: 18″
- Depth: 9″
- Height: 12″
Cut your fabrics (and foam stabilizer if you are using it) for the outside of the cover to these measurements.
You will need the following:
- Two pieces – one for the front and one for the back
- Two pieces for the sides
- One piece for the top
(It’s a bit like building a box around your machine.)
For extra effect, you can make the four vertical sides using the same fabric, and use a contrasting fabric for the top.
The pockets
To cut out the pockets, follow these steps:
- Cut a further four pieces using contrasting fabrics for the pockets
- Use the same width measurement as you used for the front and back
- And half the height measurement
- So, in our example the pockets will be 18″ width by 6″ high
- And cut two pieces of bias tape to trim.
Line the fabrics for the pockets––use two of the four pieces for this, or alternatively you can use woven cotton––and add lace bias tape across the top.
- Pin the pocket in place on the front of the cover.
- Stitch the pocket in place.
- Repeat this process with the back of the cover.
(If you want to make smaller pockets inside, you can divide your pocket pieces into smaller compartments.)
Putting it all together
And now to put it all together, starting with the sides:
- Use specialist adhesive spray for fabrics, to hold the fabric and foam in place.
(Remember at this point to have the pieces facing the “wrong” side outwards. We will turn them round the right way once they are stitched together.)
- Pin the right-side edge of the front piece to the edge of the side piece, and sew them together.
- Now do the same with the other sides until you have an open rectangle.
- Turn it the right way out and top stitch the edges to help keep the rectangle shape (keep these stitches as close as you can to the seam).
- Do this on all four sides.
Now for the top:
- Secure the fabric to the foam with adhesive spray.
- Turn your cover inside out again.
- Take your corner pieces and clip them, and then clip along one of the sides (Wonder Clips are super handy for this if you have them).
- Stitch along the side being careful to remove the clips as you approach them.
- When you get to the end of the side, and while the needle is down, turn to the other side (the short side), line up the edges, and sew.
- When you reach the other corner, keeping the needle down, turn the cover, line up the edges of the other long side, clip again and sew.
- When you reach the other corner, repeat the process until you finish all the corners.
- Turn it back the right way again.
The lining
The separate lining (which will be later stitched to the cover) is made in a similar way––creating a second “box” shape. Since the cover is smaller than the original measurements (because of the seams), you will need to make the lining seam allowances slightly bigger, by about 1/8″. This creates a slightly smaller “box” or lining to fit snugly inside the cover.
You will also need to leave a gap at the top, so that you can turn the cover the right way round once you have finished sewing the lining to the cover.
With the lining on the wrong side:
- Pop it over the top of the cover (the cover will be on the right side). Line up the bottom edges of the cover and the lining, and pin them together.
- Sew around the edges, stitching the lining and the cover together.
- Continue until you have all four sides completed.
- When you reach the beginning, leave a gap and turn it all the right side out.
- To close the gap left in the lining, fold the edges inside, and stitch in place by hand.
- Then using your machine, sew over the seams at the bottom, and finish by hand making small stitches in every corner, to fix the lining to the top.
And congratulations! You will have made a wonderful cover for your sewing machine, fully lined, with a handy pocket, and made to last.
A personalized, bespoke sewing machine cover would also make a fantastic gift for someone who loves sewing too.
I would love to hear from you, have you ever made a cover for a sewing machine? Let me know how you got on in the comments below.
Want to learn about our magic fabric (we call it MABRIC) and how to get it free with one year of unlimited free classes? Learn more here
I made one years ago however will try to make this one with the stars ⭐️
I can’t wait to try this. I have never made one before.
I have made a whole machine’s, reversible color. I am pretty good at sewing but I rushed to get finished just so I could get it covered.
Sincerely
This is such a neat idea. Good presents for a seamstress or quilter.
Love this pattern for sewing mschine cover. Definitely will make one, and reversible too! How clever. Thanks for sharing.