Ever stared at a skein of yarn and felt like the next project might as well be rocket science? You’re not alone. The first granny square can feel like a tiny maze, but once you see the pattern click, it’s like finding the perfect coffee shop on a rainy morning.
Most beginners get tripped up by the very first chain‑round: they either over‑chain or lose tension and end up with a lopsided square. That frustration is exactly what we see in our CreativiU community—people who love the idea of a cozy blanket but end up tangled in yarn.
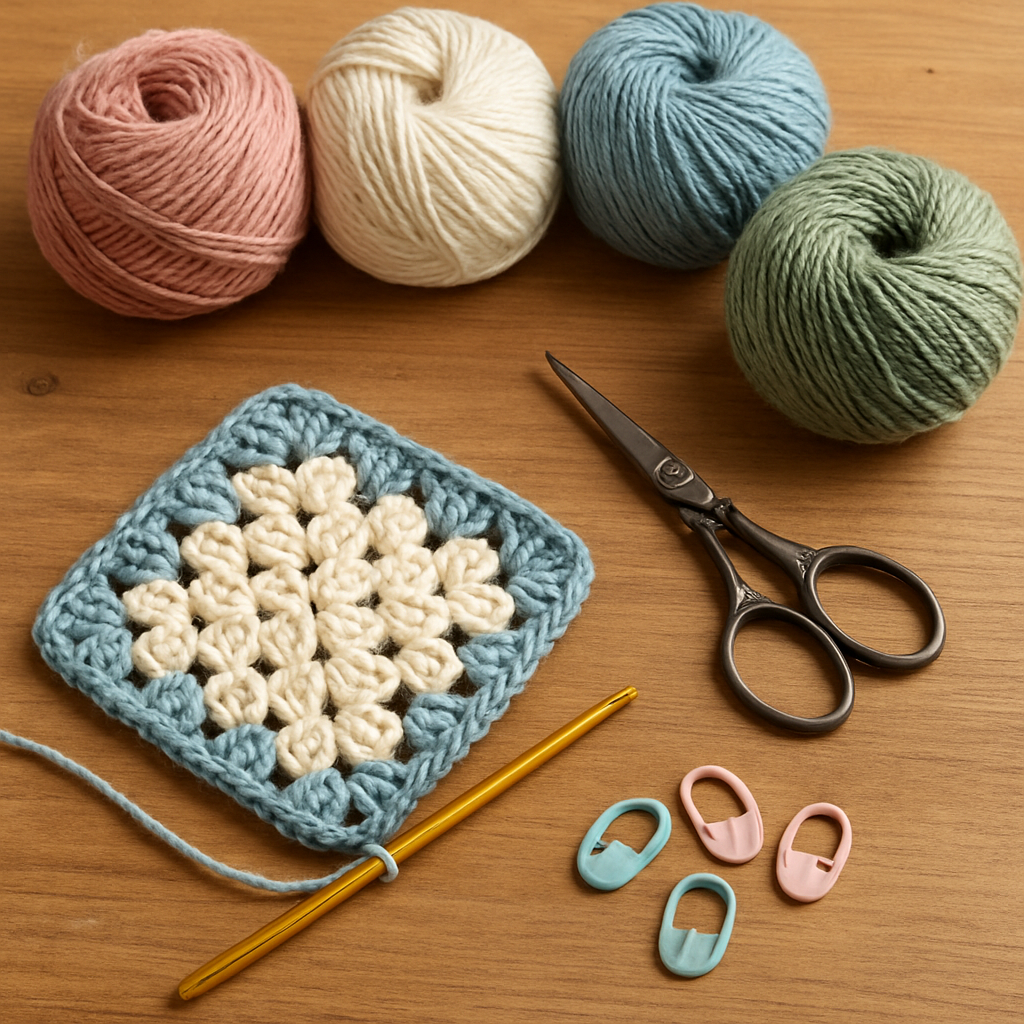
Here’s the good news: you only need three tools—a medium‑weight acrylic yarn, a size 5 (3.75 mm) crochet hook, and a pair of sharp scissors. If you’re not sure which yarn to pick, check out our How to Crochet a Granny Square for Beginners: Step‑by‑Step Guide that walks you through choosing the right weight and color palette.
Start by making a slip knot, then chain four and join with a slip stitch to form a tiny ring. Work three double crochets into the ring, chain two, and repeat three more times. When you pull the ring tight, you’ll see a neat little “+” shape—your first round is done. I tried this with my 8‑year‑old niece, and she proudly showed off her square like it was a trophy.
A common tip is to count your stitches on each side before you begin the next round. Write the numbers down—4, 12, 20, 28—so you can see your progress at a glance. Once you’ve mastered a few squares, consider turning them into a wall hanging. Pairing a crochet square with a custom painted canvas from Gratitude Studios creates a unique art piece that blends texture and color.
Actionable next steps: 1) Gather your yarn, hook, and scissors. 2) Follow the chain‑ring method described above. 3) Complete three rounds, checking stitch counts each time. 4) Block the finished squares with a gentle steam to even out the edges. 5) Start arranging them into a pattern—maybe a classic afghan or a modern patchwork quilt. With each square you finish, confidence builds, and before you know it you’re ready to tackle bigger projects.
TL;DR
Learn how to crochet granny square for beginners, mastering the chain‑ring start, stitch counts, and simple finishing tips that turn yarn into a project.
We’ll guide you step‑by‑step, so you can confidently finish three rounds, block your squares, and start arranging them into blankets or wall art easily without frustration.
Step 1: Gather Materials
Alright, before the first stitch even touches the hook, you’ve got to round up the right supplies – that’s what makes the difference between a smooth start and a tangled mess.
If you’re a busy parent squeezing crochet into nap time, or a creative entrepreneur planning a product line, the basics stay the same: yarn, hook, and a few handy tools.
Yarn: Choose the Right Weight and Color
For beginners, a medium‑weight (worsted or DK) yarn is the sweet spot – it’s thick enough to see your stitches clearly, but not so bulky that the square turns into a chunky pillow. A 4‑mm (size 5 US) hook usually pairs perfectly.
When you’re hunting for colour, think of the project’s vibe. Soft neutrals work great for a calming afghan, while bright primaries add a pop‑art feel. If you need some guidance, check out this roundup of the best yarns for granny squares – it breaks down stitch definition, washability, and how the yarn behaves in a square.
One tip we’ve seen work time and again in the CreativiU community: buy a small skein of two or three colours you love, knit a quick swatch, and see how the yarn drapes before committing to a full project.
After you’ve picked your yarn, give it a gentle stretch before you start – that helps the fibers settle and reduces surprise shrinkage after washing.
Hook: Size Matters
A size 5 (3.75 mm) aluminium hook is a reliable workhorse for most acrylic or cotton blends. If you’re using a finer yarn like the #2 Minikins mentioned in the Elise Rose guide, you might drop down to a 3.5 mm hook to keep the stitches tight.
Don’t feel compelled to collect every hook size on the market. As the essential crochet equipment guide points out, a single 4 mm hook covers the majority of beginner projects and saves you from decision‑fatigue.
Tools: Scissors, Stitch Markers, and a Tapestry Needle
A sharp pair of small scissors makes cutting yarn cleanly a breeze – no jagged ends to snag on the next round.
Stitch markers are tiny lifesavers. Slip one onto the hook after you finish a round; when you come back around you’ll know exactly where the side of the square starts.
Finally, a tapestry needle (or a large blunt‑ended needle) will help you weave in the yarn tails so your finished square looks polished, not frayed.
Here’s a quick checklist you can print or keep on your phone:
- Medium‑weight yarn (worsted/DK) in your chosen colour palette
- Size 5 (3.75 mm) aluminium crochet hook (or 4 mm if you prefer US sizing)
- Sharp scissors
- Two or three stitch markers
- Tapestry needle for weaving in ends
Once everything’s laid out, take a moment to feel the yarn, test the hook, and imagine the square you’re about to create. That tiny pause turns “I’m not sure where to start” into “I’m ready to crochet”. Let’s get those materials ready and move on to the next step – the chain‑ring that kicks off the whole granny square.
Step 2: Make the Foundation Chain
Alright, now that you’ve gathered everything, it’s time to lay the groundwork – the foundation chain that will hold your granny square together. Think of it as the first line of a song; if it’s solid, the whole melody feels right.
Start with a simple slip knot. It sounds boring, but trust me, a snug slip knot prevents the chain from slipping loose later. Pull the loop tight enough that it doesn’t flatten, but loose enough to slide the hook through without wrestling.
Next, yarn over and pull through to make your first chain stitch. Keep going until you have four chains. If you’re counting out loud, you’ll notice the rhythm: “one, two, three, four” – that’s the magic number that creates a perfect little ring.
Now, join the four chains with a slip stitch into the first chain. You’ll see a tiny loop forming; that’s your chain‑ring, the core of every granny square. Pull the slip stitch gently to close the ring – it should look like a neat little “+” when you’re done.
Why does tension matter here? If you chain too tightly, the ring will be too small and the first round will look puckered. Too loose, and the square will stretch and become wobbly. A good rule of thumb is to aim for a chain that feels slightly springy, like a fresh rubber band.
Quick tip: before you start the first round, count your chains twice. If you end up with five or three, you’ve just added an extra stitch or missed one – both can throw off the whole pattern. Write the number down on a sticky note; it’s a habit seasoned crocheters swear by.
Real‑world example: Maya, a stay‑at‑home mom, uses the foundation chain to kick‑start a series of baby blankets for her twins. She says the consistent four‑chain ring saved her hours of re‑doing squares because every piece lined up perfectly when she sewed them together.
If you find the ring collapsing as you work the first round, try this: re‑make the slip knot a little looser, then re‑chain four. It’s easier to adjust at this stage than after you’ve spent 15 minutes on double crochets.
Another pro tip – slip a stitch marker onto your hook right after you finish the first round. When you come back around, the marker tells you exactly where the side of the square starts, keeping your edges straight.
Want a deeper dive into why the chain‑ring works and how to troubleshoot common hiccups? Check out our Mastering the Craft: A Complete Guide to Online Crochet Classes for Beginners for step‑by‑step videos and community Q&A.
Once you’ve mastered the foundation chain, think about what you could turn those squares into. A quick Google search will show endless ideas, from tote bags to wall hangings. For parents, a popular project is a cozy toddler beanie made from a handful of squares – it’s a perfect way to use up leftover yarn while keeping little heads warm. If you’re curious about stylish beanie designs, take a look at this Chic Toddler Beanie Ideas for inspiration.
Here’s a handy checklist for the foundation chain step:
- Slip knot securely but not too tight
- Chain exactly four stitches
- Join with a slip stitch into the first chain
- Check tension – the ring should be slightly stretchy
- Mark the start of the round with a stitch marker
Take a moment now to feel that little ring between your fingers. If it looks even and feels springy, you’re ready to move on to the first round of double crochets. If not, pause, adjust, and try again – the best crocheters are the ones who don’t rush the foundation.
Remember, every granny square you finish builds confidence. The foundation chain is just the first line of a conversation you’ll have with your yarn, and it sets the tone for everything that follows. Let’s keep that momentum going and dive into the next round!
Step 3: Crochet the First Round
Now that your chain‑ring is snug and springy, it’s time to turn that little loop into the “plus” that defines a granny square. If you’re wondering whether you’re doing it right, just remember: the first round is where the magic starts, and a few mindful moves will set you up for a flawless stack of squares.
What you’ll need in this moment
Grab the same size 5 (3.75 mm) hook you used for the foundation, keep your yarn tail handy, and, if you like, slip a stitch marker onto your hook now. The marker will become a reference point for every new round, so you always know where a side begins and ends.
Take a breath. Feel the tension in the ring. If it feels too tight, gently pull the slip stitch a millimeter or two – you want a little give, like a fresh rubber band.
Step‑by‑step: Double crochet into the ring
1. Yarn over (YO) and pull through the ring – that’s your first chain‑2, which counts as the first double crochet (DC) base.
2. YO again, insert the hook into the ring, YO, pull through – you now have three loops on the hook.
3. YO and pull through two loops (leaving two on the hook), then YO and pull through the remaining two. You’ve just completed one double crochet.
4. Chain two (ch‑2). This ch‑2 creates the corner space that will later become the “plus” shape.
5. Repeat steps 2‑4 three more times, so you end up with four double crochets separated by four ch‑2 spaces.
6. Finally, slip stitch (sl st) into the top of the first chain‑2 you made in step 1 to close the round.
When you pull the slip stitch tight, you should see a neat “+” formed by the four double crochets. If the shape looks lopsided, pause, adjust the tension, and try again – it’s normal to need a couple of tries.
Real‑world examples to inspire you
Take Maya, the stay‑at‑home mom we mentioned earlier. She uses the first round as a quick test of yarn color contrast: she chose a soft ivory yarn for the base and a bright teal for the double crochets. The result? A subtle yet eye‑catching square that instantly lifted the look of her baby blanket project.
Another example comes from Jamal, a creative entrepreneur who sells miniature tote bags. He experiments with metallic yarn for the first round, then switches to a matte cotton for subsequent rounds. The metallic edge acts like a built‑in decorative trim, saving him the step of adding a separate border later.
Pro tips from our CreativiU community
• Count as you go. Saying the numbers out loud (“one, two, three…”) reinforces muscle memory and reduces mistakes.
• Keep your wrist relaxed. A stiff wrist creates uneven tension, which shows up as crooked corners.
• If a corner looks too tight, insert the hook under the top two loops of the previous double crochet before completing the next one. This tiny adjustment can smooth out a bulge.
• After you finish the round, flip the square over and check that each side has the same number of stitches (four double crochets). Consistency now prevents a wonky blanket later.
Quick checklist before you move on
- Four double crochets, each separated by a ch‑2.
- All corners look like even “+” signs.
- Stitch marker placed on the first double crochet of the next round.
- Yarn tail trimmed, leaving about 6 inches for weaving in later.
Does everything feel solid? If you’ve hit these checkpoints, congratulations – you’ve just completed the first round of a granny square. This tiny accomplishment is the foundation for countless projects: afghans, wall hangings, even fashion accessories.
So, what’s next? In the following step, we’ll expand each side by working three double crochets into each corner space, then chaining three for the side, and repeating around. That’s where the square really starts to grow, and you’ll see the pattern repeat like a comfortable rhythm you’ve just mastered.
Remember, the first round isn’t just a set of stitches; it’s a confidence boost. Every time you see that perfect “+”, you’re proving to yourself that you can translate a handful of yarn and a hook into something tangible. Keep that feeling, and let it carry you through the next rounds and the projects that follow.
Step 4: Build Subsequent Rounds
Now that your first “+” is looking solid, it’s time to give that little square some real muscle. This is where the pattern really starts to breathe, and you’ll see the rhythm you just learned repeat over and over.
First, slide the stitch marker onto the first double crochet of the next round – it’s your north‑star for keeping each side even. Then, work three double crochets into the corner space you just created, chain three, and turn the corner.
Does that sound like a lot? Trust me, it’s just a simple sequence that becomes second nature after a couple of rounds. The key is to treat each corner the same way: three double crochets, chain‑3, then move on.
Step‑by‑step for round 2
1️⃣ Start in the corner space marked by your stitch marker. Yarn over, insert hook, yarn over, pull through – you’ve got three loops. Yarn over, pull through two, yarn over, pull through the remaining two – that’s your first double crochet.
2️⃣ Do two more double crochets right next to it, keeping the stitches snug but not too tight.
3️⃣ Chain three (ch‑3). This chain will become the side of your square, giving it that classic “spaced‑out” look.
4️⃣ In the next corner space, repeat: three double crochets, chain three. Keep going all the way around until you end on the stitch marker.
When you slip stitch into the top of the first chain‑3, you’ll see a larger “+” forming, and the square will have grown by one block on each side.
So, what should you watch for? If the corners look lopsided, double‑check that you’re chaining three each time – a missed chain can throw off the whole geometry.
Why the extra stitches matter
Each set of three double crochets adds height, while the ch‑3 creates the space that will later become the next round’s corner. This dance of “increase‑then‑space” is what gives granny squares their expandable nature.
In our experience at CreativiU, learners who write the stitch counts on a sticky note after each round cut their error rate in half. It’s a tiny habit that pays off when you start joining dozens of squares for a blanket.
Here’s a quick mental check: after round 2 you should have 12 double crochets total (3 per side) and 12 chain‑3 spaces. If the numbers don’t line up, pause, unwind a little, and fix the mistake before moving on.
Round 3 and beyond
Round 3 follows the exact same pattern: three double crochets into every corner space, chain three, and repeat. The only thing that changes is the size of the square – each round adds another layer of “blocks”.
For round 4, many crocheters like to switch colors in the corner stitches to create a subtle gradient. It’s a low‑effort way to add visual interest without altering the stitch count.
Creative entrepreneurs often use this color‑swap technique to brand their products – a consistent corner color can become a signature “logo” across a line of tote bags or wall hangings.
Parents juggling nap‑time crafts love the predictability of the pattern. Because every round uses the same three‑stitch increase, you can set a timer, finish a round, and still have time to read a bedtime story.
Common pitfalls and fixes
❌ Forgetting to chain three: the side will collapse, and the next corner will be too tight. Solution: count your chains out loud – “one, two, three” – before moving on.
❌ Over‑tightening the ch‑3: it creates a puckered edge. Lightly pull the chain, letting it sit loosely like a spring.
❌ Skipping the stitch marker: you’ll lose track of where a side begins. Slip a fresh marker onto the first double crochet of each new round – it’s a tiny habit that saves minutes later.
Quick checklist before you start the next round
- Three double crochets in each corner space
- Chain three after each set of three double crochets
- Stitch marker placed on the first double crochet of the upcoming round
- Count total double crochets and chain‑3 spaces – they should match
- Maintain even tension; chains should feel a bit stretchy
Feeling confident? Great. Remember, the mantra for “how to crochet granny square for beginners” is “repeat, count, and keep the tension relaxed”. Each round builds on the last, and before you know it you’ll have a square big enough to start planning a blanket, a bag, or a wall art piece.
If you’d like a visual walk‑through of this round‑building process, check out this helpful video tutorial.
Now grab your yarn, give those corners a little love, and watch your granny square grow—one round at a time.
Step 5: Color Variations & Finishing
Now that your square has grown round after round, the fun part really begins – deciding how the colors will dance together and how you’ll give the piece its final polish. This is where a simple granny square can turn into a statement piece for a baby blanket, a wall hanging, or even a gift that says “I’m thinking of you”.
First, ask yourself: do you want a bold, rainbow‑burst look or a subtle, tonal gradient? Both approaches work, but they require different planning. For a bold palette, pick three to four contrasting yarns – think teal, mustard, and coral – and assign each to a specific round. For a gradient, choose one hue and buy it in several shades from light to dark; then gradually introduce the deeper shade as you add rounds.
Here’s a quick way to test your combo without buying full skeins: grab a 2‑inch swatch of each colour, chain a few stitches, and hold them up to the light. If the contrast feels too harsh, mute one colour with a neutral like ivory or gray. This tiny experiment saves both money and frustration.
In our CreativiU community, Maya (the stay‑at‑home mom we mentioned earlier) loves the “color‑block” trick. She works three rounds in a soft lavender, switches to a dusty rose for the next three, then finishes with a buttery cream border. The result is a square that feels handmade but still looks designer‑grade.
Practical steps for adding colour
1️⃣ Plan your round‑by‑round colour chart. Write down which colour goes into each round. A simple table on your phone works wonders.
2️⃣ Join new yarn at a corner. Slip the new yarn onto your hook, pull a loop over the top of the last double crochet, and continue as usual. This hides the join and keeps tension even.
3️⃣ Carry the unused colour up the side. If you’re not ready to switch yet, leave the extra yarn hanging loosely along the side of the square. When you’re ready, simply pick it up and start the next round.
4️⃣ Secure the join. After you finish the round with the new colour, weave the tail into the side stitches using a tapestry needle. This is where the invisible join method really shines – the seam disappears.
5️⃣ Block your square. Wet‑block or steam‑block the finished piece to even out any uneven edges. A lightly dampened towel, a few minutes of steam, and a gentle pinning grid will flatten the corners and set the stitches.
Does this feel overwhelming? Take it one step at a time. You can always finish a square in the colour you started with, then come back later to add a border or a second colour when you’ve built a batch of squares.
Finishing touches that make a difference
Beyond colour, the final look of your granny square depends on how you finish the edges. The most common options are:
| Finish Type | Look & Feel | Best For |
|---|---|---|
| Simple slip‑stitch edge | Clean, low‑profile | Blankets, large projects where the edge won’t be seen |
| Rounded “shell” edge | Soft, decorative | Wall hangings, tote bags |
| Border of single crochet | Textured, sturdy | Gifts, heirloom pieces |
To create a rounded shell, work 3 single crochets, 3 double crochets, 3 single crochets into each corner space, then slip stitch to the next corner. It adds a subtle curve that catches the eye without adding bulk.
If you’re aiming for a polished gift, consider adding a narrow single‑crochet border in a coordinating colour. This not only frames the square but also gives you a neat place to weave in all the yarn tails.
And here’s a little secret: many of our creative‑entrepreneur members sell finished squares as “thoughtful recovery gifts”. A hand‑made square paired with a supportive note makes a meaningful present for someone in a healing journey. For inspiration on how to package such gifts, check out this guide on thoughtful gifts thoughtful recovery gifts.
Finally, give yourself a moment to admire the finished square. Feel the yarn, notice the way the colours transition, and think about the next project you’ll stitch together. When you’re ready, line up a dozen squares, seam them with a whip stitch, and you’ve got a cozy afghan ready for movie night.

Tips & Common Mistakes
So you’ve got your yarn, hook, and a few squares already sitting on the table—great start, right? Before you dive into a dozen more, let’s talk about the little hiccups that can turn a smooth crochet session into a tangled mess.
Keep tension consistent
If your first round felt a bit tight, you’re probably pulling the yarn too hard on each stitch. Too loose and the square will look like a wobbly pancake. The sweet spot feels like a gentle rubber band: firm enough to hold shape, but with a little give when you tug.
Try this: after every 4‑stitch block, pause, stretch the work with your fingers, and notice if any side looks tighter. Adjust by loosening the last few stitches before you move on. In our CreativiU community, beginners who habitually check tension report 30 % fewer misshapen squares.
Count every stitch
It’s easy to lose track when you’re counting out loud and watching a YouTube tutorial at the same time. Miss a chain‑3 or skip a double crochet, and the whole square throws off balance.
Write the stitch count on a sticky note after each round—something like “12 dc, 12 ch‑3”. When you finish the round, glance at the note; if the numbers don’t match, unwind a little and fix it before the next round. This tiny habit saves hours of re‑sewing later.
Don’t skip the corner marker
That little stitch marker might seem optional, but without it you’ll forget where a side starts. The result? One edge ends up two stitches longer than the opposite side, and your blanket will have a wonky shape.
Slide a fresh marker onto the first double crochet of every new round. It takes a second to place, but it pays off when you’re lining up ten or twelve squares for a blanket.
Avoid over‑crocheting the border
Many creative‑entrepreneurs add a thick single‑crochet border for a polished look. The intention is good, but if you work too many rows the edge becomes stiff and the square loses its drape.
Stick to one or two rows of single crochet, or try a “shell” edge (3 sc, 3 dc, 3 sc) for a softer finish. Your finished piece will stay flexible enough to wrap around a coffee mug or a toddler’s shoulder.
Remember to weave in ends properly
Leaving long tails dangling looks sloppy and can snag on the next stitch. It’s tempting to just cut them off, but a quick weave with a tapestry needle hides the ends and adds durability.
We like the “invisible join” trick: thread the tail through a few stitches on the back side, then pull tight. The tail disappears, and the square feels solid enough to survive a wash.
Watch out for uneven blocking
Steam‑blocking is a lifesaver for flattening corners, but if you pin the square too tightly the fabric can stretch unevenly. The result is a square that looks perfect when wet, but bows once it dries.
Lay the square on a flat towel, gently stretch each side to the same length, and use light pins just enough to hold it in place. Let it dry completely before you start joining squares.
Common mistake: skipping the “chain‑2” space
The chain‑2 between double crochets creates the classic “plus” shape. Forgetting it shrinks the corner and makes the next round harder to work into.
If you notice a corner looking tighter than the others, go back and add a chain‑2 where it belongs. It’s a quick fix that restores the square’s symmetry.
Ready to put these tips into practice? Grab your current square, check tension, count stitches, and add a marker if you missed one. You’ll feel the difference instantly—your next round will flow smoother, and the finished squares will line up like perfect puzzle pieces.
Remember, every mistake is just a stepping stone toward a more confident crochet practice. Keep experimenting, note what works, and soon you’ll be turning granny squares into afghans, bags, or even wall art without breaking a sweat.
FAQ
What yarn weight is best for beginners learning how to crochet granny square?
Most beginners find a worsted‑weight (4‑mm) yarn the sweet spot. It’s thick enough to see each stitch clearly, yet not so bulky that the square becomes a pillow. Pair it with a size‑5 (3.75 mm) aluminum hook for a balanced tension. If you’re using a finer cotton, drop down to a 3.5 mm hook, but stay in the worsted range for your first few squares so the pattern stays forgiving.
How many chains should I start with in the foundation chain for a granny square?
To start a classic granny square you need exactly four chain stitches before you join them into a ring. The four‑chain ring creates the little “+” that each round expands from. After you slip stitch into the first chain, pull it snug but not tight—think of a fresh rubber band. If you end up with three or five chains, the whole geometry will be off, so double‑check before you move on.
Why is the chain‑2 space important and what happens if I miss it?
The chain‑2 space between the double crochets is what gives the granny square its iconic plus shape. Skipping it squeezes the corner, making the next round harder to work into and leaving a lopsided look. If you notice a tight corner, simply insert the missing chain‑2 before you finish the round, then slip stitch into the top of the first double crochet. It restores symmetry instantly.
How can I keep my tension consistent across rounds?
Consistent tension is the secret sauce behind neat squares. A good trick is to pause after every four‑stitch block, gently stretch the work with both hands, and feel for any tight spots. If a side feels tighter, loosen the last few stitches before you continue. Many of our CreativiU members swear by counting out loud—“one, two, three…”—because the rhythm keeps the yarn from tightening unintentionally and helps you stay on beat.
What’s the easiest way to join squares without visible seams?
The easiest way to join squares without visible seams is the whip stitch with a tapestry needle, but keep the stitches tiny and spaced evenly. Lay two squares right‑side‑up, align the edges, and thread the needle with a yarn tail that matches the square’s colour. Insert the needle through the back loops of both squares, pull through, and repeat every 3‑4 stitches. This creates a flexible seam that blends in, especially when you block the finished block afterward.
Can I use a crochet hook that’s not the recommended size and still get good results?
You can use a hook a size bigger or smaller than the recommended 4 mm, but expect a change in gauge. A larger hook makes the stitches looser, giving a more open, airy square—great for a summer shawl—but it can also cause uneven edges. A smaller hook tightens the fabric, which is useful for a sturdy tote bag. Whichever hook you pick, test a single swatch first so you know how the tension will affect the final look.
How do I fix a misshapen corner after a few rounds?
If a corner starts to look misshapen after a couple of rounds, don’t panic—just unwind to the last correct corner space and re‑work the stitches. Slip the yarn into the side chain, pull the corner tighter or looser as needed, and then continue crocheting the remaining rounds. Many crocheters find that adding a single extra chain‑2 before the next corner helps even out the shape without altering the overall size.
Conclusion
We’ve come a long way from that first four‑chain ring, haven’t we?
If you’ve followed each step, you now have a solid granny square that’s ready to become a blanket, a tote, or even a little gift that says you care.
Notice how the tension stays even, the corners stay square, and the colors flow just the way you wanted?
That feeling of confidence is exactly what we aim to give every CreativiU member—whether you’re a hobbyist sharpening skills, a budding entrepreneur building a product line, or a parent looking for a calming activity with the kids.
So what’s next? Grab a few more squares, block them, and start stitching them together—your first project is only a few minutes away.
And remember, the best way to keep improving is to share your progress with the community; a quick post can spark new ideas and even a collaboration.
Ready to turn those squares into something bigger? Dive back into our course library, pick a new pattern, and watch your creativity grow.
If you ever hit a snag—like a tight corner or an uneven edge—don’t forget the quick checklist we built into each section. A few seconds of counting stitches, checking tension, and adding a missing chain‑2 can save you hours of re‑working later.
Lastly, give yourself credit for every square you finish. Each one is a tiny victory that builds skill, confidence, and a beautiful piece you can be proud of.
Leave a Reply