Ever stumbled upon alcohol ink art and felt that flicker of excitement mixed with a pinch of doubt? You know, that moment when colors swirl and seem to dance unpredictably — beautiful, but a bit intimidating. If you’ve wondered how to use alcohol inks on canvas without turning your project into a chaotic mess, you’re far from alone.
Here’s the thing: alcohol inks aren’t your typical paint. They’re vibrant, fluid, and downright magical — but they behave more like a living thing than a static medium. That unpredictability can either thrill you or have you stressing over every drop. But what if I told you that with just a bit of understanding and some simple techniques, you can harness that wild energy to create stunning, one-of-a-kind artwork?
There’s a real joy in watching those inks flow and blend on a canvas, transforming blank space into something alive. And you don’t have to be a seasoned artist to get that rush. The process itself is a playful exploration — think of it as a creative experiment where mistakes just become happy accidents, leading to unique effects you won’t find in any tutorial.
So, how do you actually get started? What materials do you need, and how do you control this fluid chaos? More importantly, how do you move from “why is this not working?” to “wow, I made that?” That’s exactly what we’re going to explore step-by-step.
If you’re hungry to deepen your crafting skills beyond basic brush strokes, this might be your next adventure. And if navigating new artistic techniques excites you, you might also want to check out our guide to mastering the arts and crafts of problem solving — it’s packed with creative strategies that turn challenges into breakthroughs.
Ready to uncover the satisfying rhythm of alcohol ink art on canvas? Let’s dive in, starting with understanding the vibe of this medium and how you can take control without losing any of the fun.
TL;DR
Ready to turn your canvas into a vibrant playground? How to use alcohol inks on canvas boils down to embracing flow, layering colors, and enjoying the unpredictable shifts that make your art one of a kind.
With simple tools and a willingness to experiment, you’ll quickly move from hesitation to that proud moment: “I made this!”
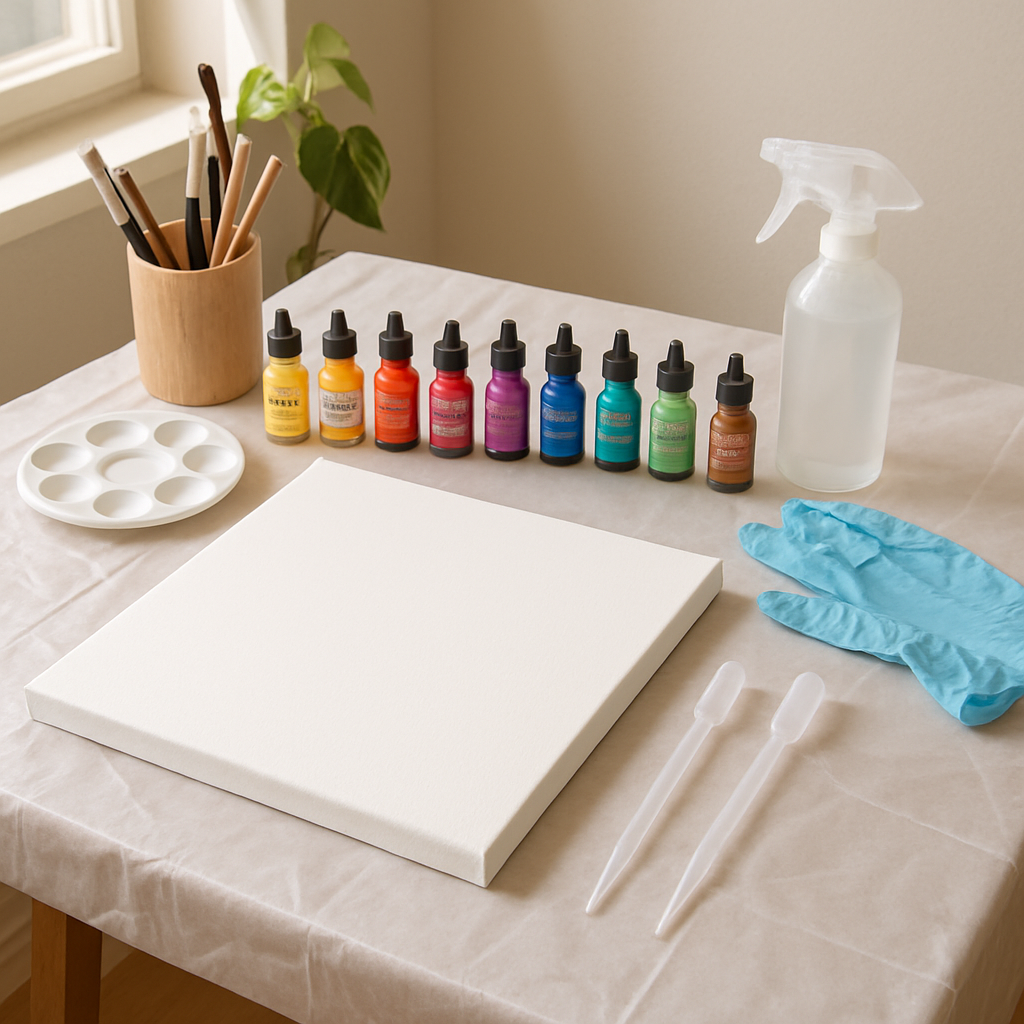
Step 1: Preparing Your Canvas and Workspace
Alright, before you dive headfirst into the wild world of alcohol inks, let’s set the stage right. You know that feeling when you’re all hyped up to start but then your supplies or space just don’t quite cooperate? Yeah, we don’t want that. Preparing your canvas and workspace properly is the secret sauce to nailing how to use alcohol inks on canvas. Trust me, it makes all the difference.
Choosing the Right Canvas: Why It Matters
Not all canvases play nice with alcohol inks. These inks love smooth, non-porous surfaces where they can dance and blend instead of being gulped up. Canvas, naturally, is porous, so you gotta treat it before the fun begins.
You can prime your canvas with a few coats of latex-based primer, gesso, or even a coat of glossy varnish to create that slick surface the inks adore. Each layer gets you closer to a surface that stops the ink from soaking in and losing that vibrant pop. If you skip this step? Your inks might dry dull, patchy, or just not flow the way they should.
Heard of pre-primed canvases? They’re a mouthful but a lifesaver. Brands like Nara Papers offer pre-primed canvas rolls that you can have stretched or framed. They’re ready to roll (literally), making your life easier—no extra layers needed.
Setting Up Your Workspace: Think Flow and Freedom
Picture this: your inks are ready, your canvas is primed, but your workspace’s a cluttered nightmare. Not ideal. You need space—not just physically but mentally—to experiment and let the inks do their unpredictable magic.
Clear off your table or easel. Alcohol inks can splash, drip, or spread in unexpected ways, so protect your surfaces with plastic or craft mats. This saves you heartache (and scrubbing later!). Good lighting helps too—natural light or a bright lamp will reveal the truest colors and details as you work.
Grab paper towels or a rag, rubbing alcohol in a spray bottle, and gloves if you want to keep ink off your hands. Oh, and have some airtight containers ready if you want to save leftover inks. You’ll thank yourself when you want to revisit a color mix later.
Now, What About Ventilation?
This one’s easy to overlook but super important. Alcohol inks have a strong smell since they’re alcohol-based. Work somewhere with good air flow—a window open, a fan running, or even outside if you can. It keeps your workspace fresh and you won’t be overwhelmed by fumes.
Seriously, small steps like this can turn your project from frustrating to downright enjoyable.
Don’t Forget Your Tools: Be Ready to Play
Besides your canvas, gather a variety of tools: brushes, droppers, straws, or air blowers. Each tool invites a different way to move your inks, creating unique patterns and textures. Having them close by lets you switch easily without interrupting your creative flow.
And hey, if you’re curious about different art surfaces beyond canvas, check out this guide on surfaces suitable for alcohol inks. It dives into synthetic papers, laminated boards, ceramics, and more.
Setting up your canvas and workspace thoughtfully sets you up for success. It’s like tuning an instrument before a concert—you can’t play your best without it.
If you want to deepen your overall creative skills, you might find Mastering the Arts and Crafts of Problem Solving: A Comprehensive Guide a useful companion. It’s packed with strategies that help you think creatively through challenges, like unexpected ink behaviors or workspace hiccups.
Ready to get your hands messy? Just make sure your canvas is prepped and your space is welcoming. Trust me, it shapes everything ahead.
Step 2: Selecting and Applying Alcohol Inks
You know that feeling when you stare at a blank canvas, eager but also a bit overwhelmed by choices? Picking the right alcohol inks and figuring out how to use them on canvas can feel just like that. But here’s the thing: it doesn’t have to be complicated. Once you know the basics of selecting and applying, you’ll feel way more confident—and honestly, it’s kind of fun experimenting with how the colors flow and blend.
First up, picking your inks. Have you noticed how alcohol inks come in these super vibrant jewel tones? That’s because they’re dye-based and really saturated, which means the colors pop on non-porous surfaces. Now, canvas is porous, so some folks recommend priming it with a glossy medium or varnish before applying inks to get the best color brightness and movement. It’s like giving the canvas a glassy playground where the inks can slide and mingle freely.
When choosing your inks, consider whether you want pure colors to mix on the canvas or prefer pre-mixed hues. Many artists swear by brands like Piñata or Tim Holtz for their rich pigments and variety of shades available, but honestly, even basic alcohol inks can yield stunning effects once you get the hang of it. Oh, and don’t shy away from metallic or pearlescent inks—they add this cool shimmer that brings depth to your work.
So, how do you actually apply alcohol ink on canvas? There’s no one right answer here, but a few techniques are favorites in the creative community. One popular method is dropping the ink straight from the bottle or a dropper onto the primed canvas. The ink spreads quickly and unpredictably, so you’ll want to work fast—or just embrace that lovely chaos.
Ever tried using a blending solution or isopropyl alcohol alongside your inks? Adding a few drops around or on top of the ink helps push the color in interesting ways and softens edges. It’s like giving your colors a little dance partner to swirl around with. Keep a small spray bottle handy for misting the canvas if you want more subtle blending effects.
If you’re worried about making a mess—don’t be. Wearing gloves and covering your workspace with a plastic sheet makes cleanup a breeze. Also, alcohol inks dry quickly, so little smearing once dry, but remember they stay reactive until totally cured, meaning layers blend better when wet. Patience is a virtue here.
Here’s a handy trick: try tilting your canvas gently after you apply ink drops. Gravity does a lot of the work moving those vibrant pools around, creating beautiful natural patterns that feel way more organic than anything you can force by brush.
Does this really work? Oh yeah. Many artists share their setups and results online, like this demo video, giving you a window into the process. Seeing how inks behave and learning from those little “oops” moments is part of the joy. And if you want to dive deeper, digital workshops or tutorials on platforms like Scrapbook.com offer fantastic step-by-step guides and inspiration to explore further beyond the basics.
One last tip before you jump in: experiment on small pieces of primed canvas or Yupo paper first. Testing different ink colors and techniques without the pressure of a big blank canvas can teach you so much about flow, saturation, and layering. It’s like rehearsing a song before playing the gig.
Ready to mix, drop, swirl, and create those gorgeous, unpredictable effects? Understanding your inks and a few simple tricks for applying them on canvas sets you up to get lost in the magic of fluid color. And remember, practice lets you discover your own style—and sometimes, those ‘accidents’ are the brush strokes that make your piece truly unique.
If you want the nitty-gritty on prepping your canvas or creative uses for alcohol inks beyond canvas, I’ve found some must-read resources that might spark your curiosity, like this thorough YouTube tutorial on alcohol ink techniques. These practical insights will help you get off the ground and start experimenting confidently with your materials.
Step 3: Manipulating Alcohol Inks for Effects
Ever started a piece with alcohol inks and then just sat there wondering how to coax those wild colors into something magical? You’re not alone. Alcohol inks are like that unpredictable friend who keeps you on your toes but rewards you with moments of pure brilliance if you play along right.
So, how do you get those dreamy blends, sharp edges, or delicate blooms without feeling like you’re fighting the medium? Let’s break it down together.
Playing With Flow: The Dance of Ink and Canvas
Alcohol inks love to move. And your canvas — especially if it’s non-porous like Yupo paper or gloss-coated surfaces — welcomes that movement. To guide the flow, you can use a few trusty tricks.
First, consider the power of a simple tool like a straw or an air blower. Gently blowing air across wet ink forms soft directional streaks or swirls. I remember trying it once and watching colors chase each other like they were racing — it’s oddly satisfying.
But be careful not to overdo it. Too much air pressure, and your colors scatter like startled birds, losing that delicate layering you worked for.
Introducing Blending Solutions: Your Smooth Operator
Here’s a secret weapon: blending solutions. These clear liquids can thin out the alcohol inks, making colors meld seamlessly instead of clashing. Using them feels like giving your inks a mellow hug to slow down their wild nature.
Want those soft gradients or smooth transitions? Drop a bit of blending solution over a fresh layer of ink and watch how it gently nudges colors to mingle. You can find quality blending solutions designed specifically for alcohol inks, like the ones recommended on Etter Art’s site, which can really open up possibilities.
Don’t have blending solution? Rubbing alcohol works in a pinch. It dilutes and lifts ink, but don’t expect the same silky smoothness. It’s like using a substitute ingredient when you run out of sugar — it can do the job, but the texture feels different.
Timing Is Everything: When to Layer and When to Let Dry
Ever notice how alcohol inks change depending on how wet your canvas is? If you layer colors while the ink is still wet, they’ll blend into each other, creating soft, cloudy effects. Let the ink dry completely before adding more layers, and you get chunkier, defined patches of color.
It’s tempting to rush when you’re excited about a color combo, but patience pays off. Remember, you’re not just painting; you’re inviting colors to have conversations. Let them finish their sentences before butting in.
Special Effects: Experiment With Tools and Additives
Want to step up your game? Play around with alcohol inks alongside other helpers like isopropyl alcohol in different concentrations or even tools like cotton swabs or brushes for texture.
For example, dropping a little straight alcohol on a saturated ink spot can create those distinctive nifty “cells” or lacy patterns. It’s like watching frost form on a window, unpredictable and lovely.
Another pro tip: use a felt applicator to dab inks on in a controlled way, building texture as you go. It’s more hands-on but gives that painterly feel, a nice break from those air-blown color storms.
So, what should you try first?
How about this cheeky combo: drop some ink onto your surface, spritz with blending solution, then lightly blow air across the pool. Take a step back. Notice how colors stretch and soften. It’s like watching a sunset unfold — unique every time.
If you want to see these techniques in action, this detailed guide on blending solutions is a great place to start, providing both inspiration and practical advice.
And hey, don’t forget—there’s zero shame in playing around until you find your groove. Every abstract blotch or unexpected swirl brings you closer to mastering how to use alcohol inks on canvas.
When you’re ready to branch beyond techniques, exploring community-driven platforms like Scrapbook.com’s workshop forums can connect you with others who share your experimentation mindset.
In the end, these inks are as much about discovery as they are about control. So experiment boldly, make those “mistakes,” and watch how your canvas tells your unique story.
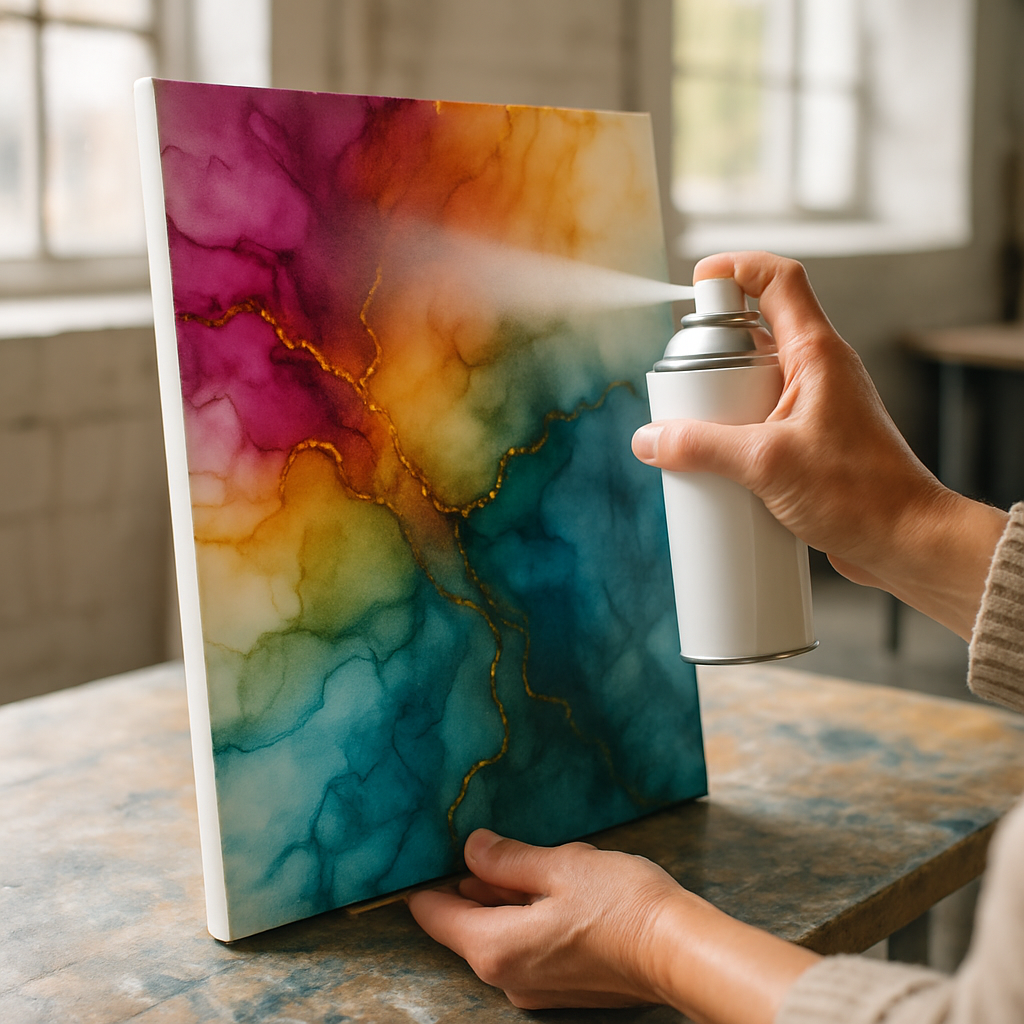
Step 4: Sealing and Finishing Your Alcohol Ink Canvas
You’ve poured your heart into the colors, watched those inks dance and swirl, and now your canvas feels like it’s bursting with life. But here’s the deal: alcohol inks can be a bit fickle. Without proper sealing, your vibrant masterpiece risks fading or getting smudged, especially if it’s exposed to sunlight or everyday touch.
Sealing isn’t just a step—it’s the promise you make to your work that it’ll stick around, vivid and proud, for longer than just a fleeting moment.
Why bother sealing?
Think about your favorite memories caught in photos. Would you leave them just lying around with no protection? Same goes for your alcohol ink art. Since these inks are dye-based, they’re prone to fading when hit by UV rays. And trust me, nobody wants their painstakingly crafted colors to look washed out after a few months.
So, sealing protects your piece from sunlight, moisture, and accidental smudges, locking in the colors you spent hours coaxing out of those inks. Plus, it adds a lovely finish—a sheen that can be matte, satin, or glossy depending on your vibe.
How to seal your alcohol ink canvas the right way
First off, patience is your best friend here. You need to let your alcohol ink artwork dry completely—think 24 to 48 hours. The inks might feel slightly tacky or gummy if rushed, and sealing over that can cause smudging or bleeding. So, let it breathe.
Once dry, it’s time for varnishing. Most artists swear by sprays like Krylon Kamar Varnish followed by a UV-resistant spray. The trick? You’ve got to layer thoughtfully. Start with a light, even coat of a clear acrylic varnish—spray from about 10 to 12 centimeters away to avoid pooling or running.
Wait an hour or so for each coat to dry, and repeat 3 or 4 times. Then, switch to a UV-resistant varnish layer to protect against light damage. But don’t just dive in and spray the UV layer directly; that can cause the inks to move if the base coat isn’t totally dry.
Are you thinking, “Where’s the best spot to do all this spraying chaos?” Good question. Find a well-ventilated but dust-free spot—think a little studio corner or a room with a window cracked open but no wind blowing dust around. Outdoors or garage can be too risky with dirt landing on your art mid-spray.
Oh, and don’t forget safety gear—mask and protective glasses can save you from headaches and eye irritation. You’re in it for the long haul, so protect yourself, too.
What about resin or other sealants?
If you want that uber-smooth, glass-like shine, resin’s your go-to—but there’s a catch. You need to do your spray sealing first (especially that UV coat) before you pour resin on top. Jumping straight to resin can cause your colors to shift or bleed. A neat trick is mounting your alcohol ink canvas onto wood or a sturdy backing before pouring resin—it keeps the piece stable and durable.
For ceramic surfaces like coasters, some artists opt for dishwasher-safe Mod Podge as a finishing coat after spraying. It gives decent protection but is less glossy and glassy compared to resin.
But here’s the bottom line: sealing is a bit of an art itself. Many find a combo of spray varnishes plus optional resin or Mod Podge is the sweet spot. You get color protection, durability, and a finish that feels just right.
Pretty table to simplify your choices
| Sealing Option | Best For | Notes |
|---|---|---|
| Acrylic Spray Varnish (e.g., Krylon Kamar) | All-around sealing on canvas and paper | Multiple light coats needed; dries relatively fast |
| UV-Resistant Spray Varnish | Protecting colors from sun fading | Apply only after acrylic spray is dry; prevents color fade |
| Epoxy Resin Coating | High-gloss finish; durable surface | Seal first with UV spray; can cause color shifts if done too early |
| Mod Podge (Dishwasher-Safe) | Non-flat surfaces like ceramic coasters | Less glossy; brush application; good for smaller projects |
So, you have options clearly laid out to fit whatever flavor your project calls for.
And hey, if you want to get into the nitty-gritty of sealing techniques or watch it all in action, this detailed post from an experienced alcohol ink artist shows you step-by-step how to nail the process—sharing honest tips that save you headaches along the way here. Plus, you can see wider community insights and discussions on sealing at Alcohol Ink Community.
Does sealing feel intimidating? Totally normal. But remember, it’s just another step in your creative journey. A little care here goes a long way to keep your alcohol ink canvas shining bright, telling your story without fading into the background anytime soon.
Ready to give your art that lasting finish? Grab your sprays, set up your space, and seal your story with love.
Common Mistakes and How to Avoid Them
Ever feel like your alcohol ink art just didn’t turn out the way you pictured? It’s frustrating, right? Like you were onto something cool but then—bam—color bleeds where you didn’t want it, or your canvas ends up looking dull instead of vibrant.
Well, you’re not alone. There are some classic pitfalls that trip up even the pros when learning how to use alcohol inks on canvas. But here’s the good news: once you spot these mistakes, they’re way easier to dodge than you’d think.
Rushing to Seal Before It’s Dry
This one’s sneaky. You might be eager to protect your masterpiece with a varnish or sealant, but if the ink isn’t fully dry, sealing can cause color shifts or cloudiness. Think about it—your ink layers are still settling, so locking them down too soon messes with the look.
Give it time. At least 24 hours to be safe. If you’re curious about sealing tips that actually work, this video from a seasoned artist breaks down timing and technique in a really clear way.
Using the Wrong Kind of Canvas
Not every canvas loves alcohol ink. If you pick one that soaks up the ink like a sponge, your colors will look flat and lifeless. You want a smooth, non-porous surface that lets the ink glide, blend, and pop.
Do a quick test patch before diving in. A little patience here saves a lot of disappointment.
Overworking the Ink
Here’s what I mean: alcohol inks are lively and unpredictable—sometimes you just have to let them dance. Trying to force colors or scrub off spots can turn vibrant pools into muddy messes.
Instead, step back, breathe, and trust the process. Remember those unexpected beautiful patterns that emerged just by tilting the canvas gently?
Not Protecting Your Workspace
Okay, this might sound trivial, but alcohol inks can stain like nobody’s business. Cover your table, wear old clothes, and have some rubbing alcohol handy to fix spots before they set in.
It keeps your creativity flowing without the side eye from anyone who cares about clean furniture.
So, what should you do next? Take a deep breath and embrace these little quirks. Making mistakes is part of unlocking the magic of alcohol inks on canvas.
For more real-life sealing tips and to see how other artists guard their work best, check out this guide on alcohol ink sealing techniques. It’s packed with down-to-earth advice that might just save your next project.
Remember: every slip, drip, or bloom is just another step closer to getting it right. You’ve got this.
Conclusion
So, you’ve journeyed through the colorful world of how to use alcohol inks on canvas, right? And maybe, like me at first, you felt a little overwhelmed by their wild nature. But here’s the thing: those unpredictable splotches and blooms? They’re not flaws—they’re part of the magic. It’s okay if your first few tries don’t look like a masterpiece. Art, especially with alcohol inks, is messy, surprising, and honestly, kind of fun because of that.
Think about it like this: every drip, every vibrant swirl, is a step closer to discovering your own creative voice. Don’t sweat the small stuff (or the stains). Protect your workspace, test your flow, and give yourself permission to make mistakes. Trust the process, and you’ll be amazed at what you can coax out of those tiny bottles of color.
Before you dive back in, ask yourself—what piece of this messy adventure did you enjoy most? Was it the way the colors blended without your control? Or maybe finally nailing a smooth seal at the end? Hold onto that feeling. That’s the nugget that will make your next project better.
Ready to keep experimenting? Grab your canvas, some inks, and don’t be afraid to let things get a little wild. You’ve got everything you need to create something truly unique. And if you ever feel stuck, remember: even pros had their first blotchy spill. Here’s to your next vibrant masterpiece!
Frequently Asked Questions (FAQ)
Getting comfortable with alcohol inks on canvas means wrestling with questions. Trust me, you’re not alone—these inks bring a whole new world that’s equal parts thrilling and a tiny bit intimidating.
How do I prevent alcohol inks from bleeding too much on canvas?
This one’s a classic headache. Alcohol inks love to flow and mingle, but if you want to tone down the wildness, try using less ink at once. Think of it like watering a plant—too much and it’s a mess; just enough and it thrives.
Also, sealing your canvas first with a light coat of a fast-drying medium can give the inks something to cling to, slowing their spread. And sometimes, letting the layers dry between applications works wonders. Yeah, patience isn’t always easy, but it pays off.
Can I use alcohol inks on any kind of canvas?
Short answer? Mostly yes, but texture matters. Smooth, primed canvases tend to give you more control and vibrant color pop. Rough or highly absorbent canvases might soak up inks unpredictably, leading to blotchy areas that aren’t quite what you hoped for.
If you’re itching to experiment with a particular canvas, do a small test first. That little trial run saves you from a full-piece surprise.
What’s the best way to seal my finished alcohol ink artwork on canvas?
Good question. Because once those inks dry, they’re delicate. A clear spray sealant or resin helps lock in those colors and adds a lovely shine. Be sure to pick a sealant labeled safe for alcohol inks and compatible with your canvas.
Pro tip: apply thin, even layers and do it in a dust-free spot. Nothing kills a finish like unexpected specks or bubbles.
How do I fix mistakes or unwanted ink spots on canvas?
Don’t panic. One of the quirks of alcohol inks is they don’t play by usual rules, but you can often lighten a blotch by dabbing with a fresh cotton swab dipped in isopropyl alcohol. It’s kinda like erasing, only with a little running and blending.
If that feels risky, try building up other colors or patterns on top. Sometimes layering is the artist’s secret weapon.
Are there safety tips I should know when working with alcohol inks?
Yes, definitely! Those pretty bottles contain alcohol, which means proper ventilation is a must. Open your windows, turn on a fan, or set up outdoors if you can. And gloves help protect your skin from staining and irritation.
Remember, it’s easy to get lost in the flow, but keeping safety in mind keeps the fun going longer.
How do I clean my brushes or tools after using alcohol inks?
Alcohol inks aren’t your typical paint, so soap and water won’t cut it. Instead, grab some rubbing alcohol to wipe your brushes clean. It dissolves the ink without wrecking your tools.
If you want to keep those brushes in good shape, clean them right after use. Leaving inks to dry on bristles? Nightmare city.
Is it okay to mix alcohol inks with other mediums on canvas?
Turns out, yeah, you can. But be mindful of the alcohol content messing with other materials like acrylics or oils. The trick is layering thoughtfully—let alcohol inks dry completely before mixing in other mediums to avoid unwanted runs or smudges.
Honestly, some of my favorite projects happened just by experimenting with layering different textures. So, don’t be shy to try.
So, what’s the big takeaway? Playing with alcohol inks on canvas is as much about discovery as technique. Keep asking questions, testing, and most importantly, having fun with those vibrant swirls and spills. You’re well on your way to making pieces that feel like your own wild story.
Leave a Reply